*****EDIT
It turns out there's a vastly simpler way to revive your STIs, so don't bother with this method here unless you like a challenge.
Basically, the quick and dirty style doesn't involve undoing the round 4-slotted nut that holds the pivot bracket on and keeps almost the entire mechanism together; instead you push the inner lever over to access the philips screw holding the mechanism in the main lever, undo that, and hey presto - you've mostly exposed the mechanism for cleaning and lubing.
See
here,
here and
here for (nice and clear) pics and further details.
For those who'd like to crack on with the full overhaul, a comprehensive set of very good pics of the process on these 6400 levers can be found
here.
Also, 9s STIs have their own failure mode where they jam; if you're keen you can try tweaking the tired springs responsible, or you can just
hook a bit of tube around them.
****
I just fully overhauled an older 8spd Ultegra shifter today... found
this old thread when I got stuck, but it was no help.
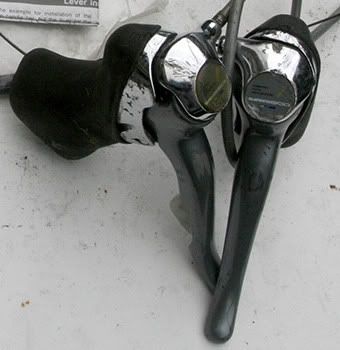
Like most folks I'd balked at my first attempt; got it halfway apart and got scared it was a genuine 'no user-serviceable parts inside' deal...
But that was a few years ago, and just motivated by curiosity. This time it was necessity; my left one's small lever had pretty much given up.
Didn't need any special tools, and managed it in two or three hours (most of which was figuring out how to replace this one spring I didn't get a look at before it came loose). I reckon I could overhaul the other one in about an hour now, but those with stubby fingers will find it tough going...
I would've taken pics, but my phone recently died... when I get a new one I'll strip down the right shifter and post a full article.
In the meantime, here's a basic run-down.
For these original-style Ultegra levers, you'll need a 5mm allen key to get em off of course, and a 2mm one to get the brake lever pivot out. Put aside the little plastic bushes and the return spring (which you can prolly tell is a bit of a trick to replace). Pull out the brake cable holder and put it aside. Get a blade and prise up the little round sticky cover off the front (which you may need a dob of Blu-Tack to replace).
Using an 8mm socket, remove the small bolt from the front, and the fascia bit incorporating the gear cable stop will come off along with a spring and surrounding plastic ring. The brake lever bracket is next, held on with a special nut that obviously requires a unique tool Shimano will charge you $40 or something for... but you can just use a particularly pointy pair of long-nose pliers (you may need to file them a bit). Underneath the bracket is a special steel washer and a similar plastic one, which retain another spring underneath via a little hole through both of them (use a steel ruler or scissor blade or some such to replace the end of the spring through the hole on reassembly).
Now we're getting into the complicated stuff, and my memory's waning, but it's primarily a matter of getting a good look at the various bits of mechanism before disassembling them; it'd be a good idea to take a few pics or even draw diagrams. The cross-shaped central bolt only lets the bits with cross-shaped holes on in two ways, rather than four, so that makes it a bit easier...
When you remove a bit made up of multiple other bits, it's a good idea to leave such subassemblies intact until you clean and grease them, or better still prepare them for reassembly as you remove them - this will minimise the amount of time you have to remember the most complicated arrangements. Use a blade to gently remove washers and such, and take care to remember or record the order of everything. When you undo the philips head screw holding the central part of the mechanism in the lever, make sure to push the central bolt through from the other side to keep the assembly intact in order to scope it out before it falls apart.
Inside here is the spring that gave me so much trouble, so try and spot where it lives before it moves (hint: the curly end hooks around the small round bump on the bit of plate beneath it, not the bent-up part... took me more than an hour to figure that out). Not much more to disassemble once you've started taking the central mechanism apart, but just make sure you properly clean and regrease the pivots for all the little sprung pawls all over the place; use some WD40 and pull a shred of rag through the pawl pivot holes.
Once the whole thing's disassembled and cleaned, grease up the bushes and stuff and begin reassembling. If you forget the precise orientation of the parts, it's not the end of the world as long as you've remembered the order they go together in - the assembly can only successfully go back together one way. If you've got it wrong, you'll notice when you go to do up the philips head screw (or before), and you may have to disassemble and reassemble multiple times (helps to leave a couple of the pawls off) to figure out the details. Perseverance will pay off, but you want to figure it out before the memories get fuzzy, so persistence is also recommended.
Once you have the central part of the mechanism back together and screwed into the lever, the small lever can go back on, and then you need to figure out the first real trick in reassembly - to replace the small lever's return spring, hook the end of the spring into the little slot in the top of the lever's pivot section, then slide the special plastic and steel washers onto the cross-shaped bolt with the matching spring holes towards the top. Using a couple of fingers to press the washers down, slide a thin piece of metal underneath to wind up the spring and push the bent end through the holes in the washers - snap. Then the pivot bracket, lock washer and special nut can go back on.
Now it's time to replace the cast fascia bit. The spring that lives under here (presumably a return spring for the large lever) has one bent end a bit longer than the other; I wasn't sure which way it went but elected to put the longer end in first, which seemed to work fine. Put in the plastic ring around the spring, and now engage the other end of the spring with the hole in the fascia bit and turn it to wind up the spring and get it pointing the right way.
Replace the small bolt (with spring washer) and tighten it up a bit. Now, the spring and its surrounding plastic ring are almost certainly poking out the side and looking very wrong, but that's okay cause you're just going to tighten the bolt a little bit at a time until the spring and ring are lightly jammed. Using a small flat screwdriver or something, just push the spring until it snaps into place, and then you can finish tightening the bolt.
Now the lever assembly is complete; only one more trick to go. Replace the brake cable holder, pivot bushes and brake lever return spring in the pivot bracket on the lever... the trick here is to use a finger to hold a bit of preload on the spring and find the angle where you can successfully slide the pivot bracket into the lever's body so as to continue winding up the return spring. Carefully holding the lever in place, you can slide the pivot pin back in, tighten up the grub screw and you're done.
Phew. It's a mission... but quite doable, if you have the requisite skill and dexterity. This stuff about STI levers being unserviceable just isn't true - they just sort out the real mechanics from the pretenders ; )
But they're rubbish next to Ergopower. As any fule kno, a blind multiple amputee can rebuild Campy levers, and they're relatively indestructible... the only weak point being the inner pivot point for the brake levers. Of course, Campy gear is way expensive and their rear hubs are a joke... and last time I tried it, Exadrive couldn't hold a candle to Hyperglide.
So, what's the solution?
Shimagnolo. Ergopower on Hyperglide is a joy.