


Mounting extremely stubborn tires??
 04-03-15, 10:18 PM
#51

working on my sandal tan

Join Date: Aug 2011
Location: CID
Posts: 22,629
Bikes: 1991 Bianchi Eros, 1964 Armstrong, 1988 Diamondback Ascent, 1988 Bianchi Premio, 1987 Bianchi Sport SX, 1980s Raleigh mixte (hers), All-City Space Horse (hers)
Mentioned: 98 Post(s)
Tagged: 0 Thread(s)
Quoted: 3871 Post(s)
Liked 2,568 Times
in
1,579 Posts

 04-04-15, 07:52 AM
#52

don't try this at home.

Join Date: Jan 2006
Location: N. KY
Posts: 5,940
Mentioned: 10 Post(s)
Tagged: 0 Thread(s)
Quoted: 974 Post(s)
Liked 512 Times
in
352 Posts
Skip all the heating, stretching, soap, talc, and giant levers.
I had your same problem. On my new Kinlin 30 rims, I struggled to mount a tire, ending up with mangled levers and sore fingers. I wondered how I would cope with a flat tire out on a ride.
But I found an easy method, and wrote it up in this thread.
The key is to lift less than an inch of bead at a time, slide the lever, and repeat. It's fast and easy.
Like this:
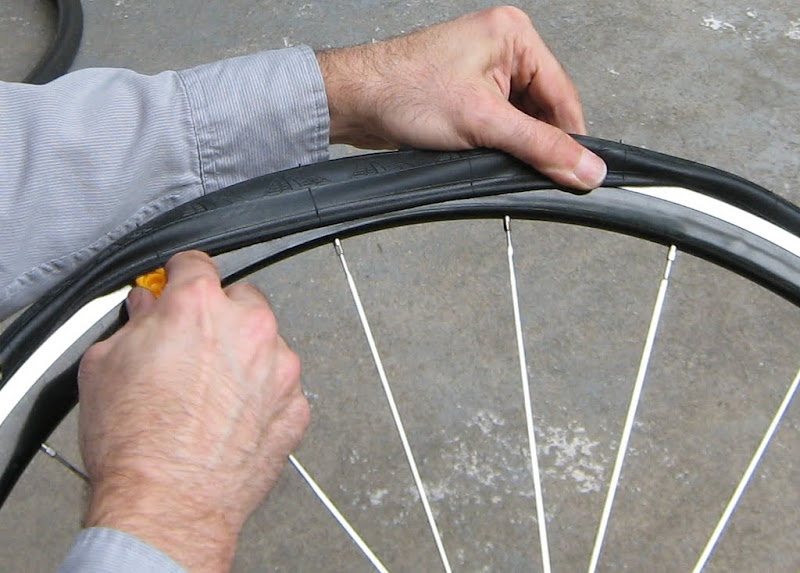
My Kinlin rims have a shallow well in the center. With just one bead mounted (which needs a tire lever) and no tube installed, I can't slide the tire around the rim to line up the label with the valve hole. That's really tight!
Anyway, a flat tire won't come off the rim while riding. That's good.
I had your same problem. On my new Kinlin 30 rims, I struggled to mount a tire, ending up with mangled levers and sore fingers. I wondered how I would cope with a flat tire out on a ride.
But I found an easy method, and wrote it up in this thread.
The key is to lift less than an inch of bead at a time, slide the lever, and repeat. It's fast and easy.
Like this:
My Kinlin rims have a shallow well in the center. With just one bead mounted (which needs a tire lever) and no tube installed, I can't slide the tire around the rim to line up the label with the valve hole. That's really tight!
Anyway, a flat tire won't come off the rim while riding. That's good.
Last edited by rm -rf; 04-04-15 at 08:05 AM.
04-05-15, 08:19 PM
#53
Senior Member

Join Date: May 2005
Location: La La Land (We love it!)
Posts: 6,301
Bikes: Gilmour road, Curtlo road; both steel (of course)
Mentioned: 2 Post(s)
Tagged: 0 Thread(s)
Quoted: 273 Post(s)
Likes: 0
Liked 10 Times
in
9 Posts
Mounting one side and then another is too complicated and causes unpredictable punctures in my book. Do all at once. Start mounting both sides at the opposite bank and go towards the valve both ways simultaneously. When 3/4 of the side is mounted, push sidewalls to the center well (the deepest zone of the rim profile whether it's U or V-shaped) at the opposite side (where you did start), zip-tie there and keep pushing remaining part of the sidewall to the rim. Retract the valve back slightly so it frees the place where the last part of the sidewall has to slip.
I damaged aluminum rim while trying to mount steel-wired Silver Arrow Duro 700x20c and punctured 3 or 4 tubes beyond repair. The learning curve is hard but it can be done. Above mentioned method works best. Good luck!
I damaged aluminum rim while trying to mount steel-wired Silver Arrow Duro 700x20c and punctured 3 or 4 tubes beyond repair. The learning curve is hard but it can be done. Above mentioned method works best. Good luck!
This is the way to do it. I just want to emphasize the method Lonesome rider described:
start opposite to valve
as you get the tire onto the rim, working towards the valve on both sides, push the beads down into the center of the rim.
When you get up to the valve, go back opposite, and re-push the beads down into the center of the rim. This will loosen it up a bit towards the remaining part of the tire.
I doubt a dryer would get hot enough to melt a tire and second, I would think that you'd be safe starting at a low-ish setting, checking on it from time to time and using judgement as to how hot to set the dryer and how long.
That said, the above technique, rigorously applied works very well.
I start at the valve; this allows me to position the tire exactly as I want it and it allows me to push the valve up so it clears the bead.
FWIW, I have had some tough tire mountings but have NEVER had one I could not make happen...

__________________
Today, I believe my jurisdiction ends here...
Today, I believe my jurisdiction ends here...
04-05-15, 08:44 PM
#54
Newbie
Join Date: May 2014
Posts: 1
Mentioned: 0 Post(s)
Tagged: 0 Thread(s)
Quoted: 0 Post(s)
Likes: 0
Liked 0 Times
in
0 Posts
04-06-15, 12:12 AM
#55
Senior Member
Join Date: Apr 2007
Posts: 6,763
Mentioned: 10 Post(s)
Tagged: 0 Thread(s)
Quoted: 1109 Post(s)
Liked 1,200 Times
in
760 Posts
I never had a tire I couldn't get mounted going valve first, but I've found it easier when starting opposite to the valve.
04-06-15, 12:30 AM
#56
Senior Member
Join Date: Oct 2014
Location: Kiev, Ukraine
Posts: 139
Bikes: Olmo Sanremo, Romet Laser
Mentioned: 0 Post(s)
Tagged: 0 Thread(s)
Quoted: 1 Post(s)
Likes: 0
Liked 0 Times
in
0 Posts
In case of easy-to-mount-tire and easy-to-mount-rim combination the difference is non-existent, really. In the case of this thread, you have spare room at the opposite side to push beads deeper to the rim well. Push both sides of the tire to each other. They do touch. The valve body sticking through the valve hole prevents full contact thus making the process of mounting stubborn tire hader.
04-06-15, 09:25 AM
#58
Senior Member
Join Date: May 2005
Location: La La Land (We love it!)
Posts: 6,301
Bikes: Gilmour road, Curtlo road; both steel (of course)
Mentioned: 2 Post(s)
Tagged: 0 Thread(s)
Quoted: 273 Post(s)
Likes: 0
Liked 10 Times
in
9 Posts
Read post #8
My Kyserium rims don't need tape (although I do use a small piece at the valve hole) but when I do install tape I cut it so the ends butt together with no overlap.
I've felt slight thumps from overlapped tape so I adapted this technique; guess it might make your tire mounting a bit easier as well...
__________________
Today, I believe my jurisdiction ends here...
Today, I believe my jurisdiction ends here...
04-06-15, 09:48 AM
#59
Really Old Senior Member

I guess that makes sense if you overlap your rim tape.
My Kyserium rims don't need tape (although I do use a small piece at the valve hole) but when I do install tape I cut it so the ends butt together with no overlap.
I've felt slight thumps from overlapped tape so I adapted this technique; guess it might make your tire mounting a bit easier as well...
IF a tire is "thumping" because you ovelrapped rim tape, you had to do a mighty bad job of it.
04-06-15, 12:48 PM
#60
Senior Member
Join Date: Nov 2004
Location: Netherlands
Posts: 521
Bikes: Wabi Lightning, fixed 13.6 pounds. Cera steel road bike Campy veloce 9s
Mentioned: 0 Post(s)
Tagged: 0 Thread(s)
Quoted: 0 Post(s)
Likes: 0
Liked 1 Time
in
1 Post
The only tip I can offer is using the palm of your hand to get the last bit of second bead over the rim, not your thumbs. I haven't met a tire/rim combo that required a lever to get the second bead on.
I also own Kinlin XR 300 rims, but use veloplugs because they were a weight weenie build. This might explain the ease with which I can mount tires on these rims (especially Conti GP 4000's, they are super supple!) as teh veloplugs leave more room in the rim well to mount the tire vs a traditional rim tape.
04-06-15, 02:35 PM
#61
Senior Member

Join Date: Apr 2010
Location: Mountain View, CA USA and Golden, CO USA
Posts: 6,341
Bikes: 97 Litespeed, 50-39-30x13-26 10 cogs, Campagnolo Ultrashift, retroreflective rims on SON28/PowerTap hubs
Mentioned: 9 Post(s)
Tagged: 0 Thread(s)
Quoted: 550 Post(s)
Liked 325 Times
in
226 Posts
If it is that easy to get a tire off with a string, it's a doodle with your bare hands.
The only tip I can offer is using the palm of your hand to get the last bit of second bead over the rim, not your thumbs. I haven't met a tire/rim combo that required a lever to get the second bead on.
I also own Kinlin XR 300 rims, but use veloplugs because they were a weight weenie build. This might explain the ease with which I can mount tires on these rims (especially Conti GP 4000's, they are super supple!) as teh veloplugs leave more room in the rim well to mount the tire vs a traditional rim tape.
1 mil Kapton (.005" for two wraps) takes up less space than Velo Plugs which weren't enough to get GP4000s on my powder coated Velocity Fusions, although the thinner tape was.
Last edited by Drew Eckhardt; 04-07-15 at 09:22 AM.
05-22-15, 08:51 AM
#62
Senior Member
Thread Starter
Join Date: Apr 2013
Location: SoCal
Posts: 6,496
Mentioned: 6 Post(s)
Tagged: 0 Thread(s)
Quoted: 276 Post(s)
Likes: 0
Liked 6 Times
in
3 Posts

