


Stripped Bottom-Bracket Cups (?), Late 90's Campy Athena...
 04-13-15, 10:17 PM
#1
Member
Thread Starter
Join Date: Oct 2013
Posts: 36
Mentioned: 0 Post(s)
Tagged: 0 Thread(s)
Quoted: 1 Post(s)
Likes: 0
Liked 1 Time
in
1 Post
Stripped Bottom-Bracket Cups (?), Late 90's Campy Athena...
Purchased a very nice condition 1998 Serotta Concours Ti-Frame. Problem - the BB is frozen. Seller's LBS had given up on removal. I tried a very reputable Bay Area LBS, no luck, but they admitted they didn't want to risk damage. The BA shop soaked the BB in anti-seize fluid for several days.
Bike is now fully dissembled. Paint is 7.5/10. Many small nicks, but will look great from 10 feet once it's rebuilt, so I would like to avoid paint damage.
So I am considering options and would welcome suggestions. Here are the pictures from both sides:
Idea 1: drill or dremel one side to create 2-4 notches, make a tool to fit the new notches, use the spindle bolt to hold it flush and apply lots of leverage.
Idea 2: carefully drill/grind cup faces so the inner cartridge will slide out.
Idea 3: find a round pipe approximately the size of the inner opening. Cut in half, slide into opening and then use small pieces of wood to shim it out until it is very tight against the cup and spindle. Maybe use spindle bolt to hold flush, apply leverage to turn.
Idea 4: use heat to loosen the cups. Not clear on how to do this without paint damage. Soak in a hot liquid? This could be part of one of the above ideas.
Bike is now fully dissembled. Paint is 7.5/10. Many small nicks, but will look great from 10 feet once it's rebuilt, so I would like to avoid paint damage.
So I am considering options and would welcome suggestions. Here are the pictures from both sides:
ACTUALS:


UNDAMAGED SIMILIAR UNIT

UNDAMAGED SIMILIAR UNIT
Idea 1: drill or dremel one side to create 2-4 notches, make a tool to fit the new notches, use the spindle bolt to hold it flush and apply lots of leverage.
Idea 2: carefully drill/grind cup faces so the inner cartridge will slide out.
Idea 3: find a round pipe approximately the size of the inner opening. Cut in half, slide into opening and then use small pieces of wood to shim it out until it is very tight against the cup and spindle. Maybe use spindle bolt to hold flush, apply leverage to turn.
Idea 4: use heat to loosen the cups. Not clear on how to do this without paint damage. Soak in a hot liquid? This could be part of one of the above ideas.
 04-13-15, 10:40 PM
#2
Senior Member
Join Date: Dec 2010
Location: Above ground, Walnut Creek, Ca
Posts: 6,681
Bikes: 8 ss bikes, 1 5-speed touring bike
Mentioned: 0 Post(s)
Tagged: 0 Thread(s)
Quoted: 86 Post(s)
Likes: 0
Liked 4 Times
in
4 Posts
jam a strong punch up against and between what's left of the splines and the spindle. then take a hand sledge to it.... or drill a hole in the face of the cup (if possible) and use a punch and that same sledge. place the hole to your best advange WRT to angle and the securing position of the frame. 
Last edited by hueyhoolihan; 04-13-15 at 10:53 PM.
04-14-15, 04:23 AM
#3
Senior Member

Join Date: Sep 2010
Location: Roswell, GA
Posts: 8,319
Bikes: '93 Trek 750, '92 Schwinn Crisscross, '93 Mongoose Alta
Mentioned: 30 Post(s)
Tagged: 0 Thread(s)
Quoted: 1438 Post(s)
Liked 1,092 Times
in
723 Posts
"Anti-seize fluid" could be anything from WD-40 (ineffective IME) to homebrew stuff to whatever. Few if any work as well as Kano Kroil. Get yourself some Kroil instead, which is the best in my experience. Apply it liberally and give the BB a few sharp hammer raps to help jar things loose and get the Kroil moving. Then give the Kroil some time to creep into the threads, with more applications and impacts. Some controlled heat, like from a hair dryer or heat ***, on the shell may help when you are trying to remove it.
04-14-15, 06:57 AM
#4
Senior Member
With an appropriate drill bit make holes to use a pin spanner (such as the Park SPA-1 or SPA-6) to remove the cups. Even the Chorus and Record level cups on these square taper cartridge units are easily mucked up.
Good luck.
-j
Good luck.
-j
04-14-15, 04:05 PM
#5
Senior Member
Join Date: Apr 2007
Posts: 6,760
Mentioned: 10 Post(s)
Tagged: 0 Thread(s)
Quoted: 1109 Post(s)
Liked 1,200 Times
in
760 Posts
And make sure you're turning it the right way. Dumb I know, but it has to be said. BTDT, of course.
I like the pin spanner idea above the best so far (along with the soaking w/ an appropriate product.... PB Blaster is another one to consider). The Park version may or may not be available or heavy duty enough for you, just search for pin spanner and you will find one to suit your purpose and budget.
The first thing that came to my mind was to take it to a "real" mechanic's shop. Car and heavy equipment mechanics deal with horribly stuck stuff all the time. If my grandpa (RIP) was any indication, they are pretty damn clever and proficient at stuff like this. A machine shop would be another idea.
But again - MAKE SURE THEY KNOW WHICH WAY TO TURN IT. And that you feel comfortable with them knowing it's a bike, not a bull dozer.
Last edited by Camilo; 04-14-15 at 04:13 PM.
04-14-15, 04:47 PM
#6

Senior Member

Join Date: May 2005
Location: La La Land (We love it!)
Posts: 6,301
Bikes: Gilmour road, Curtlo road; both steel (of course)
Mentioned: 2 Post(s)
Tagged: 0 Thread(s)
Quoted: 273 Post(s)
Likes: 0
Liked 10 Times
in
9 Posts
jam a strong punch up against and between what's left of the splines and the spindle. then take a hand sledge to it.... or drill a hole in the face of the cup (if possible) and use a punch and that same sledge. place the hole to your best advange WRT to angle and the securing position of the frame.
It's fairly easy, shouldn't harm the frame, and the shock of the impact should help to break the cup loose.
As the others have said, be sure you are going in the correct direction...
__________________
Today, I believe my jurisdiction ends here...
Today, I believe my jurisdiction ends here...
04-15-15, 06:34 PM
#7
Newbie
Join Date: Jul 2014
Posts: 1
Mentioned: 0 Post(s)
Tagged: 0 Thread(s)
Quoted: 0 Post(s)
Likes: 0
Liked 0 Times
in
0 Posts
you know my first thought was also the drill holes - use pin spanner idea, but if the specialized tool stripped out, im not sure a pin spanner would have enough grip.
how about this: find a large, class 10.9 nut which is smaller than the diameter of the cup but has a hole larger than the spindle. have a shop weld it onto the cup. if they're careful, they should be able to avoid damage to the paint or the spindle. now you should be able to soak it in penetrating oil and use a nice long cheater bar with a good quality wrench to break it loose.
...what do you think? i bet a mechanics shop would do it for a 12 pack of beer.
edit: spelling
04-15-15, 08:04 PM
#8
Member
Thread Starter
Join Date: Oct 2013
Posts: 36
Mentioned: 0 Post(s)
Tagged: 0 Thread(s)
Quoted: 1 Post(s)
Likes: 0
Liked 1 Time
in
1 Post
Great Ideas - THANKS!
Thank you for all the great ideas. I have been away from home since posting so I will get to give it a "whack" this weekend.
I think I am going to start by finding a tool I can hold tight with the spindle bolt and mate to custom drilled holes. If that doesn't work, welding sounds like the next best.
Once one side is off, the other side should be cake using the method on the Sheldon site.
Update next week.
Thanks again.
I think I am going to start by finding a tool I can hold tight with the spindle bolt and mate to custom drilled holes. If that doesn't work, welding sounds like the next best.
Once one side is off, the other side should be cake using the method on the Sheldon site.
Update next week.
Thanks again.
04-15-15, 08:19 PM
#9
Senior Member

Join Date: Nov 2014
Location: Eugene, Oregon, USA
Posts: 27,547
Mentioned: 217 Post(s)
Tagged: 0 Thread(s)
Quoted: 18376 Post(s)
Liked 4,511 Times
in
3,353 Posts
In this case, if you're using a custom pin spanner, figure out how to mount adequate spacers onto your bottom bracket to hold the tool in place. If one side works, you can try the other side before you completely remove the bottom bracket.
I assume you're planning on at least sacrificing the cups, if not the whole BB.
04-15-15, 08:28 PM
#10
Member
Thread Starter
Join Date: Oct 2013
Posts: 36
Mentioned: 0 Post(s)
Tagged: 0 Thread(s)
Quoted: 1 Post(s)
Likes: 0
Liked 1 Time
in
1 Post
With my old Rigina freewheels, I learned you always bolt down the tool... otherwise you make a mess (I've filed down the slots to get a freehub off of a wheel before).
In this case, if you're using a custom pin spanner, figure out how to mount adequate spacers onto your bottom bracket to hold the tool in place. If one side works, you can try the other side before you completely remove the bottom bracket.
I assume you're planning on at least sacrificing the cups, if not the whole BB.
The basic idea is to take one of the sockets that is used to remove a rear spin-on freewheel. Cut matching notches with dremel/drill. Put a big washer behind it, secure with the spindle nut, apply leverage.
For posterity's sake I will document my method and post results.
Separate question - when removing the DRIVE side, am i turning clockwise or counter clockwise as I stand facing the frame?
Thanks in advance...
04-15-15, 08:51 PM
#11

Senior Member
Join Date: Oct 2009
Location: Willy, VIC
Posts: 644
Mentioned: 0 Post(s)
Tagged: 0 Thread(s)
Quoted: 2 Post(s)
Likes: 0
Liked 1 Time
in
1 Post
Mnemonic: BBB = Bottom Bracket is Backwards, eg Right hand side is Left hand thread, Left hand side is Right hand thread.
Drive side loosens going clockwise with the frame in front of you.
BTW a Campy compatible Square taper BB can be had for a lot less than $100.
Drive side loosens going clockwise with the frame in front of you.
BTW a Campy compatible Square taper BB can be had for a lot less than $100.
Last edited by Mark Kelly; 04-15-15 at 08:59 PM.
04-15-15, 09:09 PM
#12
Member
Thread Starter
Join Date: Oct 2013
Posts: 36
Mentioned: 0 Post(s)
Tagged: 0 Thread(s)
Quoted: 1 Post(s)
Likes: 0
Liked 1 Time
in
1 Post
Thanks!
Agree on ST_BB cost, I am totally up in the air on what groupset to do once I get this thing unstuck.
It came with campy triple 9-speed, which will eventually end up on a bike for my wife as I don't need the gearing or want to ride a triple.
Either Ultegra-10 (on-hand), or look for a used campy 11 which would make it wheel-compatible with my Trek Ultegra 11. I have a nice threadless carbon 1" fork and I would like to keep the build on the lighter side.
04-15-15, 09:31 PM
#13
Senior Member
Join Date: Nov 2014
Location: Eugene, Oregon, USA
Posts: 27,547
Mentioned: 217 Post(s)
Tagged: 0 Thread(s)
Quoted: 18376 Post(s)
Liked 4,511 Times
in
3,353 Posts
So, the above should be true by Sheldon Brown's page:
Sheldon Brown's Bicycle Bicycle Bottom Bracket Crib Sheet
However, it lists the Italian BBs (36x24) and the French BB (35x1) as being right/right.
04-15-15, 09:38 PM
#14
Senior Member
Join Date: Oct 2009
Location: Willy, VIC
Posts: 644
Mentioned: 0 Post(s)
Tagged: 0 Thread(s)
Quoted: 2 Post(s)
Likes: 0
Liked 1 Time
in
1 Post
You're welcome. As Clifford notes, that mnemonic is for British standard (so maybe it should be BBBB).
BTW if memory serves the cups on that BB are aluminium, in which case the advice regarding heating it is counterproductive: aluminium has a higher CTE than does titanium.
BTW if memory serves the cups on that BB are aluminium, in which case the advice regarding heating it is counterproductive: aluminium has a higher CTE than does titanium.
04-15-15, 10:53 PM
#15
Member
Thread Starter
Join Date: Oct 2013
Posts: 36
Mentioned: 0 Post(s)
Tagged: 0 Thread(s)
Quoted: 1 Post(s)
Likes: 0
Liked 1 Time
in
1 Post
How about using COLD. From other non-bike forums I picked up the following. Also looked up the thermal co-efficients for Ti vs. Steel vs. Aluminum (not sure about the cup material)
Linear Temp. Expansion Coefficient: [TABLE="class: large, width: 582"]
[TR]
[TD][/TD]
[TD] # Times (10[SUP]-6 [/SUP]m/(m K))[SUP]*)[/SUP][/TD]
[/TR]
[/TABLE]
[TABLE="class: large, width: 582"]
[TR]
[TD]Titanium[/TD]
[TD]8.6[/TD]
[/TR]
[/TABLE]
[TABLE="class: large, width: 582"]
[TR]
[TD]Steel[/TD]
[TD]12.0[/TD]
[/TR]
[/TABLE]
[TABLE="class: large, width: 582"]
[TR]
[TD]Aluminum[/TD]
[TD]22.2[/TD]
[/TR]
[/TABLE]
Looks like with cold the Ti in the frame will not compress as much at the AL or Steel in the cups - not sure which I am dealing with but guessing AL from how easily it stripped.
"In today's shootout we took on some seriously rusted/frozen exhaust manifold bolts on an old 390 employing:
(1) Dry Ice
(2) CRC Freeze Off / Super Penetrant
(3) Poultice consisting of talc power, ATF, and acetone
(4) PB Blaster
The above were individually applied to two randomly selected rusted bolts across both banks. The Dry Icewas held in place for approx 30 minutes per bolt. The CRC Freeze Off application consisted of three 30-second sprays. The Poultice was brushed on and covered up with talc powder and cellophane wrap to prevent the acetone from evaporating, then allowed to remain on the bolts for approx 4 hrs. The PB Blasterapplication consisted of three 10-second sprays followed by an approx 4-hr wait before attempting removal.
Results:
Dry Icewas the clear winner (allowing for relatively easy bolt removal) followed by the Poultice which worked on one of the test bolts but failed to loosen the other for removal. CRC Deep Freeze / Super Penetrantand PB Blaster tied for last place and did little as the bolts remained "frozen".
Last edited by LateStart; 04-15-15 at 10:57 PM. Reason: typo
04-15-15, 10:56 PM
#16
Member
Thread Starter
Join Date: Oct 2013
Posts: 36
Mentioned: 0 Post(s)
Tagged: 0 Thread(s)
Quoted: 1 Post(s)
Likes: 0
Liked 1 Time
in
1 Post
More from "Ford Truck Enthusiasts" - no ice, just magic potions.
Yes I have, it's been around many many years and does very well in tests (see below from Machinist's Magazine)-- next shootout we do in my shop we'll add it to the mix of competitors.
Penetrating oil..... Average load
None ..................... 516 pounds
WD-40.................. 238 pounds
PB Blaster............. 214 pounds
Liquid Wrench.... 127 pounds
Kano Kroil............ 106 pounds
ATF-Acetone mix....53 pounds
04-15-15, 11:07 PM
#17
Senior Member
Join Date: Mar 2009
Location: los angeles
Posts: 366
Mentioned: 0 Post(s)
Tagged: 0 Thread(s)
Quoted: 1 Post(s)
Likes: 0
Liked 0 Times
in
0 Posts
*additional mnemonics:
right side pedal is right hand thread.
right hand threads rise to the right. (when stuck staring at threads yet still unsure)
right side pedal is right hand thread.
right hand threads rise to the right. (when stuck staring at threads yet still unsure)
05-01-15, 03:36 PM
#18
Member
Thread Starter
Join Date: Oct 2013
Posts: 36
Mentioned: 0 Post(s)
Tagged: 0 Thread(s)
Quoted: 1 Post(s)
Likes: 0
Liked 1 Time
in
1 Post
Bring out the big guns...
When brute force fails... it is time for the heavy duty equipment...
1) FAIL: all manner of torque-producing arrangements failed, including those with thread de-gooing potions.
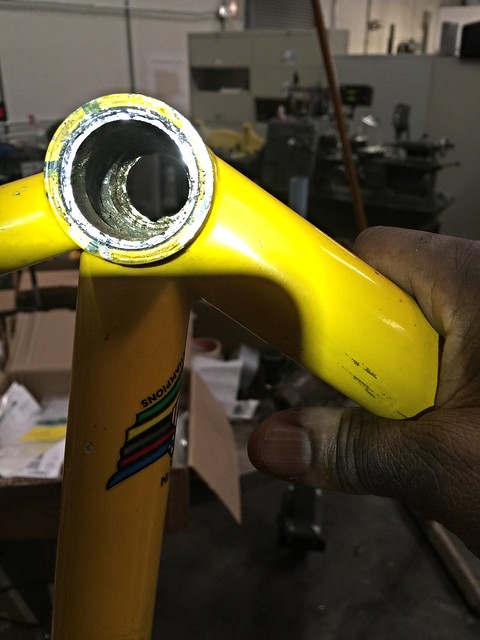
2) SUCCESS: put it on a milling machine owned by a friend. Milled out the 'face' of one side of the cups. Then pressed out the cartridge with a large press.
None of this would be possible in a home garage.
Now I have the full cup on one side and a threaded sleeve on the other side. From the inside of the BB it looks like the aluminum cup bonded to the titanium BB. This is galvanic corrosion from incorrect or no anti-seize applied during assembly AND/OR exposure to salt water.
 [/url]
1) FAIL: all manner of torque-producing arrangements failed, including those with thread de-gooing potions.
2) SUCCESS: put it on a milling machine owned by a friend. Milled out the 'face' of one side of the cups. Then pressed out the cartridge with a large press.
None of this would be possible in a home garage.
Now I have the full cup on one side and a threaded sleeve on the other side. From the inside of the BB it looks like the aluminum cup bonded to the titanium BB. This is galvanic corrosion from incorrect or no anti-seize applied during assembly AND/OR exposure to salt water.
[/url]
Last edited by LateStart; 05-02-15 at 01:09 AM. Reason: add pictures
05-01-15, 04:09 PM
#19
Senior Member
Join Date: Dec 2010
Location: Above ground, Walnut Creek, Ca
Posts: 6,681
Bikes: 8 ss bikes, 1 5-speed touring bike
Mentioned: 0 Post(s)
Tagged: 0 Thread(s)
Quoted: 86 Post(s)
Likes: 0
Liked 4 Times
in
4 Posts
good for you  . persistence can be virtue. most would have tossed that frame a while back.
  looking forward to seeing the final result.
if the BB has been exposed to the elements, like water and salt, most likely an oxidation of the preponderant sacrificial BB or BB shell element. just a guess.
. persistence can be virtue. most would have tossed that frame a while back. looking forward to seeing the final result.if the BB has been exposed to the elements, like water and salt, most likely an oxidation of the preponderant sacrificial BB or BB shell element. just a guess.
Last edited by hueyhoolihan; 05-01-15 at 04:15 PM.
05-01-15, 07:19 PM
#20
Old fart

Join Date: Nov 2004
Location: Appleton WI
Posts: 24,786
Bikes: Several, mostly not name brands.
Mentioned: 153 Post(s)
Tagged: 0 Thread(s)
Quoted: 3588 Post(s)
Liked 3,400 Times
in
1,934 Posts
If you drill holes in the cup for a pin spanner, tap them so you can thread bolts through the spanner (instead of the pins) right into the cup to hold the spanner on the cup.
05-01-15, 07:23 PM
#21
Senior Member
Join Date: May 2005
Location: La La Land (We love it!)
Posts: 6,301
Bikes: Gilmour road, Curtlo road; both steel (of course)
Mentioned: 2 Post(s)
Tagged: 0 Thread(s)
Quoted: 273 Post(s)
Likes: 0
Liked 10 Times
in
9 Posts
Easier to remember that you tighten pedals when you freewheel either side (build a few hundred bikes and you will never forget this)...
__________________
Today, I believe my jurisdiction ends here...
Today, I believe my jurisdiction ends here...
05-01-15, 07:35 PM
#22
Senior Member
Join Date: Nov 2014
Location: Eugene, Oregon, USA
Posts: 27,547
Mentioned: 217 Post(s)
Tagged: 0 Thread(s)
Quoted: 18376 Post(s)
Liked 4,511 Times
in
3,353 Posts
In another thread there was a discussion about lye and handlebar stems.
What would happen if you left your bottom bracket in a lye bath overnight?
Would the bottom bracket come out, leaving a funky anodized (paintless) bottom bracket shell?
Anyway, it might be an option to consider. Do a bit more research or tests before doing it though.
What would happen if you left your bottom bracket in a lye bath overnight?
Would the bottom bracket come out, leaving a funky anodized (paintless) bottom bracket shell?
Anyway, it might be an option to consider. Do a bit more research or tests before doing it though.
05-01-15, 10:14 PM
#23
Senior Member
Join Date: May 2003
Location: Mountain Brook. AL
Posts: 4,002
Mentioned: 14 Post(s)
Tagged: 0 Thread(s)
Quoted: 303 Post(s)
Likes: 0
Liked 136 Times
in
104 Posts
Where lye dissolves aluminum, it has relatively little effect on steel and titanium, other than the risk of hydrogen embrittlement, not exactly what you want on a bike frame.
Lye makes a great paint remover however....
Lye makes a great paint remover however....
05-02-15, 12:37 AM
#24
Member
Thread Starter
Join Date: Oct 2013
Posts: 36
Mentioned: 0 Post(s)
Tagged: 0 Thread(s)
Quoted: 1 Post(s)
Likes: 0
Liked 1 Time
in
1 Post
A chemical that dissolves AL but wont harm Ti frame?
BUT - the Serotta Ti is a mix of Aluminum and Ti, right? Won't I ruin the frame?
"Within the Legend's shiny exterior is Serotta's triple-butted Colorado Concept C4Ti 3Al/2.5V-titanium tubeset."
Sodium Hydroxide seems like a good choice - available and cheap.
Thoughts?
05-02-15, 01:20 AM
#25
Senior Member
Join Date: Dec 2010
Location: Above ground, Walnut Creek, Ca
Posts: 6,681
Bikes: 8 ss bikes, 1 5-speed touring bike
Mentioned: 0 Post(s)
Tagged: 0 Thread(s)
Quoted: 86 Post(s)
Likes: 0
Liked 4 Times
in
4 Posts
you might want to find out the percentage of each element.
i say this because, i've got a few 150 year old U.S double eagle gold coins that are still pretty bright. they aren't 100 gold, they were alloyed with a few other elements to provide a few qualities that the pure gold element lacks. the same is true for titanium, i think. if i remember right, it doesn't take much to make a big difference. often just a few percent of the overall mass, sometimes even less.
i say this because, i've got a few 150 year old U.S double eagle gold coins that are still pretty bright. they aren't 100 gold, they were alloyed with a few other elements to provide a few qualities that the pure gold element lacks. the same is true for titanium, i think. if i remember right, it doesn't take much to make a big difference. often just a few percent of the overall mass, sometimes even less.