


Handlebars have forward movement
 11-20-15, 04:52 PM
#1
Senior Member
Thread Starter
Handlebars have forward movement
So when I first got my BD bike, I greased the fork because everyone said I should do it.
I thought I put all the cups/cones back in correctly, and I've ridden the bike for over a month without any issues. I just noticed today while putting Koolstops on my front wheel that my handle bar can move forward...
I'm guessing this is not normal? Before I go diving back in to the fork to try and see if I actually did do the cups/cones correctly, can anyone confirm this for me that I did it incorrectly? The top seal under the spacers spins freely when I move it.
Last edited by SlvrDragon50; 11-20-15 at 05:43 PM.
 11-20-15, 04:56 PM
#2
Senior Member

Join Date: Feb 2009
Posts: 2,522
Mentioned: 11 Post(s)
Tagged: 0 Thread(s)
Quoted: 1422 Post(s)
Likes: 0
Liked 7 Times
in
5 Posts
You have to preload the cap BEFORE you tighten down the pinch bolts on the stem.
Just a little bit though. None of your spacers should spin.
Just a little bit though. None of your spacers should spin.
11-20-15, 05:43 PM
#3
Senior Member
Thread Starter
The spacers don't spin, only the little plastic cover below all of the spacers. I preloaded the headset then tightened down the stem.
 11-21-15, 09:47 AM
#5
Senior Member
Join Date: Oct 2007
Location: West Yorkshire, United Kingdom
Posts: 5,773
Mentioned: 5 Post(s)
Tagged: 0 Thread(s)
Quoted: 453 Post(s)
Liked 104 Times
in
87 Posts
Any grease on the fork should be removed on the sections covered by the stem/spacers (i.e. when the headset is in stalled, all the exposed areas.
11-21-15, 10:17 AM
#6
Senior Member
Thread Starter
I applied grease to the fork according to a Global Cycling Network video. I greased the bearings, and a portion of the bottom part of the fork tube.
I will try redoing the adjustment though. I really need to get a work stand
I will try redoing the adjustment though. I really need to get a work stand
11-21-15, 10:28 AM
#7
Banned
I manage to adjust those types of headsets fine, with the wheel on the Ground.. ..
Last edited by fietsbob; 11-21-15 at 10:43 AM.
11-21-15, 11:51 AM
#9
Senior Member
Join Date: Mar 2015
Posts: 491
Mentioned: 0 Post(s)
Tagged: 0 Thread(s)
Quoted: 9 Post(s)
Likes: 0
Liked 1 Time
in
1 Post
If you have tightened everything up and the fork is still a bit loose it maybe the result of the compression nut bottoming out before it contacts the spacers. So in a case like this you may need to add one spacer or a thicker spacer.
11-21-15, 12:07 PM
#10
Senior Member
Join Date: Mar 2015
Posts: 491
Mentioned: 0 Post(s)
Tagged: 0 Thread(s)
Quoted: 9 Post(s)
Likes: 0
Liked 1 Time
in
1 Post
[h=2]Copied from Park Tools site.
Threadless Headset Adjustment[/h] Threadless headsets work on the same principal as threaded headsets. The bearing races need to press against the bearings. The bolt in the top cap will put pressure on the stem, which presses on washers below the stem, which press on the bearing races, which press against the bearings.
NOTE: The cap and bolt at the top of the stem do not secure the stem onto the steering column. The bolt or bolts on the side of the stem keep the stem from moving once the adjustment is made. The cap is used for bearing adjustment only.
Begin by removing the adjusting bolt in the center of the steering column. Next, remove the top cap. There may be a star-shaped nut or other fittings inside the steering column. The bolt threads into this fitting and pulls on the fork against the headset bearing surfaces, which acts to tighten the adjustment. Note the height of the steering column relative to the stem. It should be about 3mm (1/8�) below the level of the stem. The stem needs to press down on the spacers in order to adjust the bearings. If the steering column is level with the top of the stem, another spacer is needed below the stem.
- Remove bolt and top cap to inspect steering column. Lubricate adjusting bolt and reinstall cap and bolt by hand only. Do not tighten.
- Loosen stem bolt(s) that secure stem to the steering column. Lubricate these bolts if they are dry. NOTE: Do not lubricate inside stem or on steering column surface.
- Wiggle the stem side to side to see that it is loose. If the stem is jammed or rusted frozen to the steering column, no adjustment can be made.
- Align stem straight to wheel and gently secure the top bolt. Stop when any resistance is felt.
- Tighten stem bolt(s).
- Check for play by pulling back and forth on fork. Turn the handlebars in different directions while checking for play. There may be play at this early setting. Use care when grabbing suspension forks, because the legs may have play. Grab upper portion of fork.
- To adjust bearings, loosen stem bolt(s).
- Turn adjusting bolt in center cap only 1/8th turn clockwise.
- Secure stem bolts, check for play again.
- Repeat adjustments as above until play disappears. Remember to loosen stem bolts before turning adjusting bolt in cap.
- Check alignment of stem and tighten stem binder bolts fully.
11-21-15, 12:26 PM
#11
Senior Member
Thread Starter
Sorry, I meant the work stand for the fork bearings and whatnot.
It was just a pain with the bike constantly falling over while I was trying to align the bearings. That's the only reason why I'm not sure if I did it correctly.
On the bright side, it's snowing now, and my riding season is over so no rush!
It was just a pain with the bike constantly falling over while I was trying to align the bearings. That's the only reason why I'm not sure if I did it correctly.
On the bright side, it's snowing now, and my riding season is over so no rush!
11-21-15, 12:37 PM
#12
Banned
Loosen the stem and dont have the top cap in place and threadless forks fall out.
not that a repair stand is not generally useful .. try to hold the bike between your legs and it wont fall over.
not that a repair stand is not generally useful .. try to hold the bike between your legs and it wont fall over.
11-21-15, 01:28 PM
#13
Senior Member
Join Date: Oct 2004
Location: Seattle
Posts: 3,248
Bikes: Kuota Ksano. Litespeed T5 gravel - brilliant!
Mentioned: 0 Post(s)
Tagged: 0 Thread(s)
Quoted: 6 Post(s)
Likes: 0
Liked 4 Times
in
4 Posts
Sorry, I meant the work stand for the fork bearings and whatnot.
It was just a pain with the bike constantly falling over while I was trying to align the bearings. That's the only reason why I'm not sure if I did it correctly.
On the bright side, it's snowing now, and my riding season is over so no rush!
It was just a pain with the bike constantly falling over while I was trying to align the bearings. That's the only reason why I'm not sure if I did it correctly.
On the bright side, it's snowing now, and my riding season is over so no rush!
The adjustment procedure is pretty straight forward.
A) Hold the bike frame at the headtube with your left hand and with your right hand grasp the fork blade (mid-section) and try to rock it back and forth. If you're holding the bike firmly, you should be able to feel any movement (the fork steerer inside the headtube). With the palm of your right hand, continuing to hold the frame off the ground, strike the fork blade to ensure that fork is settled into its races. A couple "blows" with your hand should cause any loosely bound parts to realign properly.
B) If you sense rocking movement within the headtube, prepare to loosen the fittings for readjustment. Start by loosening the stem bolts that clamp the steerer tube. Insert your allen key in the allen-head bolt centered in the cap. Tighten the cap bolt 1/4 turn clockwise, then retighten the stem bolts, alternating between upper and lower bolt to spread the compressing forces evenly.
C) Repeat the test in step (A) to determine if the adjustment has gone through successfully.
I've also used the "rocking method" for checking my headset adjustment. With the left brake lever (assuming left lever/front brake) fully compressed, try to rock the bike back and forth to sense any looseness. This method works better on some bikes than others and has the advantage of letting the bike rest on the ground while you're testing. But you get more feedback when the two parts are tested by hand.
Taking the wheel out of the fork when you're adjusting the headset can help if you find it difficult to hold the loaded fork off the ground for extended periods. It lso makes the front end easier to grasp.
11-21-15, 03:07 PM
#14
Senior Member
Thread Starter
So when I removed the stem to look at what was going on inside the column, the centering compression sleeve (the split ring) is slipping in its place and letting the fork move. And just to verify I am describing the right parts, I am talking about the ring that is present after removing the top cage bearing and race.
Maybe I just have a bad compression ring and need to get a new one? (even though it's a new bike :/)
Wait... I'm looking at this picture now:
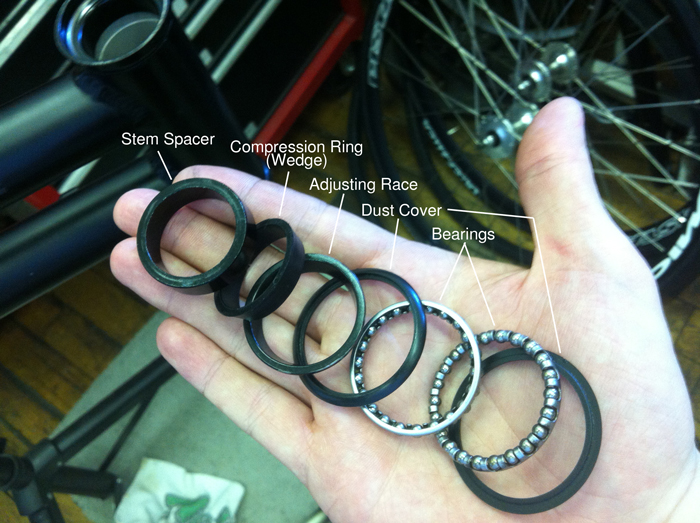
I don't even have that big compression ring. I have this tiny split ring the fits between the space between the column and tube.
Maybe I just have a bad compression ring and need to get a new one? (even though it's a new bike :/)
Wait... I'm looking at this picture now:
I don't even have that big compression ring. I have this tiny split ring the fits between the space between the column and tube.
Last edited by SlvrDragon50; 11-21-15 at 03:17 PM.
11-21-15, 10:43 PM
#16
Senior Member
Thread Starter
So weird that I don't have one. I don't remember even seeing it when I first took apart the stem.
So where can I get a compressionn ring? I can't find Ritchey compression rings anywhere. Only Cane Creek.
So where can I get a compressionn ring? I can't find Ritchey compression rings anywhere. Only Cane Creek.
11-21-15, 11:47 PM
#19
Senior Member
Join Date: Mar 2015
Posts: 491
Mentioned: 0 Post(s)
Tagged: 0 Thread(s)
Quoted: 9 Post(s)
Likes: 0
Liked 1 Time
in
1 Post
I think maybe now you do not need a compression ring as the compression is supplied by the top cap, bolt and star nut. The steering column relatively to the stem should be 1/8" below the level of the stem. Sorry for my confusion.
Last edited by elmore leonard; 11-21-15 at 11:57 PM.
11-21-15, 11:54 PM
#20
Senior Member
Thread Starter
I think I'll have to recheck my bearings and make sure they were inserted correctly.
11-22-15, 11:56 AM
#23

Senior Member

I have had a few assembly errors on bikes I have purchased, both online and from a store. My MTB from Performance Bike was missing a spacer for the bottom bracket that allowed my whole crank to move side to side. The most recent bike I bought from BD had the rear cassette small cog incorrectly installed which left the rest of the cassette loose on the freehub. So don't be surprised if it is happening to you.
Do you know the specs for the headset, manufacturer and model? I am sure there is a tech doc somewhere online showing the correct parts and assembly order. It is very likely you are missing a part or something is switched around. It is a waste of time to speculate without being there to see for myself, though.
Do you know the specs for the headset, manufacturer and model? I am sure there is a tech doc somewhere online showing the correct parts and assembly order. It is very likely you are missing a part or something is switched around. It is a waste of time to speculate without being there to see for myself, though.
11-22-15, 12:32 PM
#24
Senior Member
Thread Starter
It is this bike: Save up to 60% of new Shimano Ultegra 6800 22 Speed Road Bikes | Motobecane Super Strada Road Bikes Sale | Save up to 60% off your next new Road Bike
All I know is that it has a Ritchey stem:
Ritchey Comp 4Axis, Threadless Aluminum, 31.8mm clamp, 1.125 Steerer
STEM.EXT-6�)90/100/110mm FOR 47-52/54-56/58-64CM,C/S:31.8/28.6x42mm
I'll send BD an email since they're usually pretty helpful. I'll probably take another stab at the guts today. Just to verify my bearings are in the correct orientation. I just assumed that if I had no gaps then the bearings are correct.
All I know is that it has a Ritchey stem:
Ritchey Comp 4Axis, Threadless Aluminum, 31.8mm clamp, 1.125 Steerer
STEM.EXT
-6�)90/100/110mm FOR 47-52/54-56/58-64CM,C/S:31.8/28.6x42mmI'll send BD an email since they're usually pretty helpful. I'll probably take another stab at the guts today. Just to verify my bearings are in the correct orientation. I just assumed that if I had no gaps then the bearings are correct.
Last edited by SlvrDragon50; 11-22-15 at 12:36 PM.
11-22-15, 01:17 PM
#25
Senior Member
I am just realizing that the picture posted isn't yours. Can you post a pic of the parts you have and the order in which they are assembled?