


The Peugeot Project
 05-16-05, 05:01 PM
#1
Drug Company Pawn
Thread Starter

Join Date: Jul 2004
Posts: 278
Mentioned: 0 Post(s)
Tagged: 0 Thread(s)
Quoted: 0 Post(s)
Likes: 0
Liked 0 Times
in
0 Posts
The Peugeot Project
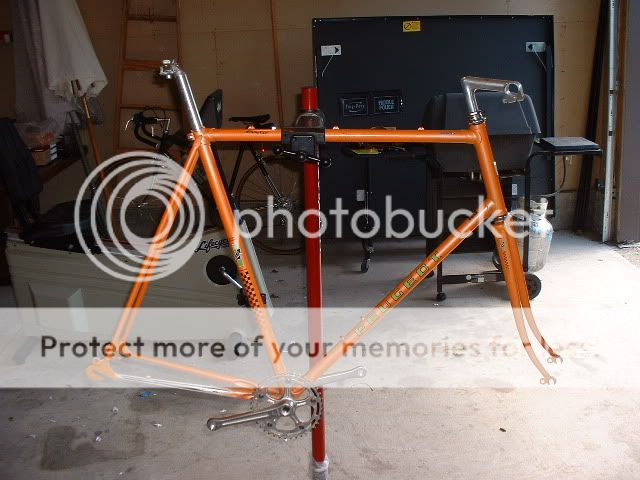
I happened across this old Peugeot frame for virtually nothing and have taken it on as my first build project. I've decided to go single speed, partly for the intrigue of having a different type of bike, and partly because it makes the built less complex (and cheaper). It's a POS carbolite 103 steel frame, so I'm not attempting anything fancy, I just want to see what I can do with it and have a little fun.
I am going to strip the paint and repaint myself. This is an low bugdet project, so powdercoating is out. Likely just go with Plasticoat spray paint.
I figured I'd do something of a "before and after" thing here, along with some periodic updates on the project. It should be interesting to chronicle the development of my new ride. Should anyone have any ideas or suggestions, please feel free to speak up!
OK, now my first question is this... I'm trying to remove the cranks and chainring in order to clean and paint it more easily. The bottom bracket is in suprisingly good condition, very smooth, spins nicely. I have removed a bolt from the center of each side. For the life of me, I can't get the damn thing off. It doesn't look like there is anything else holding it on, but I can't wiggle it loose. How do you get it off? If anyone would like a picture from another angle, I can do that. HELP!
 05-16-05, 05:14 PM
#2

Vello Kombi, baby

Join Date: Dec 2002
Location: Je suis ici
Posts: 5,188
Bikes: 1973 Eisentraut; 1970s Richard Sachs; 1978 Alfio Bonnano; 1967 Peugeot PX10
Mentioned: 6 Post(s)
Tagged: 0 Thread(s)
Quoted: 80 Post(s)
Likes: 0
Liked 14 Times
in
13 Posts
You need a crank remover. A specialized tool that screws into the treads on the crank, and then pushes the crankarm off the bottom bracket spindle. That looks like a late seventies UO10. The stock cranks are stronglight, but they take the standard 22mm remover (some older stronglights take a larger diameter crank remover). Odd 122 bolt circle diameter on the cranks, can be hard to replace. Depending on frame vintage, the bottom bracket on these bikes is threaded either French or Swiss, the later being tough to replace. Fortunately, the stock bottom bracket is pretty bombproof; just grease it up with fresh bearings and you should be fine.
__________________
"It's always darkest right before it goes completely black"
Waste your money! Buy my comic book!
"It's always darkest right before it goes completely black"
Waste your money! Buy my comic book!
05-16-05, 05:17 PM
#3
Senior Member

Join Date: Jun 2004
Location: Seattle, WA
Posts: 450
Mentioned: 0 Post(s)
Tagged: 0 Thread(s)
Quoted: 0 Post(s)
Likes: 0
Liked 0 Times
in
0 Posts
You will need a tool called a "crank puller". I am not sure if the ones you are likely to find stocked at your LBS these days will work on old French parts.
05-16-05, 07:33 PM
#4
Drug Company Pawn
Thread Starter
Join Date: Jul 2004
Posts: 278
Mentioned: 0 Post(s)
Tagged: 0 Thread(s)
Quoted: 0 Post(s)
Likes: 0
Liked 0 Times
in
0 Posts
Originally Posted by Poguemahone
You need a crank remover. A specialized tool that screws into the treads on the crank, and then pushes the crankarm off the bottom bracket spindle. That looks like a late seventies UO10. The stock cranks are stronglight, but they take the standard 22mm remover (some older stronglights take a larger diameter crank remover). Odd 122 bolt circle diameter on the cranks, can be hard to replace. Depending on frame vintage, the bottom bracket on these bikes is threaded either French or Swiss, the later being tough to replace. Fortunately, the stock bottom bracket is pretty bombproof; just grease it up with fresh bearings and you should be fine.
What's are you referring to by a "122 bolt circle diameter"? Sorry, I'm something of a newbie when it comes to the details.
05-16-05, 07:44 PM
#5
feros ferio

Join Date: Jul 2000
Location: www.ci.encinitas.ca.us
Posts: 21,796
Bikes: 1959 Capo Modell Campagnolo; 1960 Capo Sieger (2); 1962 Carlton Franco Suisse; 1970 Peugeot UO-8; 1982 Bianchi Campione d'Italia; 1988 Schwinn Project KOM-10;
Mentioned: 44 Post(s)
Tagged: 0 Thread(s)
Quoted: 1392 Post(s)
Liked 1,324 Times
in
836 Posts
Check out SheldonBrown.com's glossary for a great explanation of BCD. While you are there, read about bottom brackets; yours is PROBABLY Swiss-threaded, which means that the fixed cup is reverse-threaded and that a replacement will be VERY hard to find.
__________________
"Far and away the best prize that life offers is the chance to work hard at work worth doing." --Theodore Roosevelt
Capo: 1959 Modell Campagnolo, S/N 40324; 1960 Sieger (2), S/N 42624, 42597
Carlton: 1962 Franco Suisse, S/N K7911
Peugeot: 1970 UO-8, S/N 0010468
Bianchi: 1982 Campione d'Italia, S/N 1.M9914
Schwinn: 1988 Project KOM-10, S/N F804069
05-17-05, 07:23 AM
#6
Senior Member

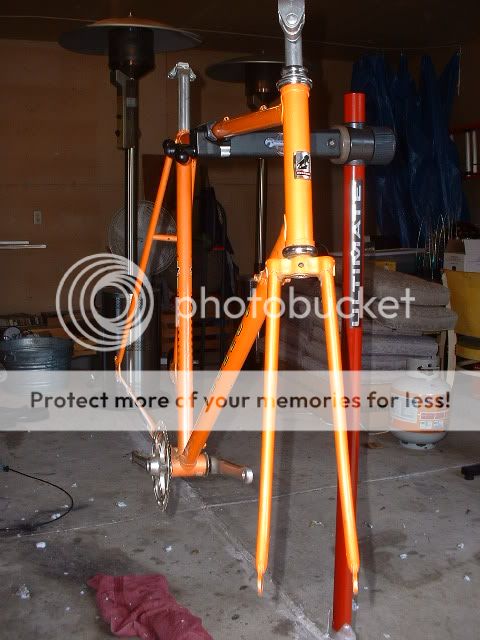
FWIW, I think I'd just embrace that frame's orangeness. I think it looks pretty attractive! also, don't count your chickens before they hatch. I recently opened up the BB on my beater fixed gear conversion, thinking that I'd find everything in good condition because it spun so easily, only to realize that the fixed cup was pitted to hell. The crank arms have a good deal of rotational momentum, so you probably won't notice a badly pitted cup or spindle just by spinning the cranks. Fortunately I had, for practice, removed and cleaned the bottom bracket on a junker that I found in the neighborhood, and the cup fit perfectly. With oddball French or Swiss parts I might have been forced to scour ebay for a few weeks or just do the "use it until it dies" approach. I found a few good chapters in the (old?)Barnett's manuals (see chapters 9 and 20 here: https://www.singlespeed.nl/techniek/Barnett.html ) that helped me a lot (in addition to Sheldon Brown's site, as always. I think he has 2 articles on cranks and bottom brackets that he wrote in the 80's on his page somewhere).
I really like my park crank puller, bought while on a local trip. I was going to buy the nashbar one, but with shipping on one item it was nearly the same price as getting the park one locally, but if you're going to buy a bunch of stuff (conceivably you have a LOT of work to do on this bike...) it's probably a good deal then. I use a lot of multipurpose cheap tools (I heart harbor freight!), but this was one of those places that a purpose built tool was indispensible.
Good luck! And I think you'll enjoy it...
05-17-05, 10:31 AM
#7
Drug Company Pawn
Thread Starter
Join Date: Jul 2004
Posts: 278
Mentioned: 0 Post(s)
Tagged: 0 Thread(s)
Quoted: 0 Post(s)
Likes: 0
Liked 0 Times
in
0 Posts
OK, you know you're a bike mechanic newbie when...
I have a crank puller. It came in the tool kit I recently bought, I just didn't know what it was. So now I have the cranks off, but I'm SURE I don't have the right tool to get the bottom bracket open. The square spindles on the BB spin A LOT rougher without the leverage of the crankarms, so it looks like a trip to the LBS is needed.
DiegoFrogs: I thought about embracing the orangeness of the frame, but in the end beauty is in the eye of the beholder and the pumpkin color just wasn't doing it for me.
05-17-05, 10:37 AM
#8
slower than you
Join Date: Mar 2004
Location: dairy country NY
Posts: 652
Bikes: Gunnar Road Sport, peugeot UO-10
Mentioned: 0 Post(s)
Tagged: 0 Thread(s)
Quoted: 1 Post(s)
Likes: 0
Liked 0 Times
in
0 Posts
I have a 1977 Peugeot UO-10. I'll be watching your progress with great interest.
I think you're making good choices, enjoy.
I think you're making good choices, enjoy.
05-17-05, 11:22 AM
#9
Senior Member
That's too bad... I'd love it with some lime green bartape to pick up on the downtube decal, with canvas bags and a british racing green brooks! This may be why my girlfriend doesn't allow me to make aesthetic decisions... I really love the classy crankarm spider. You're probably putting clipless pedals on it too? That, my friend, is why I'm going to the garage sales this weekend.
05-17-05, 11:25 AM
#10
Senior Member
Join Date: Mar 2005
Posts: 1,442
Mentioned: 0 Post(s)
Tagged: 0 Thread(s)
Quoted: 1 Post(s)
Likes: 0
Liked 1 Time
in
1 Post
That's almost always the case with the old adjustable BBs, they feel great with the cranks on....
You didn't give us a pic of the other side, but likely you will need a lockring wrench for the outer lockring, and possibly a pin wrench for the adjustable cup. (some use ordinary wrenches)
Most likely the spindle (axle) and cups are in OK shape, they're very durable. But once you pop the thing apart, you will need new bearings. They are not expensive, just be sure to take one to the bike shop for proper sizing.
I agree with the above poster; I kinda like that burnt-orange paint job. Distinctive!
05-17-05, 01:56 PM
#11
Drug Company Pawn
Thread Starter
Join Date: Jul 2004
Posts: 278
Mentioned: 0 Post(s)
Tagged: 0 Thread(s)
Quoted: 0 Post(s)
Likes: 0
Liked 0 Times
in
0 Posts
Wow... so how I have two votes for keeping the orange color... Unfortunately, the stripping process has already begun, so there's no going back... but now I'm maybe regretting the repainting part a little. Part of the reason I wanted to repaint was for the experience and partly because my other bike is bright yellow and two obnoxiously colored bikes was just too much to stand. lol. 
Any opinions on color? I'm thinking either a dark hunter green, deep red or white. I also want to do the lugs in a contrasting color, or at the least detail the lines on the lugs. The rims are going to be black and the brakes and brake levers black as well... they are already purchased, so there's no changing those.
Any opinions on color? I'm thinking either a dark hunter green, deep red or white. I also want to do the lugs in a contrasting color, or at the least detail the lines on the lugs. The rims are going to be black and the brakes and brake levers black as well... they are already purchased, so there's no changing those.
05-17-05, 03:59 PM
#12
Papa Wheelie

Join Date: Feb 2005
Location: Madison, Wi
Posts: 1,470
Bikes: Jamis Aurora '02; Takara Medalist (650B)
Mentioned: 0 Post(s)
Tagged: 0 Thread(s)
Quoted: 0 Post(s)
Likes: 0
Liked 0 Times
in
0 Posts
Paint it black... no, Red... black...
No... definitely Red if you are doing black parts
dark cherry red
No... definitely Red if you are doing black parts
dark cherry red
05-17-05, 04:51 PM
#13
crotchety young dude

Join Date: Jan 2005
Location: SF, CA
Posts: 4,818
Bikes: IRO Angus; Casati Gold Line; Redline 925; '72 Schwinn Olympic Paramount
Mentioned: 0 Post(s)
Tagged: 0 Thread(s)
Quoted: 2 Post(s)
Likes: 0
Liked 0 Times
in
0 Posts
Hunter green with yellow striping around the lugs. Ooh. I wish I had lugs...
05-17-05, 08:09 PM
#14
Vello Kombi, baby
Join Date: Dec 2002
Location: Je suis ici
Posts: 5,188
Bikes: 1973 Eisentraut; 1970s Richard Sachs; 1978 Alfio Bonnano; 1967 Peugeot PX10
Mentioned: 6 Post(s)
Tagged: 0 Thread(s)
Quoted: 80 Post(s)
Likes: 0
Liked 14 Times
in
13 Posts
I'd keep the orange. I believe you use a 25mm wrench or a large adjustable wrench to work the adjustable cup on these models. There's a couple bike specific 25mm wrenches, both Var and Park make/made them.
As to the French/Swiss bottom bracket issue, I've seen both variations on the UO10; the only sure way to tell is take the fixed cup off. And if the races are in good shape why bother.
To work on the bottom bracket, you'll need a 25mm wrench (as noted above) or a pin spanner (if the adjustable cup has tiny holes to adjust it with instead of wrench flats), a crank puller, and a lockring wrench. Since you're contemplating fixed gear, I recommend the Hozan c205 lockring wrench; it's the best all-round one. If you're riding fixed, this and a chain whip are two tools you should probably own, if you don't already. Be aware there are two track cog/chain sizes; get a cog for a standard 3/32 chain and you won't need a specialized chain whip.
__________________
"It's always darkest right before it goes completely black"
Waste your money! Buy my comic book!
"It's always darkest right before it goes completely black"
Waste your money! Buy my comic book!
05-18-05, 01:32 PM
#15
Drug Company Pawn
Thread Starter
Join Date: Jul 2004
Posts: 278
Mentioned: 0 Post(s)
Tagged: 0 Thread(s)
Quoted: 0 Post(s)
Likes: 0
Liked 0 Times
in
0 Posts
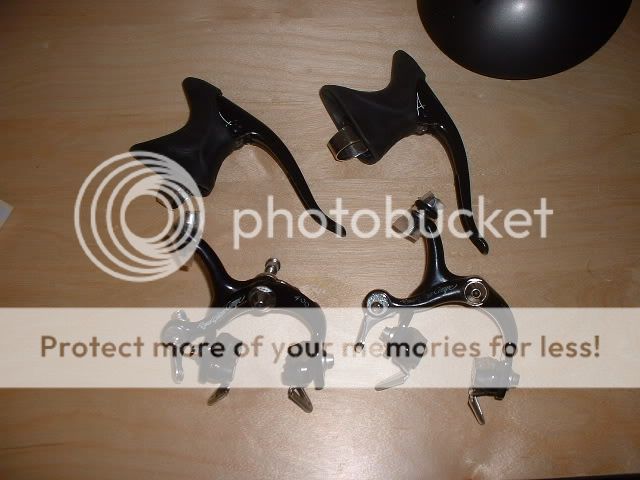
The brake calipers and levers arrived today!!
Purchaced on ebay for about $36. They are dia comp, "Royal Gran Compe" aero levers.
They are in GREAT condition... hoods are still soft with no tears. The brake pads are new, no wear at all. My only concern is replacing the pads in the future... can anyone give me any idea how hard they will be to find replacement pads?
On other news, I dropped the bike off at the LBS to have the BB checked out. The more I looked at it, the more I wanted the pros to pop it open and check it... it just didn't feel right when I spun it without the crankarms... too creaky.
05-18-05, 02:50 PM
#16
Ha Ha! Boss.

Join Date: Feb 2005
Location: pdx, or
Posts: 879
Bikes: Univega custom 14sp mixte + Sears 3sp groceryhoggg
Mentioned: 0 Post(s)
Tagged: 0 Thread(s)
Quoted: 0 Post(s)
Likes: 0
Liked 0 Times
in
0 Posts
finding brake pads shouldn't be hard to do, check out your LBS for similar pads. They're usually reasonably (wtf sp?) priced. I get cheaper ones for about 8 bucks a pair.
05-18-05, 11:58 PM
#17
94 Trek 1400

Join Date: May 2005
Location: Chi Town baby!
Posts: 260
Bikes: Mountainsmith Mountain bike and a Trek 1400.
Mentioned: 0 Post(s)
Tagged: 0 Thread(s)
Quoted: 0 Post(s)
Likes: 0
Liked 0 Times
in
0 Posts
I would like to say you are going to have 2 very nice looking bikes. I wish i had the money and ability to do what you have done. The bike i have is a late 1970s Relaigh Romper Road bike in depserate need of being replaced. When i go on rides with my friends (one has a custom made astro damler (spelling on that name) road bike {ti rims, al handle bar, al cranks and, it was made by afriend of his out of parts from his older bikes he has 8 i think} and the other a very nice giant) i get eaten alive. Sadly, i do not have the money to join them in their awesomeness. Good luck and i will enjoy seeing your progress!
05-21-05, 10:02 AM
#18
Junior Member
Join Date: Aug 2004
Location: Outside of Ann Arbor, MI
Posts: 194
Bikes: Tumbleweed Prospector 29+, 1991 Schwinn High Plains resto-mod, 1998 Schwinn Homegrown resto-mod
Mentioned: 0 Post(s)
Tagged: 0 Thread(s)
Quoted: 16 Post(s)
Likes: 0
Liked 0 Times
in
0 Posts
Having done a couple mountain bike builds, I'd say do your homework, amass a list of needed parts and tools (don't forget cables, etc.) and wait for a site (cambria, jenson, etc.) to have a sale or coupon off your total order. It requires patience, but this has panned out well for me in the past.
Too bad you started the stripping, I think the orange is distinctive. My LBS has a deep cherry/red wine Waterford frame on the wall that looks pretty damn sexy but you aren't going to get those kind of results with a rattle can. Maybe go to a couple auto body shops in the area and see what a paint job would cost. You can add accenting later.
As others have said, you need a crank remover for the crank arms. Or if this is something you won't do often/ever again, ask the LBS to do it for a couple bucks.
You might want to measure the width of your rear dropouts as well. An old bike like that may have an odd dimension that a modern "standard sized" hub won't slide into easily.
05-21-05, 10:29 AM
#19
Sweetened with Splenda
Join Date: Sep 2003
Location: Brooklyn, Alabama
Posts: 2,335
Bikes: Too many 80s roadbikes!
Mentioned: 0 Post(s)
Tagged: 0 Thread(s)
Quoted: 1 Post(s)
Likes: 0
Liked 0 Times
in
0 Posts
Originally Posted by Bikewer
You didn't give us a pic of the other side, but likely you will need a lockring wrench for the outer lockring, and possibly a pin wrench for the adjustable cup. (some use ordinary wrenches)
-chris
05-21-05, 02:30 PM
#20
Drug Company Pawn
Thread Starter
Join Date: Jul 2004
Posts: 278
Mentioned: 0 Post(s)
Tagged: 0 Thread(s)
Quoted: 0 Post(s)
Likes: 0
Liked 0 Times
in
0 Posts
Update:
Last week I took it in to have the LBS take a look at the BB. Turns out it's pretty shot... cups are pitted... blah blah blah. So they're installing a new sealed cartridge bracket.
The wheels are here!!! Actually, I decided to upgrade the wheels on my Felt and use the xerolites from the Felt for the Peugeot. Yeah, they aren't vintage, but the rear hub fits the rear spacing fine and it does the job. Brakes reach the 700c wheels fine.
more pics soon...
05-24-05, 12:46 PM
#21
Drug Company Pawn
Thread Starter
Join Date: Jul 2004
Posts: 278
Mentioned: 0 Post(s)
Tagged: 0 Thread(s)
Quoted: 0 Post(s)
Likes: 0
Liked 0 Times
in
0 Posts
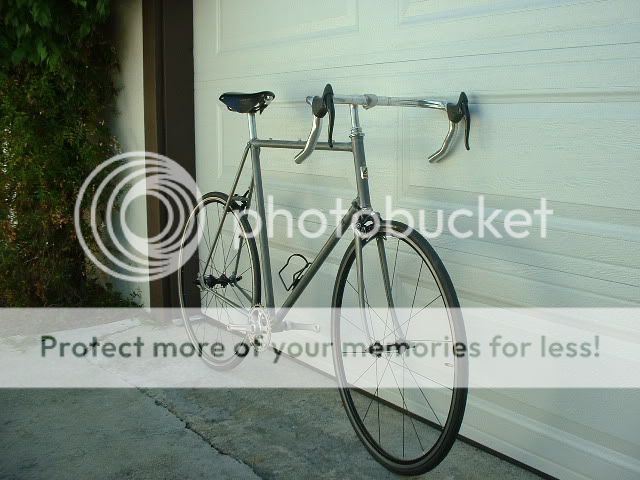
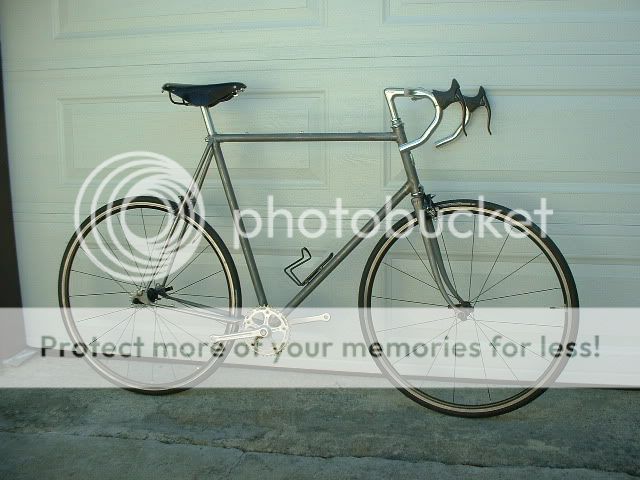
OK, more updates!!!
It's actually starting to come together... and fast!
The brakes are on... with a little effort. The holes in the frame for the brake bolt were too small for the brake nut to squeeze into... sooooo... I had to file away at the hole in on both the fork and in the rear until the nut could meet the bolt. Took a couple hours actually, after shredding an old drill bit for my Dremel tool and using a metal hand file the rest of the way. The nuts fit in really snug now.
I managed to almost strip the crankarm bolts on both sides and had to make an "emergency" run to the LBS (a day after having the BB replaced) to have them remove the crankarm bolt. They laughed at me of course. I think they're getting a good laugh at my expense when I'm not around. But they're SUPER helpful and really lighthearded about it all... it's all in good fun. I walked out with two new crankarm bolts of course.
Despite the general love of the orange color here, I had already started the stripping when everone voted for Orange, so all the paint had to go. It's bare steel now, and actually looks REALLY sharp in person. The pictures don't do the look justice. Handlebar tape will be black. I'm leaning heavinly toward a wine red/burgundy color for the frame with some stripe highlights for the lugs.
Also yet to be completed is the rear gearing. I need a few more spacers to hold the 16 tooth BMX cog I got in place.
So there we are... enjoy the pics and thanks for looking!
05-24-05, 01:50 PM
#22
Senior Member
That's too bad about the orange, but it looks like you're moving along nicely. I love the Brooks. Is the bottom bracket nice and smooth now?
05-24-05, 02:45 PM
#23
Senior Member

Join Date: Mar 2005
Location: Portugal-Israel
Posts: 863
Mentioned: 0 Post(s)
Tagged: 0 Thread(s)
Quoted: 0 Post(s)
Likes: 0
Liked 0 Times
in
0 Posts
Smaug
You got a pair of wheels bordering the top of the line nowadays and you haven't bought a crank puller yet? Go for park CWP 6 and you will not regret.
You got a pair of wheels bordering the top of the line nowadays and you haven't bought a crank puller yet? Go for park CWP 6 and you will not regret.
05-24-05, 04:11 PM
#24
Drug Company Pawn
Thread Starter
Join Date: Jul 2004
Posts: 278
Mentioned: 0 Post(s)
Tagged: 0 Thread(s)
Quoted: 0 Post(s)
Likes: 0
Liked 0 Times
in
0 Posts
AAAAAAAAAAAAAAARRRRRRRRRRRRRRGGGGGGGGGGGGGGGGHHHHHHHHHHH!!!!!!!!
OK, so I just hit a little road block... or rather, a really big roadblock
I was putting a pair of clipless pedals on... left side slid right on, no problems.
Then the right side... didn't want to grab the threads in the crankarm. So I pushed a little harder while turning the pedal wrench. Still wouldn't grab the grooves. And, yes, I was turning it the right way.
I think I've destroyed the threads for the pedals on the right side. That pedal is NOT going into the crankarm, no amount of cursing, yelling, coaxing, throwing tools or casting spells got in on for the last hour.
I'm going to ask even though I know the answer... is there any way to save the crank? The pedal threads got pretty trashed up (at least the first 2mm worth). I REALLY REALLY REALLY don't want to replace the crankset. I'm overbudget as it is now.
The dudes at the LBS are gonna get a chuckle out of this one.
05-24-05, 06:03 PM
#25
Vello Kombi, baby
Join Date: Dec 2002
Location: Je suis ici
Posts: 5,188
Bikes: 1973 Eisentraut; 1970s Richard Sachs; 1978 Alfio Bonnano; 1967 Peugeot PX10
Mentioned: 6 Post(s)
Tagged: 0 Thread(s)
Quoted: 80 Post(s)
Likes: 0
Liked 14 Times
in
13 Posts
See if they can retap it. The threads may be salvagable. Should be fairly cheap. That particular model of Stronglight crank is threaded english, so French threads are not the problem (and anyway, you could tap them ot english easy enough).
__________________
"It's always darkest right before it goes completely black"
Waste your money! Buy my comic book!
"It's always darkest right before it goes completely black"
Waste your money! Buy my comic book!