


homebrew bike stand?
 07-04-07, 09:55 PM
#1
The Brutally Handsome
Thread Starter
Join Date: Jun 2007
Location: Siberia
Posts: 508
Mentioned: 0 Post(s)
Tagged: 0 Thread(s)
Quoted: 0 Post(s)
Likes: 0
Liked 2 Times
in
2 Posts
homebrew bike stand?
hi, im pretty new to the forum so i hope this is a good place to post this. i was wondering if anyone has built their own bike stand. i tried building one using a vice and some extra things i had, and it worked, but i wasn't satisfied. and before someone chews my head off about the importance of proper tools or whatever, i just want to say that not everyone can afford a bike stand. thanks for any info you might have!
 07-04-07, 10:01 PM
#2

Pwnerer
 07-04-07, 10:06 PM
#3
The Brutally Handsome
Thread Starter
Join Date: Jun 2007
Location: Siberia
Posts: 508
Mentioned: 0 Post(s)
Tagged: 0 Thread(s)
Quoted: 0 Post(s)
Likes: 0
Liked 2 Times
in
2 Posts
i understand that there are many ways to build a bike stand, i'm looking for ideas people might have tried and liked. i have yet to find one for less than 100$ if you would like to point me in the right direction, and i would be concerned about the quality of a very inexpensive stand. if one can be built, then why spend money? also, the seat is not made to hold the bike and i have tried many "over a rafter" type solutions but they don't keep the bike stationary. thanks
07-04-07, 10:15 PM
#4
Pwnerer
Here's one.
I built a bike stand for myself over 20 years ago that is still a sturdy and viable solution, but I accomplished it with a variety of factors:
1) A donated base
2)An in-house welder that did the work for free
3)Some work on my part, which depending upon your station in life, may or may not equate to a signifigant hourly rate of labor
4)I didn't know what I was doing and have thought of some improvements since then
5)I have since used commercial stands and have discovered that professionals know what they are doing and believe that not only can you learn from them, but that you get what you pay for.
Last edited by Wordbiker; 07-04-07 at 10:22 PM.
07-04-07, 10:20 PM
#5
The Brutally Handsome
Thread Starter
Join Date: Jun 2007
Location: Siberia
Posts: 508
Mentioned: 0 Post(s)
Tagged: 0 Thread(s)
Quoted: 0 Post(s)
Likes: 0
Liked 2 Times
in
2 Posts
i was excited until i checked the shipping, 30-50$ making it cost more the 100$ total. i don't mean to sound like some homeless doofus, but i can't afford to buy a 100$ tool
07-05-07, 12:34 AM
#6
It's ALL base...

Join Date: Aug 2006
Location: Los Angeles
Posts: 6,716
Mentioned: 0 Post(s)
Tagged: 0 Thread(s)
Quoted: 2 Post(s)
Likes: 0
Liked 1 Time
in
1 Post
A very solid support can be made with a rope looped over the seat and another rope looped under the handlbars. Both are attached to the rafters a little outboard of each end where they attach to the bike, and then kept with a little tension betwee them.
Nothing works as nicely as a purpose built stand though.
Nothing works as nicely as a purpose built stand though.
07-05-07, 04:04 AM
#7
Senior Member

Join Date: Apr 2007
Posts: 175
Bikes: 90' Trek 1000, Trek 700 cyclocross conversion, Legnano, 54 Indian Scout, 1980 Trek 412, Zeus Professional?, Raleigh Team USA, Raleigh Technium, Scott Spark 60,...
Mentioned: 1 Post(s)
Tagged: 0 Thread(s)
Quoted: 6 Post(s)
Likes: 0
Liked 2 Times
in
2 Posts
Here are plans for the stand I built:
https://www.bicyclebikes.com/bicycle-...and-plans.html
https://www.bicyclebikes.com/bicycle-...and-plans.html
07-05-07, 06:08 AM
#9
Member
Join Date: May 2006
Posts: 36
Mentioned: 0 Post(s)
Tagged: 0 Thread(s)
Quoted: 0 Post(s)
Likes: 0
Liked 0 Times
in
0 Posts
I clamp the head of a wooden handled hammer in my bench vise with the handle sticking out over the floor.
I can hang it by the seat to work on rear wheel/drivetrain or hang near the head tube by the top bar to work on the front end.
I can hang it by the seat to work on rear wheel/drivetrain or hang near the head tube by the top bar to work on the front end.
07-05-07, 06:19 AM
#10
Senior Member
Join Date: Aug 2005
Location: Pittsburgh, PA
Posts: 33,656
Bikes: '96 Litespeed Catalyst, '05 Litespeed Firenze, '06 Litespeed Tuscany, '20 Surly Midnight Special, All are 3x10. It is hilly around here!
Mentioned: 39 Post(s)
Tagged: 0 Thread(s)
Quoted: 2026 Post(s)
Likes: 0
Liked 1,096 Times
in
742 Posts
A reasonably sturdy stand can be built from 1-1/2" or 2" steel pipe if you can get someone to thread it.
Use a doubled up piece of 3/4" plywood for the base and make it as large as you can afford the space.
Securely bolt (not screw) a "floor flange" to it and thread a pipe into the flange as the upright. Make it as tall as you want. Thread a 90� Elbow on top of the upright. Get a 1-1/2" or 2" x 1" reducer and add a short horizontal piece of 1" pipe to hold the clamp. The clamp is a wood workers type that has a sliding section jaw that slips over this 1" pipe and a second section that threads onto the 1" pipe end and has a screw handle to move the jaw. Pad the jaws with thin wood strips and some rubber gasket material to protect the tubes or seatpost.
This can be made relatively cheaply, particularly if you have a source of scrap pipe and can cut and thread it yourself or have a friend who can. Even having it all done by Home Depot, etc. shouldn't cost more than about $50 in materials.
07-05-07, 07:18 AM
#11
Senior Member
Join Date: Jun 2003
Posts: 668
Mentioned: 0 Post(s)
Tagged: 0 Thread(s)
Quoted: 140 Post(s)
Liked 72 Times
in
48 Posts
Originally Posted by vulcan
I clamp the head of a wooden handled hammer in my bench vise with the handle sticking out over the floor.
I can hang it by the seat to work on rear wheel/drivetrain or hang near the head tube by the top bar to work on the front end.
I can hang it by the seat to work on rear wheel/drivetrain or hang near the head tube by the top bar to work on the front end.
The best stand I ever made was just 2 plastic covered hooks ($2 at Aubuchon Hardware) that I nailed to the leg of my workbench. one hook holds the chainstay, the other holds the seat stay. It's perfect for dropping the rear wheel out, adjusting the derailers or trueing the wheel. I use a long hardwood sick in my bench vice to hang the brake levers to adjust the front brakes. Sometimes I'll use zip ties to hold the bike to the side of a bench. I've never found a job I couldn't do just as well without a stand.
em
07-05-07, 08:10 AM
#12
Pwnerer
 07-05-07, 08:19 AM
#13
Healthy and active

Join Date: Mar 2007
Location: Caldwell, Idaho USA
Posts: 887
Bikes: mid-60's Dunelt 10-speed, Specialized Allez Sport Tripple, Trek 7.2 FX
Mentioned: 0 Post(s)
Tagged: 0 Thread(s)
Quoted: 1 Post(s)
Likes: 0
Liked 1 Time
in
1 Post
Do a search on the forum. A couple of months ago there were some homemade workstands for bike repair. One involved PVC pipe in an "X" pattern. It supported the bike under the bottom bracket and at the fork ends. The front wheel had to be removed.
I have a hook in a ceiling joist. I hang the bike from whichever end I am not working on.
I have a hook in a ceiling joist. I hang the bike from whichever end I am not working on.
07-05-07, 11:01 AM
#14
Infidel

Join Date: Jun 2007
Location: Bayou Blue, La. but I ain't from around here
Posts: 270
Bikes: 1976 step thru Schwin 10 speed with fenders, home made20" long bike, '73 Puegeot P-15, several beaters, kids bikes and projects
Mentioned: 0 Post(s)
Tagged: 0 Thread(s)
Quoted: 0 Post(s)
Likes: 0
Liked 1 Time
in
1 Post
Originally Posted by Sizzle-Chest
hi, im pretty new to the forum so i hope this is a good place to post this. i was wondering if anyone has built their own bike stand. i tried building one using a vice and some extra things i had, and it worked, but i wasn't satisfied. and before someone chews my head off about the importance of proper tools or whatever, i just want to say that not everyone can afford a bike stand. thanks for any info you might have!
I know it is unlikely that these parts will occur again but it gives you an idea of what you can do. The nice thing about a movable stand is that you can take it into your living room.
07-05-07, 11:10 AM
#15
Big Doofus

Join Date: Jun 2007
Location: Cascadia
Posts: 1,007
Bikes: Trek 830 MTB, Fuji S10-S
Mentioned: 0 Post(s)
Tagged: 0 Thread(s)
Quoted: 0 Post(s)
Likes: 0
Liked 0 Times
in
0 Posts
Thanks for the good ideas! I'm always impressed by how we can muddle through without some important piece or other. My solution is to turn my Black & Decker work-mate on its side, secure a wheel in it, then put an automotive jack stand under the bottom bracket. I've only ever raised the rear wheel this way, but its a charm for adjusting derailleurs etc. There's something to having a proper bike stand, though. Lends a sense of legitimacy to the operation. People tend to believe what you say the more you look the part. So maybe it's more a "want" than a "need," but still very nice to have.
ETA: LOVE the shop stool!
ETA: LOVE the shop stool!
07-05-07, 02:35 PM
#16
Newbie
Join Date: Jun 2007
Posts: 4
Mentioned: 0 Post(s)
Tagged: 0 Thread(s)
Quoted: 0 Post(s)
Likes: 0
Liked 0 Times
in
0 Posts
Here's my first effort made from 1" angle iron. The top tube clamp is less than optimal; it should probably clamp on the seatpost. I only tighten it enough that the bike doesn't fall off so I've never caused any damage. It's also quite bendy axially.
However I think it's about as simple as a stand can be, which is good for a beginning weldor.

However I think it's about as simple as a stand can be, which is good for a beginning weldor.
 07-06-07, 08:44 PM
#17
It's ALL base...
Join Date: Aug 2006
Location: Los Angeles
Posts: 6,716
Mentioned: 0 Post(s)
Tagged: 0 Thread(s)
Quoted: 2 Post(s)
Likes: 0
Liked 1 Time
in
1 Post
Just FYI- Performance has this stand on sale for $40:

https://www.performancebike.com/shop/...tegory_ID=4216
https://www.performancebike.com/shop/...tegory_ID=4216
07-06-07, 09:00 PM
#18
Senior Member

Join Date: Dec 2006
Location: So Cal
Posts: 2,678
Mentioned: 0 Post(s)
Tagged: 0 Thread(s)
Quoted: 0 Post(s)
Likes: 0
Liked 0 Times
in
0 Posts
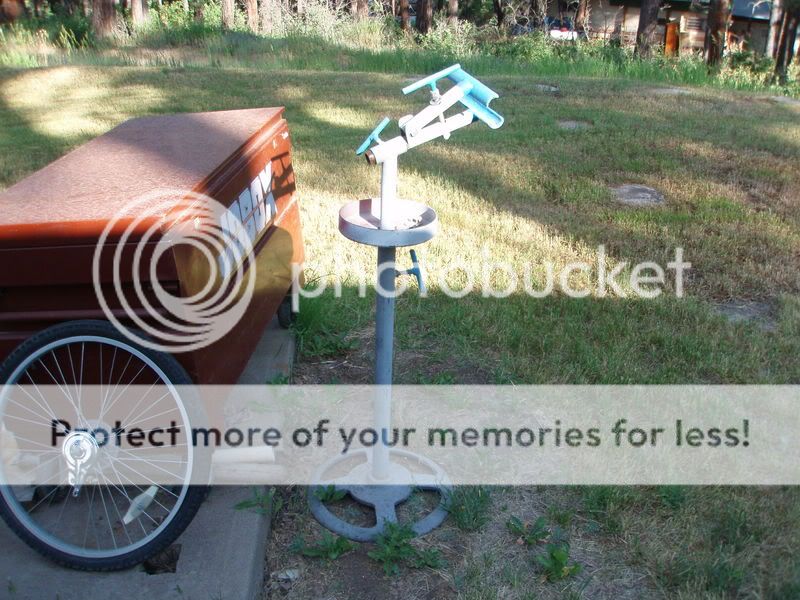
Here is my creation I'd also recommend looking for a low priced stand is much easer but I like to tinker with things and I had this stand so I used it for my base.
More photos here if you want to see more https://www.jtgraphics.net/bike_stand.htm

More photos here if you want to see more https://www.jtgraphics.net/bike_stand.htm
__________________
It may not be fancy but it gets me were I need to go.
https://www.jtgraphics.net/cyclist_bicycles.htm
It may not be fancy but it gets me were I need to go.
https://www.jtgraphics.net/cyclist_bicycles.htm

 07-07-07, 01:16 AM
#21
stringbreaker
Join Date: Sep 2006
Location: wa. State
Posts: 4,463
Bikes: specialized crossroads hybrid 2006 Raleigh Cadent 2 1971 Schwinn Varsity, 1972 Schwinn Continental, 1977 Schwinn Volare (frame)
Mentioned: 0 Post(s)
Tagged: 0 Thread(s)
Quoted: 9 Post(s)
Likes: 0
Liked 2 Times
in
2 Posts
looks like a winner to me you will probably improve on it as you go along or maybe not if it suits your needs, ya gotta keeper there my friend
12-01-08, 12:03 PM
#22
Junior Member
Join Date: Nov 2008
Posts: 10
Mentioned: 0 Post(s)
Tagged: 0 Thread(s)
Quoted: 0 Post(s)
Likes: 0
Liked 0 Times
in
0 Posts
bike stand
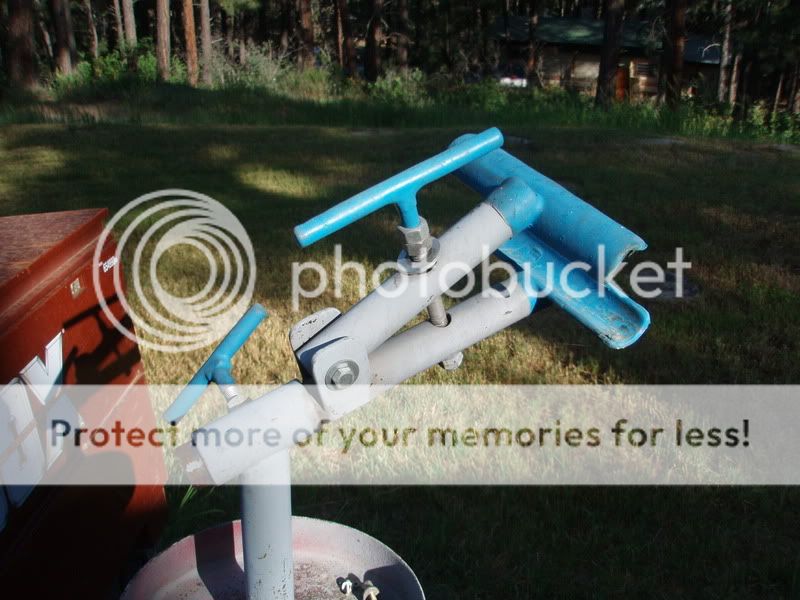
I have a vise that rotates and has jaws for pipe so all I needed was to make something that fit the bike
1 each-1 1/2" galvanized T
1 each -1 1/2" length of pipe (any length will do)
2 each - hose clamps
1" pipe insulation
Cut the T horizontal to the long axis across the top of the T
Assemble on the bike using the hose clamps then lift it into the vise

1 each-1 1/2" galvanized T
1 each -1 1/2" length of pipe (any length will do)
2 each - hose clamps
1" pipe insulation
Cut the T horizontal to the long axis across the top of the T
Assemble on the bike using the hose clamps then lift it into the vise
12-01-08, 02:21 PM
#23
Medicinal Cyclist

Join Date: Aug 2008
Location: Mohawk Valley/Adks, NYS
Posts: 2,807
Bikes: 2003 Klein Q Carbon Race; 2009 Giant OCR-1
Mentioned: 0 Post(s)
Tagged: 0 Thread(s)
Quoted: 0 Post(s)
Likes: 0
Liked 0 Times
in
0 Posts
Here's how I do it. Cost about $10 in pipe.
This one is in the garage for summer use. I put one in the basement when it got cold. It's just a short piece of pipe attached to the basement wall. More stable.
This one is in the garage for summer use. I put one in the basement when it got cold. It's just a short piece of pipe attached to the basement wall. More stable.
Last edited by Daytrip; 12-01-08 at 02:24 PM.
12-01-08, 02:37 PM
#24
Senior Member

Join Date: Jan 2008
Location: Shanghai, West Virginia
Posts: 524
Mentioned: 0 Post(s)
Tagged: 0 Thread(s)
Quoted: 4 Post(s)
Likes: 0
Liked 7 Times
in
4 Posts
Here's one tricked out of wood. It's kept outside and is mainly for post-ride cleaning, but can be used for maintenance and repair for all except front wheel stuff.
https://s450.photobucket.com/albums/q...ikeRack3-1.jpg
Here's a close-up of the notch that stabilizes the bottom bracket shell.
https://s450.photobucket.com/albums/q...ketNotch-1.jpg
https://s450.photobucket.com/albums/q...ikeRack3-1.jpg
Here's a close-up of the notch that stabilizes the bottom bracket shell.
https://s450.photobucket.com/albums/q...ketNotch-1.jpg
