


Sanding/stripping a Scott CR1 frameset
 01-01-08, 05:42 PM
#1
Senior Member
Thread Starter
Join Date: Mar 2007
Posts: 60
Mentioned: 0 Post(s)
Tagged: 0 Thread(s)
Quoted: 0 Post(s)
Likes: 0
Liked 0 Times
in
0 Posts
Sanding/stripping a Scott CR1 frameset
I've sanded down other carbon parts before... bottle cages, even some crank arms once. I used a steel wire disc attachment on a powerdrill, and got really nice results- a smooth matte finish. I didn't bother going through the clearcoat and then peeling off the decals- I just sanded them right off.
Obviously, a frame is a different animal. Unlike bottlecages or alloy-cored cranks, the potential to damage structural integrity is present... thin tubes and all that.
Has anyone sanded down a painted/clearcoated carbon frame until it was a matte raw carbon finish? What techniques/tools did you use? Any tips/tricks/words of caution?
Also, does anyone know of a resource for Scott CR1 frame decals? I found some Scott MTB frame decals on ebay that I guess would work, but I'd really like to get CR1 decals. The end result I'm going for will be a raw carbon matte clearcoat finish (low/no gloss) with stock decals... I'm thinking red decals...
Help appreciated. Thanks!
 01-01-08, 06:17 PM
#2

Old & Getting Older Racer

Join Date: Jan 2006
Location: SoCal
Posts: 5,343
Bikes: Bicycle Transportation: 2022 Hyundai Kona Electric, 2019 Kia Niro Plug-In Hybrid
Mentioned: 62 Post(s)
Tagged: 0 Thread(s)
Quoted: 41 Post(s)
Likes: 0
Liked 8 Times
in
5 Posts
Hi,
If you get down to the "raw" carbon on any carbon fiber part, you are basically ruining the structural integrity of the part. The resin used to hold all of the fibers together is crucial in the strength of the part.
Technically, you could sand the clearcoat / paint off of a part but as you've probably found, you can't tell exactly when you're through the paint and into the resin.
My educated guess is that when the repaint a carbon frame the painter sands the existing finish just enough for the new paint to be able to get a "grip" on the old paint.
__________________
Thanks.
Cleave
"Real men still wear pink."
Visit my blog at https://cleavesblant.wordpress.com/
Lightning Velo Cycling Club: https://www.lightningvelo.org/
Learn about our Green Dream Home at https://www.lawville.org/
Thanks.
Cleave
"Real men still wear pink."
Visit my blog at https://cleavesblant.wordpress.com/
Lightning Velo Cycling Club: https://www.lightningvelo.org/
Learn about our Green Dream Home at https://www.lawville.org/
01-01-08, 06:36 PM
#3
Senior Member
Join Date: Aug 2005
Posts: 84
Mentioned: 0 Post(s)
Tagged: 0 Thread(s)
Quoted: 0 Post(s)
Likes: 0
Liked 0 Times
in
0 Posts
I am thinking about doing the same thing to my 89 trek 2300. Well at least stripping the paint and clear coat off. I called a local custom bicycle shop here in Seattle and was told to use a damp low grit sand paper and sand until you get a tiny bit of carbon on the paper, he was very helpful and answered many questions patiently. Give them a try, its called Elliot bay bicycles. Good luck.
01-01-08, 07:33 PM
#4
Mitcholo

Join Date: Aug 2006
Location: Oost Vlaanderen in mind, Cleveland in body
Posts: 8,850
Bikes: 2010 Mitcholo w/ Sram Force/Red
Mentioned: 0 Post(s)
Tagged: 0 Thread(s)
Quoted: 2 Post(s)
Likes: 0
Liked 0 Times
in
0 Posts
-Go to a shop that supplies body shops, not Wal-Mart or Napa.
-Ask for Scuff Gel (not all makers call it this, but it's like calling lip balm 'ChapStick')
-Ask for Red and Grey ScotchBrite pads
-Buy afforementioned products
-Get a bucket of water and a sponge
-Apply water to frame
-Apply some ScuffGel to frame
-Use a Red ScotchBrite like you're sanding the tube
-When the tube is dull, but still has shiny spots in it that looks like an orange peel, switch to the grey pad
-'Sand' cautiously with the grey until the shiney spots are gone
-Some shiny spots are alright, especially if they're in an area that you're afraid to hit for whatever reason
- You're ready for paint.
Also, once you're done with the red pad, it won't take too long until you get the shiny spots out, if you're sitting there stroking your tube for 10 minutes, you're probably burning through the protective "skin" of clearcoat.
::EDIT:: Keep applying water and ScuffGel, lubrication is key. The 3M stuff smells awesome, too. Get it. 3M is tops. I love 3M products more than life itself.
[/3M shill]
01-01-08, 08:42 PM
#5

juneeaa memba!
Join Date: Oct 2003
Location: boogled up in...Idaho!
Posts: 5,632
Bikes: Crap. The box is not big enough...
Mentioned: 0 Post(s)
Tagged: 0 Thread(s)
Quoted: 13 Post(s)
Likes: 0
Liked 3 Times
in
3 Posts
uhm, you sanded the finish off of the carbon-fiber parts? I think that you need that finish for UV protection, dontcha? Isn't the base agent essentially the epoxy that they use in fiberglass work? I suppose you could reapply a finish with a flat or eggshell gloss, but I don't know enough to advise, other than to say that this sounds pretty serious...
01-01-08, 09:06 PM
#6
Senior Member
Join Date: Jun 2006
Posts: 20,305
Mentioned: 130 Post(s)
Tagged: 0 Thread(s)
Quoted: 3464 Post(s)
Liked 2,829 Times
in
1,995 Posts
uhm, you sanded the finish off of the carbon-fiber parts? I think that you need that finish for UV protection, dontcha? Isn't the base agent essentially the epoxy that they use in fiberglass work? I suppose you could reapply a finish with a flat or eggshell gloss, but I don't know enough to advise, other than to say that this sounds pretty serious...
Generally, epoxy resin used has little UV protection, the clear has some, but in the favor against total destruction, Many, (not all, Calfree comes to mind) have the outermost layer of cloth for marketing appearances, it is not oriented the correct direction if it appears as a single sheet of fabric, stresses are too varied. go forward, shorten its life, there will be more plastic fantastics to come.
I would never buy a used one for other reasons.
01-01-08, 10:50 PM
#7
Senior Member
Join Date: May 2003
Location: Mountain Brook. AL
Posts: 4,002
Mentioned: 14 Post(s)
Tagged: 0 Thread(s)
Quoted: 303 Post(s)
Likes: 0
Liked 136 Times
in
104 Posts
This is very dangerous territory. Sub millimeter thick CF versus 1.5-3cm thick cranks.
A flap disk sander would be a lot better idea than wire on a frame, especially a $1500
frame that weighs in the KG or a bit less range but you are flying in the stratosphere
here without a parachute. If I were OCD enough to pursue such a project, I think I
would do it by hand rather than any power tool. And don't even think about sand
blasting, even with plastic media. Losing a water bottle is one thing, sanding
through the CF of a high end frame (now D/C or not) is another.
01-01-08, 11:55 PM
#9
Senior Member

Join Date: Sep 2006
Posts: 1,329
Mentioned: 1 Post(s)
Tagged: 0 Thread(s)
Quoted: 16 Post(s)
Likes: 0
Liked 2 Times
in
2 Posts
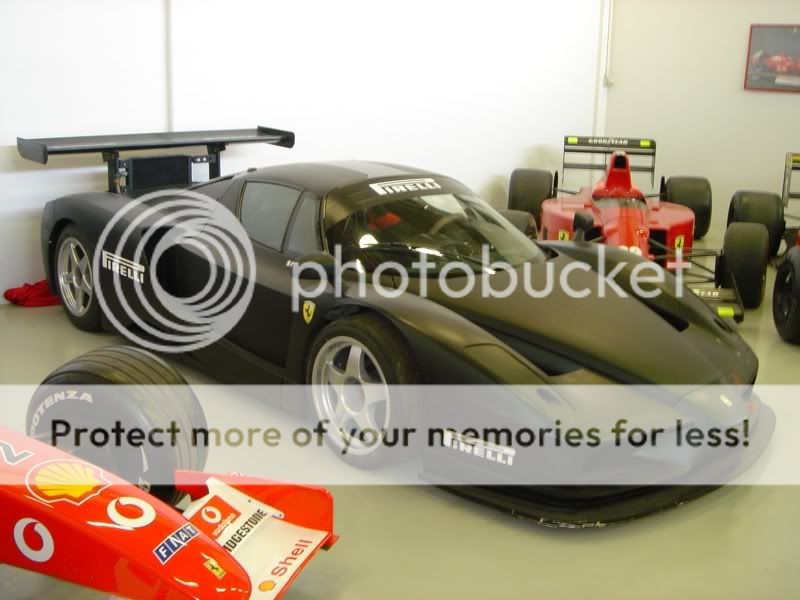
Why not apply your decals then spray the frame in Matte Clear? Will give you the effect you want without the extra work or possibly compromising or damaging the frame. Hobbyists been using a similar technique for years, gloss clear coat as a primer, apply decals, then a couple coats of matte clear. Can get interesting results with matte clear. Here's a Ferrari done with matte clear:
01-01-08, 11:58 PM
#10
Stop reading my posts!

Join Date: Sep 2004
Posts: 12,582
Mentioned: 90 Post(s)
Tagged: 0 Thread(s)
Quoted: 1443 Post(s)
Liked 1,062 Times
in
787 Posts
I have never done it, but the thought of what could go wrong would scare me off: the resin that binds the carbon (and/or kevlar) fibers is more than just a surface treatment, it's structural. Sure there must be some surplus material under the paint or color coat but if you haven't done it before you'd be guessing as to how far you can go before you do damage to the structural integrity. I sure wouldn't risk it if I was intending to ride down some screaming descent on the results. But if I was to do it I'd use a slow controlled method like sand paper in hand, not a wire brush on an electric motor. And no way would I use a chemical stripper.
01-02-08, 01:11 AM
#11
Member
Join Date: Nov 2007
Posts: 47
Mentioned: 0 Post(s)
Tagged: 0 Thread(s)
Quoted: 0 Post(s)
Likes: 0
Liked 0 Times
in
0 Posts
Why would you risk ruining a perfectly good frame just for looks? More power to you for this project, but this strikes me as a very easy way to ruin an expensive frame.
01-02-08, 03:15 AM
#12
Roman Killer
Join Date: Jan 2007
Posts: 1,161
Mentioned: 0 Post(s)
Tagged: 0 Thread(s)
Quoted: 0 Post(s)
Likes: 0
Liked 0 Times
in
0 Posts
To the OP: most of the advice here is spot on, particularly the step by step 2 posts up. Just take your time and don't rush anything. Sanding down paint on carbon is like cooking: you can always add more seasoning, but you can't undo over-seasoning. Be slow and methodical, and remember: light touch.
01-02-08, 03:22 AM
#13
Senior Member

Join Date: Sep 2007
Posts: 534
Mentioned: 0 Post(s)
Tagged: 0 Thread(s)
Quoted: 0 Post(s)
Likes: 0
Liked 0 Times
in
0 Posts
source of raw carbon frames: CLICK MY SIG!
__________________
Neo Exile frameset clearance 10% off. now $675 only!
only size S available.
09 Christmas Groupbuy Started
PM me to join My Mail List
Neo Exile frameset clearance 10% off. now $675 only!
only size S available.
09 Christmas Groupbuy Started
PM me to join My Mail List
01-02-08, 03:33 AM
#14
Senior Member
boy, I would say don't mess with cf frames. unlike metal, some processes actually strengthen metal-like beadblasting them but the only things that can happen are weakening and taking away the UV protection w/ cf.
The resin is what makes cf a structure, otherwise it's cloth. might be able to take off the paint/graphics but if it was applied directly to the resin, then clearcoated. the only chance you have is to remove resin.
just from a safety and longevity standpoint, I wouldn't do it. JMO, good luck if you do it.
01-02-08, 04:27 AM
#15
Roman Killer
Join Date: Jan 2007
Posts: 1,161
Mentioned: 0 Post(s)
Tagged: 0 Thread(s)
Quoted: 0 Post(s)
Likes: 0
Liked 0 Times
in
0 Posts
boy, I would say don't mess with cf frames. unlike metal, some processes actually strengthen metal-like beadblasting them but the only things that can happen are weakening and taking away the UV protection w/ cf.
The resin is what makes cf a structure, otherwise it's cloth. might be able to take off the paint/graphics but if it was applied directly to the resin, then clearcoated. the only chance you have is to remove resin.
just from a safety and longevity standpoint, I wouldn't do it. JMO, good luck if you do it.
The resin is what makes cf a structure, otherwise it's cloth. might be able to take off the paint/graphics but if it was applied directly to the resin, then clearcoated. the only chance you have is to remove resin.
just from a safety and longevity standpoint, I wouldn't do it. JMO, good luck if you do it.
Don't get me wrong, it's easy to F up a carbon frame by oversanding, but one shouldn't be concerned with decals directly on the resin or UV issues...
EDIT: I suppose it's possible that some wack-ass cheap CF frames don't do a basecoat and just paste the decals directly on the resin, but that would be a money-saving, quality reducing move... the OP's not going to run into that on a CR1.
01-02-08, 05:32 AM
#16
Senior Member
interesting info vt to ca, however it would be good to verify specific maufacturing rather than assumptions on CR1 construction.
how are bicycle frames protected from uv exposure now? i thought it was integral to the strength of the resin to have UV protection...
I'm a bit confused here- gelcoat is referenced to the mold release coat that is usually black (but can be any color). a clearcoat is a paint after final assembly.
I'm not doubting what you are saying but would like to get more info, it would be good to know as I have a carbon bike currently (as my last road bike was a MXM, also full carbon)
here is good ol sheldon brown's info on painting carbon
sheldonbrown.com/rinard/carbonqa.htm
Painting
Q: How can I paint over carbon fiber wheels (e.g. Specialized tri spoke, disc wheels and Zipp wheels)? How hard is it to do custom paint on carbon fiber? What materials do I need? Any recommended readings or URLs ???
A: Yes, you can paint over carbon fiber. Call JB for a pro job, or do it yourself. In my experience this is how it's done:
Remove stickers and their adhesives (I use DX-330 or acetone).
Hand sand off some of the old clear coat or paint, if present. Decals under the clear coat can be sanded smooth this way. Stop sanding immediately at any spot if you touch carbon. It is incredibly easy to remove carbon by hand sanding. Watch especially near sharp edges (airfoil trailing edges on wheels, frames and forks) and parting lines on molded parts (often along the center line of frames and wheels, often along the sides of forks). Wet sanding helps keep the dust down.
Clean the surface mechanically and chemically as follows:
- Mechanically clean: remove stuff like paint flakes, old bits of dried substances, stickers and their adhesives, decals, flapping plies, scale, crud, etc.
- Chemically clean: remove grease and oil: fingerprints, real grease from old bike parts, oil from the old bike chain, etc.
- One last wash: rinse and scrub with acetone until white paper towels come clean.
Prime using Fill'n'Sand or similar. Fill'n'sand is just a high-build primer intended to hide small imperfections, which, depending on your level of perfectionism, is optional ;-). Any similarly described product should do.
Paint using regular paint (Imron, Deltron, PPG, spray can, etc.) as usual. Do not exceed 100 degrees F. Some pinholes may appear. I think this may be outgassing. Bake at lower temps or let the paint dry at room temp to avoid.
See https://www.westsystem.com/webpages/u.../index.htm#2.6 for West System's recommendations for preparing a newly cured epoxy surface for paint.
Warnings:
Do not media blast with any media! Not sand, not plastic, not glass beads, not walnut shells, not steel or ceramic shot. Nothing! Not at even the lightest pressure or for even the shortest time. It is incredibly easy to eat away the carbon and epoxy. Before you know it your part is ruined!
Do not use chemical paint strippers! They will attack the epoxy resin that holds your part together. Acetone, alcohol and other solvents are okay, but they don't remove paint.
Do not use heat! Some epoxies undergo glass transition as low as 150 degrees F or so. Keep it under 100 to be safe. If it is too hot to touch with your bare skin, it is too hot. That means no power tools (buffing wheels, sanding discs, etc.) and no heat gun paint strippers, etc.
01-02-08, 07:18 AM
#17
Unique Vintage Steel

OP, please do not start multiple threads on the same topic across multiple boards. Thank you.
 01-02-08, 12:11 PM
#18
Guest
Posts: n/a
Mentioned: Post(s)
Tagged: Thread(s)
Quoted: Post(s)

My process...
~Clean the frame thoroughly with wax & grease remover. (PPG DX330)
~Using wet 220 grit sandpaper, I grind off all the decals.
~Switch to 320 and lightly sand the rest of the frame. No need to remove ALL the old paint/clear.
(unless there is a color of paint that you don't want on your frame, then you'll have to 320 those spots until the color is gone. That's assuming that you are going with just a clear over carbon, no colors)
If you ARE going to paint a new color, then sand off the decals and sand the rest of the frame just enough to give the new paint some tooth.
~Once you have the decals sanded off and the rest scuffed, clean again with DX330.
Now either A) spray a coat of clear for applying new decals to OOOOR...
B) spray a coat of PPG LFDP 40 or any color; 50, 90 etc. Use a color that closely matches the top color you are going to use. ie; white primer under white, yellow & red. Green under green. Black under black etc.
If A) then let dry overnight. Apply decals and spray a coat of clear. At this point, if you want a matte finish, you will add some flattening agent to the clear, then spray.
If B) then continue on with color(s), decals, & plain ol' clear.
Here's a blasphemous* job I did on a CF/aluminum Big Sur frame.
*Blasphemous because there is NO carbon showing anywhere!
 01-03-08, 04:12 AM
#19
Senior Member
Thread Starter
Join Date: Mar 2007
Posts: 60
Mentioned: 0 Post(s)
Tagged: 0 Thread(s)
Quoted: 0 Post(s)
Likes: 0
Liked 0 Times
in
0 Posts
And sometimes I check the mechanics forum too.
My process...
~Clean the frame thoroughly with wax & grease remover. (PPG DX330)
~Using wet 220 grit sandpaper, I grind off all the decals.
~Switch to 320 and lightly sand the rest of the frame. No need to remove ALL the old paint/clear.
(unless there is a color of paint that you don't want on your frame, then you'll have to 320 those spots until the color is gone. That's assuming that you are going with just a clear over carbon, no colors)
If you ARE going to paint a new color, then sand off the decals and sand the rest of the frame just enough to give the new paint some tooth.
~Once you have the decals sanded off and the rest scuffed, clean again with DX330.
Now either A) spray a coat of clear for applying new decals to OOOOR...
B) spray a coat of PPG LFDP 40 or any color; 50, 90 etc. Use a color that closely matches the top color you are going to use. ie; white primer under white, yellow & red. Green under green. Black under black etc.
If A) then let dry overnight. Apply decals and spray a coat of clear. At this point, if you want a matte finish, you will add some flattening agent to the clear, then spray.
If B) then continue on with color(s), decals, & plain ol' clear.
Here's a blasphemous* job I did on a CF/aluminum Big Sur frame.
*Blasphemous because there is NO carbon showing anywhere!
