


How to remove a one-piece crank?
 06-21-08, 11:39 AM
#1
Member
Thread Starter
Join Date: Apr 2008
Posts: 26
Mentioned: 0 Post(s)
Tagged: 0 Thread(s)
Quoted: 0 Post(s)
Likes: 0
Liked 0 Times
in
0 Posts
How to remove a one-piece crank?
Yeah don't say it, I know its a sign of a garbage bike, but its what I have to work with. I'm planning on replacing it with Altus cranks from an old bike I stripped, only I'm not sure how to go about removing them.
This isn't the same model as mine, but they look essentially the same:
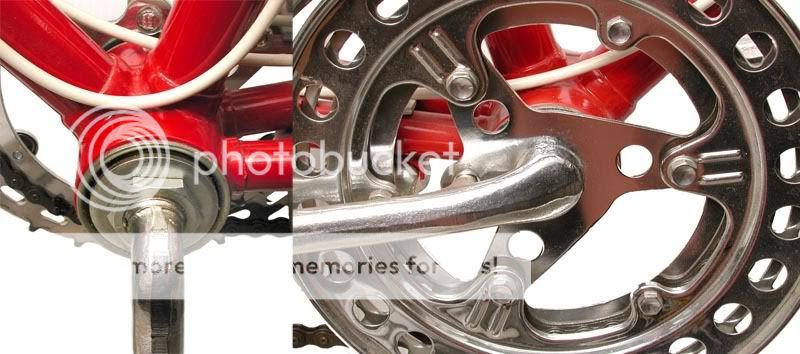
I figure that taking a wrench to the giant hex on one side has something to do with it, but overall I'm mystified.
Also does anyone think that I'll run into compatibility issues with installing a new crank onto what must be a cheap bracket down there?
This isn't the same model as mine, but they look essentially the same:
I figure that taking a wrench to the giant hex on one side has something to do with it, but overall I'm mystified.
Also does anyone think that I'll run into compatibility issues with installing a new crank onto what must be a cheap bracket down there?
Last edited by sn00ke; 06-21-08 at 11:50 AM.
 06-21-08, 12:02 PM
#2
Senior Member
Join Date: May 2007
Posts: 703
Mentioned: 0 Post(s)
Tagged: 0 Thread(s)
Quoted: 1 Post(s)
Likes: 0
Liked 0 Times
in
0 Posts
Yeah, just loosen that hex nut.
The BB shell on it is not threaded...you'll need some kind of adapter or special BB to use a 3 piece crankset with it...
The BB shell on it is not threaded...you'll need some kind of adapter or special BB to use a 3 piece crankset with it...
06-21-08, 12:34 PM
#4
Low car diet

Join Date: Aug 2007
Location: Corvallis, OR, USA
Posts: 2,407
Bikes: 2006 Windsor Dover w/105, 2007 GT Avalanche w/XT, 1995 Trek 820 setup for touring, 201? Yeah single-speed folder, 199? Huffy tandem.
Mentioned: 0 Post(s)
Tagged: 0 Thread(s)
Quoted: 2 Post(s)
Likes: 0
Liked 4 Times
in
4 Posts
This should answer your questions: https://sheldonbrown.com/opc.html
06-21-08, 05:00 PM
#5
Senior Member
Join Date: Jun 2008
Location: angus scotland
Posts: 600
Bikes: Grifter BSA 20
Mentioned: 0 Post(s)
Tagged: 0 Thread(s)
Quoted: 0 Post(s)
Likes: 0
Liked 0 Times
in
0 Posts
Ive got a DMR adaptor rings
they sit in the frame and have the long bolts to hold them in
theres standard bsa threads in side them so you can screw in a normal 3 peice bottom bracket
also have a Raleigh ladies mtb that has a cheap bb in a american style bb.
think its a standard raleigh part.
they sit in the frame and have the long bolts to hold them in
theres standard bsa threads in side them so you can screw in a normal 3 peice bottom bracket
also have a Raleigh ladies mtb that has a cheap bb in a american style bb.
think its a standard raleigh part.
06-21-08, 06:27 PM
#6
Senior Member
Join Date: Sep 2006
Location: Paradise, TX
Posts: 2,087
Bikes: Soma Pescadero, Surly Pugsley, Salsa Fargo, Schwinn Klunker, Gravity SS 27.5, Monocog 29er
Mentioned: 1 Post(s)
Tagged: 0 Thread(s)
Quoted: 186 Post(s)
Liked 234 Times
in
166 Posts
It's probably not worth the expense of converting once you figure the cost of the adaptor plus the new crankset, bottom bracket, and pedals. Unless you really need to use clipless pedals.....
06-21-08, 11:26 PM
#7
Senior Member
Join Date: Oct 2007
Posts: 330
Mentioned: 0 Post(s)
Tagged: 0 Thread(s)
Quoted: 3 Post(s)
Likes: 0
Liked 3 Times
in
1 Post
All the threads on the left side are left-handed (Bass Ackwards)
After you remove the left pedal, left locknut, and cone, you will need to remove the ball races as soon as possible. The left crank arm will come out through the cups, but not with the ball races in place.
If you can find a bike store that caters to the BMX riders, there are some better Astabula style cranks, pedals, and bearing sets available.
Yes, I fix bikes for the kids in the neighborhood....why do you ask?
Edited to add: Beware of over tightening the cones. The cups are all soft steel, but case hardened. If you run them tight, you will crack the case hardening and ruin the cups. If it has a coaster brake, be sure to locktite and tighten the buhjesus out of the fixed cone. (holds the chainring on the crank) The drive pin has some slop in the hole in the chain ring, and thus the chainring can turn just a smidgen on the crank. I have seen that cause the fixed cup to loosen, which tightens the bearing adjustment...took me two bearing sets to figure that one out...fortunatly they are cheap.
Last edited by kevbo; 06-21-08 at 11:34 PM.
06-22-08, 12:37 AM
#8
Member
Thread Starter
Join Date: Apr 2008
Posts: 26
Mentioned: 0 Post(s)
Tagged: 0 Thread(s)
Quoted: 0 Post(s)
Likes: 0
Liked 0 Times
in
0 Posts
Hmm so pretty much all I have to do is take out the entire assembly, slap one of these in
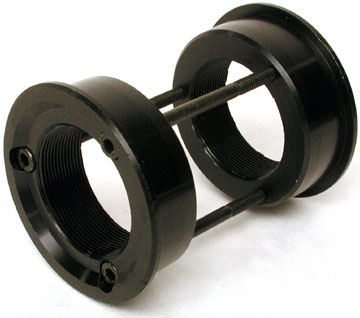
And I can install a standard bracket/cranks? Sounds pretty simple, thanks alot!
(note: I already have the replacement parts, they're old but haven't been used much)
And I can install a standard bracket/cranks? Sounds pretty simple, thanks alot!
(note: I already have the replacement parts, they're old but haven't been used much)
