


Shimano UN72 bb specific question
 07-30-08, 11:53 AM
#1
Captian
Thread Starter

Join Date: Jul 2008
Posts: 32
Bikes: 1967 Raligh Road bike
Mentioned: 0 Post(s)
Tagged: 0 Thread(s)
Quoted: 0 Post(s)
Likes: 0
Liked 0 Times
in
0 Posts
Shimano UN72 bb specific question
I have a Shimano UN72 that I am having trouble with. I can't figure out how the threaded retaining ring comes off the right side. I know unlike other Shimano BBs it can be removed, hell, it's why I bought the thing. I have tired a few simple things, but I wanted to post before I busted out the vice. So if you have come across how it is affixed to the casing, please throw me a bone.
Luv ya!
Media
Luv ya!
Media
 07-30-08, 12:51 PM
#2

Senior Member
Join Date: Oct 2005
Location: Fresno, CA
Posts: 4,454
Mentioned: 6 Post(s)
Tagged: 0 Thread(s)
Quoted: 128 Post(s)
Likes: 0
Liked 12 Times
in
10 Posts
I'm not sure what you're asking. All of the UN-7X series of square-taper bottom brackets are the same in my experience, at least where installation is concerned. Drive-side threads in reverse (counter-clockwise), so it will thread out clockwise. The separate retaining cup on the non-drive-side threads in clockwise and out counter-clockwise.
Here's Park Tool's page on servicing cartidge-type bottom brackets, including the UN-72.
https://parktool.com/repair/readhowto.asp?id=94
Here's Park Tool's page on servicing cartidge-type bottom brackets, including the UN-72.
https://parktool.com/repair/readhowto.asp?id=94
__________________
"c" is not a unit that measures tire width
"c" is not a unit that measures tire width
07-30-08, 02:30 PM
#3
Captian
Thread Starter
Join Date: Jul 2008
Posts: 32
Bikes: 1967 Raligh Road bike
Mentioned: 0 Post(s)
Tagged: 0 Thread(s)
Quoted: 0 Post(s)
Likes: 0
Liked 0 Times
in
0 Posts
I'm not sure what you're asking. All of the UN-7X series of square-taper bottom brackets are the same in my experience, at least where installation is concerned. Drive-side threads in reverse (counter-clockwise), so it will thread out clockwise. The separate retaining cup on the non-drive-side threads in clockwise and out counter-clockwise.
Here's Park Tool's page on servicing cartidge-type bottom brackets, including the UN-72.
https://parktool.com/repair/readhowto.asp?id=94
Here's Park Tool's page on servicing cartidge-type bottom brackets, including the UN-72.
https://parktool.com/repair/readhowto.asp?id=94

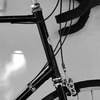
The Fixed Flange is what needs to come off.

As you can see in this picture, the threading is on a removable ring, how do I get that off?
07-30-08, 02:42 PM
#4
Senior Member
Join Date: Oct 2005
Location: Fresno, CA
Posts: 4,454
Mentioned: 6 Post(s)
Tagged: 0 Thread(s)
Quoted: 128 Post(s)
Likes: 0
Liked 12 Times
in
10 Posts
Thanks for explaining. I think you're overthinking this though.
The main things you need to know are:
1. as long as you have a 68mm English-threaded bottom bracket (by far the most common) the drive-side threads are reverse-threaded, and the non-drive-side threads are normal.
2. it's not super-important, but you should probably loosen the removable ring first. I'm pretty sure that the UN-72 has the removable ring on the non-drive-side. But you can tell by which side has the raised edge which sits up against the exterior face of the bottom bracket shell. In the pictures you attached (both the diagram and the photo) you can see which is the fixed flange because it has that raised edge.
In the picture you attached, threading is on both the removable ring (L) and the fixed flange (R). The fixed flange is a different color than the center shell, and it is a separate piece of metal, but I'm pretty sure it is fixed to the cartridge itself and doesn't come off.
Even if both rings/cups/flanges are separable from the cartridge unit itself, you'd still remove the BB from the bike the same way.
__________________
"c" is not a unit that measures tire width
"c" is not a unit that measures tire width
07-30-08, 02:57 PM
#5

Senior Member

I guess the question is, How do I remove the "fixed flange" on a shimano UN72? Unlike the other Shimanos, the threading in on a removable cup, rather than on the cartridge itself.
The Fixed Flange is what needs to come off.
As you can see in this picture, the threading is on a removable ring, how do I get that off?
The Fixed Flange is what needs to come off.
As you can see in this picture, the threading is on a removable ring, how do I get that off?
Then use a big wrench and spin it clockwise to remove as it's reverse-threaded.
07-30-08, 03:10 PM
#6
Senior Member
Join Date: Sep 2005
Posts: 1,959
Mentioned: 0 Post(s)
Tagged: 0 Thread(s)
Quoted: 2 Post(s)
Likes: 0
Liked 2 Times
in
2 Posts
Are you saying you want to remove the "fixed flange" from the rest of the BB assembly?
I don't think all un72's are built like that. I have one and the fixed flange is definitely fixed. If yours does not look like that photo you provided, if the fixed side is aluminum and seems to be machined onto the shell, it is cuz that's how they're made. Maybe it was earlier ones that had removable cups on both sides.
I don't think all un72's are built like that. I have one and the fixed flange is definitely fixed. If yours does not look like that photo you provided, if the fixed side is aluminum and seems to be machined onto the shell, it is cuz that's how they're made. Maybe it was earlier ones that had removable cups on both sides.
__________________
fun facts: Psychopaths have trouble understanding abstract concepts.
"Incompetent individuals, compared with their more competent peers, will dramatically overestimate their ability and performance relative to objective criteria."
fun facts: Psychopaths have trouble understanding abstract concepts.
"Incompetent individuals, compared with their more competent peers, will dramatically overestimate their ability and performance relative to objective criteria."
07-30-08, 04:14 PM
#7
Captian
Thread Starter
Join Date: Jul 2008
Posts: 32
Bikes: 1967 Raligh Road bike
Mentioned: 0 Post(s)
Tagged: 0 Thread(s)
Quoted: 0 Post(s)
Likes: 0
Liked 0 Times
in
0 Posts
Thanks for explaining. I think you're overthinking this though.
The main things you need to know are:
1. as long as you have a 68mm English-threaded bottom bracket (by far the most common) the drive-side threads are reverse-threaded, and the non-drive-side threads are normal.
2. it's not super-important, but you should probably loosen the removable ring first. I'm pretty sure that the UN-72 has the removable ring on the non-drive-side. But you can tell by which side has the raised edge which sits up against the exterior face of the bottom bracket shell. In the pictures you attached (both the diagram and the photo) you can see which is the fixed flange because it has that raised edge.
In the picture you attached, threading is on both the removable ring (L) and the fixed flange (R). The fixed flange is a different color than the center shell, and it is a separate piece of metal, but I'm pretty sure it is fixed to the cartridge itself and doesn't come off.
Even if both rings/cups/flanges are separable from the cartridge unit itself, you'd still remove the BB from the bike the same way.
The main things you need to know are:
1. as long as you have a 68mm English-threaded bottom bracket (by far the most common) the drive-side threads are reverse-threaded, and the non-drive-side threads are normal.
2. it's not super-important, but you should probably loosen the removable ring first. I'm pretty sure that the UN-72 has the removable ring on the non-drive-side. But you can tell by which side has the raised edge which sits up against the exterior face of the bottom bracket shell. In the pictures you attached (both the diagram and the photo) you can see which is the fixed flange because it has that raised edge.
In the picture you attached, threading is on both the removable ring (L) and the fixed flange (R). The fixed flange is a different color than the center shell, and it is a separate piece of metal, but I'm pretty sure it is fixed to the cartridge itself and doesn't come off.
Even if both rings/cups/flanges are separable from the cartridge unit itself, you'd still remove the BB from the bike the same way.
https://sheldonbrown.com/raleigh26.html is the link for what I am trying to do.
I hope I cleared up what I am trying to do.
Thanks again.
07-30-08, 04:21 PM
#8
Captian
Thread Starter
Join Date: Jul 2008
Posts: 32
Bikes: 1967 Raligh Road bike
Mentioned: 0 Post(s)
Tagged: 0 Thread(s)
Quoted: 0 Post(s)
Likes: 0
Liked 0 Times
in
0 Posts
Are you saying you want to remove the "fixed flange" from the rest of the BB assembly?
I don't think all un72's are built like that. I have one and the fixed flange is definitely fixed. If yours does not look like that photo you provided, if the fixed side is aluminum and seems to be machined onto the shell, it is cuz that's how they're made. Maybe it was earlier ones that had removable cups on both sides.
I don't think all un72's are built like that. I have one and the fixed flange is definitely fixed. If yours does not look like that photo you provided, if the fixed side is aluminum and seems to be machined onto the shell, it is cuz that's how they're made. Maybe it was earlier ones that had removable cups on both sides.
Yeah, mine is exactly like the picture. I threw that link up so you could see what I am trying to do. I need to remove the flange form the cartridge to replace it with the correctly threaded rings. I made sure that for sure that I had the correct bb to do this.
Thanks for reading, and responding.
07-30-08, 05:19 PM
#9
Senior Member
Join Date: Sep 2005
Posts: 1,959
Mentioned: 0 Post(s)
Tagged: 0 Thread(s)
Quoted: 2 Post(s)
Likes: 0
Liked 2 Times
in
2 Posts
I'd try tapping the bottom carefully with a screwdriver or something to see if it budges.
__________________
fun facts: Psychopaths have trouble understanding abstract concepts.
"Incompetent individuals, compared with their more competent peers, will dramatically overestimate their ability and performance relative to objective criteria."
fun facts: Psychopaths have trouble understanding abstract concepts.
"Incompetent individuals, compared with their more competent peers, will dramatically overestimate their ability and performance relative to objective criteria."
07-30-08, 05:29 PM
#10
Vello Kombi, baby

Join Date: Dec 2002
Location: Je suis ici
Posts: 5,188
Bikes: 1973 Eisentraut; 1970s Richard Sachs; 1978 Alfio Bonnano; 1967 Peugeot PX10
Mentioned: 6 Post(s)
Tagged: 0 Thread(s)
Quoted: 80 Post(s)
Likes: 0
Liked 14 Times
in
13 Posts
I've done this, and I just knocked the cup off with the above method. Not hard. Phil rings do work with 'em.
__________________
"It's always darkest right before it goes completely black"
Waste your money! Buy my comic book!
"It's always darkest right before it goes completely black"
Waste your money! Buy my comic book!
07-30-08, 08:36 PM
#11
Senior Member
Join Date: Aug 2005
Location: Pittsburgh, PA
Posts: 33,656
Bikes: '96 Litespeed Catalyst, '05 Litespeed Firenze, '06 Litespeed Tuscany, '20 Surly Midnight Special, All are 3x10. It is hilly around here!
Mentioned: 39 Post(s)
Tagged: 0 Thread(s)
Quoted: 2026 Post(s)
Likes: 0
Liked 1,096 Times
in
742 Posts
I've had the older UN72 bb you are describing and the "fixed cup" is indeed a separate item from the cartridge body but it's a fairly tight press fit with a sealent in between to keep it from clicking and making noise. I never separated one but it should be fairly easy to do by supporting the cup's edges in a vise and tapping on the drive-side spindle end with a mallet.
What everyone else seems to be describing is the new Shimano UN-7X or UN-5X design where the cartridge body is one piece and threaded on the drive-side.
What everyone else seems to be describing is the new Shimano UN-7X or UN-5X design where the cartridge body is one piece and threaded on the drive-side.
07-30-08, 10:44 PM
#12
Senior Member

Join Date: Jul 2008
Location: Indiana
Posts: 166
Bikes: 85 Fuso, 86 Peloton, 84,88 Paramount
Mentioned: 0 Post(s)
Tagged: 0 Thread(s)
Quoted: 1 Post(s)
Likes: 0
Liked 1 Time
in
1 Post
It's a press fit. I knocked one off using two wrenches, one secured in a vice with the thinner middle section of the BB in this wrench. The other an adjustable wrench loosely tightened on the threads and against the shoulder of the ring. Bang on the adjustable wrench with a hammer and it will come off. Not a proper way to treat an adjustable wrench I know. I would not bang on the spindle as I would think all that force is going onto the bearings.
07-31-08, 11:42 AM
#13
Senior Member
Join Date: Jun 2008
Location: angus scotland
Posts: 600
Bikes: Grifter BSA 20
Mentioned: 0 Post(s)
Tagged: 0 Thread(s)
Quoted: 0 Post(s)
Likes: 0
Liked 0 Times
in
0 Posts
Oh its the old Phil Wood cups in a Raleigh tale.
I always say you should recut the bottom bracket.
Ive done this at home with no special tools
or at work with a BB cutting tool
If its a 20 your modding...it would cost �10 to do that...on a maintenance plan.
So any maintenance would be covered under that too.
Where as the cups are at least �40...then your stuck with the BB you can find.
Recut it and you can fit any modern English thread BB
So you could even fit external bearing BBs
Last edited by griftereck; 07-31-08 at 11:44 AM. Reason: crummy spelling
09-24-08, 04:45 PM
#14
Newbie
Join Date: May 2008
Posts: 4
Mentioned: 0 Post(s)
Tagged: 0 Thread(s)
Quoted: 0 Post(s)
Likes: 0
Liked 0 Times
in
0 Posts
Sorry to resurrect a dead thread, but I'm having problems with my UN72 cups too, and figured I'd ask my question here instead of making a new thread.
I bought a UN72 bb off of ebay after reading that both cups could be removed and that Phil Wood's french retaining cups would fit. Now the non-drive side cup (cup with the shoulder) came already removed, and from what I've been reading that's the cup that you need a vice to remove. So should I just be able to remove the remaining cup with a bottom bracket tool or what?
I bought a UN72 bb off of ebay after reading that both cups could be removed and that Phil Wood's french retaining cups would fit. Now the non-drive side cup (cup with the shoulder) came already removed, and from what I've been reading that's the cup that you need a vice to remove. So should I just be able to remove the remaining cup with a bottom bracket tool or what?
09-25-08, 11:00 AM
#15
Senior Member
Join Date: Jan 2007
Location: Walnut, CA
Posts: 174
Mentioned: 0 Post(s)
Tagged: 0 Thread(s)
Quoted: 0 Post(s)
Likes: 0
Liked 0 Times
in
0 Posts
09-25-08, 05:09 PM
#16
Perineal Pressurized

Join Date: Oct 2003
Location: In Ebritated
Posts: 6,555
Mentioned: 0 Post(s)
Tagged: 1 Thread(s)
Quoted: 3 Post(s)
Likes: 0
Liked 2 Times
in
2 Posts
Nota bene:
in situ
Secundum nota bene
post fabricatum
What the ****?
__________________
This is Africa, 1943. War spits out its violence overhead and the sandy graveyard swallows it up. Her name is King Nine, B-25, medium bomber, Twelfth Air Force. On a hot, still morning she took off from Tunisia to bomb the southern tip of Italy. An errant piece of flak tore a hole in a wing tank and, like a wounded bird, this is where she landed, not to return on this day, or any other day.
This is Africa, 1943. War spits out its violence overhead and the sandy graveyard swallows it up. Her name is King Nine, B-25, medium bomber, Twelfth Air Force. On a hot, still morning she took off from Tunisia to bomb the southern tip of Italy. An errant piece of flak tore a hole in a wing tank and, like a wounded bird, this is where she landed, not to return on this day, or any other day.
09-25-08, 09:05 PM
#17
Senior Member
Join Date: Jan 2007
Location: Walnut, CA
Posts: 174
Mentioned: 0 Post(s)
Tagged: 0 Thread(s)
Quoted: 0 Post(s)
Likes: 0
Liked 0 Times
in
0 Posts
09-26-08, 03:26 AM
#18
Perineal Pressurized
Join Date: Oct 2003
Location: In Ebritated
Posts: 6,555
Mentioned: 0 Post(s)
Tagged: 1 Thread(s)
Quoted: 3 Post(s)
Likes: 0
Liked 2 Times
in
2 Posts
A well written article otherwise marred by the pretentious use of faux latin.
__________________
This is Africa, 1943. War spits out its violence overhead and the sandy graveyard swallows it up. Her name is King Nine, B-25, medium bomber, Twelfth Air Force. On a hot, still morning she took off from Tunisia to bomb the southern tip of Italy. An errant piece of flak tore a hole in a wing tank and, like a wounded bird, this is where she landed, not to return on this day, or any other day.
This is Africa, 1943. War spits out its violence overhead and the sandy graveyard swallows it up. Her name is King Nine, B-25, medium bomber, Twelfth Air Force. On a hot, still morning she took off from Tunisia to bomb the southern tip of Italy. An errant piece of flak tore a hole in a wing tank and, like a wounded bird, this is where she landed, not to return on this day, or any other day.
09-26-08, 08:13 AM
#19
otherwiseordinary

Join Date: Jan 2006
Location: California
Posts: 697
Mentioned: 0 Post(s)
Tagged: 0 Thread(s)
Quoted: 0 Post(s)
Likes: 0
Liked 0 Times
in
0 Posts
I remember going to the bike shop and asking for a UN-72 BB.
The BB was for my Bianchi which had Italian threads.
The shop owner told me that he had some but these specific ones were hard to find.
I believe the old UN72 (now discontinued) came in different threading and lengths, maybe even dual sided removable cups.
The later UN71 or UN73 are a different design from the old UN72's
It seems to me you might have purchased a newer UN7X BB.
This design of the newer UN series BB's, from my experience, only has one removable ring and a "fixed" cup.
Do post your solution, I am curious...
edit: I just read the Sheldon Brown site, and it does state exactly what I had mentioned above.
09-26-08, 10:23 AM
#20
Senior Member
 09-26-08, 11:57 AM
#21
Luddite
Join Date: Jan 2007
Location: Portland, OR
Posts: 276
Bikes: Univega Gran Turismo, Cannondale Synapse, Bianchi Aquiletta Folder
Mentioned: 0 Post(s)
Tagged: 0 Thread(s)
Quoted: 0 Post(s)
Likes: 0
Liked 0 Times
in
0 Posts
One trick is to use a dremel tool to grind a few narrow slots into the threads of an old pair of 24 TPI cups (making sure the forward face of the slot is at a slight overhang) to make thread cutters. Cups are much harder steel than any BB shell, and should work for a few re-threading jobs if you use alot of oil and do it slowly. Stick a bolt through the hole in the cup to hold it. The tool will align itself pretty well since the first three threads of a 24TPI cup are a pretty good fit into a 26TPI BB shell.
09-26-08, 03:55 PM
#22
Senior Member
One trick is to use a dremel tool to grind a few narrow slots into the threads of an old pair of 24 TPI cups (making sure the forward face of the slot is at a slight overhang) to make thread cutters. Cups are much harder steel than any BB shell, and should work for a few re-threading jobs if you use alot of oil and do it slowly. Stick a bolt through the hole in the cup to hold it. The tool will align itself pretty well since the first three threads of a 24TPI cup are a pretty good fit into a 26TPI BB shell.
09-29-08, 10:37 AM
#23
Captian
Thread Starter
Join Date: Jul 2008
Posts: 32
Bikes: 1967 Raligh Road bike
Mentioned: 0 Post(s)
Tagged: 0 Thread(s)
Quoted: 0 Post(s)
Likes: 0
Liked 0 Times
in
0 Posts
Here you go.
https://www.sheldonbrown.com/raleigh26.html
You are going to have to order a set of rings from phil wood that fit. and then get the un-72 BB. It is going to be a pain in the butt, but you will get it to work with just a wrench and some time.
You are going to have to order a set of rings from phil wood that fit. and then get the un-72 BB. It is going to be a pain in the butt, but you will get it to work with just a wrench and some time.
09-29-08, 10:44 AM
#24

Bicycle Repair Man !!!

You need special tools as the bb shell has to be re-tapped and taps are too expensive for the average DIY'r.
I used a 73 mm cartridge after I re-tapped the bb on my Twenty and the conversion is splendid.
I work in a bike shop so have access to bb taps.
I used a 73 mm cartridge after I re-tapped the bb on my Twenty and the conversion is splendid.
I work in a bike shop so have access to bb taps.
09-29-08, 12:48 PM
#25
Captian
Thread Starter
Join Date: Jul 2008
Posts: 32
Bikes: 1967 Raligh Road bike
Mentioned: 0 Post(s)
Tagged: 0 Thread(s)
Quoted: 0 Post(s)
Likes: 0
Liked 0 Times
in
0 Posts
Sorry to resurrect a dead thread, but I'm having problems with my UN72 cups too, and figured I'd ask my question here instead of making a new thread.
I bought a UN72 bb off of ebay after reading that both cups could be removed and that Phil Wood's french retaining cups would fit. Now the non-drive side cup (cup with the shoulder) came already removed, and from what I've been reading that's the cup that you need a vice to remove. So should I just be able to remove the remaining cup with a bottom bracket tool or what?
I bought a UN72 bb off of ebay after reading that both cups could be removed and that Phil Wood's french retaining cups would fit. Now the non-drive side cup (cup with the shoulder) came already removed, and from what I've been reading that's the cup that you need a vice to remove. So should I just be able to remove the remaining cup with a bottom bracket tool or what?