home-built stand for fitting, tuning, etc.
#1
Steel Member
Thread Starter
Join Date: Jul 2008
Location: Knoxville, TN
Posts: 1,427
Bikes: N + 1
Mentioned: 1 Post(s)
Tagged: 0 Thread(s)
Quoted: 7 Post(s)
Likes: 0
Liked 1 Time
in
1 Post
home-built stand for fitting, tuning, etc.
I know it's probably easier to just find a used trainer on the cheap, but I was wondering if anyone here has ever built a stand to make bike fitting & some tuning simpler...basically a rack to fit the rear axle into & lift the wheel just enough to let it spin. If so, i'd be interested in seeing pics/plans/details. I have some scrap metal + a mig welder, so I thought this could be a handy tool for finer fit adjustments...for me or when I'm helping someone else.
#2
mechanically sound
Old tube hanging from a rafter in the garage, looped under the nose of the saddle.
#3
In the right lane
Probably not what the OP is looking for, but works for minor adjustments, chain cleaning.
This might be a good place to start. if you are looking for something more substantial. Some of the PVC designs don't look much better than my poly rope.
Anyone try one of these?
Last edited by gerv; 12-27-08 at 04:33 PM.
#4
In the right lane
Although this might be a better design than any mentioned in my earlier post. Author claims it will cost < 30 dollars, although if your garage is well stocked, it might be less.
I am somewhat suspicious of the clamping mechanism however.
https://www.instructables.com/id/DIY-...-Repair-Stand/
I am somewhat suspicious of the clamping mechanism however.
https://www.instructables.com/id/DIY-...-Repair-Stand/
#5
Steel Member
Thread Starter
Join Date: Jul 2008
Location: Knoxville, TN
Posts: 1,427
Bikes: N + 1
Mentioned: 1 Post(s)
Tagged: 0 Thread(s)
Quoted: 7 Post(s)
Likes: 0
Liked 1 Time
in
1 Post
I've built a repair stand....I guess I should have been more clear...it's really for fine-tuning the fit (ie, adjusting the seat position, trying out bars/stems, etc.) that I was looking for something to lift the rear wheel. The only tuning advantage over the stand would be to be able to test out the bike "under a load" ...which probably wouldn't be an advantage very often, actually.
EDIT: BTW, that general idea for the stand isn't bad...I used a pony clamp from Harbor Freight modified by screwing on a custom clamp (something like a 110 degree angle...like a shop stand clamp) to the clamp. I build the clamp from welding two small sections of 3/8" steel, cutting, etc. & then sprayed it all with a plastic coating & wrapped the clamp itself with used bar tape (an on-going effort & fine tuning process to protect frames from scratches....I had a couple casualties trying it out early on...luckily with garage sale bikes).
EDIT: BTW, that general idea for the stand isn't bad...I used a pony clamp from Harbor Freight modified by screwing on a custom clamp (something like a 110 degree angle...like a shop stand clamp) to the clamp. I build the clamp from welding two small sections of 3/8" steel, cutting, etc. & then sprayed it all with a plastic coating & wrapped the clamp itself with used bar tape (an on-going effort & fine tuning process to protect frames from scratches....I had a couple casualties trying it out early on...luckily with garage sale bikes).
Last edited by fiataccompli; 12-27-08 at 07:16 PM.
#6
Senior Member
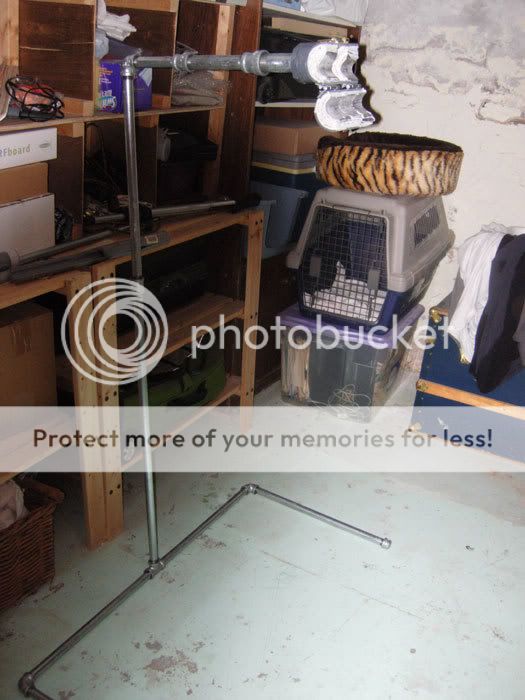
I've finally gotten around to building my own repair stand, incorporating ideas from the first and sixth stands at 8 Bombproof DIY Bike Repair Stands (actually, there's a page out there somewhere with more explicit instructions for a stand made from galvanized pipe, but I can't find it at the moment).
I should have done this project a year ago, because a guy at a plumbing company told me that prices have gone up drastically since then. So the pipe and fixtures you see here cost about $45 (Canadian). I also bought a nifty little pipe wrench, which you really need to tighten the joints properly.

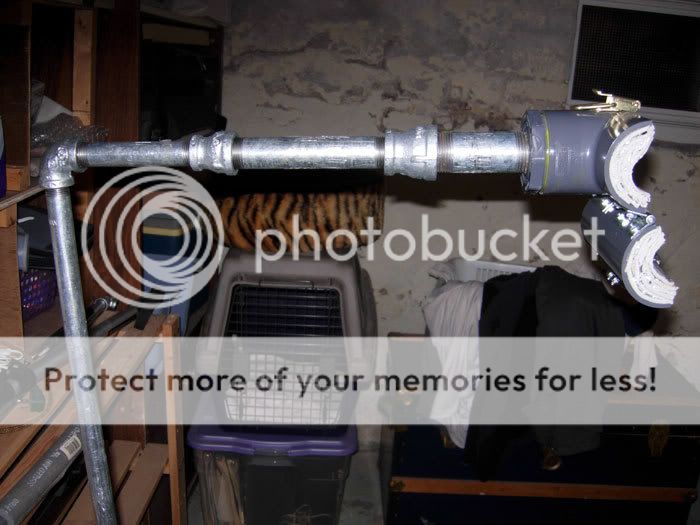
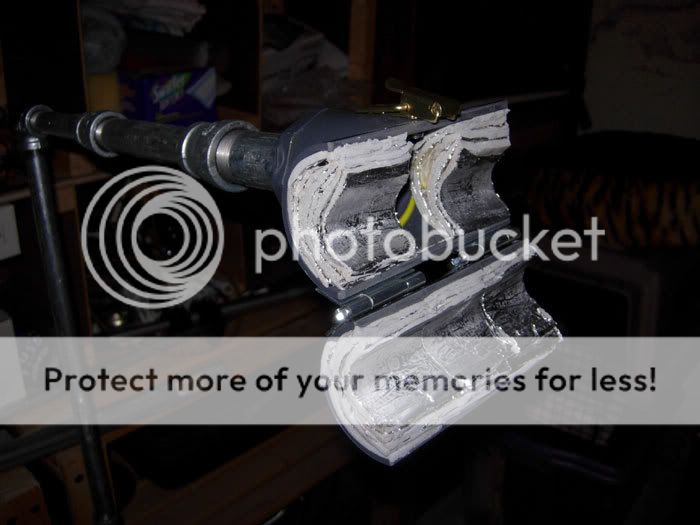
The stand is mostly 1/2-inch galvanized pipe, but I had to use two couplings to go from 1/2-inch to 1-inch in order to screw on a bushing and then glue a tee to it. I couldn't figure out any other way to get a tee onto the stand, and I didn't want to use larger pipe because that would have been too heavy. I got the tee and bushing at a plumbing company, and then found a friendly machine shop who offered to cut the tee in half with a bandsaw for free--they even buffed the edges for me, too!

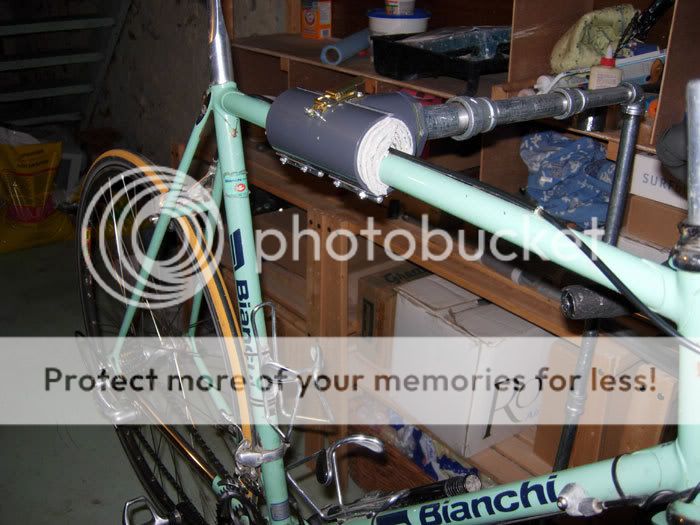
After getting the hinges and latch on I put some foam pipe insulation inside my newly-fashioned clamp, but I wasn't getting a very tight grip on the 1-inch tube of my 1980s-vintage steel frame. Then I saw a package of aluminum shielded pipe insulation at the hardware store, and it hit me: I could layer it inside the clamp to achieve my desired thickness. It's also a lot firmer than the foam. By the way: the fifth stand on that page linked to above uses a glue clamp, which I went out and bought but found to be unwieldy and even potentially damaging to your frame if you're not careful, so I wouldn't recommend that.

It's a pretty sturdy stand, I must say. But I've given up attempting to replicate store-bought stands and their fancy ability to grip seat tubes firmly. No, I'm satisfied with clamping the bike along the top tube. By the way, the reason the clamp on my stand is only 4 feet high is because I've got an old house with a 6-foot basement. I've got a spare 5-foot pipe to use on the stand for the shed when winter's over.

I should have done this project a year ago, because a guy at a plumbing company told me that prices have gone up drastically since then. So the pipe and fixtures you see here cost about $45 (Canadian). I also bought a nifty little pipe wrench, which you really need to tighten the joints properly.

The stand is mostly 1/2-inch galvanized pipe, but I had to use two couplings to go from 1/2-inch to 1-inch in order to screw on a bushing and then glue a tee to it. I couldn't figure out any other way to get a tee onto the stand, and I didn't want to use larger pipe because that would have been too heavy. I got the tee and bushing at a plumbing company, and then found a friendly machine shop who offered to cut the tee in half with a bandsaw for free--they even buffed the edges for me, too!

After getting the hinges and latch on I put some foam pipe insulation inside my newly-fashioned clamp, but I wasn't getting a very tight grip on the 1-inch tube of my 1980s-vintage steel frame. Then I saw a package of aluminum shielded pipe insulation at the hardware store, and it hit me: I could layer it inside the clamp to achieve my desired thickness. It's also a lot firmer than the foam. By the way: the fifth stand on that page linked to above uses a glue clamp, which I went out and bought but found to be unwieldy and even potentially damaging to your frame if you're not careful, so I wouldn't recommend that.

It's a pretty sturdy stand, I must say. But I've given up attempting to replicate store-bought stands and their fancy ability to grip seat tubes firmly. No, I'm satisfied with clamping the bike along the top tube. By the way, the reason the clamp on my stand is only 4 feet high is because I've got an old house with a 6-foot basement. I've got a spare 5-foot pipe to use on the stand for the shed when winter's over.

Last edited by rousseau; 02-14-09 at 11:21 PM.
#7
Senior Member
Although this might be a better design than any mentioned in my earlier post. Author claims it will cost < 30 dollars, although if your garage is well stocked, it might be less.
I am somewhat suspicious of the clamping mechanism however.
https://www.instructables.com/id/DIY-...-Repair-Stand/
I am somewhat suspicious of the clamping mechanism however.
https://www.instructables.com/id/DIY-...-Repair-Stand/
I also wouldn't use such small "nipples" at the bottom of the stand--I'd want to have a wider base for it.
#9
Senior Member
Thing is, you have to tighten the clamp really tightly to get the bike to stay, but you never really a firm fore-aft position anyway. The PVC clamp takes a bit of doing, but it's far superior, I think.
#10
Senior Member
Join Date: Nov 2008
Location: Seattle
Posts: 129
Bikes: Trek Madone, Trek TX900, Serotta CSI, Performance Scattante Elite
Mentioned: 0 Post(s)
Tagged: 0 Thread(s)
Quoted: 0 Post(s)
Likes: 0
Liked 0 Times
in
0 Posts
frame clamp
My suggestion is just buck up and buy one. If you shop around you can get them for $100.00, maybe a little less and any of the ones available to purcahse will be easier to use, stronger and more well designed than any of the home brew ones displayed here.
I am a big fan of building things myself but sometimes it 's just not worth it. If you are only going to use this a few times then it's probably OK to make your own, but if you are in this for the long haul and work on your bike / bikes all the time, it's money well spent.
Remember, sometimes you just have to spend some nmoney, just spend it in the right places.
If you change hobbies, you can always sell your stand too.
#11
Steel Member
Thread Starter
Join Date: Jul 2008
Location: Knoxville, TN
Posts: 1,427
Bikes: N + 1
Mentioned: 1 Post(s)
Tagged: 0 Thread(s)
Quoted: 7 Post(s)
Likes: 0
Liked 1 Time
in
1 Post
an old thread, revived. about 5 days after I posted this, I found a bike & trainer on the local CL for $50....problem solved & another bike in the collection to boot. Glad I didn't go down the road of building a trainer type device. A work clamp/stand...not too bad a job...but a trainer for fitting & 'under load' testing - that would have been tough to build & be anywhere as simple as the one I bought.


