


What's the trick to installing this $#@! Shimano Quick Link??
 09-16-09, 10:02 PM
#1
Senior Member
Thread Starter

Join Date: Jul 2009
Posts: 151
Mentioned: 0 Post(s)
Tagged: 0 Thread(s)
Quoted: 0 Post(s)
Likes: 0
Liked 0 Times
in
0 Posts
What's the trick to installing this $#@! Shimano Quick Link??
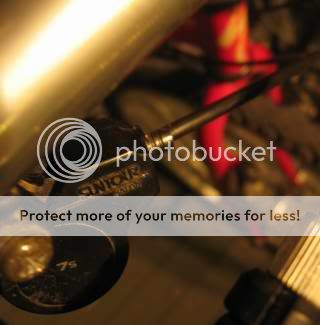
I can't believe the problems I'm having installing a new Shimano UG 7 spd chain. It comes with this non-standard "quick link"; two-piece master link (see pic). It consists of a plate with two pins, and a connecting plate that secures this to the chain. The connecting plate has an enlarged opening on one end. This goes on to one of the pins, the plate is then pushed up, and the other end is pressed on to the second pin. I have tried following the instructions and a prior thread on this, and still can't get it on. I have tried bending the quick link outward with as much force as I can; and I even tried using pliars to squeeze the connecting plate on. It ain't working. I tried pushing the connecting plate as far on to the first pin as possible, tried bending the links to get it on, tried stretching the links to get it on... it ain't getting on. So much for "quick" link.
Do I even need this $#@ thing? Especially when the instructions say once it's on, it should not be installed a second time! I have a couple of extra links. Is it just as good, if not better, for me to simply install another link, instead of this "special" so-called quick link?

Do I even need this $#@ thing? Especially when the instructions say once it's on, it should not be installed a second time! I have a couple of extra links. Is it just as good, if not better, for me to simply install another link, instead of this "special" so-called quick link?
 09-16-09, 10:12 PM
#2
Call me The Breeze

Never seen that design on a shimano chain before. Interesting.
As far as your installation goes, you need to turn the faceplate 180 degrees and slide it over before you try to engage the second pin.
As far as your installation goes, you need to turn the faceplate 180 degrees and slide it over before you try to engage the second pin.
09-16-09, 10:35 PM
#3
cab horn
Join Date: Jun 2004
Location: Toronto
Posts: 28,353
Bikes: 1987 Bianchi Campione
Mentioned: 1 Post(s)
Tagged: 0 Thread(s)
Quoted: 42 Post(s)
Likes: 0
Liked 25 Times
in
18 Posts
I can't believe the problems I'm having installing a new Shimano UG 7 spd chain. It comes with this non-standard "quick link"; two-piece master link (see pic). It consists of a plate with two pins, and a connecting plate that secures this to the chain. The connecting plate has an enlarged opening on one end. This goes on to one of the pins, the plate is then pushed up, and the other end is pressed on to the second pin. I have tried following the instructions and a prior thread on this, and still can't get it on. I have tried bending the quick link outward with as much force as I can; and I even tried using pliars to squeeze the connecting plate on. It ain't working. I tried pushing the connecting plate as far on to the first pin as possible, tried bending the links to get it on, tried stretching the links to get it on... it ain't getting on. So much for "quick" link.
Do I even need this $#@ thing? Especially when the instructions say once it's on, it should not be installed a second time! I have a couple of extra links. Is it just as good, if not better, for me to simply install another link, instead of this "special" so-called quick link?
Do I even need this $#@ thing? Especially when the instructions say once it's on, it should not be installed a second time! I have a couple of extra links. Is it just as good, if not better, for me to simply install another link, instead of this "special" so-called quick link?
 09-16-09, 11:54 PM
#5
Senior Member
Thread Starter
Join Date: Jul 2009
Posts: 151
Mentioned: 0 Post(s)
Tagged: 0 Thread(s)
Quoted: 0 Post(s)
Likes: 0
Liked 0 Times
in
0 Posts
Well, I guess I just figured out the problem (I mean besides the problem of this being a REALLY craptastic design). Only because I took the link off in order to photograph it for this thread.... looking at it more closely, I realized the plate with the two pins was slightly bent outward, in the centre (maybe by my trying to get it on the chain, or maybe it came that way). This would not make it as easy to fit the connecting plate. So I bent it the other way with pliers, so the pins are slightly toward each other. This eventually helped me get it on, but even then, only with pliers; not my fingers. And not perfectly, as the pin that fits into the enlarged hole is not 100% all the way in, as much as the other pins. The chain could conceivably break at this point, if this is not the normal way its supposed to fit. But my prodding with the pliers is not getting it inserted any better; and risks making things worse. So, I'm going to try going up a steep hill and see if the chain snaps or stays in place. What's the number to that 700 Club again?
09-16-09, 11:54 PM
#6

Senior Member

You need to turn two adjacent links 90-degrees. This gives you the room to slide the clip over the 1st pin, then straighten it out to pop over the 2nd pin. Bending the opposite plate so the tips of the two pins are closer is the key. Then release and the pins move apart and nothing is lined up with the big hole.
Last edited by DannoXYZ; 09-17-09 at 12:10 AM.
09-17-09, 12:00 AM
#7
cab horn
Join Date: Jun 2004
Location: Toronto
Posts: 28,353
Bikes: 1987 Bianchi Campione
Mentioned: 1 Post(s)
Tagged: 0 Thread(s)
Quoted: 42 Post(s)
Likes: 0
Liked 25 Times
in
18 Posts
https://techdocs.shimano.com/media/te...9830604498.pdf
09-17-09, 12:49 AM
#12
Senior Member

Join Date: Nov 2007
Posts: 3,720
Mentioned: 3 Post(s)
Tagged: 0 Thread(s)
Quoted: 317 Post(s)
Likes: 0
Liked 1 Time
in
1 Post
Operator is back, how charming. 
To OP: The Quick link is designed to quickly drive you mad, at least it looks like it is..
To OP: The Quick link is designed to quickly drive you mad, at least it looks like it is..
Last edited by badmother; 09-17-09 at 12:50 AM. Reason: zPeLlinG
09-17-09, 07:54 AM
#13
Mad bike riding scientist

Join Date: Nov 2004
Location: Denver, CO
Posts: 27,342
Bikes: Some silver ones, a red one, a black and orange one, and a few titanium ones
Mentioned: 152 Post(s)
Tagged: 1 Thread(s)
Quoted: 6200 Post(s)
Liked 4,204 Times
in
2,358 Posts
Easier just to post the instructions replete with diagrams and ****.
https://techdocs.shimano.com/media/te...9830604498.pdf
https://techdocs.shimano.com/media/te...9830604498.pdf
")
__________________
Stuart Black
Plan Epsilon Around Lake Michigan in the era of Covid
Old School�When It Wasn�t Ancient bikepacking
Gold Fever Three days of dirt in Colorado
Pokin' around the Poconos A cold ride around Lake Erie
Dinosaurs in Colorado A mountain bike guide to the Purgatory Canyon dinosaur trackway
Solo Without Pie. The search for pie in the Midwest.
Picking the Scablands. Washington and Oregon, 2005. Pie and spiders on the Columbia River!
09-17-09, 12:34 PM
#14
Senior Member
Thread Starter
Join Date: Jul 2009
Posts: 151
Mentioned: 0 Post(s)
Tagged: 0 Thread(s)
Quoted: 0 Post(s)
Likes: 0
Liked 0 Times
in
0 Posts
You need to turn two adjacent links 90-degrees. This gives you the room to slide the clip over the 1st pin, then straighten it out to pop over the 2nd pin. Bending the opposite plate so the tips of the two pins are closer is the key. Then release and the pins move apart and nothing is lined up with the big hole.
So anyway, I'm still having problems with the chain. Having ridden the bike yesterday, I feel a skip each revolution. I'm assuming it may be that the pin is not fully engaged in the large hole, if it isn't something else. One question I asked remains: can I do away with this damn quick link and just use a standard extra link to join the chain, particularly since the instructions say the quick link can't be used more than once anyway? Or is there some reason why you would need the quick link to join the chain?
09-17-09, 01:28 PM
#15
Bianchi Goddess

Join Date: Apr 2009
Location: Shady Pines Retirement Fort Wayne, In
Posts: 27,847
Bikes: Too many to list here check my signature.
Mentioned: 192 Post(s)
Tagged: 2 Thread(s)
Quoted: 2926 Post(s)
Liked 2,922 Times
in
1,490 Posts
that was easy one look at the pic and I figured it out
__________________
�One morning you wake up, the girl is gone, the bikes are gone, all that's left behind is a pair of old tires and a tube of tubular glue, all squeezed out"
Sugar "Kane" Kowalczyk
�One morning you wake up, the girl is gone, the bikes are gone, all that's left behind is a pair of old tires and a tube of tubular glue, all squeezed out"
Sugar "Kane" Kowalczyk
 09-17-09, 02:54 PM
#16
Senior Member
Thread Starter
Join Date: Jul 2009
Posts: 151
Mentioned: 0 Post(s)
Tagged: 0 Thread(s)
Quoted: 0 Post(s)
Likes: 0
Liked 0 Times
in
0 Posts
Super. Now let's see if we can figure out why the chain is giving me problems (skipping), after I already figured out how to install it yesterday. Here's some more pix to look at. Note how the plates of the quick link are not bent outward, as with the other links:


09-17-09, 03:20 PM
#17
aka Phil Jungels
You shouldn't have bent those two pins together with the pliers. Just put the chain together, slide one end of the "connector" over one pin, flex the chain until you can get it over the other pin, slide it on, relax the tension, done.
09-17-09, 05:53 PM
#18
Senior Member
Thread Starter
Join Date: Jul 2009
Posts: 151
Mentioned: 0 Post(s)
Tagged: 0 Thread(s)
Quoted: 0 Post(s)
Likes: 0
Liked 0 Times
in
0 Posts
Problem is, even after fitting the link, the chain was skipping, as I mentioned. I figured out the problem with that, as well. The connector plate was squeezed too tight on one pin (no matter which way round the rear plate was installed). This might be because the rear plate was bent, or it might be because this is a shtty master link design, or quality control whereby tolerances are not exact (and they have to be very much so, here). Anyway, the end result of this, is that the connector plate wasn't flexing as freely on one end. This caused the link to remain stiff, no matter how much you flex it side to side. After wasting two straight days of working on this one link, I decided enough is enough, and I stopped using it, and joined the chain with a regular link.
09-18-09, 11:06 AM
#20
Elitist Troglodyte
Join Date: Jun 2006
Location: Dallas
Posts: 6,925
Bikes: 03 Raleigh Professional (steel)
Mentioned: 0 Post(s)
Tagged: 0 Thread(s)
Quoted: 2 Post(s)
Likes: 0
Liked 1 Time
in
1 Post
One trusts that you used new pins? Re-using peened pins is a recipe for disaster.
__________________
Stupidity got us into this mess - why can't it get us out?
- Will Rogers
Stupidity got us into this mess - why can't it get us out?
- Will Rogers
09-18-09, 12:06 PM
#21
Senior Member
Thread Starter
Join Date: Jul 2009
Posts: 151
Mentioned: 0 Post(s)
Tagged: 0 Thread(s)
Quoted: 0 Post(s)
Likes: 0
Liked 0 Times
in
0 Posts
Worse still, I used one link of this new chain to repair a chain on another bike (a 7 spd Minelli), which had broken due to a loose pin on one link. This newly repaired chain tested okay as far as it not breaking, after putting a load on the pedals and trying to snap it. But now it skips teeth as well (though not nearly as much as on the bike with the new chain), whereas it did not skip teeth before I repaired it with just one link from the new chain. I don't know what it is, but it may be this model of Shimano chain is incompatible with a lot of bikes. I might understand with the Minelli, as it has a Hyperglide or Hyperdrive chainring; and the new chain is a Uniglide model. But I read they were supposed to be compatible. And the other bike is an older 6 spd, so not Hyperglide.
09-18-09, 01:25 PM
#22
cab horn
Join Date: Jun 2004
Location: Toronto
Posts: 28,353
Bikes: 1987 Bianchi Campione
Mentioned: 1 Post(s)
Tagged: 0 Thread(s)
Quoted: 42 Post(s)
Likes: 0
Liked 25 Times
in
18 Posts
Yeah, I used the links that came with the new chain to rejoin it. I tested it by grinding hard with the pedals to see if the chain would break, and it did not. But I have other problems... I had hoped the new chain would resolve a problem I was having with the chain skipping over the teeth, mostly in the highest gear (smallest cog in rear). Not only did it not, but its worse than the chain I had prior, which rarely did this. (Yeah, I know I might have to replace the cassette, or at least one cog on the freewheel, but its obvious to me that the chain itself is playing a role here).
Worse still, I used one link of this new chain to repair a chain on another bike (a 7 spd Minelli), which had broken due to a loose pin on one link. This newly repaired chain tested okay as far as it not breaking, after putting a load on the pedals and trying to snap it. But now it skips teeth as well (though not nearly as much as on the bike with the new chain), whereas it did not skip teeth before I repaired it with just one link from the new chain. I don't know what it is, but it may be this model of Shimano chain is incompatible with a lot of bikes. I might understand with the Minelli, as it has a Hyperglide or Hyperdrive chainring; and the new chain is a Uniglide model. But I read they were supposed to be compatible. And the other bike is an older 6 spd, so not Hyperglide.
Worse still, I used one link of this new chain to repair a chain on another bike (a 7 spd Minelli), which had broken due to a loose pin on one link. This newly repaired chain tested okay as far as it not breaking, after putting a load on the pedals and trying to snap it. But now it skips teeth as well (though not nearly as much as on the bike with the new chain), whereas it did not skip teeth before I repaired it with just one link from the new chain. I don't know what it is, but it may be this model of Shimano chain is incompatible with a lot of bikes. I might understand with the Minelli, as it has a Hyperglide or Hyperdrive chainring; and the new chain is a Uniglide model. But I read they were supposed to be compatible. And the other bike is an older 6 spd, so not Hyperglide.
That's not what he's asking. You need the specific shimano replacement pin to rejoin links. You cannot ride a chain that has been repinned with a used pin. No matter how much you've "tested it". It WILL break at an inopportune time and you WILL die.
09-18-09, 04:21 PM
#23
Senior Member
Thread Starter
Join Date: Jul 2009
Posts: 151
Mentioned: 0 Post(s)
Tagged: 0 Thread(s)
Quoted: 0 Post(s)
Likes: 0
Liked 0 Times
in
0 Posts
Good lord, does somebody pay you to be the village idiot around here, or do you just volunteer for the job?
Last edited by TheCappucinoKid; 09-18-09 at 07:27 PM.
09-18-09, 08:54 PM
#24
Senior Member
It sounds so easy when you say it.... but no seriously, the chain wasn't having none of that. It might have been flexing it in the wrong direction (outward instead of inward) that prevented the connector from fitting over the pins, but at any rate, it would not fit; with hand pressure or pliers, until I took it off and bent the pin plate inward with pliers.
09-18-09, 09:13 PM
#25
cab horn
Join Date: Jun 2004
Location: Toronto
Posts: 28,353
Bikes: 1987 Bianchi Campione
Mentioned: 1 Post(s)
Tagged: 0 Thread(s)
Quoted: 42 Post(s)
Likes: 0
Liked 25 Times
in
18 Posts
I'm not the one who doesn't now how to read instructions. You got quite the nerve to insult me in this fashion on this forum. YOU are the one asking for help, not me. Should we expect this from every awesome thread you post?