


narrow chainstay bridge rear fender mounting tips
 10-17-09, 12:57 PM
#1
Senior Member
Thread Starter
Join Date: Feb 2008
Location: Berlin, Germany
Posts: 204
Mentioned: 0 Post(s)
Tagged: 0 Thread(s)
Quoted: 2 Post(s)
Likes: 0
Liked 0 Times
in
0 Posts
narrow chainstay bridge rear fender mounting tips
i have a new pair of berthoud fenders and need to mount them on my Raleigh Super Course. the front goes on perfect. the rear needs some doctoring. i've come into 2 issues. the chainstay is narrower than the fender by 3mm and there is no chainstay bridge hole for mounting. i've learned well to head the advice of BF members before doing any sort of hacking.  so here we go...
for the first problem i thought i could trim the edges a bit with tin snips so i get a nice fit. even though i'd prefer not to modify the fenders in this way, i've read that the fender should drop a bit below the bridge to get the best foot protection. perhaps just squeezing the fender a bit would work?
for the second problem I thought i could use a P-Clamp, which would move the mounting point 15mm lower thus raising the back.
a solution which i find a lot of people recommending is using zip ties. i'm not against it but the only real problem here is that the SC's wheelbase is pretty long. to get a nice fender fit, i have to distance the fender a bit from the bridge. like peter white does here:
i feel like the zip tie would only work if the fender was close the bridge.
ps i also considered drilling a hole in the bridge, but that could get ugly especially seeing that i already painted the frame and don't own a thread cutter.
as always, any and all suggestions (and pictures) are welcome!
cheers,
so here we go...for the first problem i thought i could trim the edges a bit with tin snips so i get a nice fit. even though i'd prefer not to modify the fenders in this way, i've read that the fender should drop a bit below the bridge to get the best foot protection. perhaps just squeezing the fender a bit would work?
for the second problem I thought i could use a P-Clamp, which would move the mounting point 15mm lower thus raising the back.
a solution which i find a lot of people recommending is using zip ties. i'm not against it but the only real problem here is that the SC's wheelbase is pretty long. to get a nice fender fit, i have to distance the fender a bit from the bridge. like peter white does here:
i feel like the zip tie would only work if the fender was close the bridge.
ps i also considered drilling a hole in the bridge, but that could get ugly especially seeing that i already painted the frame and don't own a thread cutter.
as always, any and all suggestions (and pictures) are welcome!
cheers,

 10-17-09, 04:18 PM
#3
Senior Member

Join Date: Jul 2008
Location: Nampa Idaho
Posts: 1,081
Bikes: 76' Centrurion Pro-Tour, 86' Specialized Rock Hopper, 88' Centurion Iron Man, 89' Bruce Gordon "Hikari", 95' Rock Hopper Ultra.
Mentioned: 1 Post(s)
Tagged: 0 Thread(s)
Quoted: 14 Post(s)
Likes: 0
Liked 3 Times
in
3 Posts
I'd go the P-clamp rout maybe with some sort of spacer. I've heard that cutting/snipping fenders causes weak spots for cracks to start, so pinching (albiet more frustrating) might be the way to go...I have a project in the workd that will be having the same issues 
Good luck,
Chris
Good luck,
Chris
10-17-09, 04:57 PM
#4
Real Men Ride Ordinaries

Join Date: Sep 2008
Posts: 3,723
Mentioned: 0 Post(s)
Tagged: 0 Thread(s)
Quoted: 17 Post(s)
Likes: 0
Liked 3 Times
in
3 Posts
I'd go the P-clamp rout maybe with some sort of spacer. I've heard that cutting/snipping fenders causes weak spots for cracks to start, so pinching (albiet more frustrating) might be the way to go...I have a project in the workd that will be having the same issues
Good luck,
Chris
Good luck,
Chris
As far as mounting, a P-clamp does sound like the best idea, don't break out a drill unless you absolutely need to. I think a long bolt, with a couple of spacers, either washers, or presta nuts, or whatever you have lying around should do the trick.
Zip ties would work, but they look rather inelegant, and give you a kind of wonky fender line. Both are just aesthetics though, they work just fine.
10-17-09, 05:02 PM
#5
cab horn
Join Date: Jun 2004
Location: Toronto
Posts: 28,353
Bikes: 1987 Bianchi Campione
Mentioned: 1 Post(s)
Tagged: 0 Thread(s)
Quoted: 42 Post(s)
Likes: 0
Liked 26 Times
in
19 Posts
Fenders like the SKS chromplastics will not crack. You can modify them at will. Also the fender does not have to attach to the bridge mount. You can also punch two holes and ziptie them to the chainstays.
 10-18-09, 08:38 AM
#7
Senior Member
Thread Starter
Join Date: Feb 2008
Location: Berlin, Germany
Posts: 204
Mentioned: 0 Post(s)
Tagged: 0 Thread(s)
Quoted: 2 Post(s)
Likes: 0
Liked 0 Times
in
0 Posts
by crimp you mean dimple it where it would meet the chainstays? any good tips on how i can do that?
can you show me a pic of the result?
Last edited by rideone; 10-18-09 at 10:40 AM.
10-18-09, 07:06 PM
#8
Senior Member

Join Date: Mar 2005
Location: Pinole, CA, USA
Posts: 17,392
Mentioned: 24 Post(s)
Tagged: 0 Thread(s)
Quoted: 443 Post(s)
Likes: 0
Liked 27 Times
in
25 Posts
I can't take pictures because my memory card got corrupted.
Here's the tool I used:
https://www.irwin.com/irwin/consumer/...6&search=false
This is the best I can do for a picture of the fender until I can get a new card. I measured the distance between the stays at the point where I wanted the fender to sit and marked the fender with a sharpie. I used the tool to flatten the fender to either side of the marks and then bend it to the angle of the stays. I did this to the bottom 3/4" of the fender. A stainless screw and Nylok nut through the chainstay bridge wedge the fender between the stays so it won't rattle.
10-18-09, 07:23 PM
#9
Senior Member

Aren't those metal fenders, Dirtdrop? Plastic fenders won't take a permanent bend quite so easily.
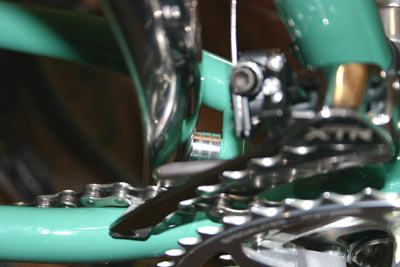
On the last two bikes I've added fenders to I've used spacers like those shown in the first pic. I didn't need it for chainstay clearance on the first bike, but on my most recent build I did.
On the last two bikes I've added fenders to I've used spacers like those shown in the first pic. I didn't need it for chainstay clearance on the first bike, but on my most recent build I did.
10-18-09, 07:52 PM
#10
Senior Member
Join Date: Mar 2005
Location: Pinole, CA, USA
Posts: 17,392
Mentioned: 24 Post(s)
Tagged: 0 Thread(s)
Quoted: 443 Post(s)
Likes: 0
Liked 27 Times
in
25 Posts
Aren't those metal fenders, Dirtdrop? Plastic fenders won't take a permanent bend quite so easily.
On the last two bikes I've added fenders to I've used spacers like those shown in the first pic. I didn't need it for chainstay clearance on the first bike, but on my most recent build I did.
On the last two bikes I've added fenders to I've used spacers like those shown in the first pic. I didn't need it for chainstay clearance on the first bike, but on my most recent build I did.
I forgot to mention that I used duct tape on the jaws of the pliers to prevent scratching.
I use carbon fiber tubing for spacers. (broken kite rods)
10-18-09, 08:18 PM
#11
Senior Member
I got thrown off by Operator's reply. A quick Google of Berthoud fenders set me straight.
10-19-09, 03:22 AM
#13
Senior Member
Thread Starter
Join Date: Feb 2008
Location: Berlin, Germany
Posts: 204
Mentioned: 0 Post(s)
Tagged: 0 Thread(s)
Quoted: 2 Post(s)
Likes: 0
Liked 0 Times
in
0 Posts
hey dirtdrop.
that's a great picture btw.
thanks for the info. i'm having a hard time understanding how that tool was used. the clamp looks almost as wide as the fender. you just grabbed and bent the fender edges, right? i imagine you clamp the tool perpendicular to the bottom of the fender and bend in?
i thought of laying the fender on a thinner wheel or rounded object and tapping (hammering) a small pipe against the feder edges, at the chainstay points, to crimp/dimple them.
i'd rather not buy a tool for this purpose - especially seeing that i already have to return the tin snips ,
that's a great picture btw.
thanks for the info. i'm having a hard time understanding how that tool was used. the clamp looks almost as wide as the fender. you just grabbed and bent the fender edges, right? i imagine you clamp the tool perpendicular to the bottom of the fender and bend in?
i thought of laying the fender on a thinner wheel or rounded object and tapping (hammering) a small pipe against the feder edges, at the chainstay points, to crimp/dimple them.
i'd rather not buy a tool for this purpose - especially seeing that i already have to return the tin snips
,
Last edited by rideone; 10-19-09 at 11:45 AM.
