


Taping handlebar direction - confused!
 09-16-10, 01:17 PM
#1
Newbie
Thread Starter

Join Date: Aug 2010
Location: Cologne, Germany
Posts: 55
Bikes: 1977 Koga Miyata Gent’s Racer, 1978 Koga Miyata Gent’s Touring, 1991 Dawes Galaxy, 2008 Sparta Pick-Up, 2012 Workcycles Kr8
Mentioned: 0 Post(s)
Tagged: 0 Thread(s)
Quoted: 0 Post(s)
Likes: 0
Liked 0 Times
in
0 Posts
Taping handlebar direction - confused!
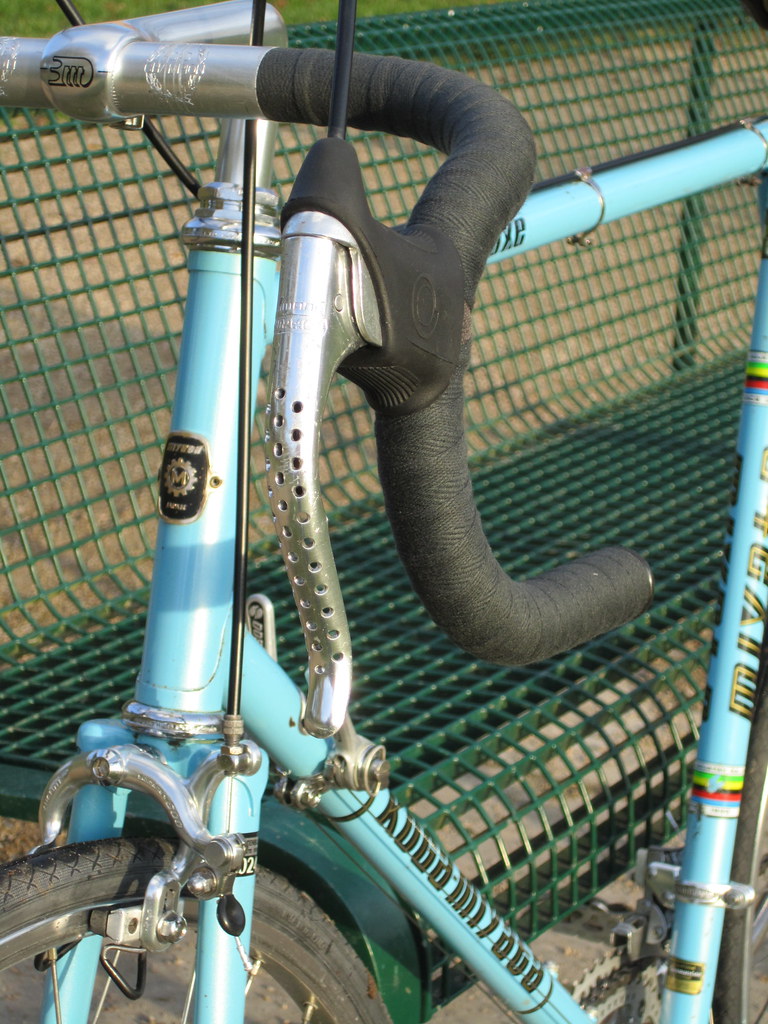
The restauration/overhaul/refurbishing of my '78 Gent's Touring is getting to an end and I am about too wrap the handelbars. The original ones were taped with black cloth tape so I got myself two rolls of that.
Now for the tricky part: The tape used to be wrapped starting at the stem and wrapped over the top of the tube away from the rider. Please take a look at the attachement too
Everywhere I look on the internet I see people starting the wrapping at the end of the handlebar and going towards the stem... I am confused, was the original way the tape was applied wrong? And why didn't they knew what the right way around was back then?
If anyone has some tips on wrapping cloth tape, don't hesitate
 09-16-10, 01:30 PM
#2

Over the hill

Join Date: Mar 2006
Location: Los Angeles, CA
Posts: 24,368
Bikes: Giant Defy, Giant Revolt
Mentioned: 1 Post(s)
Tagged: 0 Thread(s)
Quoted: 995 Post(s)
Liked 1,203 Times
in
689 Posts
The reason behind the method recommended everywhere you look is to have the natural pressure from your grip tighten the tape instead of loosen it. I'm a little too young to know much about cloth tape (it came on my first track bike and I ditched it for cork), but this might not be a concern with it. Does it have an adhesive back?
__________________
It's like riding a bicycle
It's like riding a bicycle
09-16-10, 01:34 PM
#3

Senior Member
Always start at the bottom and tape in the direction that your fingers curl with your hands on the drops. The left and right sides therefore are taped in opposite directions. This has always been the way to do it, even with cloth tape. If you did it otherwise with cloth tape, the tape would fray and curl over on itself.
__________________
Il faut de l'audace, encore de l'audace, toujours de l'audace
1980 3Rensho-- 1975 Raleigh Sprite 3spd
1990s Raleigh M20 MTB--2007 Windsor Hour (track)
1988 Ducati 750 F1
Il faut de l'audace, encore de l'audace, toujours de l'audace
1980 3Rensho-- 1975 Raleigh Sprite 3spd
1990s Raleigh M20 MTB--2007 Windsor Hour (track)
1988 Ducati 750 F1
09-16-10, 01:57 PM
#4
Senior Member
Join Date: Jul 2009
Posts: 11,128
Bikes: 1986 Alan Record Carbonio, 1985 Vitus Plus Carbone 7, 1984 Peugeot PSV, 1972 Line Seeker, 1986(est.) Medici Aerodynamic (Project), 1985(est.) Peugeot PY10FC
Mentioned: 22 Post(s)
Tagged: 0 Thread(s)
Quoted: 150 Post(s)
Likes: 0
Liked 34 Times
in
27 Posts
I also learned form back in the 80's that you start taping from the brake lever housing and out to the ends and towards the center of the bar to avoid the tape edges that can catch under your hands when you have pressure/weight on the bars and loosen your tape job. Been doing that since then and it always works!
Chombi
Chombi
Last edited by Chombi; 09-16-10 at 05:23 PM.
09-16-10, 02:02 PM
#5
Newbie
Thread Starter
Join Date: Aug 2010
Location: Cologne, Germany
Posts: 55
Bikes: 1977 Koga Miyata Gent’s Racer, 1978 Koga Miyata Gent’s Touring, 1991 Dawes Galaxy, 2008 Sparta Pick-Up, 2012 Workcycles Kr8
Mentioned: 0 Post(s)
Tagged: 0 Thread(s)
Quoted: 0 Post(s)
Likes: 0
Liked 0 Times
in
0 Posts
The reason behind the method recommended everywhere you look is to have the natural pressure from your grip tighten the tape instead of loosen it. I'm a little too young to know much about cloth tape (it came on my first track bike and I ditched it for cork), but this might not be a concern with it. Does it have an adhesive back?
Always start at the bottom and tape in the direction that your fingers curl with your hands on the drops. The left and right sides therefore are taped in opposite directions. This has always been the way to do it, even with cloth tape. If you did it otherwise with cloth tape, the tape would fray and curl over on itself.
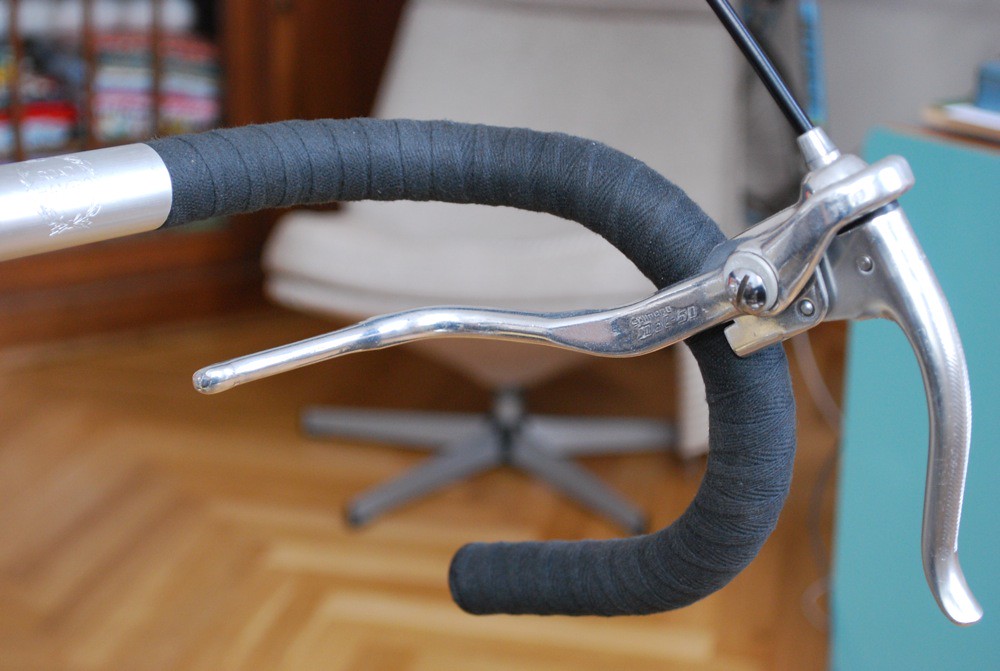
The original way of applying mad the tape lock itself at the stem (the tape wraps around the starting point) and it is held in place at the end by the bar plugs. I also found this topic in the archives of the forum: https://www.bikeforums.net/archive/in.../t-652282.html
Uzz2050
06-10-10, 07:48 PM: It depends on what kind of tape above all else, and to a lesser extent what kind of shifters. If you have STI, or downtube I suppose, and you happen to be using either a synthetic tape, or cloth tape, you're pretty much free to wrap from the stem down. As long as you wrap them tightly, they don't really curl at the edges, and you get the pretty no tape look. 'Natural' cork tape is pickier, but as long as you do a nice tight wrap, you can usually get away with either direction. By the time it's started to peel, it's usually time to replace it anyway
I think I'll stick with the tape and the original way of taping
That will give me this (I have the same handlebar that makes it all flush):https://www.raydobbins.com/molteni_replica/photo12.jpg
Thanks for the quick responses!
09-16-10, 02:04 PM
#6
Senior Member
Join Date: Apr 2006
Location: Orange County CA
Posts: 963
Bikes: Surly CC, Raleigh Team Pro, Specialized Rockhopper with an xtracycle
Mentioned: 0 Post(s)
Tagged: 0 Thread(s)
Quoted: 1 Post(s)
Likes: 0
Liked 0 Times
in
0 Posts
Start from the bottom and go outwards towards as you make your way to the stem. Easier to cut it and finish it with electrical tape. I find it a pain to go the other way and cram it into the drop bar hole with a stop/barend.
I know on the older vintage rides or the randoneers like to tape from the bottom and finish it off with twine and shellac. Looks pretty sweet..but probably not so nice on a modern road bike.
EDIT: just had a look at your ride. I think the twine thing would look pretty sweet on this. Poke around rivbike.com if you are interested..
09-16-10, 02:11 PM
#7
Guest
Join Date: Jul 2008
Location: Grid Reference, SK
Posts: 3,768
Bikes: I never learned to ride a bike. It is my deepest shame.
Mentioned: 0 Post(s)
Tagged: 0 Thread(s)
Quoted: 1 Post(s)
Likes: 0
Liked 6 Times
in
6 Posts
I tape by:
1. Cutting two 4-inch peices of the tape and placing them over the brake lever clamps and hold them down with the lever hoods. Also cut two 6 inch peices of electrical tape and put aside (many newer sets of bar tape come with the 4 inch extra and a peice of black finishing tape)
2. Start wrapping at the bottom wrapping IN, leaving a little excess to fold inside the bar and cover witht he plug
3. When reaching the brake lever, I wrap as close as possible to the bottom of the lever then cross over the little extra peiceand make the next pass as close as possible to the top of the lever
4. continue wrapping to the point where you want to stop on the bar top... if I did it right I am wrapping towards the back over the bar.
5. Cut the tape on an angle so it leaves a blunt edge where I want it to stop near the stem and wrap a peice of electrical tape to neatly cover this end.
With modern padded or cork tape, wrapping from bottom to top is usually necessary to prevent the edges peeling up. I don't think it matters if the tape is wrapped inwards or outwards, tho. Thin tape like Benotto I don't think it matters which way you go.
According to Sheldon Brown, keeping the tape under constant high tension during the wrap is necessary.
Here is a link to sheldon Brown's instructions.
https://sheldonbrown.com/handlebar-tape.html
09-16-10, 03:16 PM
#8
Thrifty Bill

Join Date: Jan 2008
Location: Mountains of Western NC
Posts: 23,523
Bikes: 86 Katakura Silk, 87 Prologue X2, 88 Cimarron LE, 1975 Sekai 4000 Professional, 73 Paramount, plus more
Mentioned: 96 Post(s)
Tagged: 0 Thread(s)
Quoted: 1236 Post(s)
Liked 964 Times
in
628 Posts
+1 With modern tape, start at the bottom and wrap inward.
Tip for people that live in warmer climates, instead of using electrical tape to seal off one end, use silicone tape. It won't come undone when it gets hot.
Tip for people that live in warmer climates, instead of using electrical tape to seal off one end, use silicone tape. It won't come undone when it gets hot.
 09-16-10, 03:50 PM
#9
Over the hill
Join Date: Mar 2006
Location: Los Angeles, CA
Posts: 24,368
Bikes: Giant Defy, Giant Revolt
Mentioned: 1 Post(s)
Tagged: 0 Thread(s)
Quoted: 995 Post(s)
Liked 1,203 Times
in
689 Posts
Thanks! I'm going to try that. I rarely have it come undone, but it does slide around just enough to leave a small strip of sticky residue that I don't like to feel.
__________________
It's like riding a bicycle
It's like riding a bicycle
09-16-10, 05:02 PM
#11
Senior Member

Join Date: Oct 2009
Posts: 444
Mentioned: 0 Post(s)
Tagged: 0 Thread(s)
Quoted: 0 Post(s)
Likes: 0
Liked 0 Times
in
0 Posts
With modern tape that has adhesive backing, it really does not matter what direction you wrap it so long as you start at the ends. It's not going anywhere if done right. As for starting at the stem, what will happen is that when you rest your hands behind the hoods (around the corner bend) the forward pressure will peel the edges of the tape up.
09-16-10, 05:50 PM
#12
Banned
A base layer under the finish of friction tape, hockey , or
tressostar/cateye cotton tape. even a straight strip ..
laid down around the outside of the upper curve
will reduce the tendency of the wrapped tape to gap open
around that portion of the bars , if done over bare metal..
tressostar/cateye cotton tape. even a straight strip ..
laid down around the outside of the upper curve
will reduce the tendency of the wrapped tape to gap open
around that portion of the bars , if done over bare metal..
09-16-10, 07:19 PM
#13
Senior Member
Join Date: Mar 2010
Location: City of Brotherly Love
Posts: 1,562
Bikes: Raleigh Companion, Nashbar Touring, Novara DiVano, Trek FX 7.1, Giant Upland
Mentioned: 0 Post(s)
Tagged: 0 Thread(s)
Quoted: 22 Post(s)
Likes: 0
Liked 0 Times
in
0 Posts
On modern bikes with cork tape I start at the end. On vintage bikes with cotton tape I start at the stem.
09-17-10, 01:06 AM
#14
Newbie
Thread Starter
Join Date: Aug 2010
Location: Cologne, Germany
Posts: 55
Bikes: 1977 Koga Miyata Gent’s Racer, 1978 Koga Miyata Gent’s Touring, 1991 Dawes Galaxy, 2008 Sparta Pick-Up, 2012 Workcycles Kr8
Mentioned: 0 Post(s)
Tagged: 0 Thread(s)
Quoted: 0 Post(s)
Likes: 0
Liked 0 Times
in
0 Posts
I'll just do it like it was taped... Nothing fancy
@Bluenot157: Thanks for that link. They are awfully expensive with shipping, but their page is written very well. I like the tone of the texts
@Everyonelese: I don't have hoods that I can flipback... This is an old bike Thanks!
@Bluenot157: Thanks for that link. They are awfully expensive with shipping, but their page is written very well. I like the tone of the texts
@Everyonelese: I don't have hoods that I can flipback... This is an old bike
Thanks!
09-17-10, 05:08 AM
#15
Senior Member
Join Date: Aug 2006
Location: Perth, W.A.
Posts: 935
Mentioned: 0 Post(s)
Tagged: 0 Thread(s)
Quoted: 0 Post(s)
Likes: 0
Liked 0 Times
in
0 Posts
If I recall correctly Sheldon Brown and Park Tools disagree on the direction, so who ya gonna believe?
I agree with the poster above who says it doesn't matter with modern adhesive backed tapes, or even the ones that are just a bit sticky.
I agree with the poster above who says it doesn't matter with modern adhesive backed tapes, or even the ones that are just a bit sticky.
09-17-10, 08:11 AM
#16
Newbie
Thread Starter
Join Date: Aug 2010
Location: Cologne, Germany
Posts: 55
Bikes: 1977 Koga Miyata Gent’s Racer, 1978 Koga Miyata Gent’s Touring, 1991 Dawes Galaxy, 2008 Sparta Pick-Up, 2012 Workcycles Kr8
Mentioned: 0 Post(s)
Tagged: 0 Thread(s)
Quoted: 0 Post(s)
Likes: 0
Liked 0 Times
in
0 Posts
Just taped it, everything started really good, but the tape was too short... I redid it 4 times and each time I got a little closer to the end, but I think I'll have to use 3 rolls for the whole handlebar...
09-17-10, 08:43 AM
#17
Guest
Join Date: Jul 2008
Location: Grid Reference, SK
Posts: 3,768
Bikes: I never learned to ride a bike. It is my deepest shame.
Mentioned: 0 Post(s)
Tagged: 0 Thread(s)
Quoted: 1 Post(s)
Likes: 0
Liked 6 Times
in
6 Posts
If you have 2 complete new rolls of tape and a handlebar of roughly normal size and diameter you should be able to do each side with one roll.
What sort of tape are you using?
edit: Just saw the pictoral essay with taping and emotions. Very nice
What sort of tape are you using?
edit: Just saw the pictoral essay with taping and emotions. Very nice
Last edited by LarDasse74; 09-17-10 at 08:47 AM.
09-17-10, 08:47 AM
#18
Newbie
Thread Starter
Join Date: Aug 2010
Location: Cologne, Germany
Posts: 55
Bikes: 1977 Koga Miyata Gent’s Racer, 1978 Koga Miyata Gent’s Touring, 1991 Dawes Galaxy, 2008 Sparta Pick-Up, 2012 Workcycles Kr8
Mentioned: 0 Post(s)
Tagged: 0 Thread(s)
Quoted: 0 Post(s)
Likes: 0
Liked 0 Times
in
0 Posts
Good thing is; I practiced
So next rolls will go on easy-peasy!
09-19-10, 03:33 PM
#19
Newbie
Thread Starter
Join Date: Aug 2010
Location: Cologne, Germany
Posts: 55
Bikes: 1977 Koga Miyata Gent’s Racer, 1978 Koga Miyata Gent’s Touring, 1991 Dawes Galaxy, 2008 Sparta Pick-Up, 2012 Workcycles Kr8
Mentioned: 0 Post(s)
Tagged: 0 Thread(s)
Quoted: 0 Post(s)
Likes: 0
Liked 0 Times
in
0 Posts
Got the real deal: Velox cloth tape and two rolls was enough. Pictures will land on my flickr page eventually. Worked all the way from the stem up untill the end and tucked everything in with the handle bar ends
11-22-10, 02:50 PM
#20
Newbie
Thread Starter
Join Date: Aug 2010
Location: Cologne, Germany
Posts: 55
Bikes: 1977 Koga Miyata Gent’s Racer, 1978 Koga Miyata Gent’s Touring, 1991 Dawes Galaxy, 2008 Sparta Pick-Up, 2012 Workcycles Kr8
Mentioned: 0 Post(s)
Tagged: 0 Thread(s)
Quoted: 0 Post(s)
Likes: 0
Liked 0 Times
in
0 Posts
Took some time, but here are some pictures from my two Koga Miayata's from 1978
Gent's Luxe:
Gent's Touring:
Gent's Luxe:
Gent's Touring:
11-22-10, 09:14 PM
#21
elcraft
We always started by cutting a smal piece to fit over the brake lever clamps and then began by starting at 2" from the stem end and wound by going over the bar from the rear. A small extra turn around the brake lever and there was always extra tape that was tucked into the bar ends and covered by the plug. With a Velox Tressostar cloth tape there was always enough tape from one roll per side to completely finish the job. The tape never shifted or rolled or otherwise unravelled as everyone claims will happen from wrapping the tape in this direction. We also never soaked or wetted the cloth tape either. This approach eliminated the need to use those little pieces of "finishing tape" to complete the wrap at the bar end. I wonder when the paragigm shifted to wrapping from "Ends towards center" instead of "Center towards ends" happened.
11-23-10, 01:21 AM
#22
Newbie
Thread Starter
Join Date: Aug 2010
Location: Cologne, Germany
Posts: 55
Bikes: 1977 Koga Miyata Gent’s Racer, 1978 Koga Miyata Gent’s Touring, 1991 Dawes Galaxy, 2008 Sparta Pick-Up, 2012 Workcycles Kr8
Mentioned: 0 Post(s)
Tagged: 0 Thread(s)
Quoted: 0 Post(s)
Likes: 0
Liked 0 Times
in
0 Posts
We always started by cutting a smal piece to fit over the brake lever clamps and then began by starting at 2" from the stem end and wound by going over the bar from the rear. A small extra turn around the brake lever and there was always extra tape that was tucked into the bar ends and covered by the plug. With a Velox Tressostar cloth tape there was always enough tape from one roll per side to completely finish the job. The tape never shifted or rolled or otherwise unravelled as everyone claims will happen from wrapping the tape in this direction. We also never soaked or wetted the cloth tape either. This approach eliminated the need to use those little pieces of "finishing tape" to complete the wrap at the bar end. I wonder when the paragigm shifted to wrapping from "Ends towards center" instead of "Center towards ends" happened.
I did this exactly in that manner. The SR Bars have a nice raised edge where the stem clamp is so the tap is flush with the center part of the handlebar. No need for ugly black electric tape (or even uglier) that nasty twine. Some people might prefer that, but I just want the plain black cloth look. One roll per side is certainly enough, alltough it took me a few tries to get it right I did two bikes now and I am not such a hardcore rider, but I haven't notice any loosening or other problems. The tape does have an adhesive backing and I pulled it on really tight so it kind of holds itself in place too.
(...) I wonder when the paragigm shifted to wrapping from "Ends towards center" instead of "Center towards ends" happened.
11-23-10, 09:03 AM
#23
Senior Member
Very pretty. Now be sure to follow up and tell us how long it took for the tape to start to fray and curl up.
__________________
Il faut de l'audace, encore de l'audace, toujours de l'audace
1980 3Rensho-- 1975 Raleigh Sprite 3spd
1990s Raleigh M20 MTB--2007 Windsor Hour (track)
1988 Ducati 750 F1
Il faut de l'audace, encore de l'audace, toujours de l'audace
1980 3Rensho-- 1975 Raleigh Sprite 3spd
1990s Raleigh M20 MTB--2007 Windsor Hour (track)
1988 Ducati 750 F1
11-23-10, 11:18 AM
#24
Senior Member

Join Date: Jan 2010
Location: Wahiawa. Oahu
Posts: 1,701
Mentioned: 0 Post(s)
Tagged: 0 Thread(s)
Quoted: 0 Post(s)
Likes: 0
Liked 0 Times
in
0 Posts
While we're on the subject . . .
I have a couple of these Delta Aztec Vibe gel pads on the way:

these are supposed to help hand pain/numbness/etc.
Because they will increase the effective diameter of the bars considerably, I'm wondering if the normal amount of tape provided will be enough. If not, and I have to use more than one roll per side, how do I make the "joint" or splice or whatever you call it . . .
Anybody used these?
I have a couple of these Delta Aztec Vibe gel pads on the way:
these are supposed to help hand pain/numbness/etc.
Because they will increase the effective diameter of the bars considerably, I'm wondering if the normal amount of tape provided will be enough. If not, and I have to use more than one roll per side, how do I make the "joint" or splice or whatever you call it . . .
Anybody used these?

Thread
Thread Starter
Forum
Replies
Last Post
jyl
Bicycle Mechanics
45
02-18-12 10:29 PM
