


anyone ever converted record hubs to sealed cartridge bearings?
 04-19-15, 09:52 PM
#26

Senior Member

If you go through with this, I could always use a spare set of cups

 04-19-15, 09:55 PM
#27
is just a real cool dude
Thread Starter

Join Date: Aug 2010
Location: The Thumb, MI
Posts: 3,165
Mentioned: 12 Post(s)
Tagged: 0 Thread(s)
Quoted: 31 Post(s)
Likes: 0
Liked 32 Times
in
14 Posts
Your not the only one! If it wasn't for our cross country move coming up in a month and a half and trying to sell a house. This would be higher up on my priority list. All my bikes are done and no other projects on my lap beside a frame that's half built.
Pars,
The cups are already out and I can give them a once over and send them your way if you want? Just a little surface rust that should clean off with some steel wool and wd40.
Pars,
The cups are already out and I can give them a once over and send them your way if you want? Just a little surface rust that should clean off with some steel wool and wd40.
04-19-15, 10:33 PM
#28
Senior Member
Join Date: Sep 2011
Location: The First State.
Posts: 1,168
Bikes: Schwinn Continental, Schwinn Paramount, Schwinn High Plains, Schwinn World Sport, Trek 420, Trek 930,Trek 660, Novara X-R, Giant Iguana. Fuji Sagres mixte.
Mentioned: 0 Post(s)
Tagged: 0 Thread(s)
Quoted: 35 Post(s)
Liked 22 Times
in
10 Posts
Go for it. Post pictures.
04-19-15, 11:08 PM
#29
Senior Member

Join Date: Nov 2014
Location: Eugene, Oregon, USA
Posts: 27,547
Mentioned: 217 Post(s)
Tagged: 0 Thread(s)
Quoted: 18373 Post(s)
Liked 4,507 Times
in
3,350 Posts
One thing that I've been thinking. I seem to have misplaced my record hubs, but if I remember right, the record races were a lot smaller than the non-record races. So they might be harder to pull/knock out.
I am curious what you come up with. I think one of the reason that many off-brands use sealed bearings is that they are much easier to deal with.
I am curious what you come up with. I think one of the reason that many off-brands use sealed bearings is that they are much easier to deal with.
04-20-15, 12:02 AM
#30
is just a real cool dude
Thread Starter
Join Date: Aug 2010
Location: The Thumb, MI
Posts: 3,165
Mentioned: 12 Post(s)
Tagged: 0 Thread(s)
Quoted: 31 Post(s)
Likes: 0
Liked 32 Times
in
14 Posts
It only took me about ten minutes to get the cups out of the hubs so that wasn't much of hassle as I thought it was going to be. The front is a little tricky as there isn't much room between the cup and the hub compared to the rear hub.
Found the bearings for both front and rear, axle hardware and some ti axles. I believe the shop may even have some in stock but I still need to order the axle hardware and axles.
Found the bearings for both front and rear, axle hardware and some ti axles. I believe the shop may even have some in stock but I still need to order the axle hardware and axles.
04-20-15, 12:08 AM
#31

Senior Member
Join Date: Jul 2004
Location: Yukon, Canada
Posts: 8,759
Mentioned: 13 Post(s)
Tagged: 0 Thread(s)
Quoted: 113 Post(s)
Likes: 0
Liked 16 Times
in
14 Posts
I also want to see it done and totally understand your motivation. Sounds like fun. Proper maintenance is a pain in the ass. I like my phil wood hubs if the bearing is still smooth then on I go, and they are still smooth after many many miles. I would have had to repack record hubs many many times if I put them through what my phils go through.
__________________
1 Super Record bike, 1 Nuovo Record bike, 1 Pista, 1 Road, 1 Cyclocross/Allrounder, 1 MTB, 1 Touring, 1 Fixed gear
1 Super Record bike, 1 Nuovo Record bike, 1 Pista, 1 Road, 1 Cyclocross/Allrounder, 1 MTB, 1 Touring, 1 Fixed gear
04-20-15, 12:18 AM
#32
is just a real cool dude
Thread Starter
Join Date: Aug 2010
Location: The Thumb, MI
Posts: 3,165
Mentioned: 12 Post(s)
Tagged: 0 Thread(s)
Quoted: 31 Post(s)
Likes: 0
Liked 32 Times
in
14 Posts
Only issue is I don't have any rims to lace these hubs into once I get them built to test them out. Haha!


 04-20-15, 11:47 AM
#34
Ride, Wrench, Swap, Race

Join Date: Jan 2010
Location: Northern California
Posts: 9,193
Bikes: Cheltenham-Pedersen racer, Boulder F/S Paris-Roubaix, Varsity racer, '52 Christophe, '62 Continental, '92 Merckx, '75 Limongi, '76 Presto, '72 Gitane SC, '71 Schwinn SS, etc.
Mentioned: 132 Post(s)
Tagged: 0 Thread(s)
Quoted: 1565 Post(s)
Liked 1,295 Times
in
865 Posts
I'm glad to hear that this won't require any machining, since it's best not to remove metal from the structure of the hubshell imo.
The axle-to-bearing fit is critical, and there are a couple of ways to accomplish bearing adjustment, either with a threaded "step cone" that fits the ID of the bearing, or with a light press-fit directly onto the axle and using paired locknuts.
There is no need for a stepped axle or for a center sleeve. The QR pressure at each end of the axle can be taken up by a pair of locknuts (or locknut and stepped cone).
I think one must use some sort of iterative process to arrive at the proper bearing adjustment, reversing course at some point to slacken the adjustment, since there will be friction at the interface of the bearing's ID.
Loosen adjustment, smack axle end with mallet, then re-tighten to some lesser degree. I've been there before with some older designs like the Gyromaster mid-flange model and the Viscount hubs.
Edco marketed sealed-cartridge-bearing hubs made by Maillard, and their fine-threaded axle and seal design was effective in giving a very, very long service interval and axle life that was the envy of the hub world, unlike so many others with inferior axle and seal design.
So of course there are quite a number of engineering considerations that are needed to create a good cartridge-bearing hubset.
04-20-15, 05:14 PM
#35
is just a real cool dude
Thread Starter
Join Date: Aug 2010
Location: The Thumb, MI
Posts: 3,165
Mentioned: 12 Post(s)
Tagged: 0 Thread(s)
Quoted: 31 Post(s)
Likes: 0
Liked 32 Times
in
14 Posts
Like a glove...
The front hub and bearing isn't so easy. The ID is 24.37mm for the hub and and standard bearings come in even sizes...24mm, 26mm... So either get the hub opened up to 26mm or go ghetto and use a soda can as a shim. I'll look around and see if I can find a shim of some sort on McMaster.
The front hub and bearing isn't so easy. The ID is 24.37mm for the hub and and standard bearings come in even sizes...24mm, 26mm... So either get the hub opened up to 26mm or go ghetto and use a soda can as a shim. I'll look around and see if I can find a shim of some sort on McMaster.
04-20-15, 06:53 PM
#36
Ride, Wrench, Swap, Race
Join Date: Jan 2010
Location: Northern California
Posts: 9,193
Bikes: Cheltenham-Pedersen racer, Boulder F/S Paris-Roubaix, Varsity racer, '52 Christophe, '62 Continental, '92 Merckx, '75 Limongi, '76 Presto, '72 Gitane SC, '71 Schwinn SS, etc.
Mentioned: 132 Post(s)
Tagged: 0 Thread(s)
Quoted: 1565 Post(s)
Liked 1,295 Times
in
865 Posts
The protruding snout of the hubshell where the dust cap normally presses in is much thinner than where the cup normally presses in, and is not so well centered with the flange.
So not only is the stress moved to the thinner end of the snout, but the off-center loading at the flange will impose greater loading on the hubshell center, possibly resulting in flex that will rock the flange and result in a more flexible wheel.
Parts that fit (or can be made to fit) still need to be evaluated for suitability as installed, and there can be many subtle considerations with respect to load path and overall structure.
Is the original bearing cup similar in OD to the bearing cartridge? Could the bearing possibly be pressed in further?
Last edited by dddd; 04-20-15 at 06:57 PM.
04-20-15, 07:18 PM
#37
is just a real cool dude
Thread Starter
Join Date: Aug 2010
Location: The Thumb, MI
Posts: 3,165
Mentioned: 12 Post(s)
Tagged: 0 Thread(s)
Quoted: 31 Post(s)
Likes: 0
Liked 32 Times
in
14 Posts
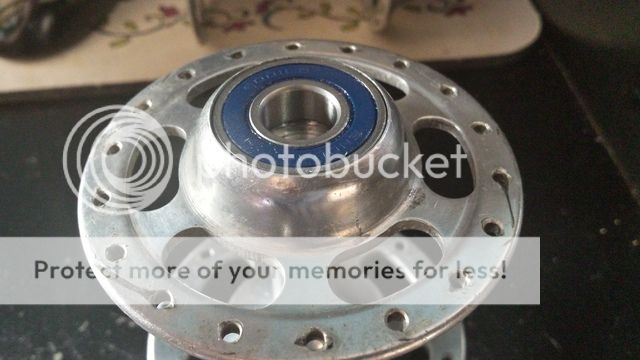
That was just pressed in with my hand. I pressed it the rest of the way in with my vice and a socket and with it fully seated there's about 1/8" below the lip.
04-20-15, 07:27 PM
#38
Senior Member

Join Date: Sep 2011
Location: Baltimore MD
Posts: 3,332
Bikes: '72 Motobecane Grand Record, '72 Gitane tandem, '72 Raleigh Super Course, '73 Raleigh Gran Sport, '73 Colnago Super, '76 Fiorelli Coppi, '78 Raleigh SBDU Team Pro, '78 Trek 930, '81 Holdsworth Special 650B, '86 Masi GC, ’94 Bridgestone RB-T
Mentioned: 67 Post(s)
Tagged: 0 Thread(s)
Quoted: 786 Post(s)
Liked 519 Times
in
281 Posts
Well done. Looking forward to the finished product.
__________________
The man who dies with the most toys�is dead. - Rootboy
The man who dies with the most toys�is dead. - Rootboy
04-27-15, 08:08 PM
#39
is just a real cool dude
Thread Starter
Join Date: Aug 2010
Location: The Thumb, MI
Posts: 3,165
Mentioned: 12 Post(s)
Tagged: 0 Thread(s)
Quoted: 31 Post(s)
Likes: 0
Liked 32 Times
in
14 Posts
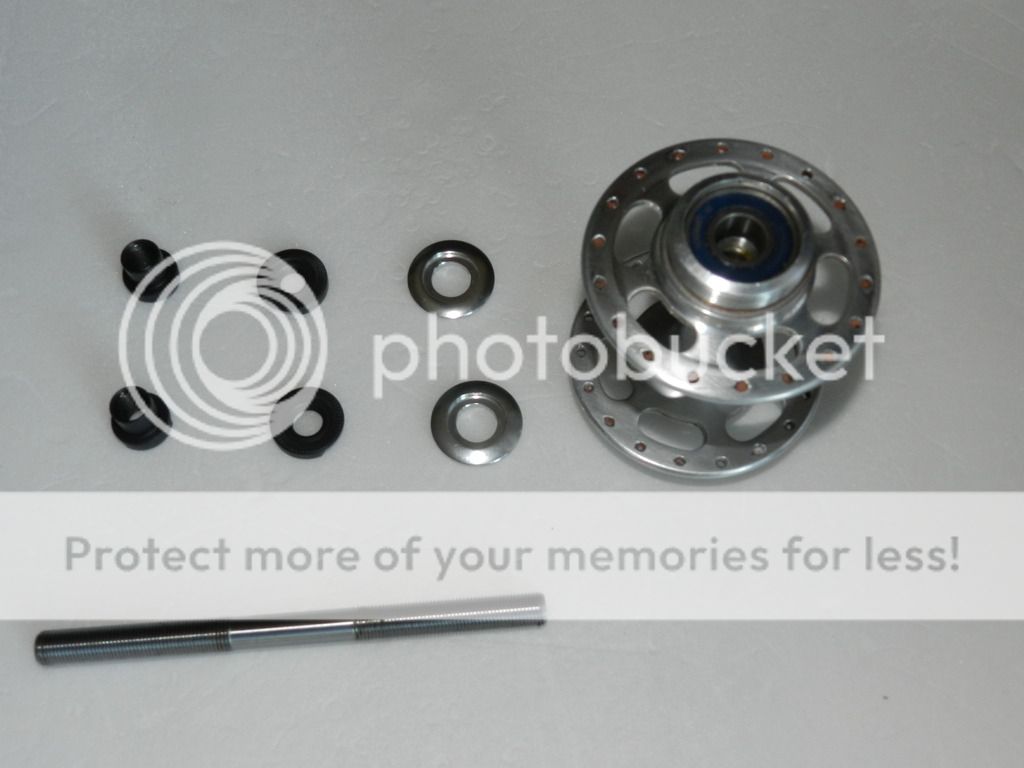
Rear hub done but just need some spacers. Just wondering what rims to lace up to these? Sorry I didn't clean it up yet as it has some buffing compound in it's nooks and crannies. Still need to polish them also.

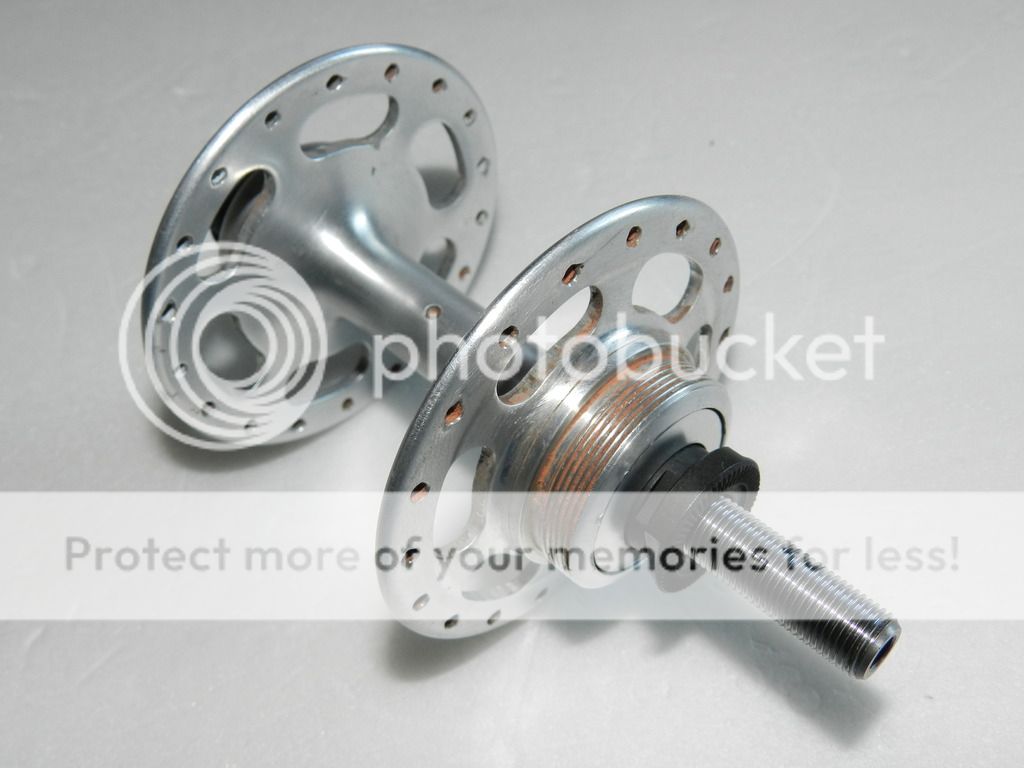
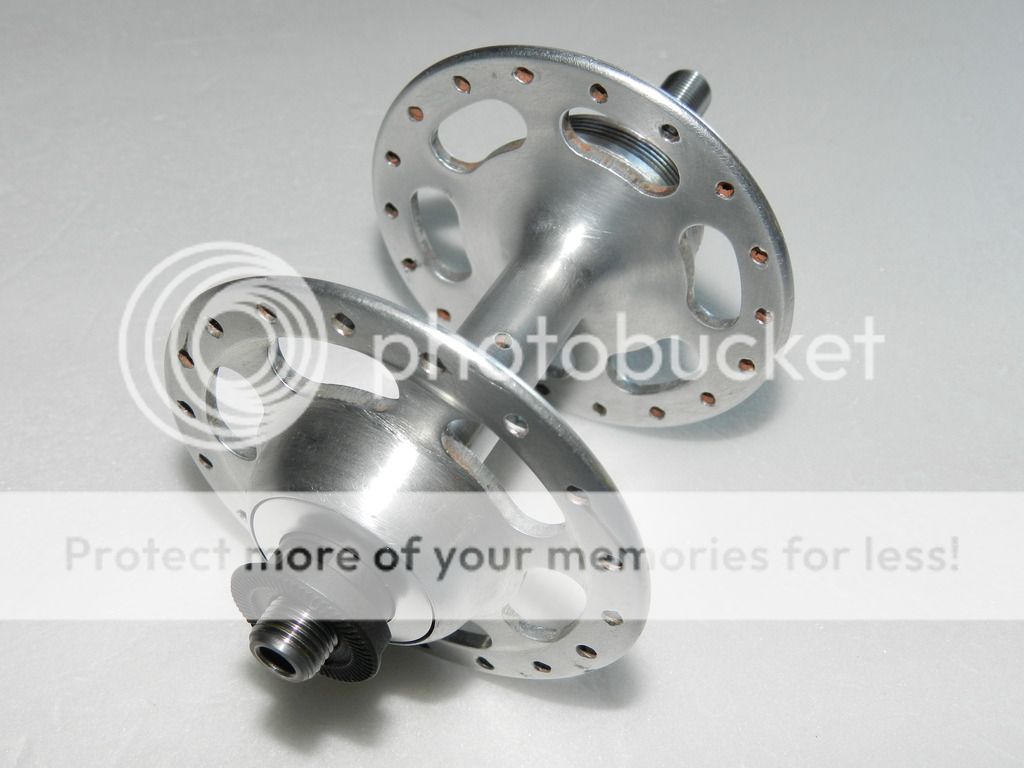
The front is looking to go to the machine shop to get just a hair of material removed. I search and searched but no luck as it's in between sizes on most normal bearings. I was hoping that I could do all this on just standard parts found through any catalog. The rear was extremely easy and everything was purchased through QBP.
The front is looking to go to the machine shop to get just a hair of material removed. I search and searched but no luck as it's in between sizes on most normal bearings. I was hoping that I could do all this on just standard parts found through any catalog. The rear was extremely easy and everything was purchased through QBP.
04-27-15, 08:29 PM
#41
is just a real cool dude
Thread Starter
Join Date: Aug 2010
Location: The Thumb, MI
Posts: 3,165
Mentioned: 12 Post(s)
Tagged: 0 Thread(s)
Quoted: 31 Post(s)
Likes: 0
Liked 32 Times
in
14 Posts
Parts available through almost any bikes shops (retail prices but can be found cheaper)
Wheels MFG axle #01 (10x1 137mm) $20
Wheels MFG axle #17 (9x1 110mm) $20
Surly New Hub hardware (rear 10x1) $10 (per hub)
6001 Cartridge bearing $5 (a piece)
Surly hub dustcap $5 (a piece)
I didn't go with really nice bearings and just standard ones for right now just to get it going but I plan on doing full ceramic. Why? Just because and it's going on my frame I'm building up.
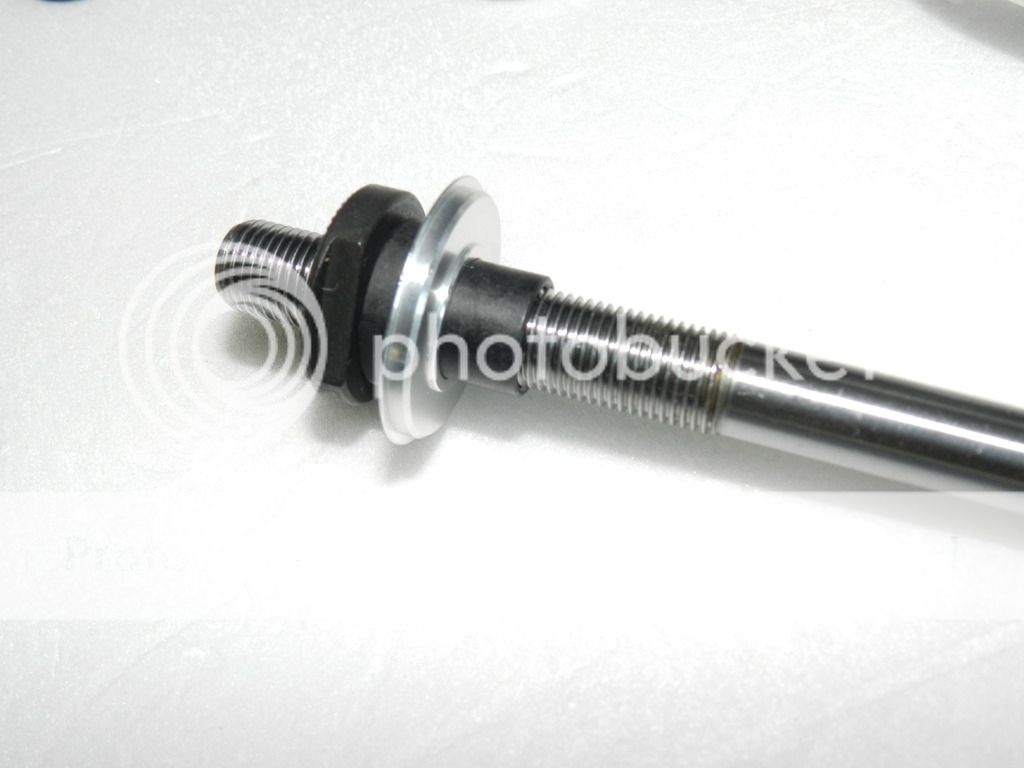
I converted to normal non Campagnolo threaded axles because hardware a lot easier to find and cheaper. I also need to get some normal looking locknuts because the ones that come with the Surly hardware kit are humongous and look like the ones that come on most SS/Fixed gear wheelsets.
Wheels MFG axle #01 (10x1 137mm) $20
Wheels MFG axle #17 (9x1 110mm) $20
Surly New Hub hardware (rear 10x1) $10 (per hub)
6001 Cartridge bearing $5 (a piece)
Surly hub dustcap $5 (a piece)
I didn't go with really nice bearings and just standard ones for right now just to get it going but I plan on doing full ceramic. Why? Just because and it's going on my frame I'm building up.
I converted to normal non Campagnolo threaded axles because hardware a lot easier to find and cheaper. I also need to get some normal looking locknuts because the ones that come with the Surly hardware kit are humongous and look like the ones that come on most SS/Fixed gear wheelsets.
Last edited by Henry III; 04-27-15 at 09:10 PM.
04-27-15, 08:59 PM
#42
Senior Member
Join Date: Jul 2004
Location: Yukon, Canada
Posts: 8,759
Mentioned: 13 Post(s)
Tagged: 0 Thread(s)
Quoted: 113 Post(s)
Likes: 0
Liked 16 Times
in
14 Posts
So awesome. Would make a lot of sense on old track shells one wanted to use on the road. In fact my girlfriend has an old record track hub on the back of her fixed gear that has non-original hardware. This would make a perfect upgrade.
__________________
1 Super Record bike, 1 Nuovo Record bike, 1 Pista, 1 Road, 1 Cyclocross/Allrounder, 1 MTB, 1 Touring, 1 Fixed gear
1 Super Record bike, 1 Nuovo Record bike, 1 Pista, 1 Road, 1 Cyclocross/Allrounder, 1 MTB, 1 Touring, 1 Fixed gear
04-27-15, 10:42 PM
#44
Senior Member

Join Date: Aug 2009
Location: Berkeley, CA
Posts: 7,241
Bikes: '72 Cilo Pacer, '72 Gitane Gran Tourisme, '72 Peugeot PX10, '73 Speedwell Ti, '74 Peugeot UE-8, '75 Peugeot PR-10L, '80 Colnago Super, '85 De Rosa Pro, '86 Look Equipe 753, '86 Look KG86, '89 Parkpre Team, '90 Parkpre Team MTB, '90 Merlin
Mentioned: 87 Post(s)
Tagged: 0 Thread(s)
Quoted: 833 Post(s)
Liked 2,125 Times
in
554 Posts
Nice work, Henry. (As someone who dreads any added drag and the effects it plays on my fragile psyche, especially during climbs--how many times have I stopped to find my brakes are not rubbing and that I only have my tired legs to blame?,) I doubt it's an improvement in terms of performance, but I'd still consider it a great success nonetheless. I applaud your gumption! 
 04-27-15, 10:47 PM
#45
is just a real cool dude
Thread Starter
Join Date: Aug 2010
Location: The Thumb, MI
Posts: 3,165
Mentioned: 12 Post(s)
Tagged: 0 Thread(s)
Quoted: 31 Post(s)
Likes: 0
Liked 32 Times
in
14 Posts
It's kind of like climbing a huge fence when there's an open gate right there. You just want to say that you did it even though there's an easier way of doing it.
04-28-15, 05:22 AM
#46
Senior Member

Join Date: Apr 2005
Location: Wherever
Posts: 16,748
Mentioned: 92 Post(s)
Tagged: 0 Thread(s)
Quoted: 556 Post(s)
Likes: 0
Liked 132 Times
in
78 Posts
I was in the "WHY do it" camp when I started reading this thread. Having seen your results, I say…why not!? Bravo, Henry.
04-28-15, 05:41 AM
#47
Senior Member

Join Date: Apr 2012
Location: Middle Earth (aka IA)
Posts: 20,435
Bikes: A bunch of old bikes and a few new ones
Mentioned: 178 Post(s)
Tagged: 0 Thread(s)
Quoted: 5888 Post(s)
Liked 3,471 Times
in
2,079 Posts
cool project; this is a great way to get an old hub rolling again.
04-28-15, 02:31 PM
#48
Ride, Wrench, Swap, Race
Join Date: Jan 2010
Location: Northern California
Posts: 9,193
Bikes: Cheltenham-Pedersen racer, Boulder F/S Paris-Roubaix, Varsity racer, '52 Christophe, '62 Continental, '92 Merckx, '75 Limongi, '76 Presto, '72 Gitane SC, '71 Schwinn SS, etc.
Mentioned: 132 Post(s)
Tagged: 0 Thread(s)
Quoted: 1565 Post(s)
Liked 1,295 Times
in
865 Posts
I agree, this seems to have turned out really well.
Lucky to have found those axle bits cheap, they remind me of old Specialized hub's bits.
These hubs will deserve some polishing now I think.
Good luck with getting the "cone" adjustment routine sorted out, good to be practicing with the cheap standard bearings, I would start out on the loose side and see how it mounts up and behaves after the QR nut is adjusted and after some initial miles.
 04-28-15, 03:14 PM
#50
Senior Member

Join Date: Aug 2003
Location: Tampa, Florida
Posts: 13,954
Mentioned: 40 Post(s)
Tagged: 0 Thread(s)
Quoted: 413 Post(s)
Likes: 0
Liked 109 Times
in
78 Posts
Henry, good job. I'm waiting to see how the front turns.
Adjusting the bearings is easy, I'll shoot you a PM on my quick n easy way of doing.
And to all the nay sayers... there is a gross shortage of spare frint hub parts. Over the years I've had more front hubs, by far, than rears with bad cones, races and shells. My spare parts bin is over loaded with rear cones and races. In a certain sense henry is saving, not discarding, old Record shells that otherwise may have found themselves in the trash.