


What kind of stem is this?
 10-31-15, 10:42 AM
#1
Senior Member
Thread Starter
Join Date: Apr 2014
Location: Davis, CA
Posts: 113
Bikes: Bridgestone 400
Mentioned: 0 Post(s)
Tagged: 0 Thread(s)
Quoted: 0 Post(s)
Likes: 0
Liked 0 Times
in
0 Posts
What kind of stem is this?
Hello!
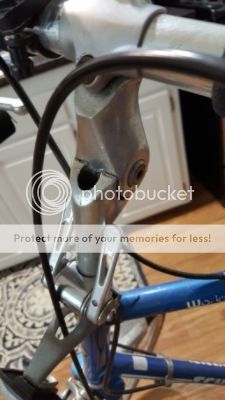
Last night I purchased a Schwinn World Sport (I believe 1984 based on the front logo number; 2014). The owner was the second owner and had only changed the stem before and I am trying to identify what type it is. It is quite tall when straight, and has a pivot in the center. Just wondering to satiate my own curiosity.
Here is a pic:
Thanks!
Last night I purchased a Schwinn World Sport (I believe 1984 based on the front logo number; 2014). The owner was the second owner and had only changed the stem before and I am trying to identify what type it is. It is quite tall when straight, and has a pivot in the center. Just wondering to satiate my own curiosity.
Here is a pic:

Thanks!
Last edited by LuckySquirrel; 10-31-15 at 11:10 AM. Reason: Resize photo
 10-31-15, 10:42 AM
#2
Senior Member
Thread Starter
Join Date: Apr 2014
Location: Davis, CA
Posts: 113
Bikes: Bridgestone 400
Mentioned: 0 Post(s)
Tagged: 0 Thread(s)
Quoted: 0 Post(s)
Likes: 0
Liked 0 Times
in
0 Posts
Sorry about the picture being so large. It was taken with my phone which has a pretty high resolution. Is there a recommended/quick way to scale the image down using Photobucket, etc. before uploading?
10-31-15, 10:48 AM
#3
cowboy, steel horse, etc

Join Date: Sep 2008
Location: The hot spot.
Posts: 44,842
Bikes: everywhere
Mentioned: 71 Post(s)
Tagged: 1 Thread(s)
Quoted: 12774 Post(s)
Liked 7,691 Times
in
4,081 Posts
Dunno specifically what kind, but it looks like an adjustable stem that's had the extension put on backwards, and it looks like they then twisted the quill 180� from where it's supposed to be.
10-31-15, 10:53 AM
#4
Senior Member
Join Date: Nov 2013
Location: South of the Twin Cities, MN
Posts: 4,122
Mentioned: 29 Post(s)
Tagged: 1 Thread(s)
Quoted: 1119 Post(s)
Liked 2,255 Times
in
1,311 Posts
Whatever brand adjustable stem it is, it's on backwards. Tilting it down now is just going to bring the bars closer to the saddle.
10-31-15, 10:59 AM
#5
Senior Member
Thread Starter
Join Date: Apr 2014
Location: Davis, CA
Posts: 113
Bikes: Bridgestone 400
Mentioned: 0 Post(s)
Tagged: 0 Thread(s)
Quoted: 0 Post(s)
Likes: 0
Liked 0 Times
in
0 Posts
 .
10-31-15, 11:01 AM
.
10-31-15, 11:01 AM
#6
Senior Member
Thread Starter
Join Date: Apr 2014
Location: Davis, CA
Posts: 113
Bikes: Bridgestone 400
Mentioned: 0 Post(s)
Tagged: 0 Thread(s)
Quoted: 0 Post(s)
Likes: 0
Liked 0 Times
in
0 Posts
") .
10-31-15, 11:06 AM
.
10-31-15, 11:06 AM
#7
Senior Member
Thread Starter
Join Date: Apr 2014
Location: Davis, CA
Posts: 113
Bikes: Bridgestone 400
Mentioned: 0 Post(s)
Tagged: 0 Thread(s)
Quoted: 0 Post(s)
Likes: 0
Liked 0 Times
in
0 Posts
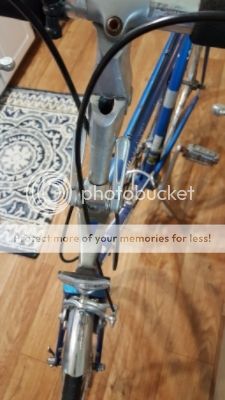
Does this seem like the correct routing of cables? I am planning to redo the cables and housing but haven't tried it before (watched a few YouTube videos last night and read part of SB's article). I want to be able to copy the routing configuration and use the current housing as a template if it is correct.
 10-31-15, 11:11 AM
#8
Senior Member
Thread Starter
Join Date: Apr 2014
Location: Davis, CA
Posts: 113
Bikes: Bridgestone 400
Mentioned: 0 Post(s)
Tagged: 0 Thread(s)
Quoted: 0 Post(s)
Likes: 0
Liked 0 Times
in
0 Posts
Hm...I tried to resize the photo to 50% using Photobucket's Editor and updated the post with the new link but it didn't seem to change it. Is the post still referencing the original photo somehow?
Edit: It worked! Just had a slight delay.
Edit: It worked! Just had a slight delay.
Last edited by LuckySquirrel; 10-31-15 at 10:17 PM.
10-31-15, 11:16 AM
#9
cowboy, steel horse, etc
Join Date: Sep 2008
Location: The hot spot.
Posts: 44,842
Bikes: everywhere
Mentioned: 71 Post(s)
Tagged: 1 Thread(s)
Quoted: 12774 Post(s)
Liked 7,691 Times
in
4,081 Posts
Thank you! Quick question; how difficult is it to remove the handlebars from the stem? Everything I read online makes it seem like this is just a few minute quick job, but after releasing the screw from the stem how does the handlebar slide out? Sorry for the noob question .
.If there's only the one bolt clamping the bar, then you'll have to remove the bar tape and brake lever from one side of the handlebars, loosen the bolt clamping the bar, then pull the bar through the stem.
It kinda looks like the stem has a removable 2-bolt faceplate, so it's likely the first scenario.
10-31-15, 11:19 AM
#10
Senior Member
Join Date: Nov 2005
Location: NW Ohio
Posts: 3,420
Bikes: 1984 Miyata 310, 1986 Schwinn Sierra, 2011 Jamis Quest, 1980 Peugeot TH8 Tandem, 1992 Performance Parabola, 1987 Ross Mt. Hood, 1988 Schwinn LeTour, 1988 Trek 400T, 1981 Fuji S12-S LTD, 197? FW Evans
Mentioned: 24 Post(s)
Tagged: 0 Thread(s)
Quoted: 531 Post(s)
Liked 1,005 Times
in
514 Posts
No, the cables are not routed correctly. The shifters should have the cable exiting toward the front of the bike. If you remove the shift cables and then remove the bolt in middle of the stem where it flexes, you can then rotate the stem around to face the front. Leave the shifters attached and they will end up in the correct orientation. Then reassemble the stem and rethread the cables and you're done.
10-31-15, 11:27 AM
#11
cowboy, steel horse, etc
Join Date: Sep 2008
Location: The hot spot.
Posts: 44,842
Bikes: everywhere
Mentioned: 71 Post(s)
Tagged: 1 Thread(s)
Quoted: 12774 Post(s)
Liked 7,691 Times
in
4,081 Posts
Does this seem like the correct routing of cables? I am planning to redo the cables and housing but haven't tried it before (watched a few YouTube videos last night and read part of SB's article). I want to be able to copy the routing configuration and use the current housing as a template if it is correct.
Something like this:

You'll want to disconnect the shifter cables prior to rotating the quill 180�. The shifters will be facing the right way after you rotate the quill. Their current position in front of the stem seems like it would be a tad awkward.
10-31-15, 11:39 AM
#12
cowboy, steel horse, etc
Join Date: Sep 2008
Location: The hot spot.
Posts: 44,842
Bikes: everywhere
Mentioned: 71 Post(s)
Tagged: 1 Thread(s)
Quoted: 12774 Post(s)
Liked 7,691 Times
in
4,081 Posts
I imagine Davis has some good used parts bike shops. Might wanna pop in to a couple in search of a proper stem. Around here you can get SR-Sakae stems for $5-10.
Looks like Schwinn liked to run front cable in front of bars sometimes.

Looks like Schwinn liked to run front cable in front of bars sometimes.
10-31-15, 02:07 PM
#13
Senior Member
That's a jacked up adjustable stem. Something you would find on inexpensive cruisers or maybe some hybrids. Looks like it's dangerously extended past safe insertion line. Need to ditch that thing.
10-31-15, 06:09 PM
#14

Bikes are okay, I guess.

Join Date: Jan 2015
Location: Richmond, Virginia
Posts: 6,938
Bikes: Waterford Paramount Touring, Giant CFM-2, Raleigh Sports 3-speeds in M23 & L23, Schwinn Cimarron oddball build, Marin Palisades Trail dropbar conversion, Nishiki Cresta GT
Mentioned: 69 Post(s)
Tagged: 0 Thread(s)
Quoted: 2647 Post(s)
Liked 2,446 Times
in
1,557 Posts
Does this seem like the correct routing of cables? I am planning to redo the cables and housing but haven't tried it before (watched a few YouTube videos last night and read part of SB's article). I want to be able to copy the routing configuration and use the current housing as a template if it is correct.
10-31-15, 10:03 PM
#15
Senior Member
Thread Starter
Join Date: Apr 2014
Location: Davis, CA
Posts: 113
Bikes: Bridgestone 400
Mentioned: 0 Post(s)
Tagged: 0 Thread(s)
Quoted: 0 Post(s)
Likes: 0
Liked 0 Times
in
0 Posts
It depends. If there's another bolt just above the frame of this pic, then it's really easy to remove the bars from the stem, just loosen both bolts and pull the faceplate off the stem, then the bars are free.
If there's only the one bolt clamping the bar, then you'll have to remove the bar tape and brake lever from one side of the handlebars, loosen the bolt clamping the bar, then pull the bar through the stem.
It kinda looks like the stem has a removable 2-bolt faceplate, so it's likely the first scenario.
10-31-15, 10:05 PM
#16
Senior Member
Thread Starter
Join Date: Apr 2014
Location: Davis, CA
Posts: 113
Bikes: Bridgestone 400
Mentioned: 0 Post(s)
Tagged: 0 Thread(s)
Quoted: 0 Post(s)
Likes: 0
Liked 0 Times
in
0 Posts
No, the cables are not routed correctly. The shifters should have the cable exiting toward the front of the bike. If you remove the shift cables and then remove the bolt in middle of the stem where it flexes, you can then rotate the stem around to face the front. Leave the shifters attached and they will end up in the correct orientation. Then reassemble the stem and rethread the cables and you're done.
10-31-15, 10:07 PM
#17
Senior Member
Thread Starter
Join Date: Apr 2014
Location: Davis, CA
Posts: 113
Bikes: Bridgestone 400
Mentioned: 0 Post(s)
Tagged: 0 Thread(s)
Quoted: 0 Post(s)
Likes: 0
Liked 0 Times
in
0 Posts
Some people like the brake cables to go behind the handlebars. Housing looks a little short at that bar height, but with a more traditional stem configuration it might be long enough.
Something like this:
You'll want to disconnect the shifter cables prior to rotating the quill 180�. The shifters will be facing the right way after you rotate the quill. Their current position in front of the stem seems like it would be a tad awkward.
Something like this:
You'll want to disconnect the shifter cables prior to rotating the quill 180�. The shifters will be facing the right way after you rotate the quill. Their current position in front of the stem seems like it would be a tad awkward.
.
10-31-15, 10:08 PM
#18
Senior Member
Thread Starter
Join Date: Apr 2014
Location: Davis, CA
Posts: 113
Bikes: Bridgestone 400
Mentioned: 0 Post(s)
Tagged: 0 Thread(s)
Quoted: 0 Post(s)
Likes: 0
Liked 0 Times
in
0 Posts
Would it be better to keep it this way since it was the original configuration?
10-31-15, 10:12 PM
#19
Senior Member
Thread Starter
Join Date: Apr 2014
Location: Davis, CA
Posts: 113
Bikes: Bridgestone 400
Mentioned: 0 Post(s)
Tagged: 0 Thread(s)
Quoted: 0 Post(s)
Likes: 0
Liked 0 Times
in
0 Posts
How can I check whether the tubes need to be changed? They're still holding air just fine. The front tire looks okay but the back tire looks like it is threading near the rim, so I was planning on just replacing both tires.
When cleaning the rims, should I just clean them with some diluted Simple Green and then use alcohol to wipe the rim wall to get rid of the degreaser? Is that an acceptable method?
10-31-15, 10:16 PM
#20
Senior Member
Thread Starter
Join Date: Apr 2014
Location: Davis, CA
Posts: 113
Bikes: Bridgestone 400
Mentioned: 0 Post(s)
Tagged: 0 Thread(s)
Quoted: 0 Post(s)
Likes: 0
Liked 0 Times
in
0 Posts
Take a close look at the shifters. They are installed backwards, as others have mentioned, but it appears that the left one (your left when on the bike) operates the front derailleur as the left shifter should do, even though this is the individual lever that should operate the rear. Someone really botched this install.
Link to stand for reference: https://www.amazon.com/Venzo-Mechanic...mechanic+stand
It seems like the rear brake is stuck in a closed position. I opened it up a bit but will definitely need to replace the cables/housing and add some lubricant to the pivot of the brake to make it work better. Should I be worried about any damage to the spring? Are springs for brakes something that can be purchased and replaced? I'm assuming that it was still only elastically deformed so there shouldn't be any plastic deformation, but just want to see what everyone thinks.
11-01-15, 11:28 AM
#21
Bikes are okay, I guess.
Join Date: Jan 2015
Location: Richmond, Virginia
Posts: 6,938
Bikes: Waterford Paramount Touring, Giant CFM-2, Raleigh Sports 3-speeds in M23 & L23, Schwinn Cimarron oddball build, Marin Palisades Trail dropbar conversion, Nishiki Cresta GT
Mentioned: 69 Post(s)
Tagged: 0 Thread(s)
Quoted: 2647 Post(s)
Liked 2,446 Times
in
1,557 Posts
The brake should have two nuts on its front that are double-nutted together. They might be tightened down too much. Try backing them off a touch to see if the brake operates more smoothly. The spring on a brake is remarkably flexible and can be re-bent if you need more tension. Springs for a given brake are more likely to be found in a shop's or collector's scrounge box than available new. Check your nearest shop first. Good luck!
11-01-15, 01:37 PM
#22
Senior Member
Thread Starter
Join Date: Apr 2014
Location: Davis, CA
Posts: 113
Bikes: Bridgestone 400
Mentioned: 0 Post(s)
Tagged: 0 Thread(s)
Quoted: 0 Post(s)
Likes: 0
Liked 0 Times
in
0 Posts
The brake should have two nuts on its front that are double-nutted together. They might be tightened down too much. Try backing them off a touch to see if the brake operates more smoothly. The spring on a brake is remarkably flexible and can be re-bent if you need more tension. Springs for a given brake are more likely to be found in a shop's or collector's scrounge box than available new. Check your nearest shop first. Good luck!
11-01-15, 04:29 PM
#23
Bikes are okay, I guess.
Join Date: Jan 2015
Location: Richmond, Virginia
Posts: 6,938
Bikes: Waterford Paramount Touring, Giant CFM-2, Raleigh Sports 3-speeds in M23 & L23, Schwinn Cimarron oddball build, Marin Palisades Trail dropbar conversion, Nishiki Cresta GT
Mentioned: 69 Post(s)
Tagged: 0 Thread(s)
Quoted: 2647 Post(s)
Liked 2,446 Times
in
1,557 Posts
Lube never hurts, except on your brake pads.
11-08-15, 11:30 PM
#24
Senior Member
Thread Starter
Join Date: Apr 2014
Location: Davis, CA
Posts: 113
Bikes: Bridgestone 400
Mentioned: 0 Post(s)
Tagged: 0 Thread(s)
Quoted: 0 Post(s)
Likes: 0
Liked 0 Times
in
0 Posts
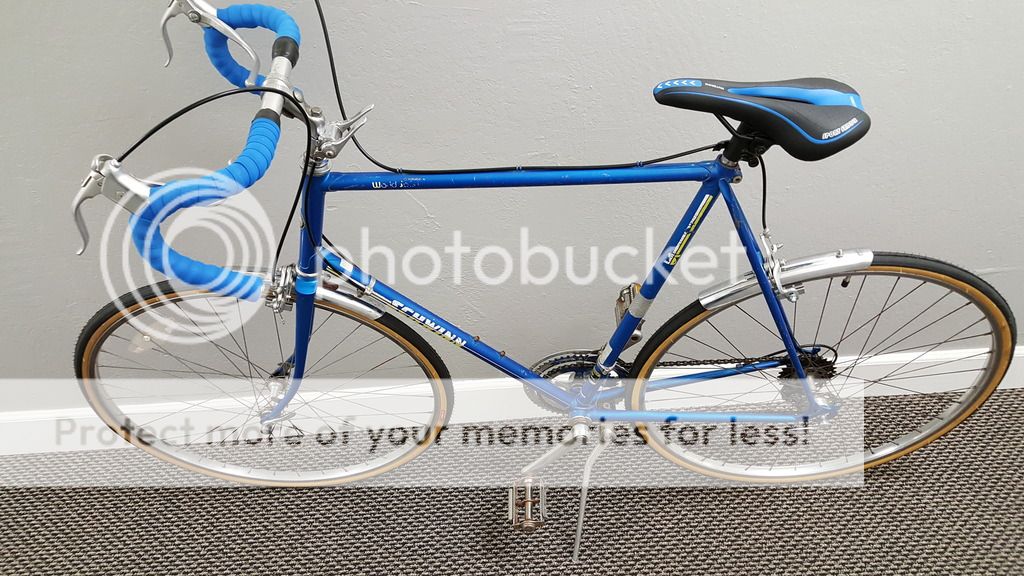
Here is an update to this bike since I know everyone likes pictures  .
.
I ended up learning a ton about bike mechanics on this project! Had a lot of fun (and some frustrations) while working on this, but it was a great learning experience.
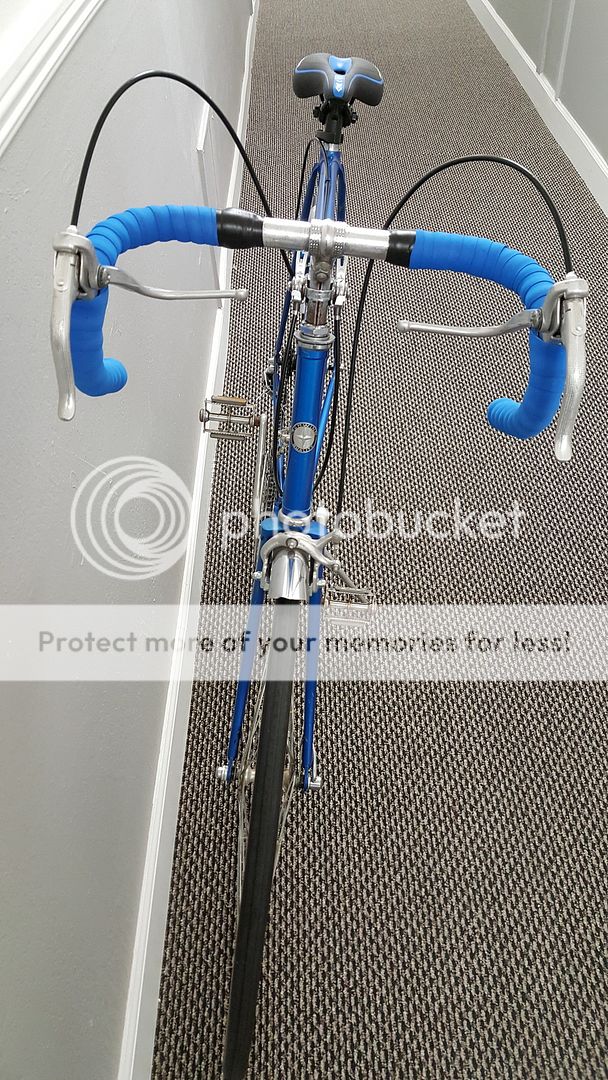
I ended up overhauling the hubs, BB, and headset. Replaced the rim tape, tubes, and tires. Put on a new chain, cables/housing, brake pads, bar tape, and seat. Went to the local bike co-op in Davis (very helpful and knowledgeable people), and fixed a slightly bent rear dropout and rear derailleur hanger as well as replaced that stem. Unfortunately, the bike was slightly large for me so I ended up selling it to another student, but am looking forward to fixing up my BS next!
And for the pics!
.I ended up learning a ton about bike mechanics on this project! Had a lot of fun (and some frustrations) while working on this, but it was a great learning experience.
I ended up overhauling the hubs, BB, and headset. Replaced the rim tape, tubes, and tires. Put on a new chain, cables/housing, brake pads, bar tape, and seat. Went to the local bike co-op in Davis (very helpful and knowledgeable people), and fixed a slightly bent rear dropout and rear derailleur hanger as well as replaced that stem. Unfortunately, the bike was slightly large for me so I ended up selling it to another student, but am looking forward to fixing up my BS next!
And for the pics!

 11-09-15, 12:01 AM
#25
Senior Member

Join Date: Jan 2009
Location: San Diego
Posts: 744
Bikes: Too many to list, all titanium or steel.
Mentioned: 0 Post(s)
Tagged: 0 Thread(s)
Quoted: 7 Post(s)
Likes: 0
Liked 8 Times
in
7 Posts
Here is an update to this bike since I know everyone likes pictures .
I ended up learning a ton about bike mechanics on this project! Had a lot of fun (and some frustrations) while working on this, but it was a great learning experience.
I ended up overhauling the hubs, BB, and headset. Replaced the rim tape, tubes, and tires. Put on a new chain, cables/housing, brake pads, bar tape, and seat. Went to the local bike co-op in Davis (very helpful and knowledgeable people), and fixed a slightly bent rear dropout and rear derailleur hanger as well as replaced that stem. Unfortunately, the bike was slightly large for me so I ended up selling it to another student, but am looking forward to fixing up my BS next!
And for the pics!
.I ended up learning a ton about bike mechanics on this project! Had a lot of fun (and some frustrations) while working on this, but it was a great learning experience.
I ended up overhauling the hubs, BB, and headset. Replaced the rim tape, tubes, and tires. Put on a new chain, cables/housing, brake pads, bar tape, and seat. Went to the local bike co-op in Davis (very helpful and knowledgeable people), and fixed a slightly bent rear dropout and rear derailleur hanger as well as replaced that stem. Unfortunately, the bike was slightly large for me so I ended up selling it to another student, but am looking forward to fixing up my BS next!
And for the pics!