


Varsinental project
 12-14-16, 08:52 PM
#1

I am potato.
Thread Starter

Join Date: Jun 2015
Location: Pacific Northwest
Posts: 3,116
Bikes: Only precision built, custom high performance elitist machines of the highest caliber. 🍆
Mentioned: 29 Post(s)
Tagged: 0 Thread(s)
Quoted: 1789 Post(s)
Liked 1,629 Times
in
933 Posts
Varsinental project
So the story with this Varsinental began with a Craigslist ad for a $40 frame and "everything you need for a single speed, and other stuff."
When I got to the guys house on Capitol Hill in Seattle, the owner said he was moving to Australia and was going to make a single speed, but only got as far as cutting off the cable bosses, kickstand and sanding off the paint.
I only agreed to purchase because in the large paper bag of mixed parts from various Continentals and Varsities was also brake levers appropriate for time-trial or aero bars. I figured at the very least they were worth $40 retail, so before I knew it, the whole pile was in the back of the Prius and I was on my way home to an irritated wife wondering how much I was going to spend "this time."
After a month of research, Connie found herself in the good hands of the folks at R+E Cycles https://www.rodbikes.com/ . The frame was re-tracked for 130 mm wheels, and a whole host of other modifications performed to thoroughly modernize this nearly 45 year old piece of Americana.
Because of an incident from my youth involving a ladies bike, a steep hill and myself coming to a rest upside down in a tree, I've developed a prejudice against Schwinn long reach calipers. So to start off this project, no matter which way it evolved, the seat stay/brake brace was moved to accommodate modern short/medium reach dual pivot brakes and 700c wheels:
 IMG_0551 by Richard Mozzarella, on Flickr
The heavy kick stand and chain-stay brace was already cut out when I bought the junk pile. Because the 1972 catalogue said it was integral to design, and I was concerned about "noodleness" whether founded or not, a new chain stay brace installed: IMG_0552 by Richard Mozzarella, on Flickr
Because the stamped drop outs were too thin for modern quick release wheels with out a washer or spacer on the QR skewer, and because of interference issues caused by the old style claw style derailer nut with modern 9/10/11 speed cassettes, the decision was made to braze on a new hanger.
 IMG_0553 by Richard Mozzarella, on Flickr
The other side was made to match:
 IMG_0554 by Richard Mozzarella, on Flickr
Derailleur cable boss' replaced:
 IMG_0555 by Richard Mozzarella, on Flickr
More cable bosses to replace the single speed disaster idea:
 IMG_0556 by Richard Mozzarella, on Flickr
Drill and tap for cable routing:
 IMG_0616 by Richard Mozzarella, on Flickr
Clearly, this monstrosity needs a Truvativ bottom bracket adaptor.
 IMG_0557 by Richard Mozzarella, on Flickr
https://harriscyclery.net/product/tru...apter-1335.htm What I hadn't counted on was the mill step inside to cause such a heart ache. To avoid the obstruction,I chamfered the inboard edge of the bushing at about a 22.5 degree angle to a depth of about .250 inches. It could be that Truvativ is correct, and Schwinn was sloppy with their tolerances. I am not satisfied with the interference fit of the bushing in the shell, and had I been making the bushing from scratch, I would have used a slightly larger diameter bushing for a tighter press fit. Because the aluminum bushing was to interface with a steel bore, I passivized it with an application of chromium-phosphate, and finished it with baked on aviation chromate primer. What a PIA. The reworked adapter was summarily greased and installed, but should it prove not tight enough, I am prepared with Loctite 609 and failing that, I am mentally prepared to epoxy it in permanent. We shall see...For the Ultegra 6800 crank, I paired it with a Shimano BBR60 bottom bracket and had exactly zero issues. https://www.amazon.com/Shimano-BBR60.../dp/B01KT43R3I Having got this far, the bike sat awhile while I decided what direction to take the build. Eventually, despite owning a complete Sora groupset, in a box, in my garage, I decided on Ultegra 6800 with a 172.5mm crankset and 50/34 compact. The complete group set came from the usual .com suspects a piece at a time as quickly as spousal embezzlement would allow.
Front half of bike, Craigslist Easton 70 carbon handle bars, A PorkCHop BMX headset https://porkchopbmx.com/vp-h755-bmx-b...mm-cups-black/ The top lock-nut of the headset required about .030 material be reamed out for the quill stem adapter to fit. I'm not too sure how I would feel about machining on a chrome finished item after the finish had been applied, but there is a chrome version of the headset it available too, if any one is interested. The original headset was more-or-less a loose install item. I wrapped the new headset with .002 shim stock and some poly-sulfide sealant (think JB-Weld or similar) and pressed it into the frame by lightly tapping with a 6 pound sledge hammer. When the sealant cured, I removed the headset, and the shim remained part of the frame. The cups were then greased and reinstalled. Headsets in the future ought to be simple. I blame this on quality-control of the original manufacture. The quill stem to thread less adaptor is https://www.niagaracycle.com/categori...adapter-silver The stem was $10 from the take-off bin at Performance Bike, I think it's 17 degrees rise @ 120mm length. I think if I could elevate the bar height about an inch, I'd really be happy with the fit, but we'll see after it gets ridden around awhile. Finally the forks are https://www.nashbar.com/webapp/wcs/st...2_174894_-1___ You would think 160mm would be the right size considering the frame measures 130mm between the cups, but the headset listed above is a bit taller than expected. On special the forks can be had for <$70 which is comparable to plain metal forks not on special, and their customer service is top notch when it comes to exchanges.

When I got to the guys house on Capitol Hill in Seattle, the owner said he was moving to Australia and was going to make a single speed, but only got as far as cutting off the cable bosses, kickstand and sanding off the paint.
I only agreed to purchase because in the large paper bag of mixed parts from various Continentals and Varsities was also brake levers appropriate for time-trial or aero bars. I figured at the very least they were worth $40 retail, so before I knew it, the whole pile was in the back of the Prius and I was on my way home to an irritated wife wondering how much I was going to spend "this time."
After a month of research, Connie found herself in the good hands of the folks at R+E Cycles https://www.rodbikes.com/ . The frame was re-tracked for 130 mm wheels, and a whole host of other modifications performed to thoroughly modernize this nearly 45 year old piece of Americana.
Because of an incident from my youth involving a ladies bike, a steep hill and myself coming to a rest upside down in a tree, I've developed a prejudice against Schwinn long reach calipers. So to start off this project, no matter which way it evolved, the seat stay/brake brace was moved to accommodate modern short/medium reach dual pivot brakes and 700c wheels:
IMG_0551 by Richard Mozzarella, on FlickrThe heavy kick stand and chain-stay brace was already cut out when I bought the junk pile. Because the 1972 catalogue said it was integral to design, and I was concerned about "noodleness" whether founded or not, a new chain stay brace installed:
IMG_0552 by Richard Mozzarella, on FlickrBecause the stamped drop outs were too thin for modern quick release wheels with out a washer or spacer on the QR skewer, and because of interference issues caused by the old style claw style derailer nut with modern 9/10/11 speed cassettes, the decision was made to braze on a new hanger.
IMG_0553 by Richard Mozzarella, on FlickrThe other side was made to match:
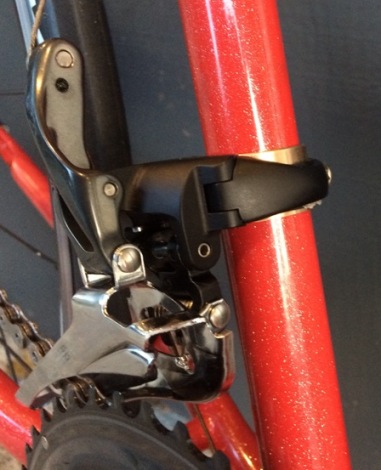
IMG_0554 by Richard Mozzarella, on FlickrDerailleur cable boss' replaced:
IMG_0555 by Richard Mozzarella, on FlickrMore cable bosses to replace the single speed disaster idea:
IMG_0556 by Richard Mozzarella, on FlickrDrill and tap for cable routing:
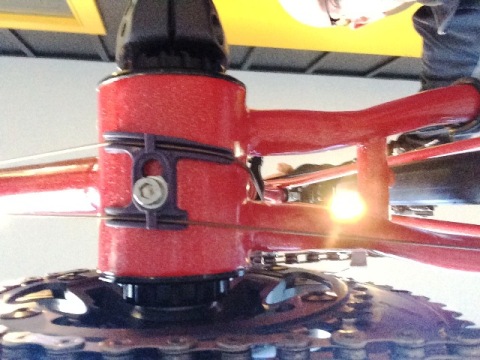
IMG_0616 by Richard Mozzarella, on FlickrClearly, this monstrosity needs a Truvativ bottom bracket adaptor.
IMG_0557 by Richard Mozzarella, on Flickrhttps://harriscyclery.net/product/tru...apter-1335.htm What I hadn't counted on was the mill step inside to cause such a heart ache. To avoid the obstruction,I chamfered the inboard edge of the bushing at about a 22.5 degree angle to a depth of about .250 inches. It could be that Truvativ is correct, and Schwinn was sloppy with their tolerances. I am not satisfied with the interference fit of the bushing in the shell, and had I been making the bushing from scratch, I would have used a slightly larger diameter bushing for a tighter press fit. Because the aluminum bushing was to interface with a steel bore, I passivized it with an application of chromium-phosphate, and finished it with baked on aviation chromate primer. What a PIA. The reworked adapter was summarily greased and installed, but should it prove not tight enough, I am prepared with Loctite 609 and failing that, I am mentally prepared to epoxy it in permanent. We shall see...For the Ultegra 6800 crank, I paired it with a Shimano BBR60 bottom bracket and had exactly zero issues. https://www.amazon.com/Shimano-BBR60.../dp/B01KT43R3I Having got this far, the bike sat awhile while I decided what direction to take the build. Eventually, despite owning a complete Sora groupset, in a box, in my garage, I decided on Ultegra 6800 with a 172.5mm crankset and 50/34 compact. The complete group set came from the usual .com suspects a piece at a time as quickly as spousal embezzlement would allow.
Front half of bike, Craigslist Easton 70 carbon handle bars, A PorkCHop BMX headset https://porkchopbmx.com/vp-h755-bmx-b...mm-cups-black/ The top lock-nut of the headset required about .030 material be reamed out for the quill stem adapter to fit. I'm not too sure how I would feel about machining on a chrome finished item after the finish had been applied, but there is a chrome version of the headset it available too, if any one is interested. The original headset was more-or-less a loose install item. I wrapped the new headset with .002 shim stock and some poly-sulfide sealant (think JB-Weld or similar) and pressed it into the frame by lightly tapping with a 6 pound sledge hammer. When the sealant cured, I removed the headset, and the shim remained part of the frame. The cups were then greased and reinstalled. Headsets in the future ought to be simple. I blame this on quality-control of the original manufacture. The quill stem to thread less adaptor is https://www.niagaracycle.com/categori...adapter-silver The stem was $10 from the take-off bin at Performance Bike, I think it's 17 degrees rise @ 120mm length. I think if I could elevate the bar height about an inch, I'd really be happy with the fit, but we'll see after it gets ridden around awhile. Finally the forks are https://www.nashbar.com/webapp/wcs/st...2_174894_-1___ You would think 160mm would be the right size considering the frame measures 130mm between the cups, but the headset listed above is a bit taller than expected. On special the forks can be had for <$70 which is comparable to plain metal forks not on special, and their customer service is top notch when it comes to exchanges.

Last edited by base2; 02-05-20 at 06:54 PM. Reason: I'm a noob
 12-14-16, 08:53 PM
#2
I am potato.
Thread Starter
Join Date: Jun 2015
Location: Pacific Northwest
Posts: 3,116
Bikes: Only precision built, custom high performance elitist machines of the highest caliber. 🍆
Mentioned: 29 Post(s)
Tagged: 0 Thread(s)
Quoted: 1789 Post(s)
Liked 1,629 Times
in
933 Posts
Front derailer bushing, 1X1.125 inches, cut to length (~.6 inches, then in half to go around seat tube) https://www.amazon.com/gp/product/B0...?ie=UTF8&psc=1 3 bushings are good for about 6-9 bikes. In the lessons learned category, a braze on lug would have really been the bees-knees. In any case the bikeforums inspired bushing really is a good solution.
 IMG_0607 by Richard Mozzarella, on Flickr
Custom welded seat post from eBay: https://www.ebay.com/itm/ATOM-BIKES-H...-/172002203385 I ordered the 14 inch because I wasn't sure what I'd need. In the end I cut about 3 inches off, and have about 4.5 inches of protrusion into the seat tube. The head came from the local co-op, https://bikeworks.org/ I knew that with the relaxed geometry, I didn't want any set-back, so a simple used mountain bike seat post for $5 was an easy find. Finding a qualified welder that could weld the cast head to the extruded 6061 solid pipe was the hardest part of this whole project. $25 and a week later I was in business and looking for a clamp.
Again, Porkchop BMX to the rescue with a clamp that applies force a little bit differently than the original. It operates by squeezing the front/back together instead of side to side, pinching at the rear like the original. https://porkchopbmx.com/dia-compe-mx-...5-4mm-1-black/
The new post must be manufactured to much higher tolerances. The old rusty post, worked, but was tight and the clamp area are suffered from what looked like massive over torquing. Because of the damage the new post wouldn't work at all. It took about an hour to hone out the deformed clamp area, but the work really paid off and the properly greased new post fit couldn't be smoother.
 IMG_0611 by Richard Mozzarella, on Flickr
Due to local terrain and my propensity to find mountain passes and hills to climb, an 11-32 cassette, found it's way on to Connie. Due to a need to quantify my vanity, a Craigslist Powertap Pro+ ($200) was paired with Craigslist free Alex Race28's and built up by the good folks at Bothell bike and Ski https://www.bikesale.com/ The cost was $100 for spokes and labor. All told a complete Powertap wheel set for $300 bucks is a good deal no matter how you slice it whether it was for a Varsinental or not, I would have jumped on the opportunity anyway. That it works for this project is so much the better. Tires, tubes and rim tape were all new and cost $0 as they were from my ready reserve of spares I keep around the garage.
 IMG_0612 by Richard Mozzarella, on Flickr
Rear cluster complete. Had I thought about it, on the Varsities the threaded hole was originally for a cable boss, and I would have ground it out before sending it off to the powder coat. But I didn't think about it, and that's just the way it is. Maybe someday it can become a taillight mount.
 IMG_0609 by Richard Mozzarella, on Flickr
The requisite cock-pit shot:
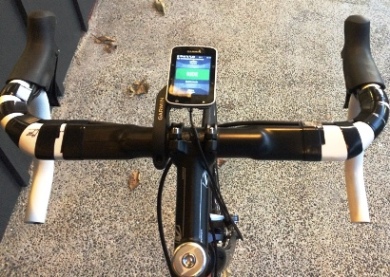 IMG_0613 by Richard Mozzarella, on Flickr
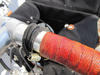
Bottom bracket area:
 IMG_0615 by Richard Mozzarella, on Flickr
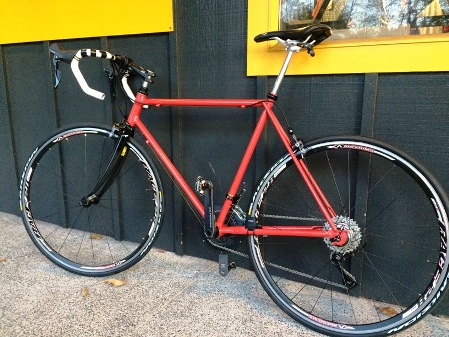
The highly esteemed Sages of the internet claim that in all matters related to cycling "light=good & heavy=bad." To that end a 32% weight reduction by way of modern technology. Behold! 25.3 pounds:
 IMG_0599 by Richard Mozzarella, on Flickr
Non-drive side:
 IMG_0603 by Richard Mozzarella, on Flickr
 IMG_0602 by Richard Mozzarella, on Flickr
Drive side:
 IMG_0604 by Richard Mozzarella, on Flickr
…And if you are wondering about the color and the sparkles it is a special order Bullseye Red and a second application of Sparkle clear coat applied by https://www.seattlepowdercoat.com/ off Leary Way in Ballard. I have nothing but praise for those guys. They really took the time to help me get exactly what I wanted. They really did top notch work and if you saw all the damage the frame had from when the previous owner hacked it up, you'd be blown away by how they really went the extra mile to make a finish to be proud of.
This was my first build. I don't know if I'll be doing another with quite this level of gusto and commitment, but I want to say "Thank You" to all of you on the C&V forum for the knowledge, ideas and inspiration found on these pages.
Now for the bar tape...

IMG_0607 by Richard Mozzarella, on FlickrCustom welded seat post from eBay: https://www.ebay.com/itm/ATOM-BIKES-H...-/172002203385 I ordered the 14 inch because I wasn't sure what I'd need. In the end I cut about 3 inches off, and have about 4.5 inches of protrusion into the seat tube. The head came from the local co-op, https://bikeworks.org/ I knew that with the relaxed geometry, I didn't want any set-back, so a simple used mountain bike seat post for $5 was an easy find. Finding a qualified welder that could weld the cast head to the extruded 6061 solid pipe was the hardest part of this whole project. $25 and a week later I was in business and looking for a clamp.
Again, Porkchop BMX to the rescue with a clamp that applies force a little bit differently than the original. It operates by squeezing the front/back together instead of side to side, pinching at the rear like the original. https://porkchopbmx.com/dia-compe-mx-...5-4mm-1-black/
The new post must be manufactured to much higher tolerances. The old rusty post, worked, but was tight and the clamp area are suffered from what looked like massive over torquing. Because of the damage the new post wouldn't work at all. It took about an hour to hone out the deformed clamp area, but the work really paid off and the properly greased new post fit couldn't be smoother.

IMG_0611 by Richard Mozzarella, on FlickrDue to local terrain and my propensity to find mountain passes and hills to climb, an 11-32 cassette, found it's way on to Connie. Due to a need to quantify my vanity, a Craigslist Powertap Pro+ ($200) was paired with Craigslist free Alex Race28's and built up by the good folks at Bothell bike and Ski https://www.bikesale.com/ The cost was $100 for spokes and labor. All told a complete Powertap wheel set for $300 bucks is a good deal no matter how you slice it whether it was for a Varsinental or not, I would have jumped on the opportunity anyway. That it works for this project is so much the better. Tires, tubes and rim tape were all new and cost $0 as they were from my ready reserve of spares I keep around the garage.
IMG_0612 by Richard Mozzarella, on FlickrRear cluster complete. Had I thought about it, on the Varsities the threaded hole was originally for a cable boss, and I would have ground it out before sending it off to the powder coat. But I didn't think about it, and that's just the way it is. Maybe someday it can become a taillight mount.

IMG_0609 by Richard Mozzarella, on FlickrThe requisite cock-pit shot:

IMG_0613 by Richard Mozzarella, on FlickrBottom bracket area:

IMG_0615 by Richard Mozzarella, on FlickrThe highly esteemed Sages of the internet claim that in all matters related to cycling "light=good & heavy=bad." To that end a 32% weight reduction by way of modern technology. Behold! 25.3 pounds:

IMG_0599 by Richard Mozzarella, on FlickrNon-drive side:

IMG_0603 by Richard Mozzarella, on FlickrIMG_0602 by Richard Mozzarella, on FlickrDrive side:
IMG_0604 by Richard Mozzarella, on Flickr…And if you are wondering about the color and the sparkles it is a special order Bullseye Red and a second application of Sparkle clear coat applied by https://www.seattlepowdercoat.com/ off Leary Way in Ballard. I have nothing but praise for those guys. They really took the time to help me get exactly what I wanted. They really did top notch work and if you saw all the damage the frame had from when the previous owner hacked it up, you'd be blown away by how they really went the extra mile to make a finish to be proud of.
This was my first build. I don't know if I'll be doing another with quite this level of gusto and commitment, but I want to say "Thank You" to all of you on the C&V forum for the knowledge, ideas and inspiration found on these pages.
Now for the bar tape...
__________________
I shouldn't have to "make myself more visible;" Drivers should just stop running people over.
Car dependency is a tax.
I shouldn't have to "make myself more visible;" Drivers should just stop running people over.
Car dependency is a tax.
Last edited by base2; 02-05-20 at 06:51 PM.
12-14-16, 09:12 PM
#3

multimodal commuter

Join Date: Nov 2006
Location: NJ, NYC, LI
Posts: 19,808
Bikes: 1940s Fothergill, 1959 Allegro Special, 1963? Claud Butler Olympic Sprint, Lambert 'Clubman', 1974 Fuji "the Ace", 1976 Holdsworth 650b conversion rando bike, 1983 Trek 720 tourer, 1984 Counterpoint Opus II, 1993 Basso Gap, 2010 Downtube 8h, and...
Mentioned: 584 Post(s)
Tagged: 0 Thread(s)
Quoted: 1908 Post(s)
Liked 574 Times
in
339 Posts
Oh, man!
Stop, please, while you're ahead! It's a Schwinn! At best, the best it can ever be, will be a repainted Schwinn. Don't throw good money after bad.
I'm sorry... but these things need to be said.
Stop, please, while you're ahead! It's a Schwinn! At best, the best it can ever be, will be a repainted Schwinn. Don't throw good money after bad.
I'm sorry... but these things need to be said.
12-15-16, 10:51 AM
#4
Senior Member
Oh how I wish I could get these photos to load! This is my kind of project 
12-15-16, 11:10 AM
#5
Senior Member
yes, pics not working here either...
 12-15-16, 11:59 AM
#7
I am potato.
Thread Starter
Join Date: Jun 2015
Location: Pacific Northwest
Posts: 3,116
Bikes: Only precision built, custom high performance elitist machines of the highest caliber. 🍆
Mentioned: 29 Post(s)
Tagged: 0 Thread(s)
Quoted: 1789 Post(s)
Liked 1,629 Times
in
933 Posts
Pics
Darn it. I so thought I had it this time. I'm at work, so I can't change it now, but I will.
In the mean time, if you click on "printable view" in thread tools box at the top of the thread, (assuming you are on desktop version of the site), then the links to the pics show. Clicking on the link gets the pic.
Sorry guys, I've regressed to a techno-noob.
Aaron
In the mean time, if you click on "printable view" in thread tools box at the top of the thread, (assuming you are on desktop version of the site), then the links to the pics show. Clicking on the link gets the pic.
Sorry guys, I've regressed to a techno-noob.
Aaron
Last edited by base2; 12-15-16 at 12:01 PM. Reason: pics darn it
12-15-16, 12:41 PM
#8
Mr. Anachronism
Join Date: Jan 2013
Location: Somewhere west of Tobie's
Posts: 2,087
Bikes: fillet-brazed Chicago Schwinns, and some other stuff
Mentioned: 29 Post(s)
Tagged: 0 Thread(s)
Quoted: 526 Post(s)
Liked 256 Times
in
165 Posts
There are many, many people who will accuse you of trying to make a silk purse from a sow's ear, but I'm not one of them. I applaud your passion for turning what most cyclists would consider useless junk into something beautiful and functional. This is exactly the kind of project that trips my trolley, and I'll admit to daydreaming about performing similar mods to a black '70 Varsity I've got in the project pile. Right down to the Nashbar fork and 700c wheels. Electro-Forged Schwinns may be ubiquitous in scrap piles all across America, but so were Model T Fords after WWII. Like the Model T, E-F Schwinns were designed and mass-produced to be cheap and indestructible transportation for the American masses. Once upon a time it seems that every American family had one. Who knows... future generations may end up embracing these bikes the way they have the Model T, as an affordable platform to break into a tinker's hobby which has grown to be financially prohibitive for many. Beautiful work! Thanks for sharing.
__________________
"My only true wisdom is in knowing I have none" -Socrates
"My only true wisdom is in knowing I have none" -Socrates
Last edited by Hudson308; 12-15-16 at 12:46 PM.
12-15-16, 01:12 PM
#9
Extraordinary Magnitude

Join Date: Aug 2009
Location: Waukesha WI
Posts: 13,646
Bikes: 1978 Trek TX700; 1978/79 Trek 736; 1984 Specialized Stumpjumper Sport; 1984 Schwinn Voyageur SP; 1985 Trek 620; 1985 Trek 720; 1986 Trek 400 Elance; 1987 Schwinn High Sierra; 1990 Miyata 1000LT
Mentioned: 84 Post(s)
Tagged: 0 Thread(s)
Quoted: 2608 Post(s)
Liked 1,699 Times
in
935 Posts
I guess... if it makes you happy.
I s'pose this is what people think of us steel frame folk out in the real world.
I s'pose this is what people think of us steel frame folk out in the real world.
__________________
*Recipient of the 2006 Time Magazine "Person Of The Year" Award*
Commence to jigglin� huh?!?!
"But hey, always love to hear from opinionated amateurs." -says some guy to Mr. Marshall.
Commence to jigglin� huh?!?!
"But hey, always love to hear from opinionated amateurs." -says some guy to Mr. Marshall.
 12-15-16, 07:11 PM
#11
Senior Member
I just spent many hours today trying to fine tune a pile of modern Walmart bikes for a Christmas give away, how I wished they were more like the Schwinns of old! I even said it out loud to the other mechanic standing beside me. At least the old Schwinns had quality...
 12-16-16, 12:33 PM
#13
Senior Member
Join Date: Mar 2013
Location: Maryland
Posts: 3,800
Bikes: Lots of English 3-speeds, a couple of old road bikes, 3 mountain bikes, 1 hybrid, and a couple of mash-ups
Mentioned: 53 Post(s)
Tagged: 0 Thread(s)
Quoted: 887 Post(s)
Liked 335 Times
in
225 Posts
 01-29-17, 02:39 PM
#14
I am potato.
Thread Starter
Join Date: Jun 2015
Location: Pacific Northwest
Posts: 3,116
Bikes: Only precision built, custom high performance elitist machines of the highest caliber. 🍆
Mentioned: 29 Post(s)
Tagged: 0 Thread(s)
Quoted: 1789 Post(s)
Liked 1,629 Times
in
933 Posts
Sorry for the long delay; life kind of took over. I finally got the picture thing figured out. You should all be able to see them now.
I asked myself why I shouldn't just upload them to an album here on BikeForums and do the linking from there. And it worked!
Anyway, The bike belongs to my wife now, the frame was just too small for me, and she loves it, but doesn't understand the cost or uniqueness of such a project. It does ride like a dream though. With any luck, she'll appreciate that when the weather turns nice.
__________________
I shouldn't have to "make myself more visible;" Drivers should just stop running people over.
Car dependency is a tax.
I shouldn't have to "make myself more visible;" Drivers should just stop running people over.
Car dependency is a tax.
01-29-17, 03:49 PM
#15
Senior Member
That is completely silly, and I like it a lot. 

It needs some Hunt Wilde sparkly Schwinn tape though. In fact I consider that a must.
It needs some Hunt Wilde sparkly Schwinn tape though. In fact I consider that a must.

Thread
Thread Starter
Forum
Replies
Last Post
TallRider
Singlespeed & Fixed Gear
40
08-05-14 11:51 PM
DsmBerg
Classic & Vintage
19
05-10-12 02:34 PM
