Sturmy Archer KB5 Help Nedeed
 02-29-24, 04:46 PM
#1
Newbie
Thread Starter

Sturmy Archer KB5 Help Nedeed
Hi everyone, I am new here and new to fixing and restoring bikes too. As I believe the cumulative knowledge here must be immense, I dare to ask for some help with my intimidating project. I recently discovered an entire new universe of Sturmy Archer by happening upon an old bike on a friend�s scrapheap. I completely fell for the idea of making the bike run again and learning about Sturmy Archer excited me more since I didn't know they even existed until then.
There was no name on the bike or any way of identifying it, partly because it had been used as a advertisement stand for a guesthouse or something similar and had been spray-painted black entirely; over rust mud and all, and partly because I believe it had parts that were not original to the frame. When I found KB5 stamped on the hub below the Sturmy Archer wavy logo I consulted the internet and found that it must be from 1935 but the handle bars looked modern with a swan neck stem which I saw on road bikes from that era and the brake levers looked different too. Hence, I believe those parts might have been put on later. Of course I couldn't identify what bike it is to look up knowledge about it, so...
I stripped the whole bike and excitedly got on with opening up the partly seized hub and found that it is different to all the ones I watched on YouTube. My hub has a drum brake incorporated. Most of the gearing came out of the hub great, got cleaned and now moves well. The intimidation begins with the following terminology I got to know from downloaded copies of old brochures: Left hand ball cup; low gear pawl and low gear pawl pin. Left hand ball cup which houses low gear pawls screws into the shell of the hub. Brochure says about removing the Left hand ball cup: ''Difficulty may be experienced when refitting the left-hand ball cup, in securing an oil-tight joint. In such cases an oil sealing washer (KJ35) should be used.'' I can't remove it without a special tool and I am reluctant to try. I wanted to remove it to service the two pawls in it.
My hub has two lower gear pawls, one moves well but the other one does not spring back easily and fully as though the 'R' spring is too weak. The pawl pins also do not come out, they look more like rivets or peened pins. My challenge and also a question is, how do I change the spring on that 'lazy' pawl? Another thing is that where the pawls are there is a third hole with nothing in it. Does it mean there should be 3 pawls? Did the pawl pins once come out and someone peened their ends to keep them put?
These are my hurdles at the moment. Does anyone know the answers? I am eager to find out.
I would love to include some pictures but sadly as newbie here I am not allowed to post pictures yet (until I post 10 posts)
Thank you for any input

Likes For Mimak:
02-29-24, 04:52 PM
#2
Senior Member
Join Date: Dec 2016
Location: Long Island, NY
Posts: 2,107
Bikes: Trek 800 x 2, Schwinn Heavy Duti, Schwinn Traveler, Schwinn Le Tour Luxe, Schwinn Continental, Cannondale M400 and Lambert, Schwinn Super Sport
Mentioned: 14 Post(s)
Tagged: 0 Thread(s)
Quoted: 809 Post(s)
Liked 1,018 Times
in
664 Posts
You can post pictures to your personal gallery on BikeForums Mimak . Then someone can move them here for you.
You may not have to remove the left side ball cup, but then again, it is a coaster brake version, so I'm not familiar with that variety.
You may not have to remove the left side ball cup, but then again, it is a coaster brake version, so I'm not familiar with that variety.
02-29-24, 10:09 PM
#3

On the road

Join Date: Aug 2005
Location: New England
Posts: 2,169
Bikes: Old Schwinns and old Raleighs
Mentioned: 35 Post(s)
Tagged: 0 Thread(s)
Quoted: 373 Post(s)
Liked 844 Times
in
322 Posts
If I am understanding correctly, you are concerned about the low gear pawls that are pinned into the left hand ball cup along with their attendant coil springs. Do you have a reason to try to dismantle them or is it more just a cleaning issue? On many of the K and K-derivative hubs, those low gear pawl pins are riveted into place. I'd only try to disassemble the left hand ball cup and pawls if I absolutely had to on one of those hubs. Could you get away with just a flush with WD40 and then oil them?
__________________
Classic American and British Roadsters, Utility Bikes, and Sporting Bikes (1935-1979):
https://bikeshedva.blogspot.com/
Classic American and British Roadsters, Utility Bikes, and Sporting Bikes (1935-1979):
https://bikeshedva.blogspot.com/
Last edited by SirMike1983; 03-01-24 at 08:57 AM. Reason: spelling correction
03-01-24, 02:26 AM
#4
Newbie
Thread Starter
Thank you for responding. I shall try to upload some pictures to make it easier for others to se what I am trying to describe.
03-01-24, 02:29 AM
#5
Newbie
Thread Starter
In response to SirMike1983. One of my low gear pawls is not moving too well and appears to either be stuck a bit or have a weak spring. I have been cleaning it with de-greaser and de-ruster and tooth brush and it helped but it still doesn't operate as well as the other one. I might just put it back together and see what happens.
Thank you for responding.
Thank you for responding.
Last edited by Mimak; 03-01-24 at 09:05 AM.
03-01-24, 03:07 AM
#6
Senior Member
Join Date: Feb 2020
Posts: 2,811
Mentioned: 49 Post(s)
Tagged: 0 Thread(s)
Quoted: 1105 Post(s)
Likes: 0
Liked 1,324 Times
in
781 Posts
You can post pictures to your personal gallery on BikeForums Mimak . Then someone can move them here for you.
.
.

Likes For oneclick:
03-01-24, 09:01 AM
#7
Newbie
Thread Starter
Oh cool, the picture actually made it somewhere, I had trouble uploading it. As a newbie here I can't make heads or tails of the site yet. Thank you for posting it oneclick.
Likes For Mimak:
03-01-24, 11:14 AM
#8
Full Member
Looks like an interesting project, but missing a few items. If you are stymied on the hub, I have a complete kb4 that I bought on eBay in one of my weaker moments. It seems to work fine, but I never opened it up.
Good luck.
Good luck.
__________________
TigerTom
TigerTom
03-01-24, 11:23 AM
#9
Newbie
Thread Starter
I have uploaded more pictures into my personal Gallery, I also managed to duplicate a few by accident, sorry about that.
03-01-24, 11:46 AM
#10
On the road
Join Date: Aug 2005
Location: New England
Posts: 2,169
Bikes: Old Schwinns and old Raleighs
Mentioned: 35 Post(s)
Tagged: 0 Thread(s)
Quoted: 373 Post(s)
Liked 844 Times
in
322 Posts
The bike is an old-style, pre-war type frame. It's a challenging project, given the condition and missing parts.
The left hand ball cup should have a flat for a vise or wrench on it, and is left-hand threaded (to prevent it from loosening under load). You use the whole wheel as leverage to unthread the cup unit. The peened-in pins are normal for the hub. Before trying to remove the left hand ball cup and trying to remove the pins, you'll want to have spare parts on hand. Each part should have a number designation in the instruction manual (I believe there is one online at Tony Hadland's site).
They sold the left hand ball cups for these both individually and a pre-assembled unit complete with pawls, peened-in pins and coil springs (the Z-letter suffix usually denoted a unit rather than just the cup piece).
Best case scenario is you have a scrap hub around with a good left hand ball cup unit, including the peened-in pins, pawls and the coils. You'd then just swap in the good unit.
If not, you'd still want a set of replacement pins and coils (and maybe the pawls too) on hand. Otherwise, you could get the thing apart and not have the parts you need to then complete the job. I'd try to source a hub with a good unit or at least the parts you need before trying to take it apart further.
__________________
Classic American and British Roadsters, Utility Bikes, and Sporting Bikes (1935-1979):
https://bikeshedva.blogspot.com/
Classic American and British Roadsters, Utility Bikes, and Sporting Bikes (1935-1979):
https://bikeshedva.blogspot.com/
Last edited by SirMike1983; 03-01-24 at 11:50 AM.
Likes For SirMike1983:
03-01-24, 04:52 PM
#11
Newbie
Thread Starter
SirMike1983 that is amazing information, thank you very much.
I think what I will do next is to clean the pawls as best as I can and try to put it all together to see how it works. After all, the pawl is still working just not as well and to its full travel as the other one, hopefully it will engage the gear properly.
I will report back my progress and if anyone is interested, I am willing to keep posting updates on the whole bike project. Perhaps I could make a YouTube video, it would just take a bit of time as I only have a few evenings here and there to work on it.
Likes For Mimak:
03-01-24, 06:02 PM
#12
On the road
Join Date: Aug 2005
Location: New England
Posts: 2,169
Bikes: Old Schwinns and old Raleighs
Mentioned: 35 Post(s)
Tagged: 0 Thread(s)
Quoted: 373 Post(s)
Liked 844 Times
in
322 Posts
Your idea is a good one. Clean, oil, and see how it goes. If the pawl is merely dirty, oil and use will gradually free it up more. If the spring is weak... it won't get any better, but at least you'll know you need to replace the spring. You have already taken the hub apart and put it back together, so you'll know how to dismantle and do what you have to if the time comes. Looks like a fun and challenging project - it's really satisfying to get a 80-90 year old bike back on the road.
__________________
Classic American and British Roadsters, Utility Bikes, and Sporting Bikes (1935-1979):
https://bikeshedva.blogspot.com/
Classic American and British Roadsters, Utility Bikes, and Sporting Bikes (1935-1979):
https://bikeshedva.blogspot.com/
03-03-24, 12:14 PM
#13
Newbie
Thread Starter
Hi there again, does anyone have a good tip on how to install the index spindle? Coupling the two tiny screws that make the spindle through the axle key all inside the axle is proving rather challenging. Any thoughts?
Thank you
Thank you
03-03-24, 03:56 PM
#14
Full Member
Keeping in mind I have no experience, it appears from �Hadland� that the indicator is assembled in the middle of the process(step 4 and 5) while the internals are out of the hub.
__________________
TigerTom
TigerTom
03-04-24, 12:02 PM
#15
Newbie
Thread Starter
The indicator is proving difficult even though the axle is disassembled and out of the hub. The two indicator parts both have a spring and they have to meet inside through the axle key inside the axle collar and I can't seem to meet them to screw together because I can't see them and also having to compress both springs. How do people do that part I don't know.
03-04-24, 01:07 PM
#16
Palmer

Join Date: Mar 2007
Location: Parts Unknown
Posts: 8,599
Bikes: Mike Melton custom, Alex Moulton AM, Dahon Curl
Mentioned: 37 Post(s)
Tagged: 0 Thread(s)
Quoted: 1657 Post(s)
Liked 1,803 Times
in
1,050 Posts
Try your inquiry on the Cycling UK Forum, Technical section. Ask for 'Brucey'.
Likes For tcs:
03-04-24, 05:50 PM
#17
Full Member
The site I was looking at was Hadland.files.Wordpress.com. The internals are not completely assembled. Step 6 is fitting the clutch.
__________________
TigerTom
TigerTom
03-07-24, 12:55 PM
#18
Newbie
Thread Starter
UPDATE
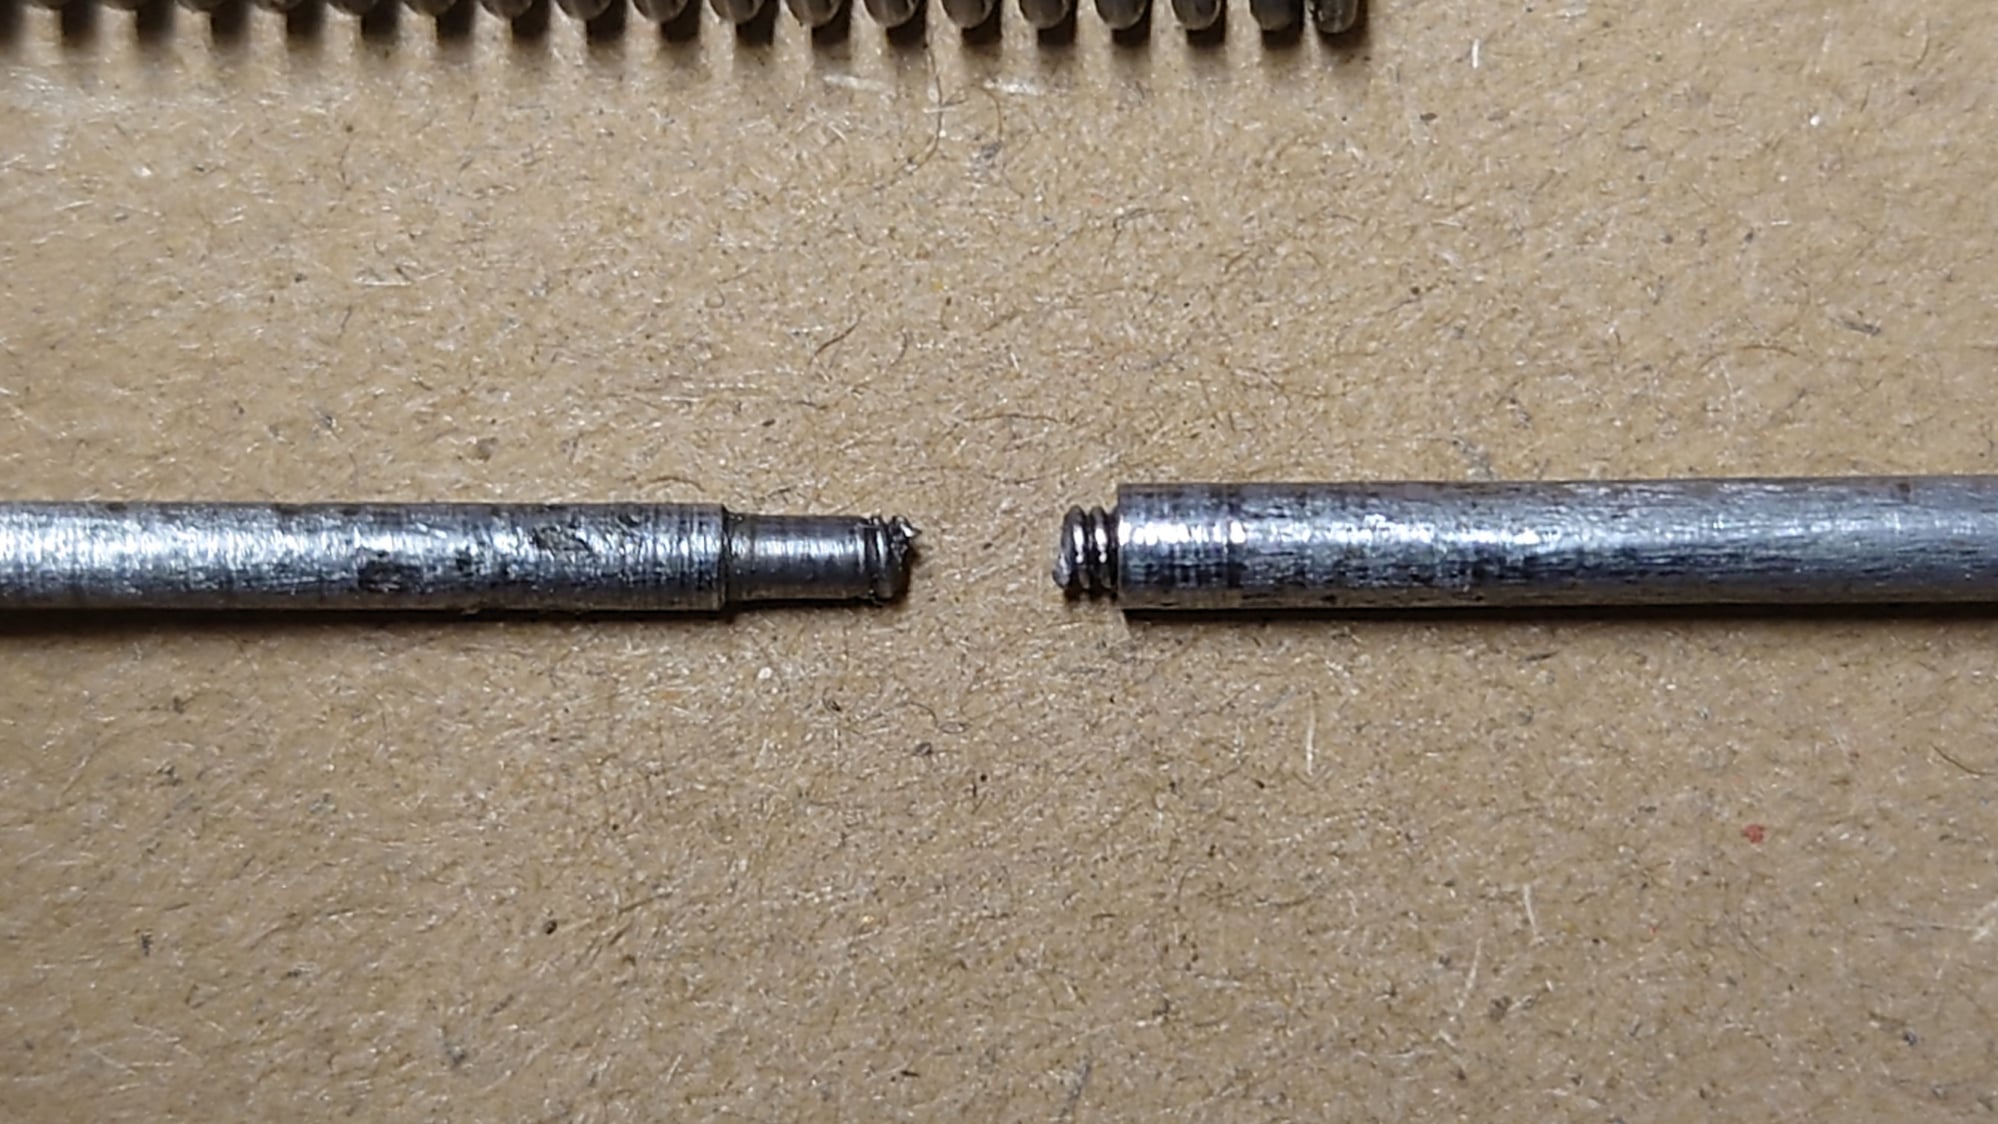
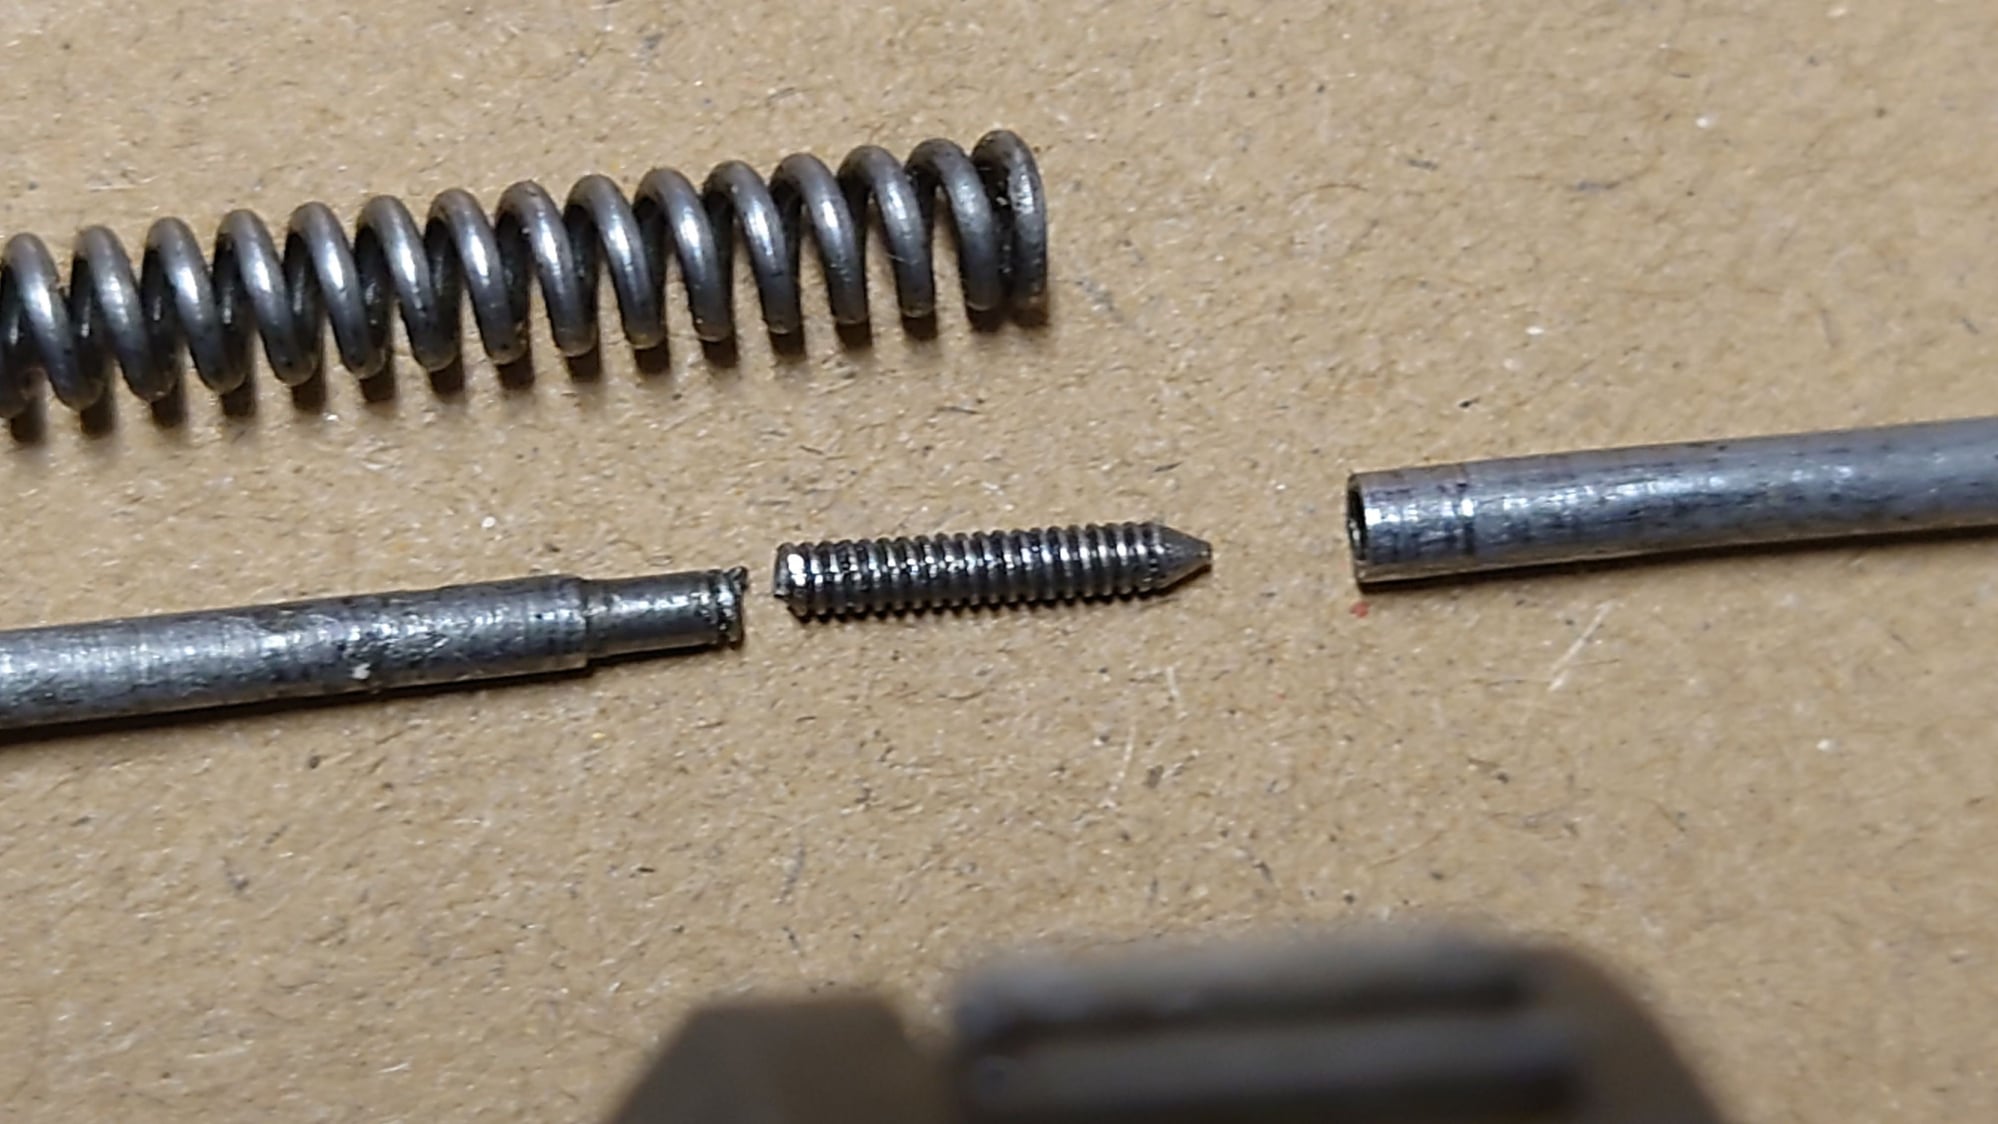
Hi there, my fears have come true. I finally managed for the two parts of the index spindle to meet through the axle key very briefly. And then the threaded part of the spindle snapped. The screw material must have been fatigued and with the strong resistance of both springs I tried to screw the two spindle parts together and it snapped. So, if anyone has a spare KB5 index spindle lying around I am looking for one now. Despite felling dejected, I am still determined to put the old hub back on the road. Wish me luck... and offer help if you can.
Thanks
03-07-24, 12:57 PM
#19
Newbie
Thread Starter
Post number 10. That must mean I can post photos now. I would love to upload the snapped spindle photo.
03-07-24, 01:06 PM
#20
Newbie
Thread Starter
The other spring is still inside the axle captured above the axle key. To capture the spring above the axle key is a job and a half in itself so I left it there for now.