


Help removing a demonically stuck post from a Austro Daimler?
 06-18-09, 03:35 PM
#1

Senior Member
Thread Starter
Help removing a demonically stuck post from a Austro Daimler?
So, someone was very nice today and gave me this nice Austro Daimler frame. Unfortunately, the seat post had been stuck, and he tried to remove it. He told me he used lye to try to get it out, then a hacksaw.
Hopefully I can succeed where he failed. Any suggestions? I was thinking about soaking it in WD-40 and drilling a hole through the seat post and trying to wench it out. I don't know how I'd hold the frame in place without damaging it though. It seems like such a shame to abandon it.
Anyway, sorry for the bad images.
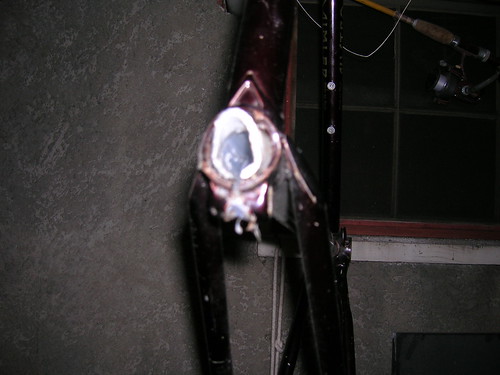
Last edited by yuoil; 06-18-09 at 03:48 PM. Reason: I fail at linking actual images.
 06-18-09, 04:19 PM
#2
Senior Member

Join Date: Oct 2004
Location: NYC
Posts: 2,124
Bikes: All 70s and 80s, only steel.
Mentioned: 0 Post(s)
Tagged: 0 Thread(s)
Quoted: 2 Post(s)
Likes: 0
Liked 2 Times
in
2 Posts
There are tons of threads on this topic. Do a search under my name, and also in the Mechanics section.
You can use lye to dissolve the post out, but it takes time, and you need to get a concentrated solution and do it in a well-ventilated place.
You can also use a drill and gradually increase the size of the bits.
Good luck.
You can use lye to dissolve the post out, but it takes time, and you need to get a concentrated solution and do it in a well-ventilated place.
You can also use a drill and gradually increase the size of the bits.
Good luck.
06-18-09, 04:24 PM
#3

Senior Member

This is a common problem and there has been /tons/ of discussion about it here. Try searching the bikemechanics forums or this one. If the search function doesn't work for you, try using google --> 'stuck seat post site:bikeforums.net'
PS that looks like a very nice frame. Be patient and you should end up with a very nice riding bike. You can search for Austro Daimler here too to see what you have
PS that looks like a very nice frame. Be patient and you should end up with a very nice riding bike. You can search for Austro Daimler here too to see what you have
06-18-09, 04:34 PM
#4
Senior Member
Join Date: Mar 2007
Location: Saskatchewan
Posts: 2,465
Mentioned: 0 Post(s)
Tagged: 0 Thread(s)
Quoted: 3 Post(s)
Likes: 0
Liked 6 Times
in
5 Posts
WD is junk. Use PB blaster.
For real stubborn posts that have been mangled I use my air hammer to loosen them up. Then they can be turned out with vise grips.
For real stubborn posts that have been mangled I use my air hammer to loosen them up. Then they can be turned out with vise grips.
06-18-09, 05:32 PM
#5
Senior Member
Thread Starter
Thanks for showing me how to search with google here. I do, admitedly have problems using the search right. My concern with vice grips is ripping the aluminum and having it stuck in there for good.
edit: geez, that did turn up a lot! Sorry, I knew this had come up before but I failed like the noob I am at finding it.
https://www.sheldonbrown.com/stuck-seatposts.html
as it's an aluminum post I'm going to soak it in ammonia and if that doesn't work I'll try the hacksaw thing. I figure that's why he cut off the saddle (Wish he hadn't, though).
Last edited by yuoil; 06-18-09 at 05:37 PM.
06-18-09, 07:32 PM
#6
Survival of the Fitest
Join Date: Jul 2004
Location: PDX
Posts: 1,559
Bikes: 198? Univega Custom Maxima, 2009 Motobecane Fantom Cross Uno
Mentioned: 0 Post(s)
Tagged: 0 Thread(s)
Quoted: 0 Post(s)
Likes: 0
Liked 4 Times
in
4 Posts
I had a really stubborn stem stuck not too long ago. Maybe this might work in your case. Perhaps you can find an old stem w/ a really narrow diameter that will fit inside the hacked seatpost. Install it and tighten the expander bolt to secure it inside the seat post. Then put a handle bar in it.
Now what I did for my stem was I had some Phil's Tenacious Oil on hand. I put a few drops around the seam and it slowly seeped down. I did that a few times and then started wrenching back and forth on that stem as humanly possible. It took a few goes but it finally, slowly, broke loose. Then it was a matter of pulling and back-n-forth to work it out.
Good luck!
06-19-09, 05:27 PM
#7
Senior Member
I just had a problem with a stuck aluminum seat post in a basic cromoly frame. Bought PB Blaster and it did the trick!
06-19-09, 05:45 PM
#8
Senior Member
Thread Starter
Well, it's still soaking in ammonia. I'm a bit concerned about having so little post to work with. I'll try PB Blaster before I resort to NaOH though, I think. To think, just a little grease could have prevented this! I think I'll always grease posts from now on 
06-19-09, 05:48 PM
#9
Great State of Varmint

Join Date: Sep 2008
Location: Dante's Third Ring
Posts: 7,476
Mentioned: 0 Post(s)
Tagged: 0 Thread(s)
Quoted: 2 Post(s)
Likes: 0
Liked 15 Times
in
15 Posts
That's an Inter 10 - most likely - Reynold's 531 double-butted frame & fork! Get out the PB Blaster and let it soak for a day or three. You'll get that seatpost out, and once you give it the components it deserves - The BEST - you'll have a world-class fast-touring road-machine. Those are some of the best frames. Easily in the same class - just not as well known - as such names as Cinelli and Masi. Someone gave you this?? Man - you owe that person a heck of a good gift!
So be patient and let the PB Blaster work it's magic. This is one frame/fork you need to take care of and work slow and steady on. You don't want to, out of frustration, rush and risk any damage.
You WILL get that busted seatpost out of the frame.
So be patient and let the PB Blaster work it's magic. This is one frame/fork you need to take care of and work slow and steady on. You don't want to, out of frustration, rush and risk any damage.
You WILL get that busted seatpost out of the frame.
06-19-09, 07:31 PM
#10
Senior Member
Join Date: Oct 2004
Location: NYC
Posts: 2,124
Bikes: All 70s and 80s, only steel.
Mentioned: 0 Post(s)
Tagged: 0 Thread(s)
Quoted: 2 Post(s)
Likes: 0
Liked 2 Times
in
2 Posts
I once spent weeks with a stuck seatpost and a bottle of PB Blaster; also ammonia and Liquid Wrench. But I went through most of my can of PB Blaster, and it never worked. Sometimes, that bond's just too much.
06-19-09, 08:19 PM
#11
feros ferio

Join Date: Jul 2000
Location: www.ci.encinitas.ca.us
Posts: 21,793
Bikes: 1959 Capo Modell Campagnolo; 1960 Capo Sieger (2); 1962 Carlton Franco Suisse; 1970 Peugeot UO-8; 1982 Bianchi Campione d'Italia; 1988 Schwinn Project KOM-10;
Mentioned: 44 Post(s)
Tagged: 0 Thread(s)
Quoted: 1390 Post(s)
Liked 1,322 Times
in
835 Posts
I concur. Steyr-Daimler-Puch makes pretty decent firearms and automobile parts, too.
__________________
"Far and away the best prize that life offers is the chance to work hard at work worth doing." --Theodore Roosevelt
Capo: 1959 Modell Campagnolo, S/N 40324; 1960 Sieger (2), S/N 42624, 42597
Carlton: 1962 Franco Suisse, S/N K7911
Peugeot: 1970 UO-8, S/N 0010468
Bianchi: 1982 Campione d'Italia, S/N 1.M9914
Schwinn: 1988 Project KOM-10, S/N F804069
06-19-09, 10:08 PM
#12
Senior Member
Thread Starter
I had an early interest in Puch, which is why I am excited. Unfortunately he didn't have the fork. I'm not sure when I'll find a replacement. But the frame is exactly my size, and the paint is very pretty, even if flawed. My big problem with soaking is keeping the liquids in. The tape adhesive seems to dissolve after a few hours and leak it out, and with the tube in there I can't just cork it up or something.
Lots of support for PB blaster though! I have to admit I've never even used it!
Lots of support for PB blaster though! I have to admit I've never even used it!
06-19-09, 10:22 PM
#13
Senior Member

Join Date: Apr 2007
Location: Thunder Bay, Ontario, Canada - burrrrr!
Posts: 11,674
Bikes: 1958 Rabeneick 120D, 1968 Legnano Gran Premio, 196? Torpado Professional, 2000 Marinoni Piuma
Mentioned: 210 Post(s)
Tagged: 0 Thread(s)
Quoted: 1372 Post(s)
Likes: 0
Liked 1,748 Times
in
937 Posts
Be Careful!!!
Putting too much torque on a stuck seat post just might break the seat tube lug away from a set stay. Do not try the twist and yank thing!
Using a hacksaw blade carefully slot the seat post from the inner diameter to the outer. The allow will cut and sound different than the steel of the seat tube. Care must be taken to ensure that the deepest part of the seat post is cut first. It is easy to cut near the exposed end.
As you do this, use a flash light to frequently observe your progress. FREQUENTLY!!! You do not want to scratch or, worse yet, cut into the steel of the seat tube. I have a procedure written for this and hope to upload it soon to MY "TEN SPEEDS".
Once you have two slots cut, about 1/4" apart, gently pry the piece between the two slots loose. Take care to not apply much prying pressure. Too much pressure just might distort the seat tube.
Eventually the slotted piece will come loose and can be easily removed. Then just grip the top of the exposed seat post, squeeze it together and voila, the stupid thing will release with no damage to the frame set.
I have broken one frame set using the twist and turn thing and I will never do it this way again. A bit of extra time spent will guarantee acceptable results. Needless to say, you will also have to remove and clean the metal debris from the bottom bracket and bracket housing.
Hope this has been a help and get in touch if you do not understand. Good luck and this process works for stuck steering stems also.
And when you install you new seat post, ensure that the seat tube is clean and free of burrs on the inside diameter. If there are burrs, you run the risk of scoring the seat post when inserting or removing the soft alloy unit. Then apply a thing coat of grease to the seat post to ensure that is does not seize again.
06-20-09, 07:06 AM
#14
hi

Join Date: Apr 2006
Location: Kingston, NY
Posts: 2,605
Mentioned: 2 Post(s)
Tagged: 0 Thread(s)
Quoted: 7 Post(s)
Likes: 0
Liked 3 Times
in
3 Posts
Be careful with PB Blaster. It worked great, but my one experience with it actually melted the paint after sitting for a day. Wipe up any excess you can.
06-20-09, 11:25 AM
#15
Too many bikes

Join Date: Apr 2006
Location: Boston MA
Posts: 1,257
Mentioned: 2 Post(s)
Tagged: 0 Thread(s)
Quoted: 5 Post(s)
Likes: 0
Liked 0 Times
in
0 Posts
Ammonia can definitely work, but I had issues with it. Perhaps not enough (I did it with the seat post
intact and pouring through the BB).
06-20-09, 12:28 PM
#16
Senior Member

Join Date: Apr 2006
Location: Washington County, Vermont, USA
Posts: 3,775
Bikes: 1966 Dawes Double Blue, 1976 Raleigh Gran Sport, 1975 Raleigh Sprite 27, 1980 Univega Viva Sport, 1971 Gitane Tour de France, 1984 Lotus Classique, 1976 Motobecane Grand Record
Mentioned: 77 Post(s)
Tagged: 0 Thread(s)
Quoted: 762 Post(s)
Liked 654 Times
in
347 Posts
What about using an adjustable reamer, or a couple of them? Might have to start with a smallish one to fit into the aluminum seat tube at first, then switch to a bigger one as the hole gets bigger.
I've never tried that. Just an idea--I haven't thought about it for long enough to find the fatal flaw, if there is one.
I've never tried that. Just an idea--I haven't thought about it for long enough to find the fatal flaw, if there is one.
06-20-09, 12:38 PM
#17
Novist senior member
My trek 520 had that same seatpost. Put it is a vise and turned until the post snaped like yours.
Take a hacsaw and saw the post lengthwise down to the seat tube. Be careful not to go to far. Then chisel it out with a 1/4 chisel. That frame is worth the work. I tried all the other ways mentioned and none of them worked. I had to bang out every bit of mine, it was completely bonded to the tube.
Take a hacsaw and saw the post lengthwise down to the seat tube. Be careful not to go to far. Then chisel it out with a 1/4 chisel. That frame is worth the work. I tried all the other ways mentioned and none of them worked. I had to bang out every bit of mine, it was completely bonded to the tube.
06-20-09, 05:40 PM
#18
Senior Member
Join Date: May 2006
Posts: 88
Mentioned: 0 Post(s)
Tagged: 0 Thread(s)
Quoted: 0 Post(s)
Likes: 0
Liked 0 Times
in
0 Posts
Take your time and you will suceed. I had a similar problem - after a lot oh help from all the ladies and gentelmen on the forum here I had sucess. I atempted lots of different ideas - brut force was never going to work.
Be careful.
https://www.bikeforums.net/classic-vintage/199130-old-new-me-531-paconi-stuck-stem.html
Be careful.
https://www.bikeforums.net/classic-vintage/199130-old-new-me-531-paconi-stuck-stem.html
06-20-09, 07:48 PM
#19
Senior Member

Get a beeswax toilet ring (<$2.00 and a little heat - cancel WARMTH from a propane torch) and it will almost fall out. The wax will flow toward the heat 1 molecule thick and dissolve the oxide bonds.
06-20-09, 07:53 PM
#20
Senior Member
Thread Starter
How can the beeswax get between the tube and the post? That seems to be the problem with all the liquid solutions. I tried the hacksaw blade but I am really bad at cutting in a straight line and I've already made a few scratches inside (shallow though :| ). I think that may be the only way though.
edit: do I have to worry about ammonia destroying the paint? I'd prefer to save it if I can.
edit: do I have to worry about ammonia destroying the paint? I'd prefer to save it if I can.
06-20-09, 08:04 PM
#21
Senior Member
The wax will flow towards the heat just like sweating copper pipe. You should have all listened to your 9th grade shop teacher more carefully!
06-20-09, 11:21 PM
#23
Great State of Varmint
Join Date: Sep 2008
Location: Dante's Third Ring
Posts: 7,476
Mentioned: 0 Post(s)
Tagged: 0 Thread(s)
Quoted: 2 Post(s)
Likes: 0
Liked 15 Times
in
15 Posts
The paint on these are funky - they look burgundy-red, purple, and brown-black depending on the light and angle. I can't guarantee that ammonia will eat it. But I'd try a test on a part not likely to see the light of day. Like under the BB-shell. You should also find the serial-number under there - for your reference.
06-21-09, 12:49 PM
#24
Novist senior member
How can the beeswax get between the tube and the post? That seems to be the problem with all the liquid solutions. I tried the hacksaw blade but I am really bad at cutting in a straight line and I've already made a few scratches inside (shallow though :| ). I think that may be the only way though.
edit: do I have to worry about ammonia destroying the paint? I'd prefer to save it if I can.
edit: do I have to worry about ammonia destroying the paint? I'd prefer to save it if I can.
That beeswax sounds interesting. So you heat the frame 1st or the wax?
06-21-09, 06:09 PM
#25
hehe... member

Join Date: Dec 2005
Location: Pittsburgh, PA
Posts: 665
Mentioned: 0 Post(s)
Tagged: 0 Thread(s)
Quoted: 0 Post(s)
Likes: 0
Liked 0 Times
in
0 Posts
Mine was broken/cut/trashed just like that. A friend works at a machine shop and he bored it out in about 20 minutes. He had some sort of giant Dremel tool. Came out good as new. If nothing else you could try that route.

