


Polished my cranks...what do you think?
 11-24-10, 07:45 PM
#1
Senior Member
Thread Starter

Join Date: Jan 2010
Posts: 120
Mentioned: 0 Post(s)
Tagged: 0 Thread(s)
Quoted: 0 Post(s)
Likes: 0
Liked 0 Times
in
0 Posts
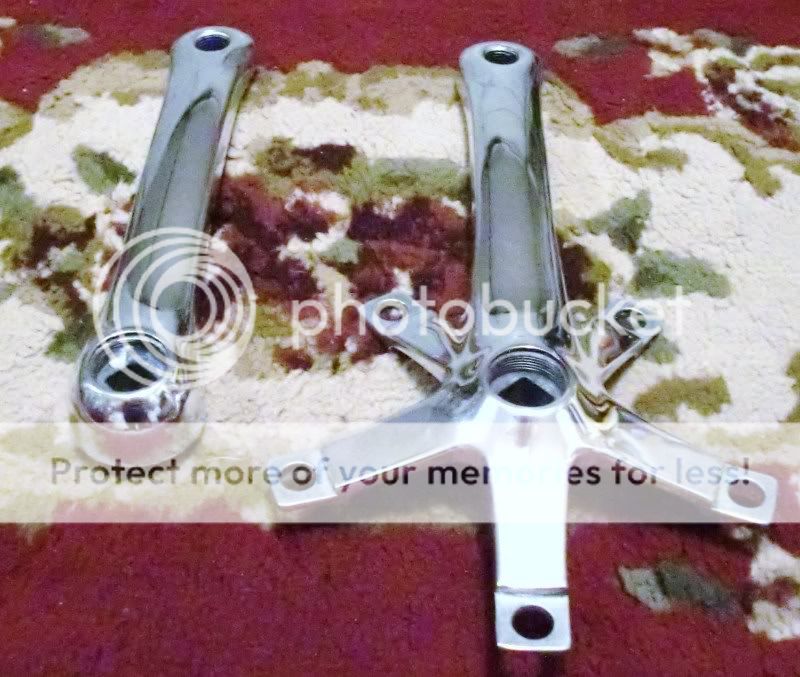
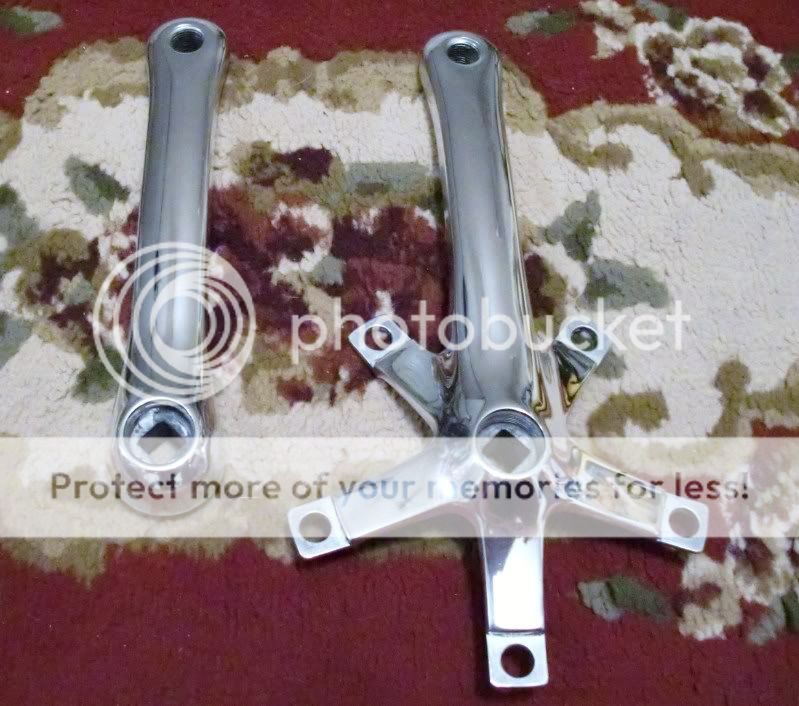
Polished my cranks...what do you think?
I picked up this 1990 Sirrus, and the 105sc cranks looked nasty. I removed the cranks, sanded them, then steel wool, then more sanding. Then I used my polish (Wicked) with the steel wool, then some more wet sanding. And finally just the polish and lots of elbow grease.
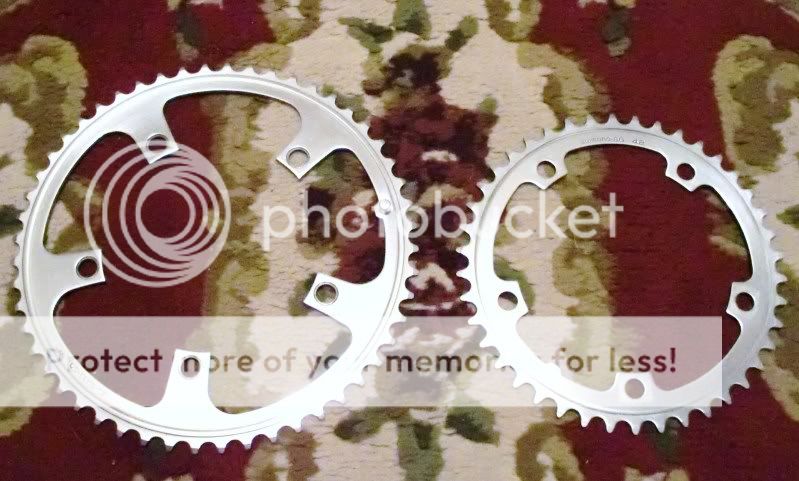
The sprockets were another story altogether, it seems that they are anodized.
So off to Mejiers for Easy Off. Sprayed them, and after 5 mins of so, washed off with water. Not so good, sprayed them again, and washed off. These were a real bear to get looking somewhat nice.
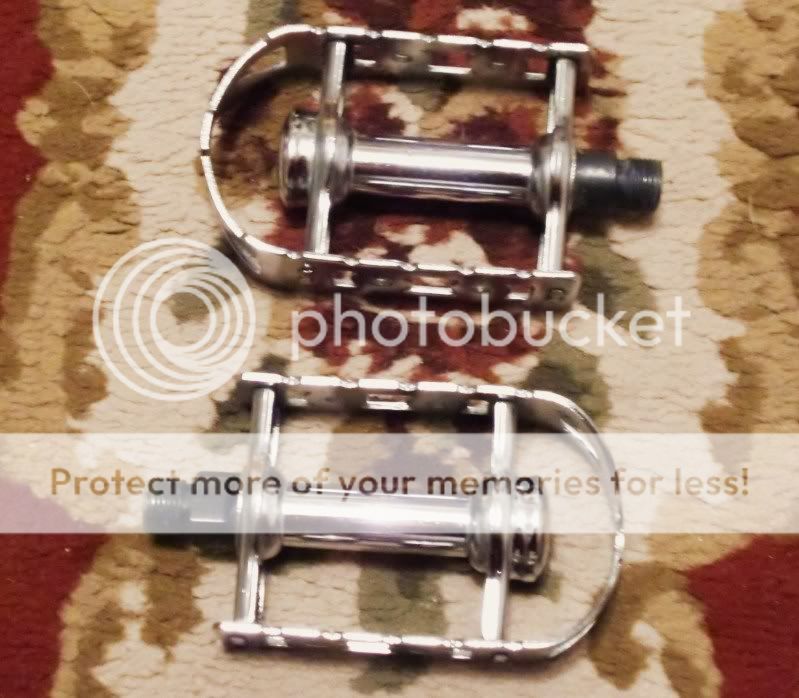
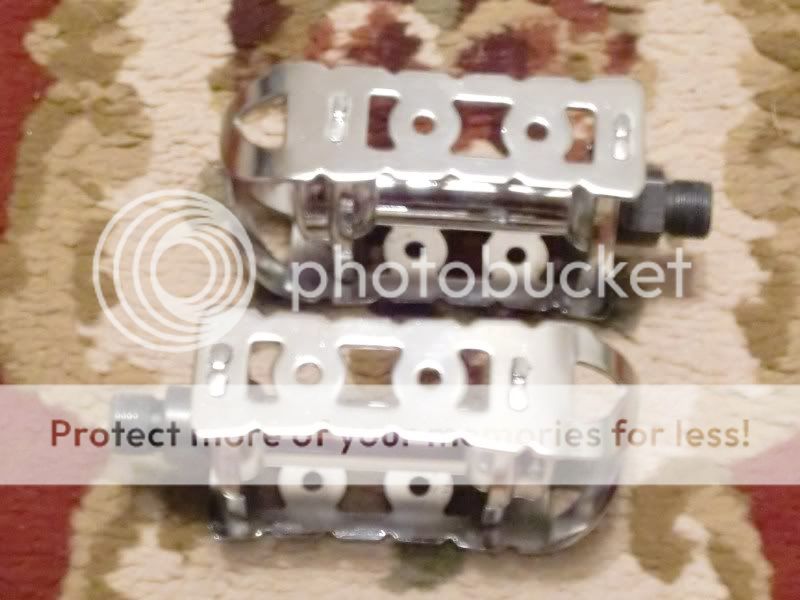
These steel pedals were on the bike also. Just plain nasty looking, plenty of rust all over. Out with the polish and steel wool. They cleaned up nice and originally I didnt think they were worth the time to clean. They surprise me, the bearings are so smooth,
these things spin effortlessly. Out of curiousity, is these just cheap mountain bike pedals? They are stamped "HTL"

The sprockets were another story altogether, it seems that they are anodized.
So off to Mejiers for Easy Off. Sprayed them, and after 5 mins of so, washed off with water. Not so good, sprayed them again, and washed off. These were a real bear to get looking somewhat nice.
These steel pedals were on the bike also. Just plain nasty looking, plenty of rust all over. Out with the polish and steel wool. They cleaned up nice and originally I didnt think they were worth the time to clean. They surprise me, the bearings are so smooth,
these things spin effortlessly. Out of curiousity, is these just cheap mountain bike pedals? They are stamped "HTL"
 11-24-10, 07:50 PM
#2
Senior Member
Nice! They look great. How long did it take? As for the pedals, I could be mistaken, but I don't think they're MTB pedals. Look like old road bike pedals to me. I don't have all that much experience with road bikes, though...
11-24-10, 07:56 PM
#3

Bianchi Goddess

Join Date: Apr 2009
Location: Shady Pines Retirement Fort Wayne, In
Posts: 27,858
Bikes: Too many to list here check my signature.
Mentioned: 192 Post(s)
Tagged: 2 Thread(s)
Quoted: 2930 Post(s)
Liked 2,923 Times
in
1,491 Posts
they look nice I hope they stay that way
Mejiers?? must be in the upper midwest nice stores
Mejiers?? must be in the upper midwest nice stores
__________________
�One morning you wake up, the girl is gone, the bikes are gone, all that's left behind is a pair of old tires and a tube of tubular glue, all squeezed out"
Sugar "Kane" Kowalczyk
�One morning you wake up, the girl is gone, the bikes are gone, all that's left behind is a pair of old tires and a tube of tubular glue, all squeezed out"
Sugar "Kane" Kowalczyk
 11-24-10, 08:16 PM
#5
Senior Member
Join Date: Aug 2005
Location: ontario
Posts: 2,234
Mentioned: 0 Post(s)
Tagged: 0 Thread(s)
Quoted: 1 Post(s)
Likes: 0
Liked 0 Times
in
0 Posts
Ive done this before, used mothers though, really shiney reflective like a mirror basically, too bad it doesnt take long for it to look bad though, few rides out in the rain and it just goes bad for some reason, all that hard work for nothing, maybe you have to clear coat them afterwords I dont know.
11-24-10, 08:30 PM
#6
Senior Member
Join Date: Jun 2008
Location: Somewhere North of Detroit and moving fast!
Posts: 689
Bikes: 1976 Fuji America 1980 Fuji America 1984 Fuji America TS V 1982 Fuji Royale II 1993 Trek 970 1997 Trek 5000 2004 Trek Calypso 2007 Trek Portland 2008 Surly LTH
Mentioned: 0 Post(s)
Tagged: 0 Thread(s)
Quoted: 2 Post(s)
Likes: 0
Liked 8 Times
in
6 Posts
You can get kicked out of the military if you get caught "polishing" your crank!
(Your aluminum bits turned out real nice!)
(Your aluminum bits turned out real nice!)
11-24-10, 08:38 PM
#7
Senior Member
Thread Starter
Join Date: Jan 2010
Posts: 120
Mentioned: 0 Post(s)
Tagged: 0 Thread(s)
Quoted: 0 Post(s)
Likes: 0
Liked 0 Times
in
0 Posts
I did the same to my 1989 Trek back in August, and rode it hard for about 3 months. Just a little polish before hanging her up for the season,
and she still looks awesome.
I used just ol fashion elbow grease, and it took maybe 6-7 hours or so doing.
Starting out doing this, I wasn't very hopeful with the end results, but I was pleasantly surprised.
Hahaha....yes Bianchigirll, I am in Indiana now. I like Mejiers much better than Wal-mart.
Thx for the kind words.
Scott
11-24-10, 09:38 PM
#8
Senior Member
6-7 hours is doable considering how awesome yours turned out. I think I'm going to have to find some decent quality but poor looking(and therefore cheaper) cranks for my bike build. I think I want polished, but I have pretty good condition Shimano tri-color anodized now and I feel like it would be wrong of me to strip and polish them. Thanks for the inspiration.
I haven't been to Mejiers all that much, but thank God for them if they have reduced some business for wal-mart.
I haven't been to Mejiers all that much, but thank God for them if they have reduced some business for wal-mart.
11-24-10, 10:09 PM
#9
FBoD Member at Large

Join Date: Aug 2008
Location: Woodbury, MN
Posts: 6,094
Mentioned: 3 Post(s)
Tagged: 0 Thread(s)
Quoted: 30 Post(s)
Likes: 0
Liked 7 Times
in
7 Posts
Everything there looks just great!!! 
divine: Yeah, unless you go so far as to coat them with something, and I haven't yet gone down that road myself, they will get a little funky with some use. The good thing is that once all the hard work getting things to look like this is done 5 minutes with some Mother's and they look like this again. Or, let them patina. I was planning to do an experiment for the new year. I have several old SR stems. I was going to polish them all up, spray one with something like Krylon clear, one with some other clear coating, and leave one uncoated. Then, stick them on a board and leave them out in the elements for all of next year. Would prove interesting I think.
I often thought about clear powder coating for things like cranks, stems, seatposts, and caliper arms. Although, I don't know about seatposts with the clamping.
11-24-10, 10:44 PM
#10
grad stud.

Join Date: Apr 2010
Location: Houston, TX
Posts: 674
Bikes: 1987 Schwinn Voyageur
Mentioned: 1 Post(s)
Tagged: 0 Thread(s)
Quoted: 0 Post(s)
Likes: 0
Liked 1 Time
in
1 Post
I've actually just spent the last hour polishing with steel wool a set of cranks that southpawboston sent me. i was amazed to see you could get yours so shiny! what grit sandpaper are you using?
11-24-10, 10:50 PM
#11
Spin Forest! Spin!

Join Date: Sep 2007
Location: Arrid Zone-a
Posts: 5,956
Bikes: I used to have many. And I Will again.
Mentioned: 2 Post(s)
Tagged: 0 Thread(s)
Quoted: 7 Post(s)
Likes: 0
Liked 11 Times
in
10 Posts
Outrageous shine! Nice work. I have two sets of FC-1550 105 cranks in need of this treatment.
11-24-10, 11:04 PM
#12
Procrastinateur supreme
Absolutely awesome job! I'd be fixin' to so similar polishing on a few anodized alloy bits, but my hands cramp uncontrollably after about five minutes. Oh well!
Great work.
Great work.
11-25-10, 12:12 AM
#13
grad stud.
Join Date: Apr 2010
Location: Houston, TX
Posts: 674
Bikes: 1987 Schwinn Voyageur
Mentioned: 1 Post(s)
Tagged: 0 Thread(s)
Quoted: 0 Post(s)
Likes: 0
Liked 1 Time
in
1 Post
If I could ask another question: is this all by hand? I have no facilities for large tools, so everything I polish tends to be with elbow grease only. I'm wondering if it's even possible for me to get these types of results (before I go out and buy metal polish and tons of sandpaper/steel wool)
11-25-10, 01:37 AM
#14
Senior Member
Thread Starter
Join Date: Jan 2010
Posts: 120
Mentioned: 0 Post(s)
Tagged: 0 Thread(s)
Quoted: 0 Post(s)
Likes: 0
Liked 0 Times
in
0 Posts
Yes dashuaigeh, done all by hand. I wish I had a bench mounted grinder-buffer. You won't need "tons" of sandpaper...Hahahaha
After I sanded the paint off with course Emory cloth, I then used steel wool. Then 500 grit wet sandpaper, followed by the steel wool again.
Then right back with the 500 grit, then 1000 grit. Then out comes my polish(Wicked), and lots and lots of rubbing.
CrankyFranky, my fingers and arms were "toast". I almost could't lift my arms, and my hands were so stiff.
After I posted this, I applied some "Freedom" wax. Wow! Pictures don't do them justice.
11-25-10, 02:15 AM
#15
Senior Member
Join Date: Oct 2010
Location: NY
Posts: 81
Bikes: Colnago VIP, Specialized Langster Comp, Specialized Epic, Don Walker track, John Cherry
Mentioned: 0 Post(s)
Tagged: 0 Thread(s)
Quoted: 0 Post(s)
Likes: 0
Liked 0 Times
in
0 Posts
Good shine!
I might also suggest some wet sanding with 1500 and 2000 grade sandpaper, before polishing. I also used rubbing compound and polishing compound before the final polish using your favorite metal polish (I used Blue Magic). Basically just a couple more steps to smooth out the finish progressively. I also don't have a bench buffer at my disposal.
I might also suggest some wet sanding with 1500 and 2000 grade sandpaper, before polishing. I also used rubbing compound and polishing compound before the final polish using your favorite metal polish (I used Blue Magic). Basically just a couple more steps to smooth out the finish progressively. I also don't have a bench buffer at my disposal.
11-25-10, 02:37 AM
#16
Senior Member
Join Date: Sep 2009
Location: Portland,Or
Posts: 1,140
Mentioned: 2 Post(s)
Tagged: 0 Thread(s)
Quoted: 43 Post(s)
Likes: 0
Liked 2 Times
in
2 Posts
Awsome work!
Never attempted polishing the rings before as most have a 'satin' finish on them originally.To help protect and prolong the finish I've been using a sealer.Its waterbase and made for painted surfaces but holds up quite well on crome and aluminum.
Ps. Having a rotary polisher almost feels like cheating.
11-25-10, 03:10 AM
#17
Senior Member

Join Date: Apr 2007
Location: Thunder Bay, Ontario, Canada - burrrrr!
Posts: 11,674
Bikes: 1958 Rabeneick 120D, 1968 Legnano Gran Premio, 196? Torpado Professional, 2000 Marinoni Piuma
Mentioned: 210 Post(s)
Tagged: 0 Thread(s)
Quoted: 1372 Post(s)
Likes: 0
Liked 1,751 Times
in
938 Posts
I like to polish, and even over polish, alloy items on bikes that I build up. I generally go for satin finish, similar to what was originally offered but sometimes, I do go all out. My ALAN is an example of extra polishing.
I, however, was lucky enough to purchase a hand made grinder for $2.00 at a yard sale, one day. That unit, coupled with some polishing compound (regular and fine compounds) purchased at Canadian Tire produces some amazing results.
I also have a second polisher/grinder that I built myself. I used an old washing machine 1/3hp motor and some odds and ends to get-er-done. It works great and I have promised it to my B4H friend.
Anyway, here is what I do much of my polishing with. And, yes, I do have to hand polish the nooks and crannies.
11-25-10, 07:15 AM
#18
Senior Member
Join Date: Nov 2008
Location: South Jersey
Posts: 1,959
Bikes: Too many Bicycles to list
Mentioned: 10 Post(s)
Tagged: 0 Thread(s)
Quoted: 90 Post(s)
Liked 137 Times
in
45 Posts
Great job on that crank and your pedals look fantastic. I like polished bits on my bikes also and sometimes I over do it. Restoring motorcycles over the years I learned a lot on what works and what won't, I have tried all kinds of polishes and different tools to try and make the job easier but it all comes back to doing it by hand gets the best results for me. I have a dual wheel buffer on a pedestal and still do 90% of my polishing by hand, I have nerve damage to my hands so it takes me forever to do some of the stuff ( I know how you feel Crankyfranky ). I did the 600 bits on my Centurion not to long ago. I really like the Mothers Aluminum & Mag wheel polish for my final polish and it works well with a dremel also which I use when doing a hub that has the spokes still in place.
before

After


before
After
Last edited by Glennfordx4; 11-26-10 at 08:06 AM.
11-25-10, 08:24 AM
#19
Senior Member

Join Date: Apr 2005
Location: Wherever
Posts: 16,748
Mentioned: 92 Post(s)
Tagged: 0 Thread(s)
Quoted: 556 Post(s)
Likes: 0
Liked 132 Times
in
78 Posts
Nice looking Glennfordx4,
Maybe, since you've experimented so much, you could expand on your posting. What works? What doesn't? And what polishes you've tried and your favorites.
Thanks
Maybe, since you've experimented so much, you could expand on your posting. What works? What doesn't? And what polishes you've tried and your favorites.
Thanks
11-25-10, 09:42 AM
#20
Senior Member

Join Date: Mar 2002
Location: NJ
Posts: 3,084
Mentioned: 0 Post(s)
Tagged: 0 Thread(s)
Quoted: 4 Post(s)
Likes: 0
Liked 5 Times
in
4 Posts
has anyone tried any sort of clearcoat or similar, to keep the polish up without frequent re-polishing? I'm curious as to how that'd work, and how to do it properly...
-rob
-rob
11-25-10, 09:52 AM
#21
Gluteus Enormus

Join Date: Dec 2007
Location: Raleigh, NC
Posts: 2,245
Bikes: Yes
Mentioned: 0 Post(s)
Tagged: 0 Thread(s)
Quoted: 1 Post(s)
Likes: 0
Liked 0 Times
in
0 Posts
11-25-10, 10:01 AM
#22
my name is Jim

Here is my polishing setup:

I have two bench grinders with extended shafts. One is 3/4 hp and I run 8" wheels on it, usually a sisal wheel loaded with black (emery) compound and a loose cotton wheel loaded with red (rouge) compound. The other is 1/2 hp and I run a 6" sewn cotton wheel loaded with brown compound and a 4" loose cotton wheel loaded with white. With this setup I rarely have to change wheels as I can go from black to brown to red to white.
The black on sisal is for removing a lot of material for deep scratches and corrosion. Brown is for both material removal and initial polishing. Red and white are for polishing only.
I also use a Dremel tool with a flex head and various polishing wheels and bits for the nooks and crannies. Finish off with simichrome by hand for that final gloss.
Caswell is an excellent source for information and products and supplies.
https://www.caswellplating.com/buffs/index.html
__________________
Flickr Albums
ebay: cicloclassico
70 Pogliaghi ItalCorse, 72 De Rosa, 72 Masi Gran Criterium, 75 Masi Gran Criterium, 77 Melton, 79 Bianchi Super Leggera, 79 Gios Super Record, 81 Picchio Special, 82 Guerciotti Super Record, 82 Colnago Profil CX, 83 Colnago Superissimo, 84 Fuso
Flickr Albums
ebay: cicloclassico
70 Pogliaghi ItalCorse, 72 De Rosa, 72 Masi Gran Criterium, 75 Masi Gran Criterium, 77 Melton, 79 Bianchi Super Leggera, 79 Gios Super Record, 81 Picchio Special, 82 Guerciotti Super Record, 82 Colnago Profil CX, 83 Colnago Superissimo, 84 Fuso
11-25-10, 10:19 AM
#23
Senior Member

Join Date: Jul 2010
Location: Somewhere Between The Beginning And The End
Posts: 1,995
Mentioned: 0 Post(s)
Tagged: 0 Thread(s)
Quoted: 1 Post(s)
Likes: 0
Liked 3 Times
in
3 Posts
Here is my polishing setup:
I have two bench grinders with extended shafts. One is 3/4 hp and I run 8" wheels on it, usually a sisal wheel loaded with black (emery) compound and a loose cotton wheel loaded with red (rouge) compound. The other is 1/2 hp and I run a 6" sewn cotton wheel loaded with brown compound and a 4" loose cotton wheel loaded with white. With this setup I rarely have to change wheels as I can go from black to brown to red to white.
The black on sisal is for removing a lot of material for deep scratches and corrosion. Brown is for both material removal and initial polishing. Red and white are for polishing only.
I also use a Dremel tool with a flex head and various polishing wheels and bits for the nooks and crannies. Finish off with simichrome by hand for that final gloss.
Caswell is an excellent source for information and products and supplies.
https://www.caswellplating.com/buffs/index.html
That's some crank polishing setup you have, looks like it would be painful.LOL.....
11-25-10, 10:30 AM
#24
my name is Jim
Oh and I forgot Easy Off to strip and or soften the anodizing (depends on how hard it is, brakes always seem pretty soft, cranks pretty hard) and wet sandpaper to remove final anodizing and deep scratches and corrosion. I usually start with 220 or 320 and progress to 1200 or 1500. And always use wet sanding, preferably under a stream of water, when sanding aluminum. Aluminum dust is not nice stuff to have floating around.
__________________
Flickr Albums
ebay: cicloclassico
70 Pogliaghi ItalCorse, 72 De Rosa, 72 Masi Gran Criterium, 75 Masi Gran Criterium, 77 Melton, 79 Bianchi Super Leggera, 79 Gios Super Record, 81 Picchio Special, 82 Guerciotti Super Record, 82 Colnago Profil CX, 83 Colnago Superissimo, 84 Fuso
Flickr Albums
ebay: cicloclassico
70 Pogliaghi ItalCorse, 72 De Rosa, 72 Masi Gran Criterium, 75 Masi Gran Criterium, 77 Melton, 79 Bianchi Super Leggera, 79 Gios Super Record, 81 Picchio Special, 82 Guerciotti Super Record, 82 Colnago Profil CX, 83 Colnago Superissimo, 84 Fuso
11-25-10, 12:00 PM
#25
FBoD Member at Large
Join Date: Aug 2008
Location: Woodbury, MN
Posts: 6,094
Mentioned: 3 Post(s)
Tagged: 0 Thread(s)
Quoted: 30 Post(s)
Likes: 0
Liked 7 Times
in
7 Posts
I use a varied array of stuff, wet/dry sandpaper, bronze and steel wool, an abrasive ball in a hand drill, Mother's, Blue Magic, all kinds of things. The methods will vary but in general:
- Remove anodizing or paint with Easy-Off is that's necessary.
- Wet sand starting at 320, 400, or 600 depending on the quality of the surface, 220 on occasion if there are deep scratches to remove.
- Continue wet sanding and end at 1500 or 2000. The finer you go the less time you'll spend with rag and polish.
- Mother's, a rag, and elbow grease until the desired shine is achieved.
Given the number of posts mentioning using Scotchbrite-type pads for a satin finish I'm going to have to do some experimenting with that.
All the parts below got this treatment except brakes, FD, shifters, brake levers, and RD which were anodized and I wanted to keep it. On those parts I simply clean the anodizing with polishing compound and then buff with a cloth. I would estimate I have 20 hours into all the parts below between disassembly (including calipers and RD, I have the Suntour tool to take the GT cages apart ), cleaning, OA on steel parts, polishing, lubrication and reassembly.

- Remove anodizing or paint with Easy-Off is that's necessary.
- Wet sand starting at 320, 400, or 600 depending on the quality of the surface, 220 on occasion if there are deep scratches to remove.
- Continue wet sanding and end at 1500 or 2000. The finer you go the less time you'll spend with rag and polish.
- Mother's, a rag, and elbow grease until the desired shine is achieved.
Given the number of posts mentioning using Scotchbrite-type pads for a satin finish I'm going to have to do some experimenting with that.
All the parts below got this treatment except brakes, FD, shifters, brake levers, and RD which were anodized and I wanted to keep it. On those parts I simply clean the anodizing with polishing compound and then buff with a cloth. I would estimate I have 20 hours into all the parts below between disassembly (including calipers and RD, I have the Suntour tool to take the GT cages apart
), cleaning, OA on steel parts, polishing, lubrication and reassembly.