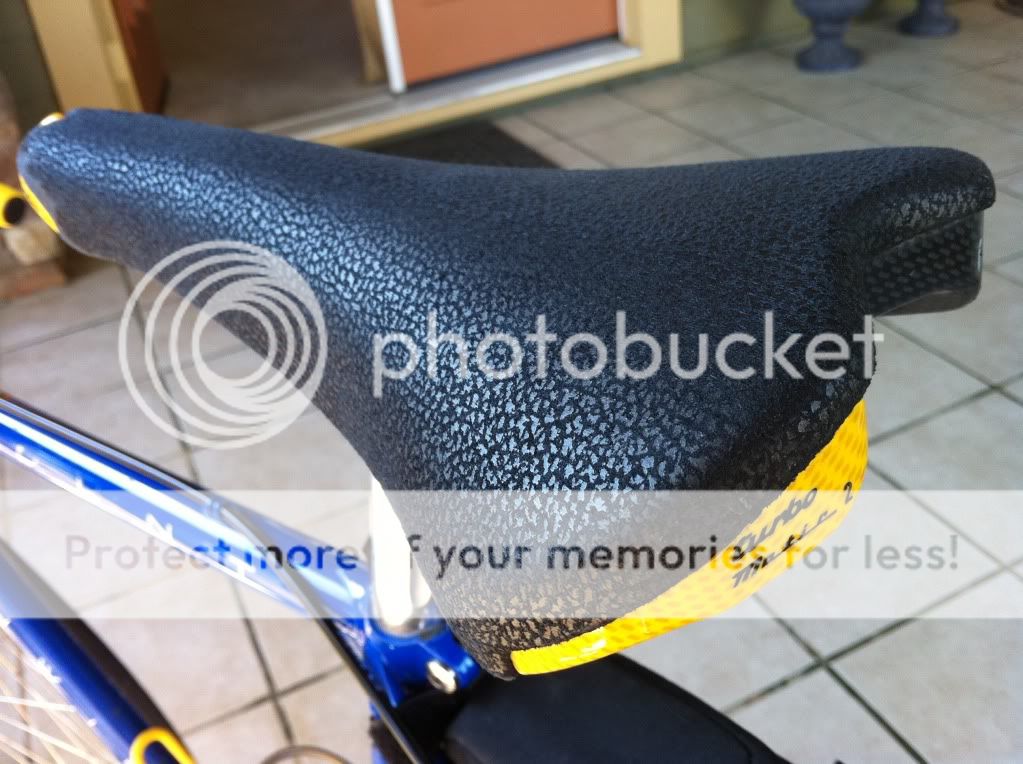
Recover Your Saddle
#1
Noob
Thread Starter
Join Date: Nov 2009
Location: Bay Area
Posts: 357
Bikes: '86 Schwinn Paramount
Mentioned: 0 Post(s)
Tagged: 0 Thread(s)
Quoted: 2 Post(s)
Likes: 0
Liked 5 Times
in
3 Posts
Recover Your Saddle
Now that springtime is near, I started recovering saddles again. I saw a few write-ups on here and instructables but I wanted to do my own. I tried to take as many pics as I could but at times, I got caught up in the work and I forgot. I'll try to fill in the blanks as much as possible.
First, why recover a saddle? Maybe you have a favorite saddle that is hard to find or expensive to replace. Maybe you have alot of time on your hands and you'd like to test your skills. What if your saddle never came in a certain color. Plenty of reasons.
Here's a list of what you'll need at the very least:
-saddle
-material (leather, suede, synthetics)
-3m Super 77 spray adhesive (first one I tried, works nicely)
-standard screwdriver
-exacto knife or small box cutter
-scissors
-course sandpaper
-spare seatpost (makes it easier to stretch material)
-something to hold said seatpost (vise or your bike)
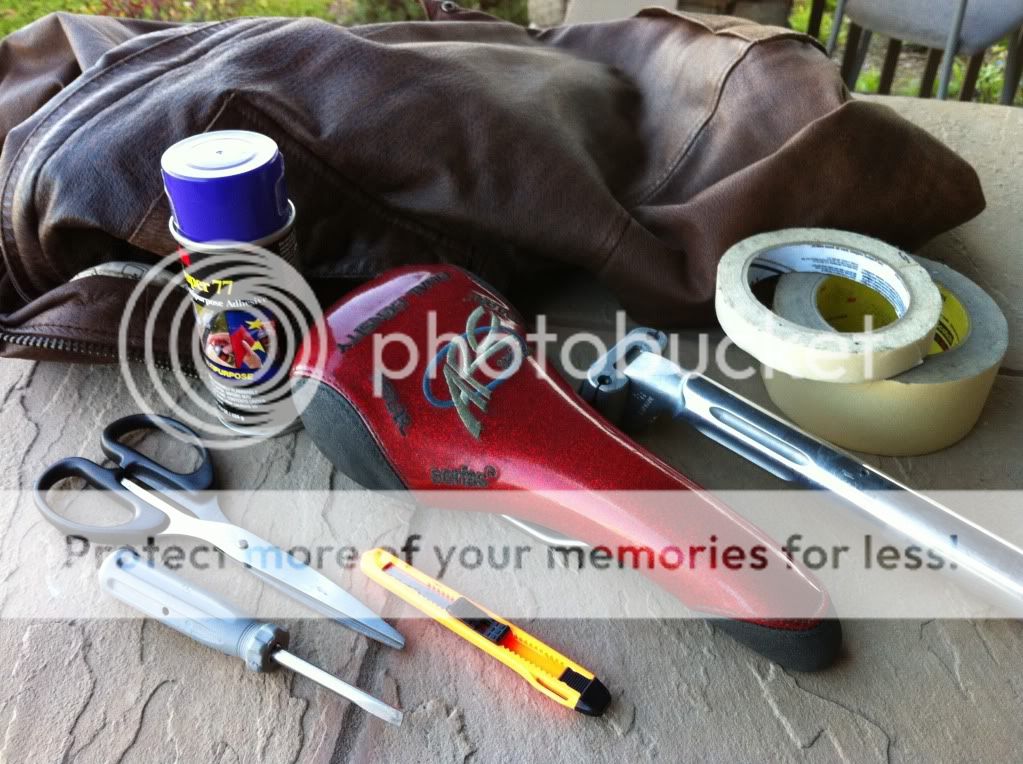
Here is my dad's favorite type of saddle, Serfas ARC. I did one for him last fall for his commuter, this ones going on his MTB (he doesn't know). Saddles have different shapes so some will be easier than others while some will be impossible to recover. These are a medium on the difficulty scale only because the old covers are so hard to remove cleanly. That's another thing too. More on that later.
This cover is held on with adhesive and staples. Remove the staples with your screwdriver.
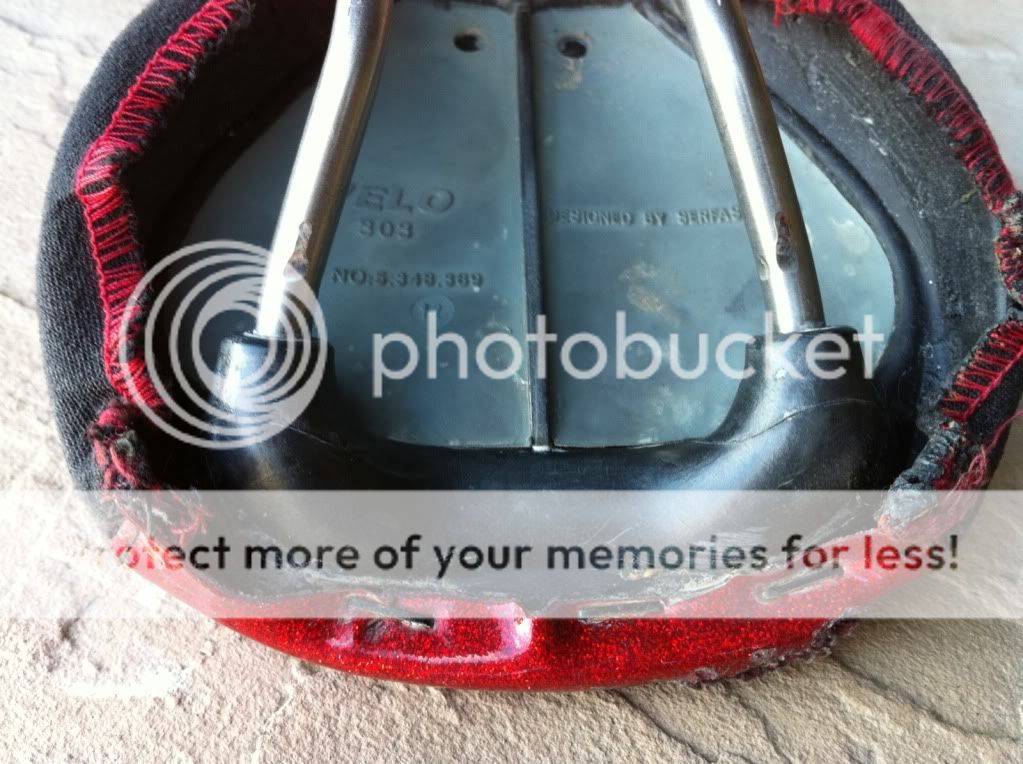
Sometimes, the adhesive is old and the cover comes off clean. It may be the age or type of adhesive was used originally. Sometimes, the adhesive is a pain like this Serfas. You want to try to remove the cover without pulling up divots of foam. Sometimes its unavoidable to mess up the foam but work slowly and take your time. Use a razor to cut away the foam if it starts to stick to the cover or do what I do with a screwdriver:
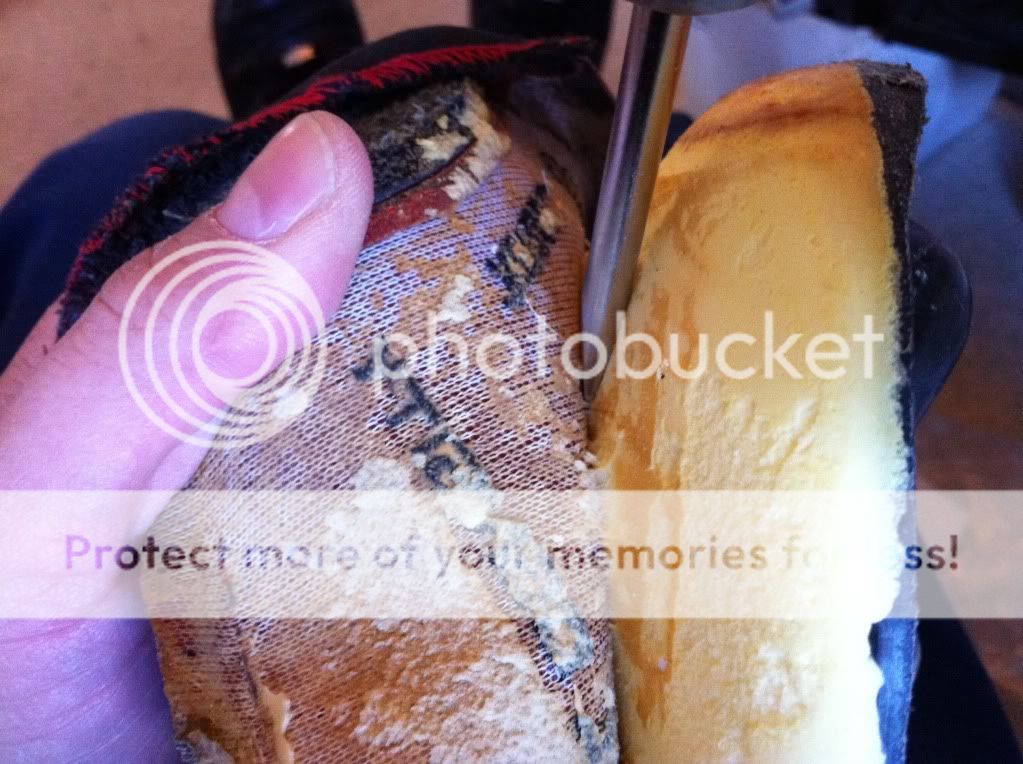
As you pull the cover away, use the screwdriver to push it away from the foam. It works pretty well but it's slow. Again take your time. Eventually, the cover will be off and you may or may not have some little pieces missing like this one:
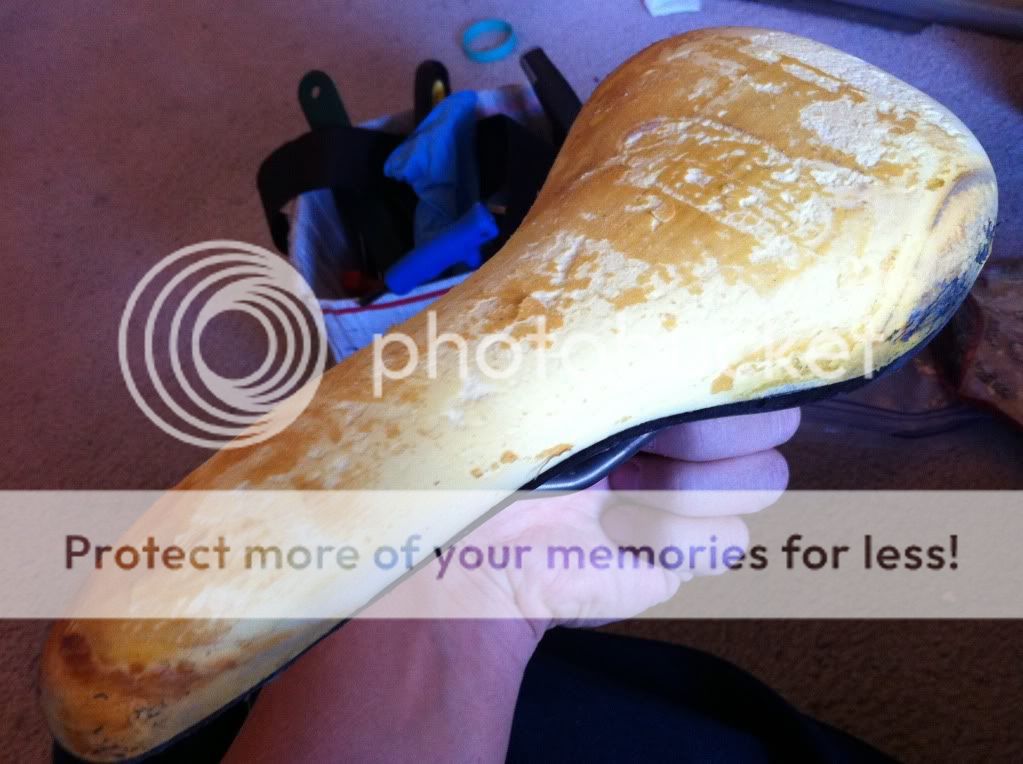

These little divots will probably show through the material. Can't really do anything about it now. Be more careful next time.
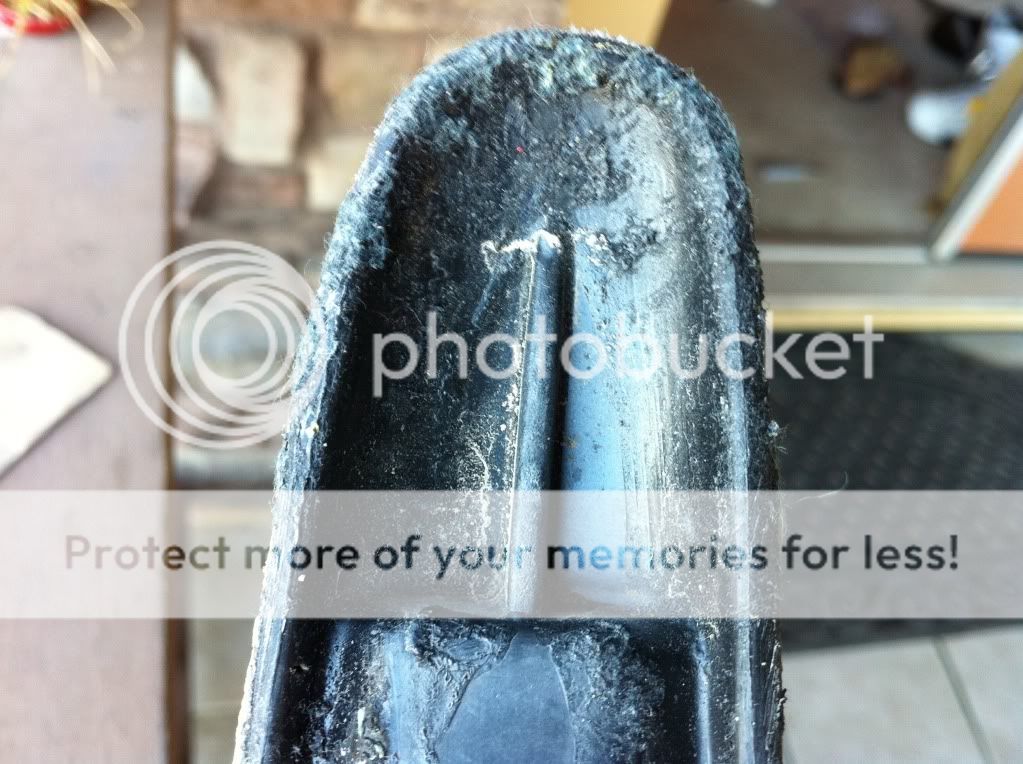
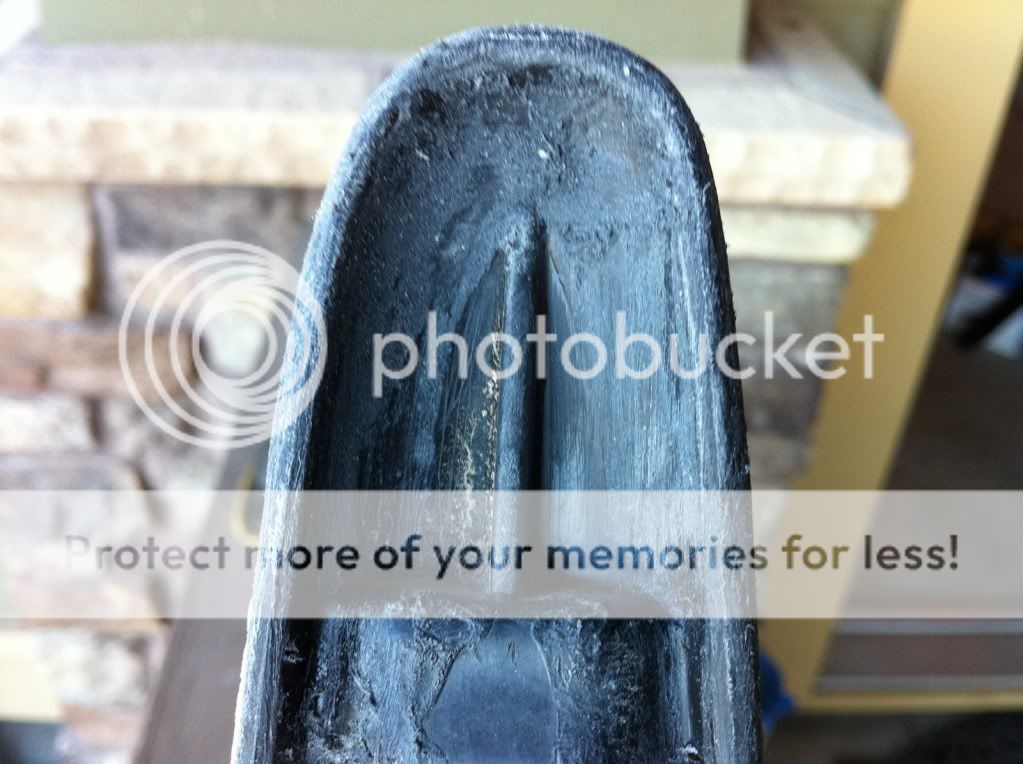
Usually, you will have to prep the saddle. I'm talking about the shell and the little pieces of old cover and adhesive still stuck to the top and bottom of the edges. I just hit it real quick with some course sandpaper. My goal is just to clean I up a little. I'm not trying to remove any old adhesive that is really on there, that stuff actually helps the new cover stick. I'm trying to remove the loose bits of cover and dirt and smooth out any rough edges.
Before:
After:
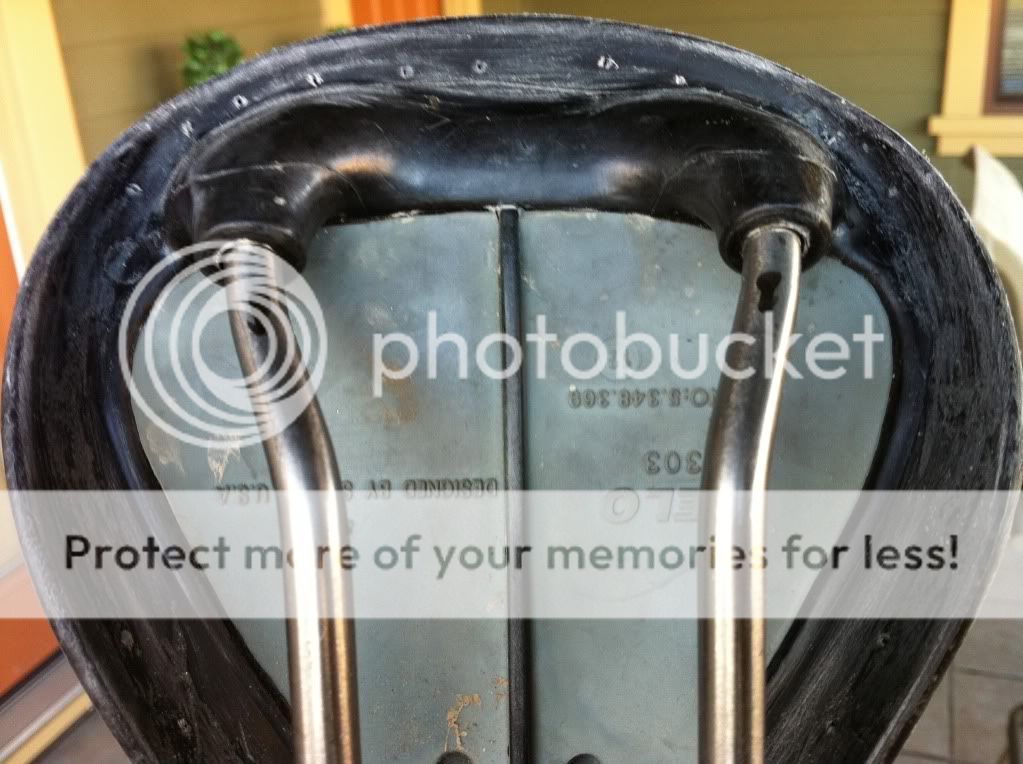
After a good cleaning, you want to mask the saddle. Cover the rails. Your mask line is gonna be where the adhesive stops and where you'll the trimming your leather later.
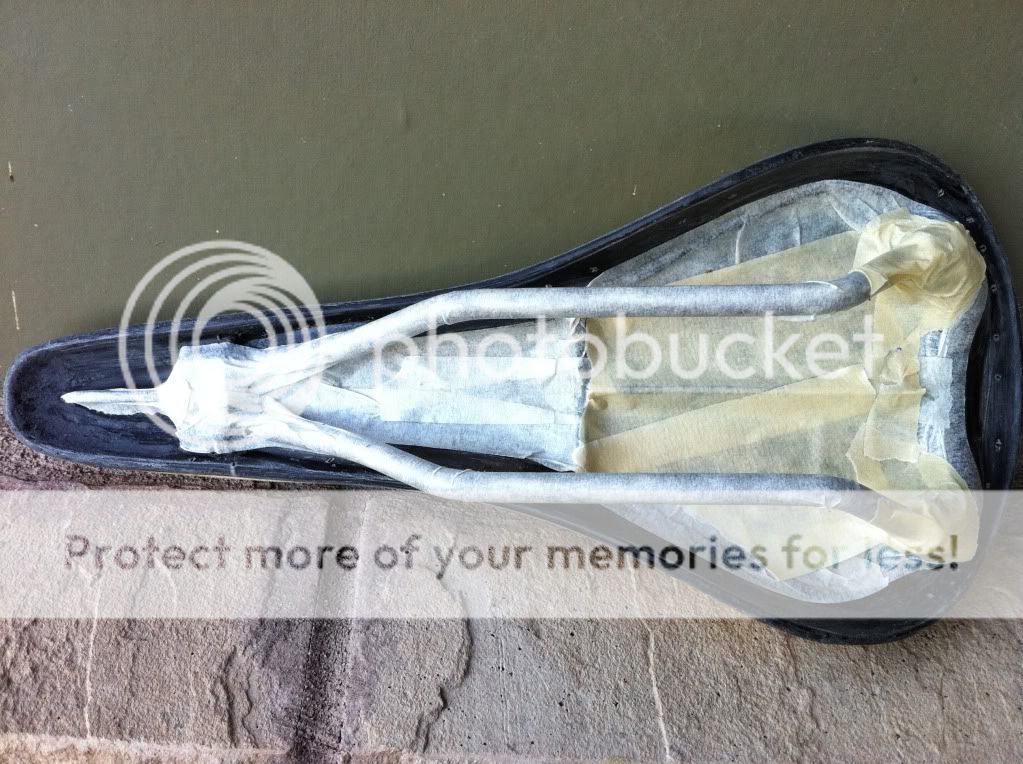
Notice how much I didn't mask at the nose of the saddle? Your gonna need alot of adhesive here because that's the most difficult place to make look clean.
First, why recover a saddle? Maybe you have a favorite saddle that is hard to find or expensive to replace. Maybe you have alot of time on your hands and you'd like to test your skills. What if your saddle never came in a certain color. Plenty of reasons.
Here's a list of what you'll need at the very least:
-saddle
-material (leather, suede, synthetics)
-3m Super 77 spray adhesive (first one I tried, works nicely)
-standard screwdriver
-exacto knife or small box cutter
-scissors
-course sandpaper
-spare seatpost (makes it easier to stretch material)
-something to hold said seatpost (vise or your bike)

Here is my dad's favorite type of saddle, Serfas ARC. I did one for him last fall for his commuter, this ones going on his MTB (he doesn't know). Saddles have different shapes so some will be easier than others while some will be impossible to recover. These are a medium on the difficulty scale only because the old covers are so hard to remove cleanly. That's another thing too. More on that later.
This cover is held on with adhesive and staples. Remove the staples with your screwdriver.

Sometimes, the adhesive is old and the cover comes off clean. It may be the age or type of adhesive was used originally. Sometimes, the adhesive is a pain like this Serfas. You want to try to remove the cover without pulling up divots of foam. Sometimes its unavoidable to mess up the foam but work slowly and take your time. Use a razor to cut away the foam if it starts to stick to the cover or do what I do with a screwdriver:

As you pull the cover away, use the screwdriver to push it away from the foam. It works pretty well but it's slow. Again take your time. Eventually, the cover will be off and you may or may not have some little pieces missing like this one:


These little divots will probably show through the material. Can't really do anything about it now. Be more careful next time.
Usually, you will have to prep the saddle. I'm talking about the shell and the little pieces of old cover and adhesive still stuck to the top and bottom of the edges. I just hit it real quick with some course sandpaper. My goal is just to clean I up a little. I'm not trying to remove any old adhesive that is really on there, that stuff actually helps the new cover stick. I'm trying to remove the loose bits of cover and dirt and smooth out any rough edges.
Before:

After:


After a good cleaning, you want to mask the saddle. Cover the rails. Your mask line is gonna be where the adhesive stops and where you'll the trimming your leather later.

Notice how much I didn't mask at the nose of the saddle? Your gonna need alot of adhesive here because that's the most difficult place to make look clean.
#2
Noob
Thread Starter
Join Date: Nov 2009
Location: Bay Area
Posts: 357
Bikes: '86 Schwinn Paramount
Mentioned: 0 Post(s)
Tagged: 0 Thread(s)
Quoted: 2 Post(s)
Likes: 0
Liked 5 Times
in
3 Posts
Here is the donor jacket and the material used:
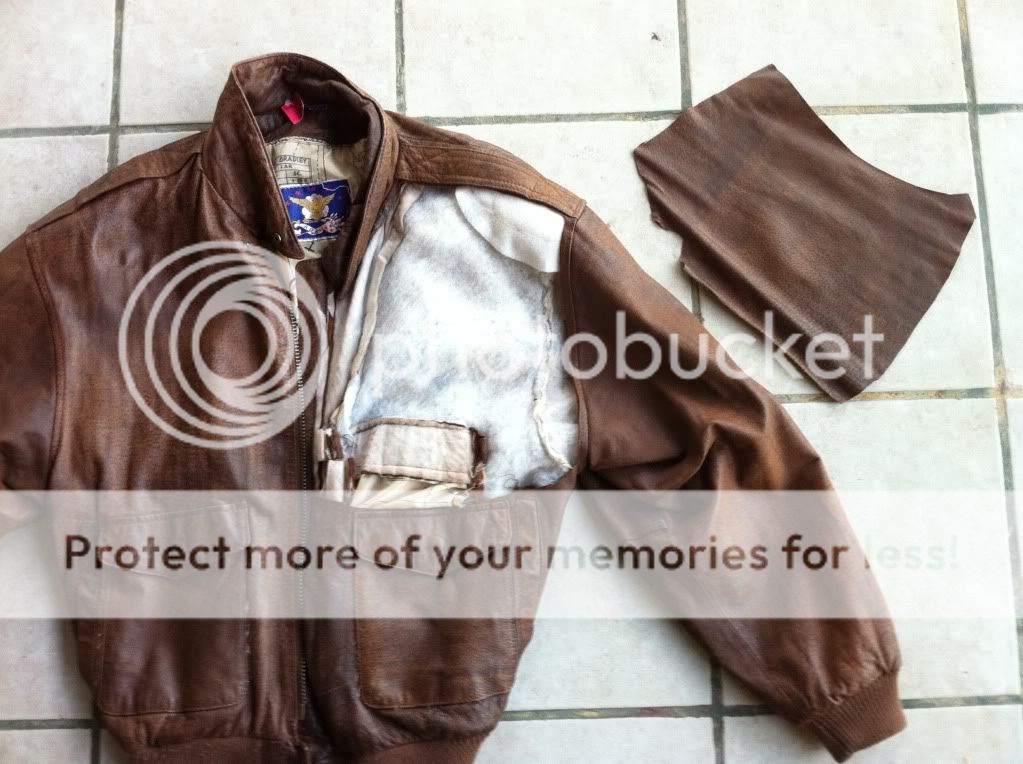
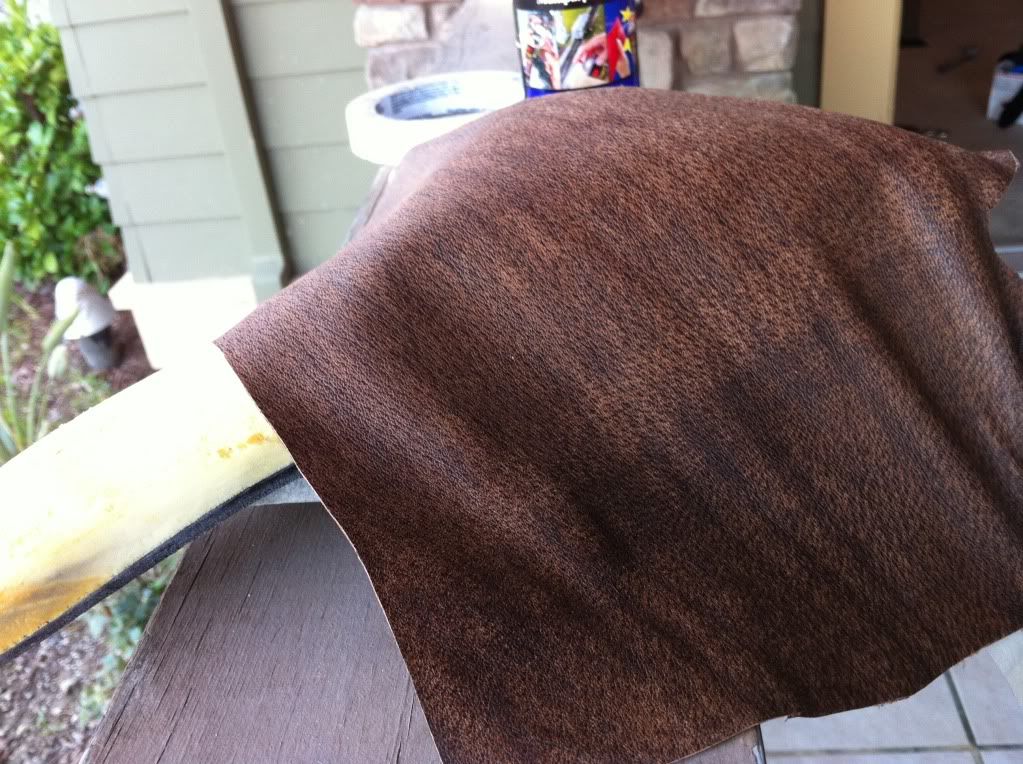
I gave myself at least 2" of excess material around all parts of the saddle, sometimes more. If this is your first time, you might need more. You can always trim later plus extra material can be used for leverage when stretching the cover onto the saddle.
The next step is to spray the adhesive! I do this in two parts.
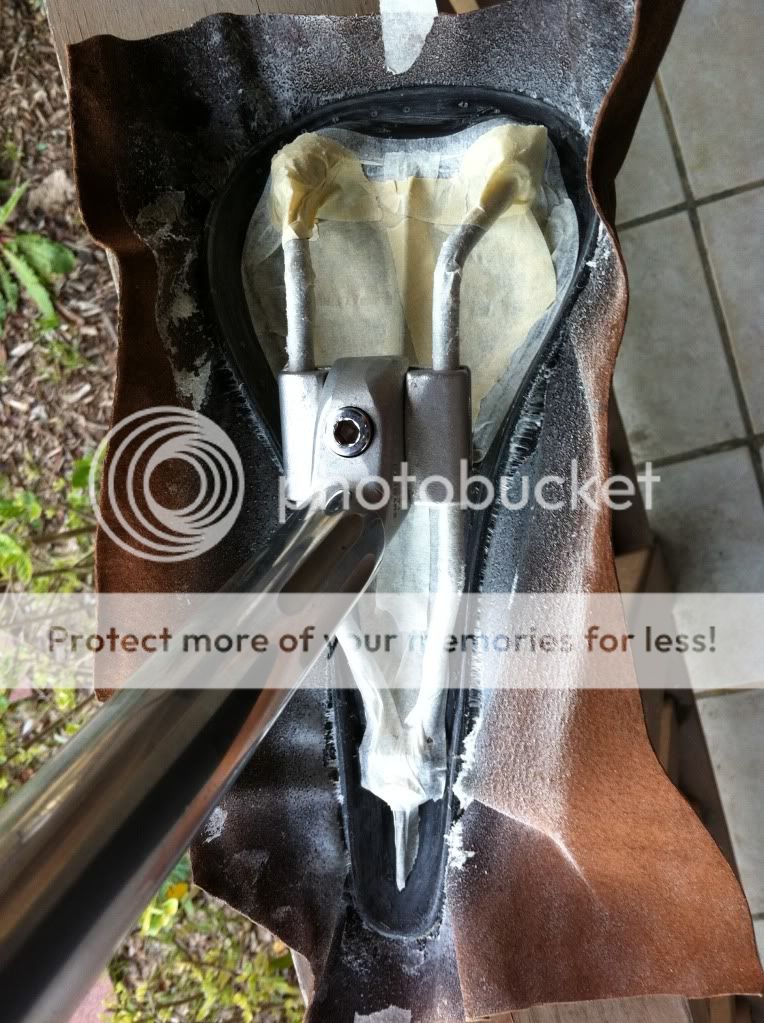
Part one. First is the top of the saddle I placed the saddle topside up and generously sprayed the top and sides of the saddle. I then sprayed the material and let both sit for a few minutes. Now's the time to attach that seatpost. Secure the seatpost so that you can have the saddle topside up:
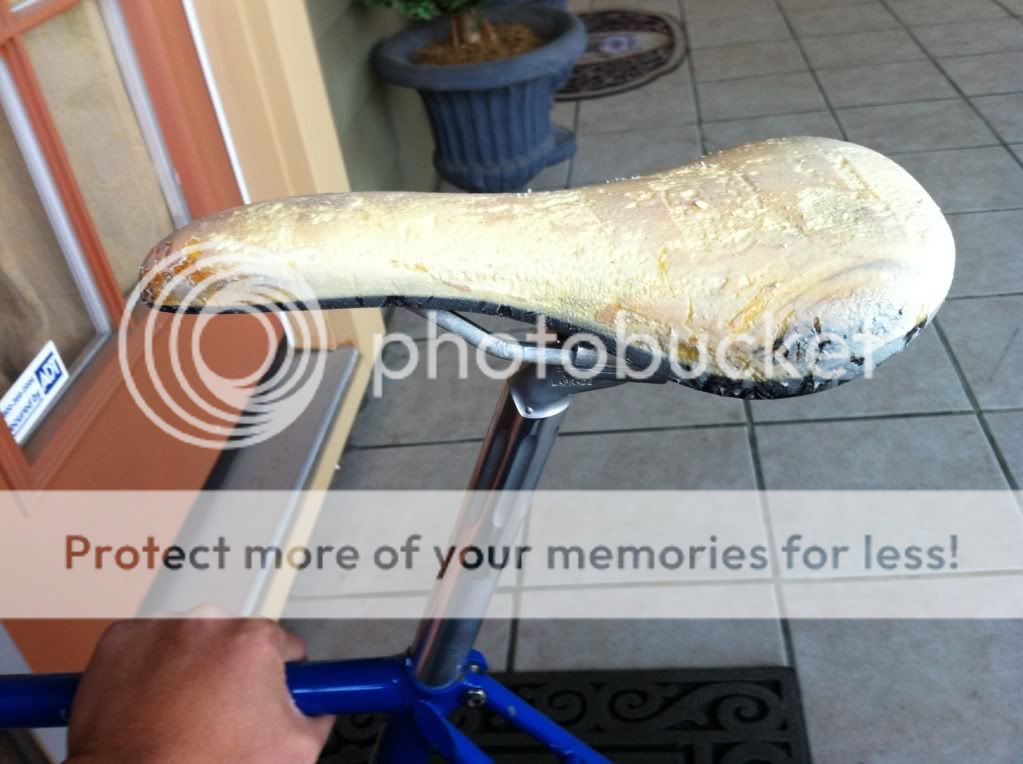
Take your cover and pull it onto the saddle while holding the sides. The adhesive isn't set yet so you can pull off the cover if you need to reposition it. Your goal is to have an even stretch all around the saddle. Avoid wrinkles by pulling up and re-stretching in that area. Here is how it looks after the first part of spraying and stretching:
Underside:
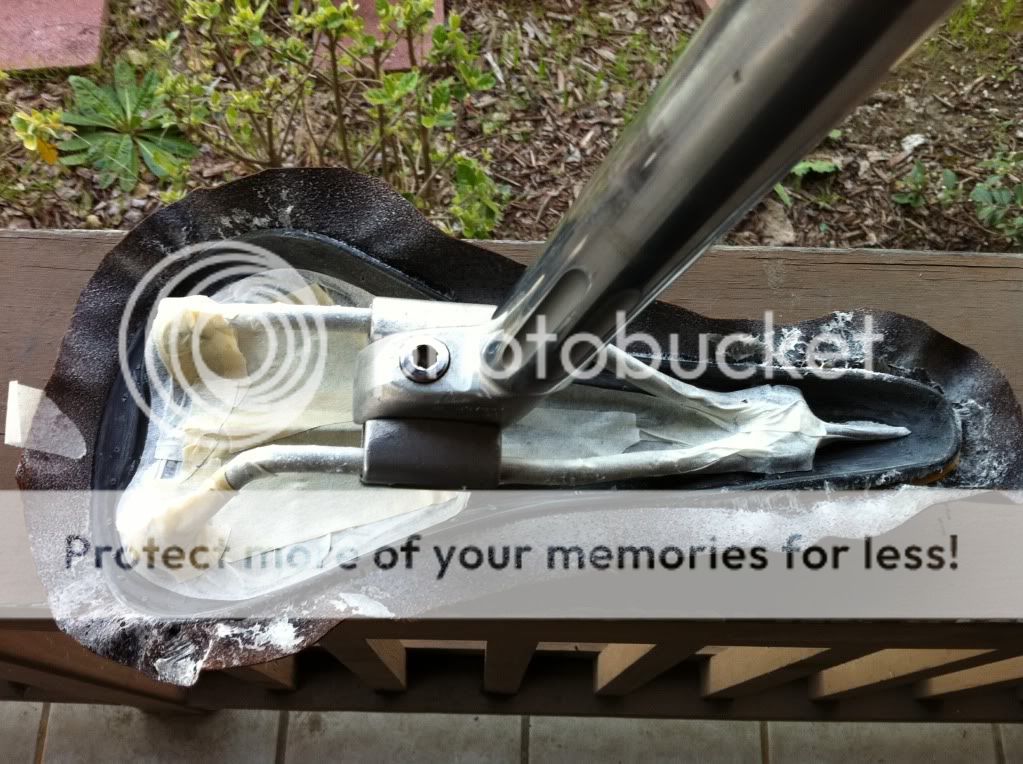
Now you can remove the seatpost. I like to trim the edges a little more now. I leave a little over an inch all around at this point:
Time to spray again.
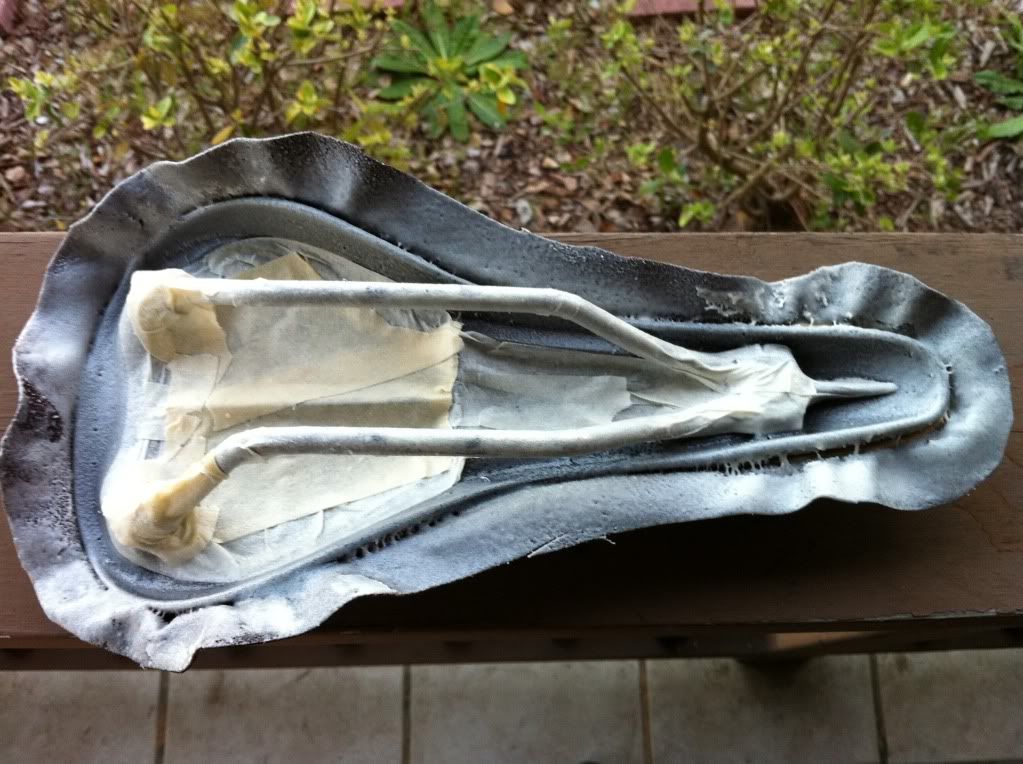
Part two. Lay the saddle topside down. Spray the inner-underside of the saddle as well as the edge of the cover. I use alot of adhesive here but it also gets very messy later. Here's how it looks:


I gave myself at least 2" of excess material around all parts of the saddle, sometimes more. If this is your first time, you might need more. You can always trim later plus extra material can be used for leverage when stretching the cover onto the saddle.
The next step is to spray the adhesive! I do this in two parts.
Part one. First is the top of the saddle I placed the saddle topside up and generously sprayed the top and sides of the saddle. I then sprayed the material and let both sit for a few minutes. Now's the time to attach that seatpost. Secure the seatpost so that you can have the saddle topside up:

Take your cover and pull it onto the saddle while holding the sides. The adhesive isn't set yet so you can pull off the cover if you need to reposition it. Your goal is to have an even stretch all around the saddle. Avoid wrinkles by pulling up and re-stretching in that area. Here is how it looks after the first part of spraying and stretching:

Underside:

Now you can remove the seatpost. I like to trim the edges a little more now. I leave a little over an inch all around at this point:

Time to spray again.
Part two. Lay the saddle topside down. Spray the inner-underside of the saddle as well as the edge of the cover. I use alot of adhesive here but it also gets very messy later. Here's how it looks:

Last edited by THEJAPINO; 02-28-11 at 11:04 PM.
Likes For THEJAPINO:
#3
Noob
Thread Starter
Join Date: Nov 2009
Location: Bay Area
Posts: 357
Bikes: '86 Schwinn Paramount
Mentioned: 0 Post(s)
Tagged: 0 Thread(s)
Quoted: 2 Post(s)
Likes: 0
Liked 5 Times
in
3 Posts
Now is the very messy part. Rolling the edges. This step is a mix of stretching, flattening, trimming, pulling the edges up and back down, and removing sticky adhesive from all over your hands. I like to start at the easiest part, the sides of the saddle. Here, you can pull the material right onto the underside of the saddle. Trim later. Then I do the back. I work my way from the sides to the back, alternating from left side then right side until I get to the middle of the back of the saddle.
You'll notice alot of wrinkles.
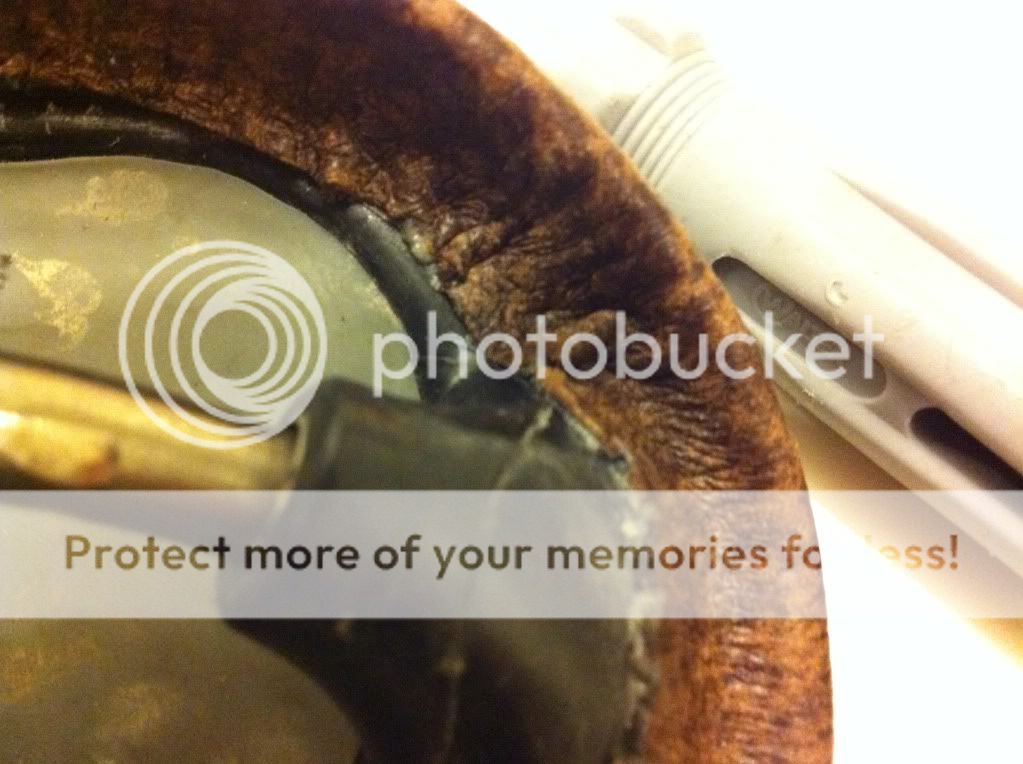
I like to use a screwdriver to flatten the highest point of the wrinkle. I press the wrinkle starting from the edge of the saddle's base to the edge of the cover under the saddle. I 'pull' the material away from where the wrinkle was, sort of spreading the wrinkle apart wit the screwdriver tip:
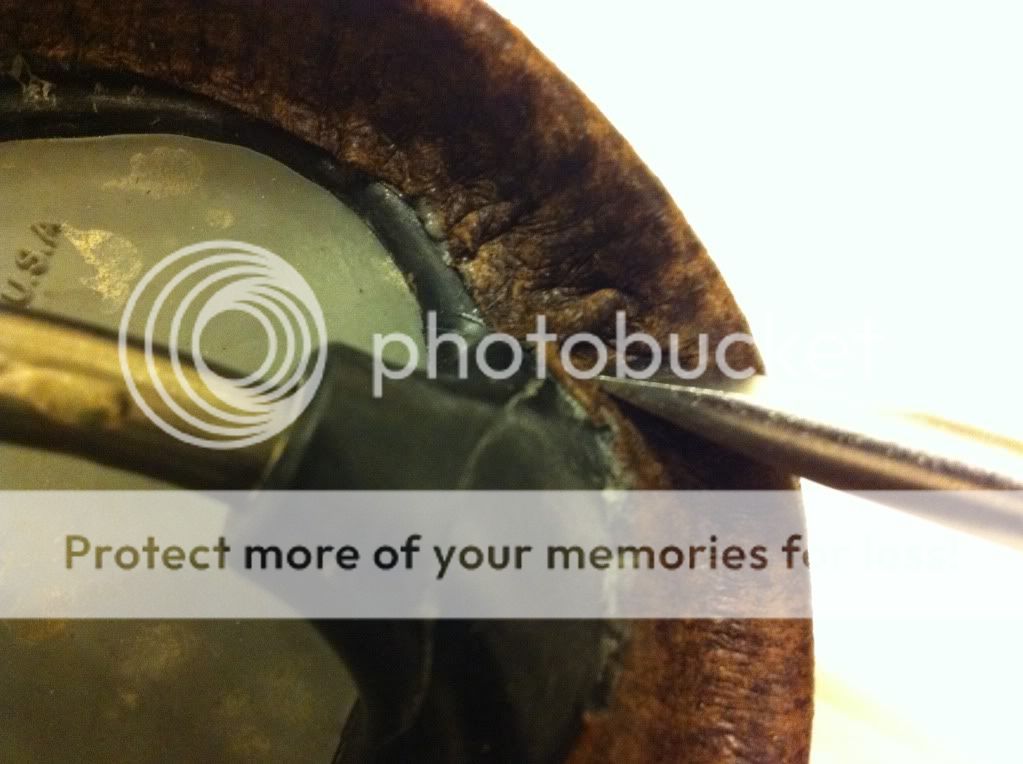
I keep doing that around the wrinkles until everything looks nice and even. All while stretching the material:
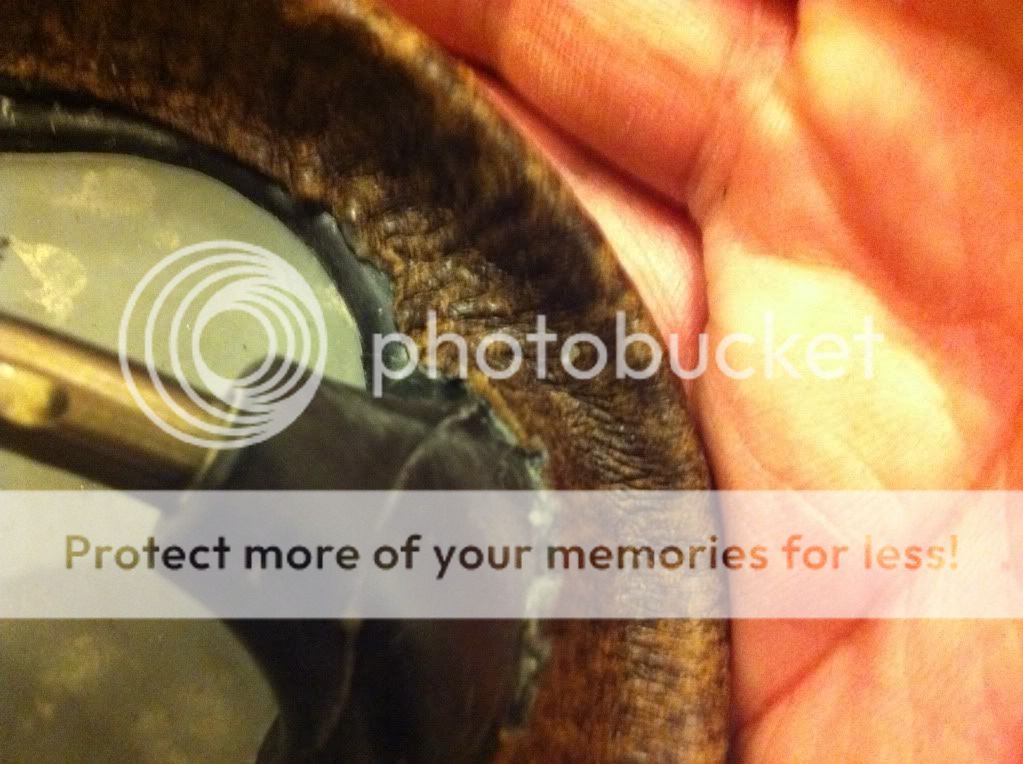
Keep flattening those wrinkles until it all looks even back there. You won't get all the wrinkles flat, just try for being even (pic after trimmed):
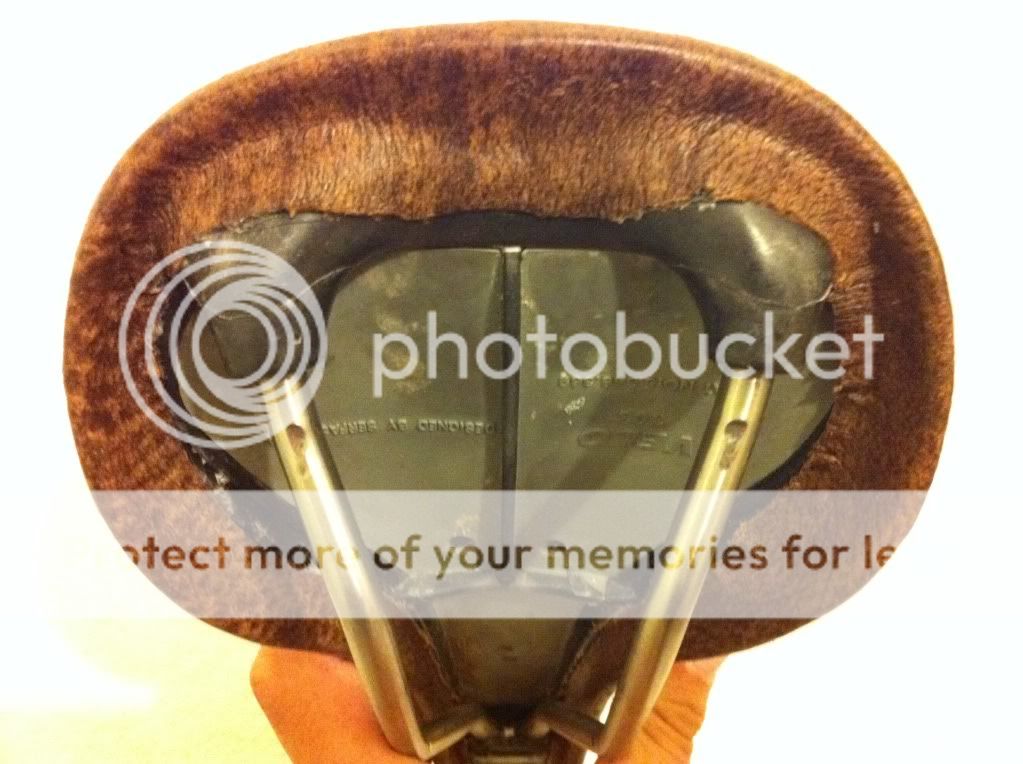
Now the nose of the saddle is a different technique all together. There will be wrinkles there no matter what, your gameplan is to stretch the sides of the nose towards the back of the saddle while stretching the front of the saddle towards the underside. In the pic, the leather at the sides is almost flat and the leather at the front curve is tightly wrinkled, flattened:
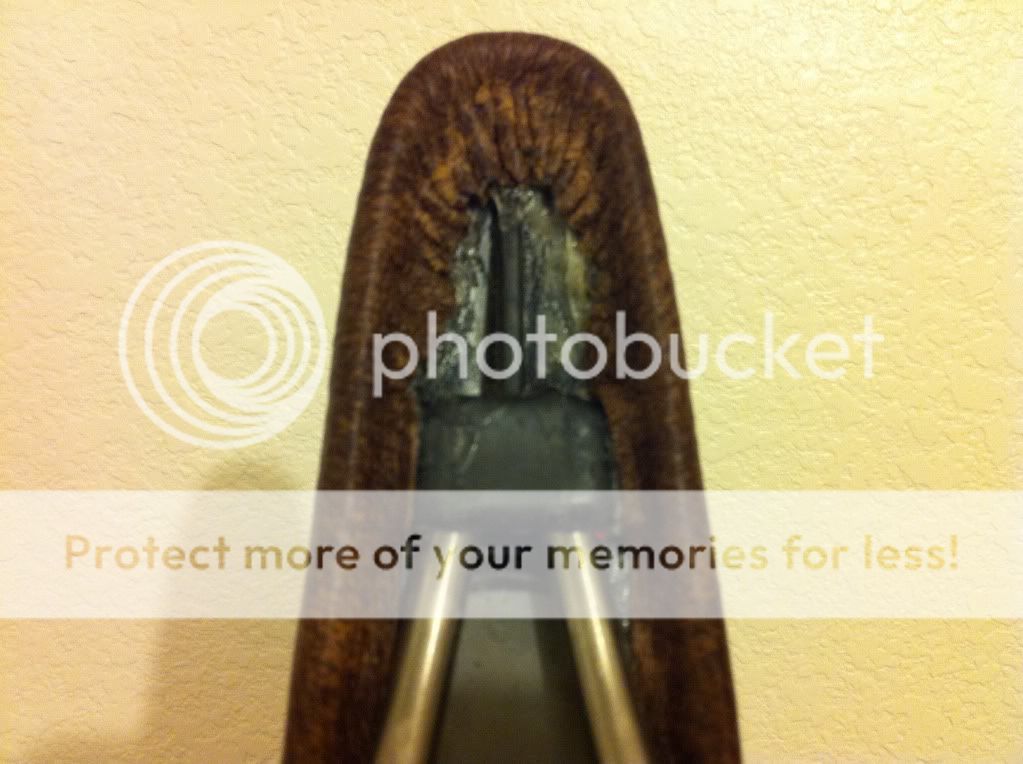
Take your time here. By now, the adhesive is very tacky. It helps because everything stays in place. You can still lift and reposition here, it's just more difficult to slide leather around.
Here is the underside all trimmed:
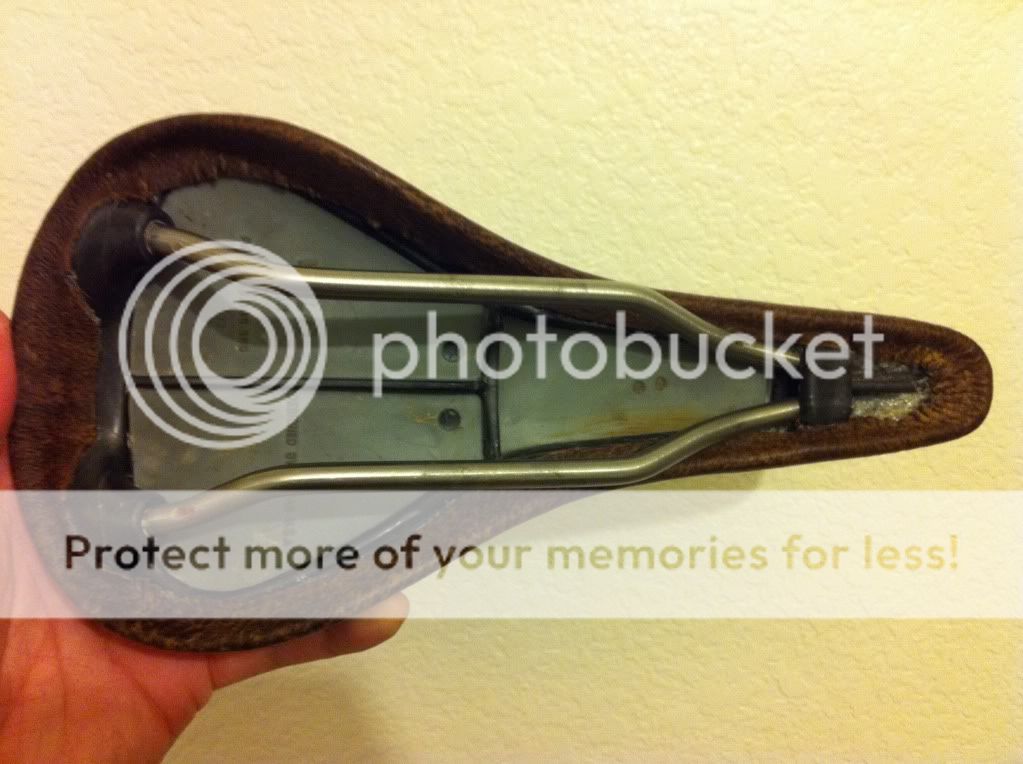
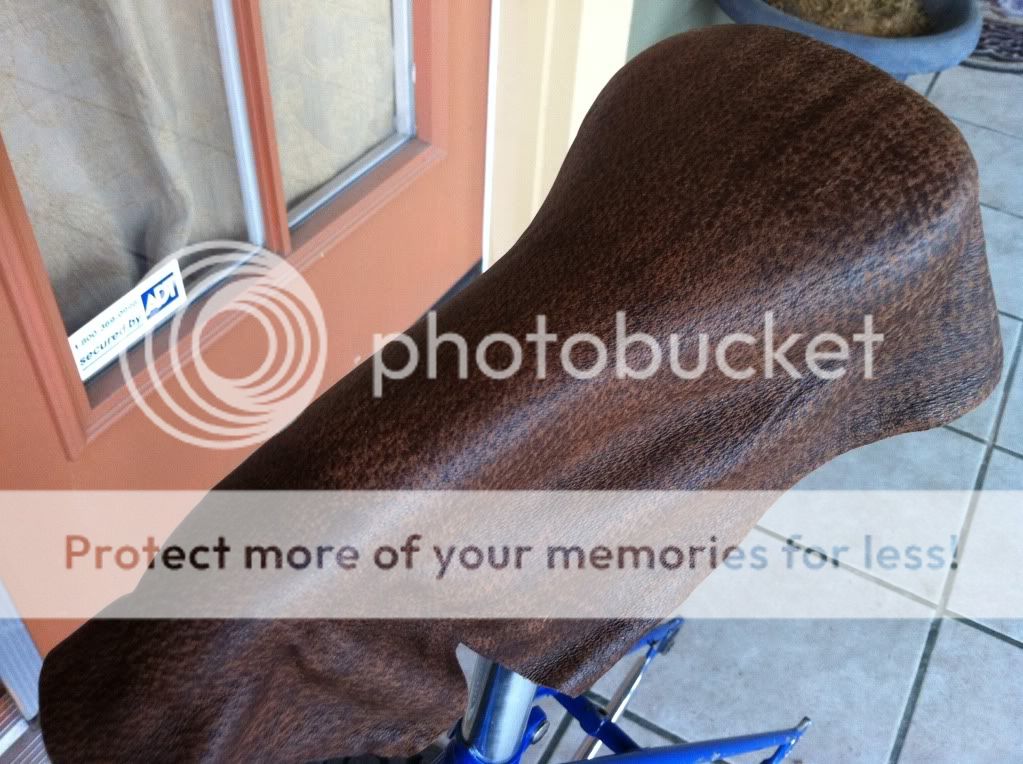
Finished product:
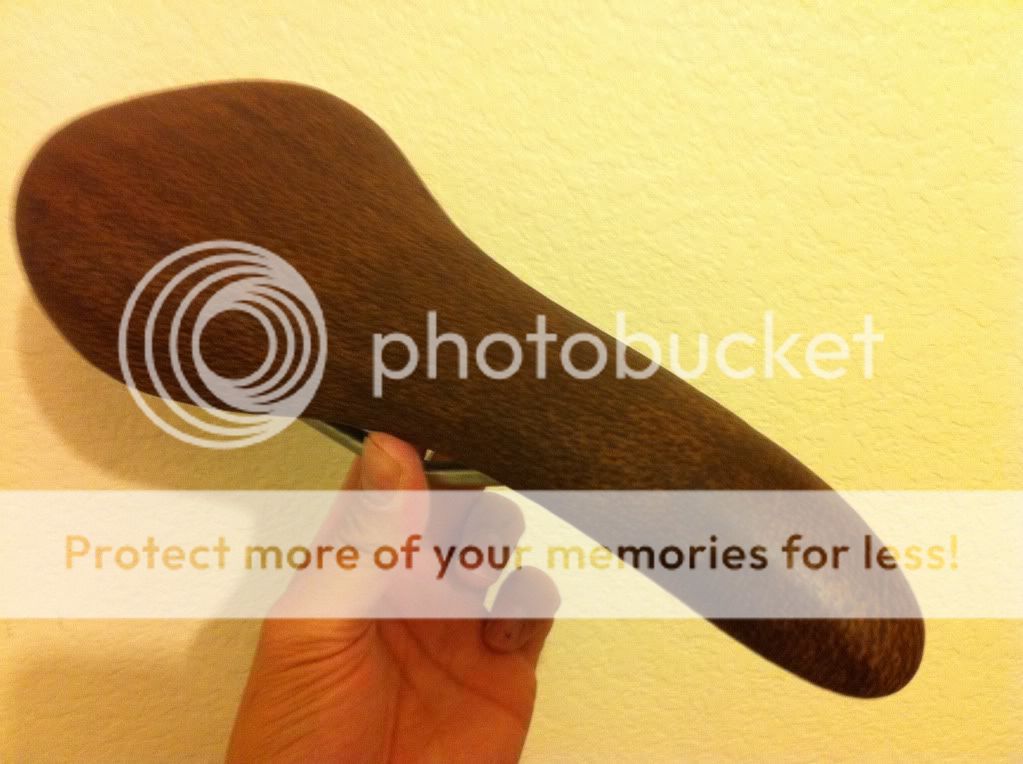
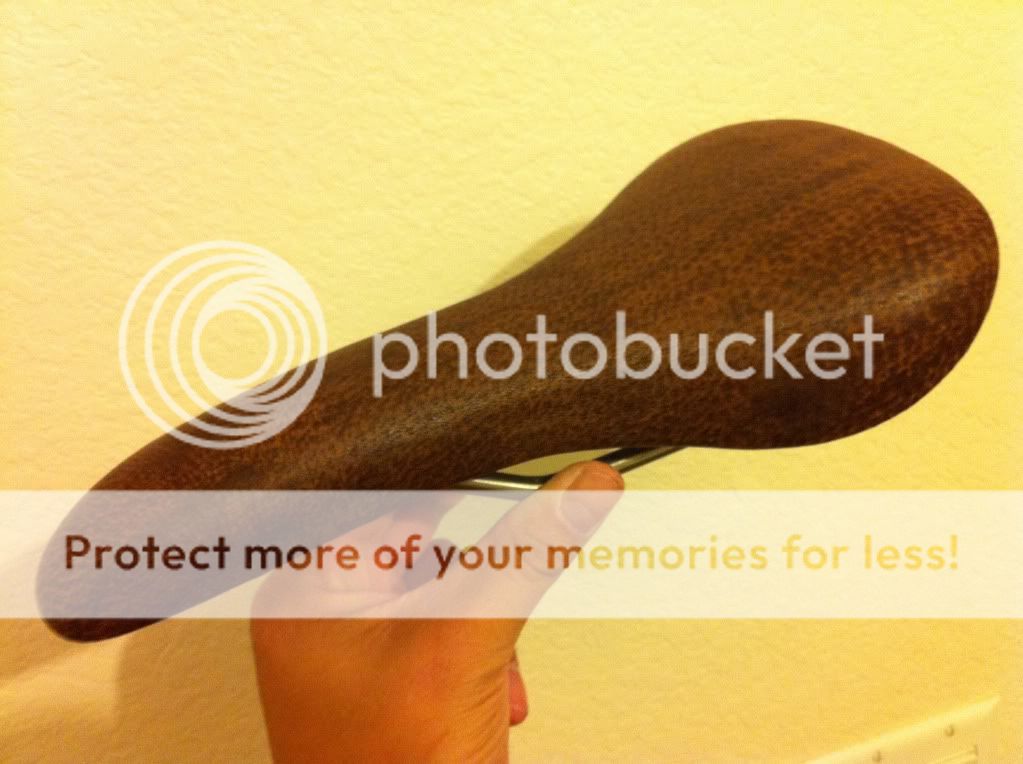
Good luck, I'll try to ask any questions you may have!
You'll notice alot of wrinkles.

I like to use a screwdriver to flatten the highest point of the wrinkle. I press the wrinkle starting from the edge of the saddle's base to the edge of the cover under the saddle. I 'pull' the material away from where the wrinkle was, sort of spreading the wrinkle apart wit the screwdriver tip:

I keep doing that around the wrinkles until everything looks nice and even. All while stretching the material:

Keep flattening those wrinkles until it all looks even back there. You won't get all the wrinkles flat, just try for being even (pic after trimmed):

Now the nose of the saddle is a different technique all together. There will be wrinkles there no matter what, your gameplan is to stretch the sides of the nose towards the back of the saddle while stretching the front of the saddle towards the underside. In the pic, the leather at the sides is almost flat and the leather at the front curve is tightly wrinkled, flattened:

Take your time here. By now, the adhesive is very tacky. It helps because everything stays in place. You can still lift and reposition here, it's just more difficult to slide leather around.
Here is the underside all trimmed:

Finished product:


Good luck, I'll try to ask any questions you may have!
Last edited by THEJAPINO; 02-28-11 at 11:06 PM.
#4
Banned.
Join Date: Jul 2009
Location: PAZ
Posts: 12,294
Mentioned: 255 Post(s)
Tagged: 0 Thread(s)
Quoted: 2588 Post(s)
Liked 4,824 Times
in
1,709 Posts
This is a neat thread - I can't wait to read "the rest of the story"...
DD
DD
#5
Senior Member
Join Date: Jun 2009
Location: Montereyish
Posts: 2,306
Mentioned: 0 Post(s)
Tagged: 0 Thread(s)
Quoted: 1 Post(s)
Likes: 0
Liked 2 Times
in
2 Posts
I'm on the edge of my seat as well, I'm about to try my first saddle recover of a Concor. I've been advised that if the cover will not separate from the pad without damaging it, to use a hairdryer. About half of the cover has peeled nicely away from the pad, the rest I will try the dryer on.


#6
Ellensburg, WA
Join Date: Aug 2008
Location: Ellensburg, WA
Posts: 3,755
Bikes: See my signature
Mentioned: 77 Post(s)
Tagged: 0 Thread(s)
Quoted: 313 Post(s)
Liked 457 Times
in
160 Posts
Fantastic photos with great detail. I've got two waiting to be done. Started to try last fall but the material I used was too thick.
__________________
1984 Gitane Tour de France; 1968 Peugeot PL8; 1982 Nishiki Marina 12; 1984 Peugeot PSV; 1993 Trek 950 mtb; 1983 Vitus 979; Colnago Super, mid-80's Bianchi Veloce, 1984 or 85 Vitus 979
1984 Gitane Tour de France; 1968 Peugeot PL8; 1982 Nishiki Marina 12; 1984 Peugeot PSV; 1993 Trek 950 mtb; 1983 Vitus 979; Colnago Super, mid-80's Bianchi Veloce, 1984 or 85 Vitus 979
#7
Senior Member
So is that leather you're using, or vinyl? I hope it wasn't your dad's favorite jacket. Very nice job. I have a Concor I've been meaning to do for a long time. I started shopping for leather, was uncertain about what to buy and dropped the ball. Maybe your thread will inspire me.
#8
Senior Member
Wow! Great thread, Japino!
__________________
Bikes on Flickr
I prefer email to private messages. You can contact me at justinhughes@me.com
Bikes on Flickr
I prefer email to private messages. You can contact me at justinhughes@me.com
#9
FBoD Member at Large
Join Date: Aug 2008
Location: Woodbury, MN
Posts: 6,094
Mentioned: 3 Post(s)
Tagged: 0 Thread(s)
Quoted: 30 Post(s)
Likes: 0
Liked 7 Times
in
7 Posts
Wool felt under the cover will bridge the little "divots" you refer to without adding a lot to the thickness of the saddle.
And those wondering, vinyl is much harder to work with because it's less flexible and thicker. OTOH you can hone your skills on vinyl fairly cheaply.
One thing you may find is that Super 77 adhesive may get soft in the heat of summer. I switched to Weldwood contact cement and got much better results. I do like the spray for the top of the saddle but I use the Weldwood on the edges where it really has to adhere.
Nice job OP...that looks really nice. Donor leather jacket, whodathunkit.
Last edited by khatfull; 02-28-11 at 11:27 PM.
#10
Senior Member
Join Date: Jun 2009
Location: Montereyish
Posts: 2,306
Mentioned: 0 Post(s)
Tagged: 0 Thread(s)
Quoted: 1 Post(s)
Likes: 0
Liked 2 Times
in
2 Posts
Wow, that was quick. You finished before I could even get my post up. I bought marine grade vinyl, which seems about twice as thick as the leather that was on it. I'm concerned about the thickness not allowing a clean tuck under the edges.
#13
Noob
Thread Starter
Join Date: Nov 2009
Location: Bay Area
Posts: 357
Bikes: '86 Schwinn Paramount
Mentioned: 0 Post(s)
Tagged: 0 Thread(s)
Quoted: 2 Post(s)
Likes: 0
Liked 5 Times
in
3 Posts
PM sent
Thanks guys, thanks for the tips also. I have a heatgun I can use, actually makes alot of sense. I tried wool felt. The felt didn't give me a tacky bond I like to feel when stretching at the topside, I may try it again though. I'll look for some of that Weldwood. Thanks!
Thanks guys, thanks for the tips also. I have a heatgun I can use, actually makes alot of sense. I tried wool felt. The felt didn't give me a tacky bond I like to feel when stretching at the topside, I may try it again though. I'll look for some of that Weldwood. Thanks!
#15
Banned.
Join Date: Jul 2009
Location: PAZ
Posts: 12,294
Mentioned: 255 Post(s)
Tagged: 0 Thread(s)
Quoted: 2588 Post(s)
Liked 4,824 Times
in
1,709 Posts
Fantastic post! Great illustrations and superior narration; A+
And the final result is absolutely gorgeous...you have a very keen eye for the details; the underside finish looks loads better than the original.
Was this your first? If not, how long have you been running one of your other recovers?
Thanks for this post. Again, great job!
DD
And the final result is absolutely gorgeous...you have a very keen eye for the details; the underside finish looks loads better than the original.
Was this your first? If not, how long have you been running one of your other recovers?
Thanks for this post. Again, great job!
DD
#16
Noob
Thread Starter
Join Date: Nov 2009
Location: Bay Area
Posts: 357
Bikes: '86 Schwinn Paramount
Mentioned: 0 Post(s)
Tagged: 0 Thread(s)
Quoted: 2 Post(s)
Likes: 0
Liked 5 Times
in
3 Posts
I've done eight now. My dad has been on his other saddle since last fall. He rides in Vegas and says his saddle is holding up nicely. I'll ask him about it again. Here it is fresh:

Last time I asked, he says it's gotten darker/nicer. I just did a Turbo in the same leather.

Last time I asked, he says it's gotten darker/nicer. I just did a Turbo in the same leather.
#18
Senior Member
Join Date: Aug 2009
Location: Berkeley, CA
Posts: 7,238
Bikes: '72 Cilo Pacer, '72 Gitane Gran Tourisme, '72 Peugeot PX10, '73 Speedwell Ti, '74 Peugeot UE-8, '75 Peugeot PR-10L, '80 Colnago Super, '85 De Rosa Pro, '86 Look Equipe 753, '86 Look KG86, '89 Parkpre Team, '90 Parkpre Team MTB, '90 Merlin
Mentioned: 87 Post(s)
Tagged: 0 Thread(s)
Quoted: 830 Post(s)
Liked 2,123 Times
in
554 Posts
Awesome thread! Thanks for the walkthrough. I am been procrastinating on a saddle recovering project (the last step in my Park Pre rebuild) because, frankly, I've been a little afraid of botching it up. You've renewed my confidence!
Btw, I bought some leather from "The Leather Guy of Minnesota" who has an ebay store if you can't find any suitable donor jackets. Lots of remnants for decent prices, some of which may not be listed on the site:
https://myworld.ebay.com/theleatherguyofmn/?afsrc=1
Btw, I bought some leather from "The Leather Guy of Minnesota" who has an ebay store if you can't find any suitable donor jackets. Lots of remnants for decent prices, some of which may not be listed on the site:
https://myworld.ebay.com/theleatherguyofmn/?afsrc=1
__________________
-Randy
'72 Cilo Pacer • '72 Peugeot PX10 • '73 Speedwell Ti • '74 Nishiki Competition • '74 Peugeot UE-8 • '86 Look Equipe 753 • '86 Look KG86 • '89 Parkpre Team Road • '90 Parkpre Team MTB • '90 Merlin Ti
Avatar photo courtesy of jeffveloart.com, contact: contact: jeffnil8 (at) gmail.com.
-Randy
'72 Cilo Pacer • '72 Peugeot PX10 • '73 Speedwell Ti • '74 Nishiki Competition • '74 Peugeot UE-8 • '86 Look Equipe 753 • '86 Look KG86 • '89 Parkpre Team Road • '90 Parkpre Team MTB • '90 Merlin Ti
Avatar photo courtesy of jeffveloart.com, contact: contact: jeffnil8 (at) gmail.com.
Last edited by gaucho777; 03-01-11 at 01:08 AM.
#19
Noob
Thread Starter
Join Date: Nov 2009
Location: Bay Area
Posts: 357
Bikes: '86 Schwinn Paramount
Mentioned: 0 Post(s)
Tagged: 0 Thread(s)
Quoted: 2 Post(s)
Likes: 0
Liked 5 Times
in
3 Posts
Yeah there are lots of material I wanna try on eBay. Do a search for 'pearlized leather hide'. I wanna do a silver saddle!
#20
Senior Member
Join Date: Aug 2009
Location: Berkeley, CA
Posts: 7,238
Bikes: '72 Cilo Pacer, '72 Gitane Gran Tourisme, '72 Peugeot PX10, '73 Speedwell Ti, '74 Peugeot UE-8, '75 Peugeot PR-10L, '80 Colnago Super, '85 De Rosa Pro, '86 Look Equipe 753, '86 Look KG86, '89 Parkpre Team, '90 Parkpre Team MTB, '90 Merlin
Mentioned: 87 Post(s)
Tagged: 0 Thread(s)
Quoted: 830 Post(s)
Liked 2,123 Times
in
554 Posts
Now where is that pink bike thread? Gotta suggest someone try that pearlised metallic fuchsia saddle restoration.

__________________
-Randy
'72 Cilo Pacer • '72 Peugeot PX10 • '73 Speedwell Ti • '74 Nishiki Competition • '74 Peugeot UE-8 • '86 Look Equipe 753 • '86 Look KG86 • '89 Parkpre Team Road • '90 Parkpre Team MTB • '90 Merlin Ti
Avatar photo courtesy of jeffveloart.com, contact: contact: jeffnil8 (at) gmail.com.
-Randy
'72 Cilo Pacer • '72 Peugeot PX10 • '73 Speedwell Ti • '74 Nishiki Competition • '74 Peugeot UE-8 • '86 Look Equipe 753 • '86 Look KG86 • '89 Parkpre Team Road • '90 Parkpre Team MTB • '90 Merlin Ti
Avatar photo courtesy of jeffveloart.com, contact: contact: jeffnil8 (at) gmail.com.
#21
FBoD Member at Large
Join Date: Aug 2008
Location: Woodbury, MN
Posts: 6,094
Mentioned: 3 Post(s)
Tagged: 0 Thread(s)
Quoted: 30 Post(s)
Likes: 0
Liked 7 Times
in
7 Posts
I'm gonna have to do leather myself one day....would never have thought of a donor jacket...yet something else to troll the thrift stores for! 

#22
Senior Member
Join Date: Apr 2007
Location: Thunder Bay, Ontario, Canada - burrrrr!
Posts: 11,674
Bikes: 1958 Rabeneick 120D, 1968 Legnano Gran Premio, 196? Torpado Professional, 2000 Marinoni Piuma
Mentioned: 210 Post(s)
Tagged: 0 Thread(s)
Quoted: 1372 Post(s)
Likes: 0
Liked 1,751 Times
in
938 Posts
Well done and, by demonstrating your procedure and results, you cannot help but come up with ways to improve your finished product. Kudos to you.
But one question, if you don't mind.
Why did you not use staples to complete and reinforce the edges? Time, and Mother Nature will attack the adhesive, starting at points most prone to oxidize - the edges. Once the edge starts to curl, or lift, the problems will increase, from there. My guess is the staples would be easy to use and greatly increase the durability of your repair. But that is just me.
At any rate, I, too, am going to give this a try, and see if I can find staples. Thanks for the tips and good luck with your future efforts.
__________________
"98% of the bikes I buy are projects".
"98% of the bikes I buy are projects".
#24
Noob
Thread Starter
Join Date: Nov 2009
Location: Bay Area
Posts: 357
Bikes: '86 Schwinn Paramount
Mentioned: 0 Post(s)
Tagged: 0 Thread(s)
Quoted: 2 Post(s)
Likes: 0
Liked 5 Times
in
3 Posts
Why did you not use staples to complete and reinforce the edges? Time, and Mother Nature will attack the adhesive, starting at points most prone to oxidize - the edges. Once the edge starts to curl, or lift, the problems will increase, from there. My guess is the staples would be easy to use and greatly increase the durability of your repair. But that is just me.
At any rate, I, too, am going to give this a try, and see if I can find staples. Thanks for the tips and good luck with your future efforts.
At any rate, I, too, am going to give this a try, and see if I can find staples. Thanks for the tips and good luck with your future efforts.
#25
Full Member
Great write-up. Like many others I have a saddle just waiting to try this on.
Just wondering has anybody gone to the trouble of trying to emboss a logo or name into the leather. I may give this a try on a scrap piece if I can locate some. Maybe you could trace out some lettering with a soldering iron and then paint fill.
Just wondering has anybody gone to the trouble of trying to emboss a logo or name into the leather. I may give this a try on a scrap piece if I can locate some. Maybe you could trace out some lettering with a soldering iron and then paint fill.


