


What type of bottom bracket cover? What type of tool.
 10-01-11, 05:22 AM
#1
Junior Member
Thread Starter

Join Date: Sep 2011
Posts: 16
Mentioned: 0 Post(s)
Tagged: 0 Thread(s)
Quoted: 0 Post(s)
Likes: 0
Liked 0 Times
in
0 Posts
What type of bottom bracket cover? What type of tool.
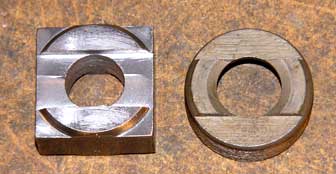
Can anyone tell me what this type of cover is called? I have found a few name for it myself whilst trying to remove and re-install it but none of them a suitable for public use. I really want to know primarily because I want to find a tool to remove and replace it. I refuse to accept that a professional bike mechanic would use a slippery adjustable spanner or start hitting it with a hammer. I would like to be able to service the bottom bracket as needed without damaging anything. Sorry if this is an obvious question, but again I come to you after a long a fruitless Internet search. Thank you.

 10-01-11, 05:32 AM
#2

Senior Member

Join Date: Apr 2007
Location: Thunder Bay, Ontario, Canada - burrrrr!
Posts: 11,674
Bikes: 1958 Rabeneick 120D, 1968 Legnano Gran Premio, 196? Torpado Professional, 2000 Marinoni Piuma
Mentioned: 210 Post(s)
Tagged: 0 Thread(s)
Quoted: 1372 Post(s)
Likes: 0
Liked 1,747 Times
in
937 Posts
That is a drive side bottom bracket cup or bearing race. There is a special tool for removing the piece but I do not have one. And, I have removed lots of these guys, during Bottom Bracket Rebuilds, using an adjustable wrench, which is quite effective is done properly...

Don't just grab an adjustable and get at it. Take the time to look through the article and ensure you understand what you are doing.
Hope this is a help.
Don't just grab an adjustable and get at it. Take the time to look through the article and ensure you understand what you are doing.
Hope this is a help.
__________________
"98% of the bikes I buy are projects".
"98% of the bikes I buy are projects".
10-01-11, 07:33 AM
#4
Junior Member
Thread Starter
Join Date: Sep 2011
Posts: 16
Mentioned: 0 Post(s)
Tagged: 0 Thread(s)
Quoted: 0 Post(s)
Likes: 0
Liked 0 Times
in
0 Posts
That is an excellent answer. Thank you so much. You told me about your site before but it slipped my mind whilst looking for this. I have learned my lesson and will always take a look at your site in the future.
Can you tell me just how stiff this component can be when screwing it back on? I know it can be difficult to remove but is it normal for it to be extremely tight when putting it back on or does this just mean the threads are dirty? I am having trouble getting it tight enough to stop excessive wobble and wondered how much to force it.
Thanks again.
10-01-11, 07:39 AM
#6
people's champ

Join Date: Oct 2010
Location: joisey
Posts: 1,517
Mentioned: 0 Post(s)
Tagged: 0 Thread(s)
Quoted: 1 Post(s)
Likes: 0
Liked 3 Times
in
2 Posts
as for tightening issue - i am assuming you are using the lockring ring / tool the right way?
https://www.youtube.com/watch?v=R_nDB...eature=related
in this video - @ around 1:10 he shows how to hold the cup in place while tightening the ring so as to hold the cup in place after you have tightened it to where it spins smoothly w no play
btw - its a job best done with the arms off
make sure your fixed cup is tight
and even if you do it right - there are times when there can be issues
in particular some folks have had difficult w fixed cups loosening during use and subsequently used locktite to prevent this from happening)
i also have had this problem and i had to replace the cups
let us know how it goes
Last edited by marley mission; 10-01-11 at 08:00 AM.
10-01-11, 09:58 AM
#7
Junior Member
Thread Starter
Join Date: Sep 2011
Posts: 16
Mentioned: 0 Post(s)
Tagged: 0 Thread(s)
Quoted: 0 Post(s)
Likes: 0
Liked 0 Times
in
0 Posts
I will gather all the required bits and bobs and give it a go. May take a while though as I need some bearings, grease etc. I will report back. Thank you.
10-01-11, 10:24 AM
#8
Senior Member

That is an excellent answer. Thank you so much. You told me about your site before but it slipped my mind whilst looking for this. I have learned my lesson and will always take a look at your site in the future.
Can you tell me just how stiff this component can be when screwing it back on? I know it can be difficult to remove but is it normal for it to be extremely tight when putting it back on or does this just mean the threads are dirty? I am having trouble getting it tight enough to stop excessive wobble and wondered how much to force it.
Thanks again.
Can you tell me just how stiff this component can be when screwing it back on? I know it can be difficult to remove but is it normal for it to be extremely tight when putting it back on or does this just mean the threads are dirty? I am having trouble getting it tight enough to stop excessive wobble and wondered how much to force it.
Thanks again.
10-01-11, 07:38 PM
#9
Old fart

Join Date: Nov 2004
Location: Appleton WI
Posts: 24,773
Bikes: Several, mostly not name brands.
Mentioned: 153 Post(s)
Tagged: 0 Thread(s)
Quoted: 3580 Post(s)
Liked 3,393 Times
in
1,927 Posts
 10-03-11, 04:18 PM
#11
Junior Member
Thread Starter
Join Date: Sep 2011
Posts: 16
Mentioned: 0 Post(s)
Tagged: 0 Thread(s)
Quoted: 0 Post(s)
Likes: 0
Liked 0 Times
in
0 Posts
Have not reassembled the bottom bracket yet but I have cleaned the threads using some of this forum’s tips and now the cover goes on really easy. I can screw it in all the way just using my fingers. It took swearing and sweat to move it before. I will endeavour to keep it as clean as possible in the future. I made a tool like ranyjawa’s and it worked a treat to loosen it when it was dirty. At least now I know what I am dealing with here. I will get back to you when the job is done. I am really grateful for the advice.
12-10-11, 08:37 AM
#12
Junior Member
Thread Starter
Join Date: Sep 2011
Posts: 16
Mentioned: 0 Post(s)
Tagged: 0 Thread(s)
Quoted: 0 Post(s)
Likes: 0
Liked 0 Times
in
0 Posts
Well, I doubt if anyone was holding his or her breath waiting for me to finish this, but I thought I would report back. I finished this job some time ago and as far as I can tell it was all good in the end. I don't have anyone around me that knows stuff about bikes and my LBS is not so local so I rely on the Internet for most of my info.
When I was researching how to do this job, I was amused/distressed to see this page on Wikibooks about bottom brackets. https://en.wikibooks.org/wiki/Bicycles/Maintenance_and_Repair/Bottom_Brackets/Bottom_bracket_overhaul
Under ‘Repairs’ it gloomily states “….most amateur attempts will fail.”
This seems unnecessarily pessimistic to me. I am not very intelligent. You could say I failed many times when trying to fix this, but I have finally done it, and now I know how to do it. I am glad this article did not put me off. In fact I have newfound confidence to fix other stuff on the bike. If I take it easy and read up on stuff carefully I doubt that I will do any lasting damage to the bike, so why not give it a go?
Thanks to everyone who contributes to this forum.
12-10-11, 10:22 AM
#13
Senior Member
Join Date: Nov 2004
Posts: 23,223
Mentioned: 654 Post(s)
Tagged: 1 Thread(s)
Quoted: 4722 Post(s)
Likes: 0
Liked 3,036 Times
in
1,874 Posts
I'm a bit late finding this thread, but lacking the proper Park tool, a cone wrench (16mm IIRC) will work. Like the Park tool it's also thin enough to get in behind the crankarm for fine adjustments to the bearing preload, without having to remove the crankarm.
12-10-11, 12:48 PM
#14
curmudgineer

Join Date: Dec 2009
Location: Chicago SW burbs
Posts: 4,417
Bikes: 2 many 2 fit here
Mentioned: 8 Post(s)
Tagged: 0 Thread(s)
Quoted: 263 Post(s)
Liked 112 Times
in
70 Posts
That's the spirit. Keep goin'. You're already way past the chimps that assemble bikes at X-mart!
12-10-11, 03:11 PM
#15
Senior Member
Join Date: Apr 2007
Location: Thunder Bay, Ontario, Canada - burrrrr!
Posts: 11,674
Bikes: 1958 Rabeneick 120D, 1968 Legnano Gran Premio, 196? Torpado Professional, 2000 Marinoni Piuma
Mentioned: 210 Post(s)
Tagged: 0 Thread(s)
Quoted: 1372 Post(s)
Likes: 0
Liked 1,747 Times
in
937 Posts
I was amused/distressed to see this page on Wikibooks about bottom brackets. https://en.wikibooks.org/wiki/Bicycle...acket_overhaul
Under ‘Repairs’ it gloomily states “….most amateur attempts will fail.”
Under ‘Repairs’ it gloomily states “….most amateur attempts will fail.”

__________________
"98% of the bikes I buy are projects".
"98% of the bikes I buy are projects".
12-14-11, 12:21 PM
#16
Junior Member
Thread Starter
Join Date: Sep 2011
Posts: 16
Mentioned: 0 Post(s)
Tagged: 0 Thread(s)
Quoted: 0 Post(s)
Likes: 0
Liked 0 Times
in
0 Posts
Thanks everyone. Yes, your method was very useful randyjawa. I will keep your invention in my bike tool box for future use. I also used the shop bought spanner, so that to all those who pointed me in that direction.


