


Jeunet road bike updated for year-round urban commuting (pic heavy)
 12-12-11, 01:37 PM
#1
Senior Member
Thread Starter

Jeunet road bike updated for year-round urban commuting (pic heavy)
I posted my original build of this 1972 Jeunet 630 last year as a pseudo-porteur (see this thread), but it's gone through a bunch of minor revisions and I thought I'd post an update. I've been so busy with home renovations this past five or so months that I haven't had time to tackle any new bike projects, but instead I've focused on tweaking the current stable.
I've been riding this Jeunet for the past year and a half, commuting to work and using it for general errands just about every day, rain or shine, except in the dead of winter. I love it for it's light weight (full metric Reynolds 531 DB), simple 1x5 gearing, and semi-upright riding configuration. It goes surprisingly fast, zips up the the 6-10% grades in my town, and imparts total confidence navigating through aggressive Boston traffic.
Its weakest link was the lighting, especially this time of year when it's dark for >50% of the time I spend on the bike. So, I revamped the lighting. I replaced my battery LED-retrofitted vintage lights with "real" lights-- B&M Lumotec IQ Cyo headlight and B&M Seculite Plus taillight, driven off a Shimano dyno hub laced to a VO PBP rim (which closely copies the original Rigida AL1320).
But mostly I just wanted to detail how I tried to integrate the dynamo lighting as best as I could without taking a drill to the frame. I used many of the same techniques I applied to my previous dynamo-lighting integration (see this thread) to try to integrate the lighting as well as possible, without drilling into the frame.
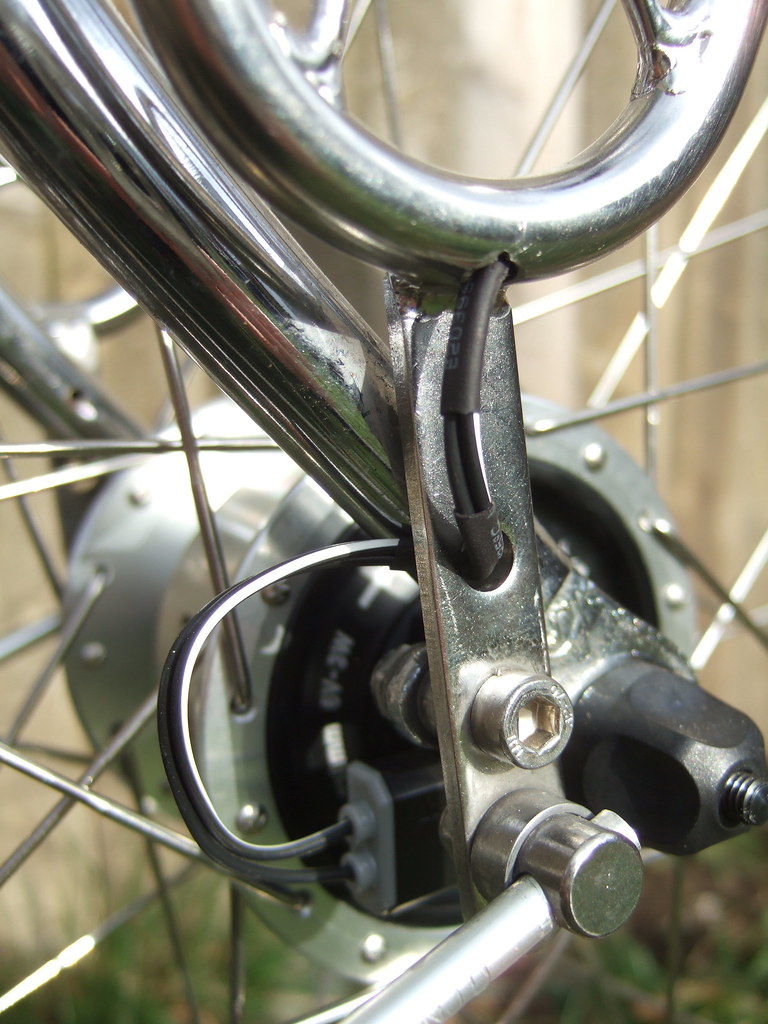
Instead, I drilled into my porteur rack. Wiring goes into the rack stay from the dyno hub:
Then out near the top to the headlight:
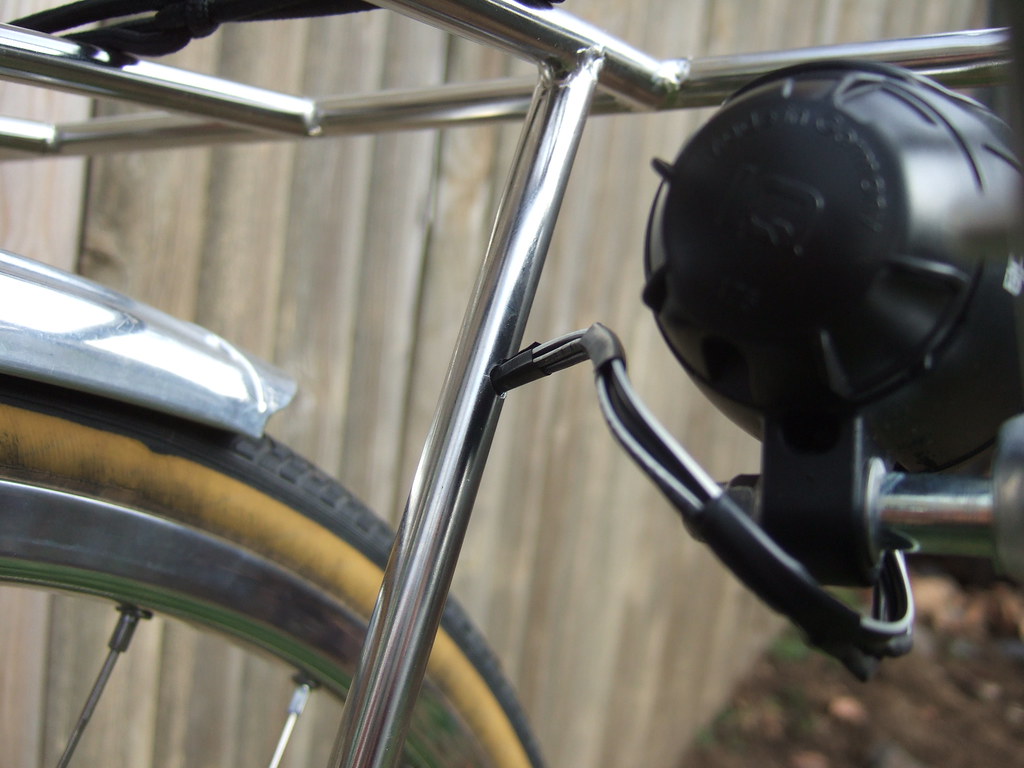
From the headlight, a second set of wiring for the taillight goes back into the rack, down to the bottom, then loops back up the rear half of the stay thanks to the smooth continuous curve at the bottom, then it exits at top and goes into the front fender (not shown).
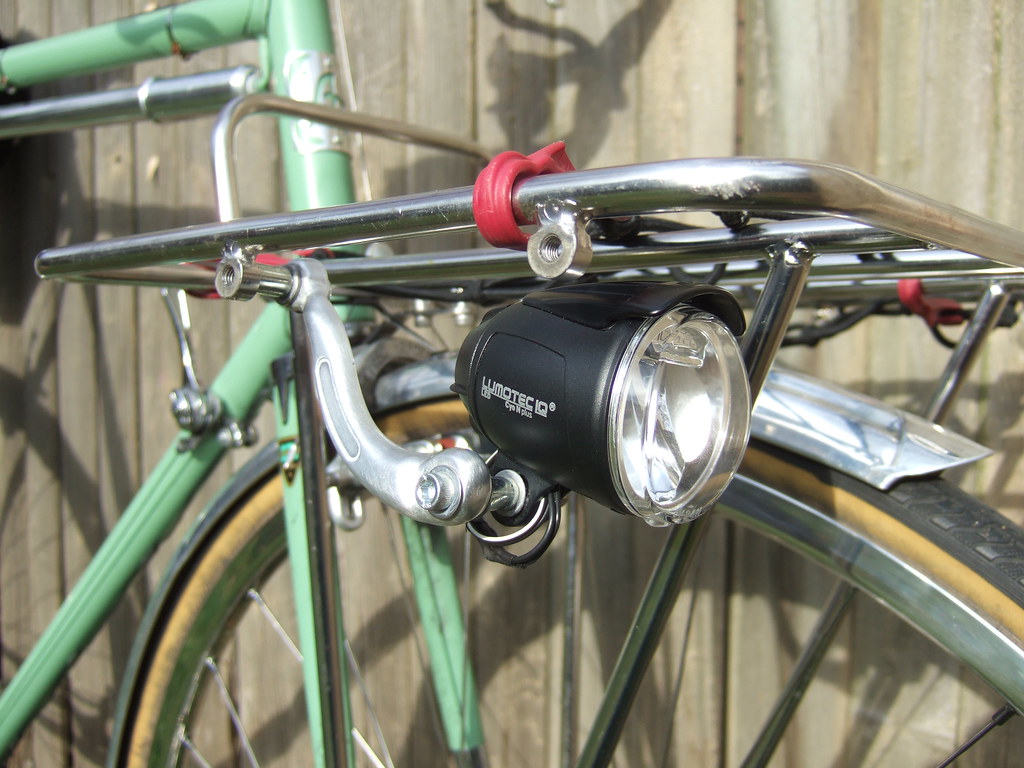
Headlight bracket made from a Weinmann centerpull:
From the rack, the wiring goes into the fender in front of the brake, back out behind the fork crown, and down along the down tube. I coiled the wire using my proprietary coil-it (tm) technology to take up the excess slack at the fork crown:
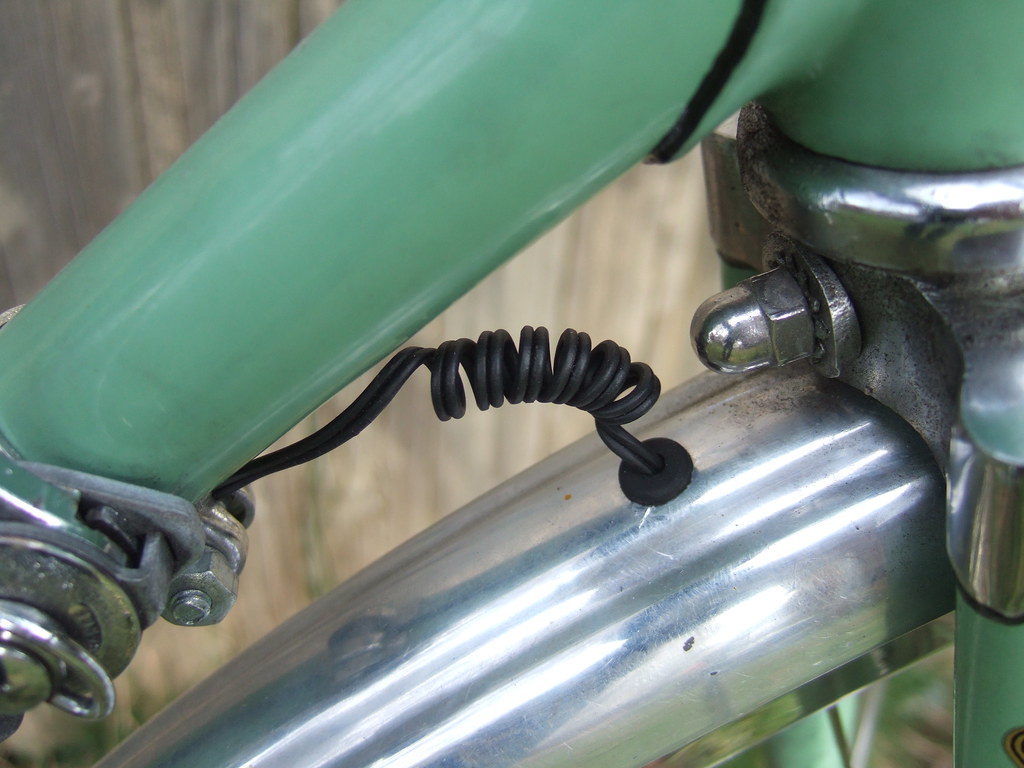
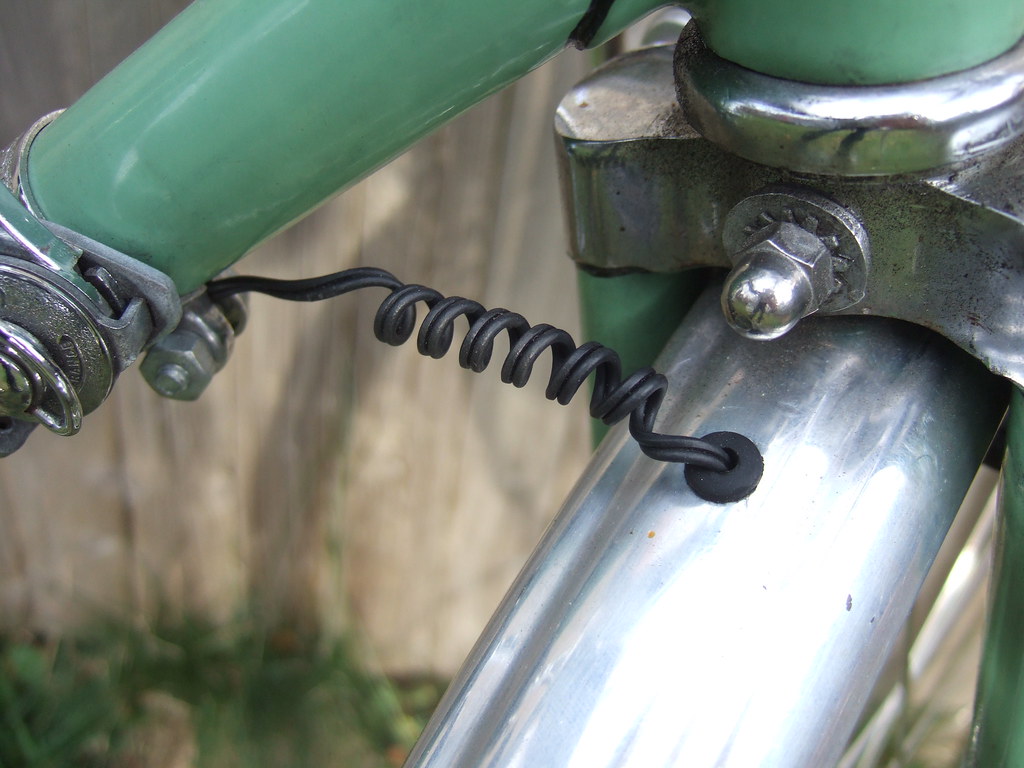
Little pieces of unshrunk shrink tubing glued onto down tube act as cable guides:

The wiring goes underneath the BB shell, then into the fender through a grommet. It runs along the inside of the fender and exits into the taillight housing.

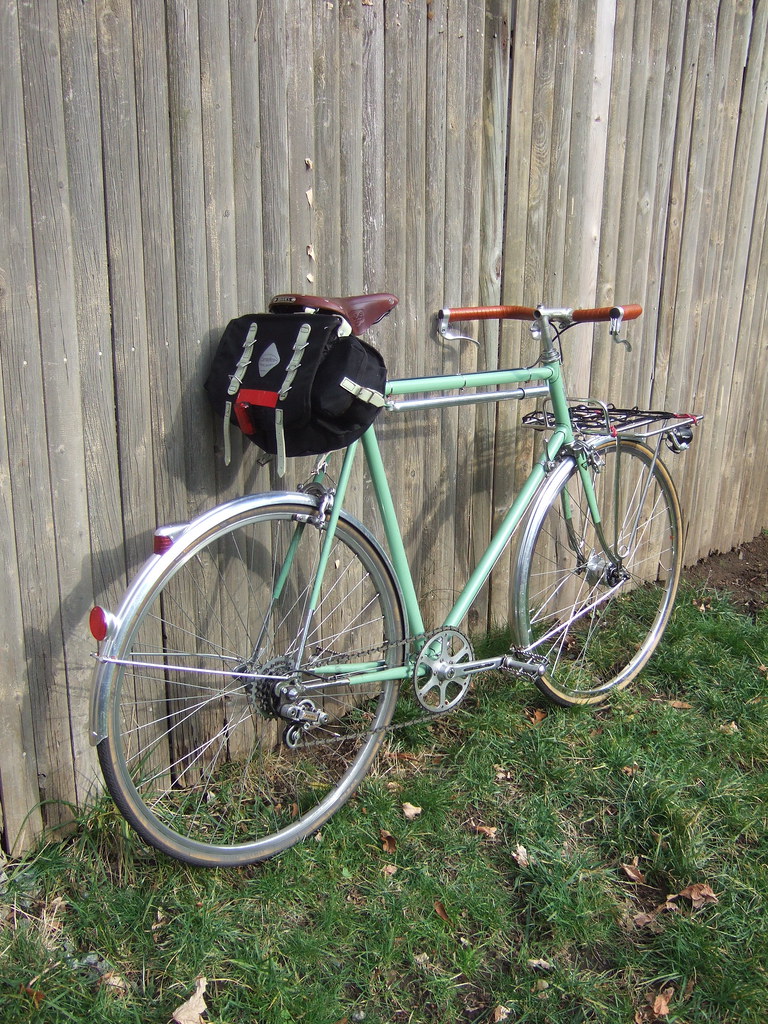
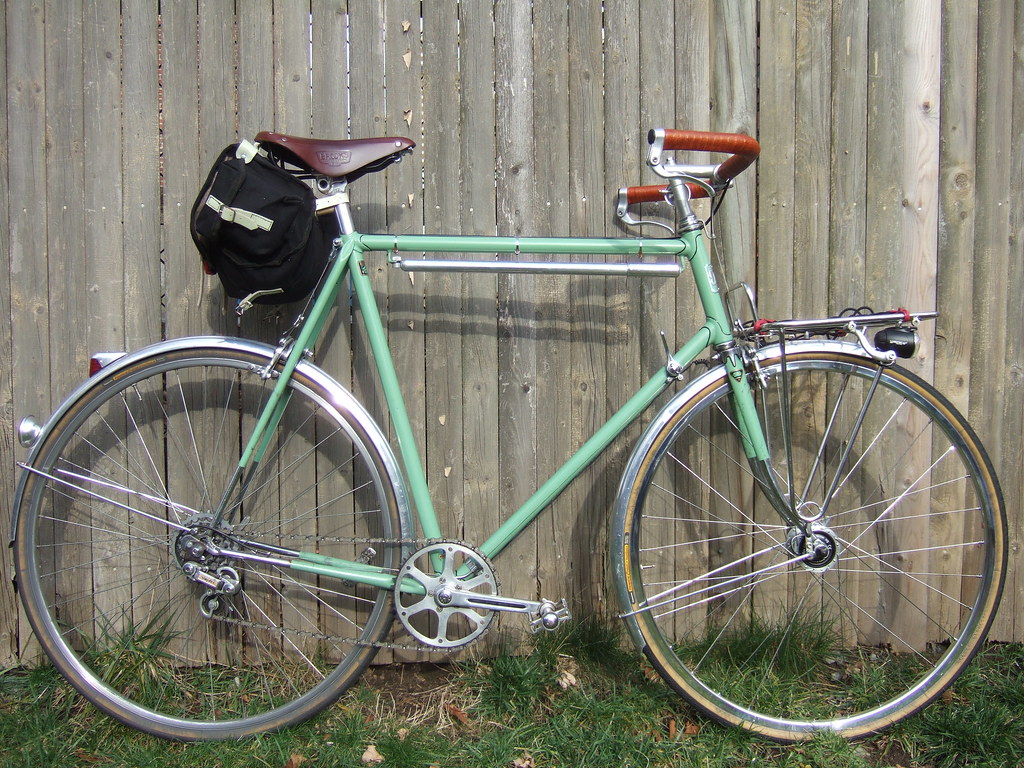
Requisite full bike shots:
The guts of the B&M taillight were retrofitted into the vintage Soubitez fender-mounted taillight. I also added a round Cateye fender reflector (an eBay.jp find), just because I thought it looked neat. I keep a blinkie hooked onto my saddlebag and a big strip of DOT-grade reflector tape slapped on, just in case. I was once ass-ended while riding, so I'm a little paranoid about my rear end .
.
I've been riding this Jeunet for the past year and a half, commuting to work and using it for general errands just about every day, rain or shine, except in the dead of winter. I love it for it's light weight (full metric Reynolds 531 DB), simple 1x5 gearing, and semi-upright riding configuration. It goes surprisingly fast, zips up the the 6-10% grades in my town, and imparts total confidence navigating through aggressive Boston traffic.
Its weakest link was the lighting, especially this time of year when it's dark for >50% of the time I spend on the bike. So, I revamped the lighting. I replaced my battery LED-retrofitted vintage lights with "real" lights-- B&M Lumotec IQ Cyo headlight and B&M Seculite Plus taillight, driven off a Shimano dyno hub laced to a VO PBP rim (which closely copies the original Rigida AL1320).
But mostly I just wanted to detail how I tried to integrate the dynamo lighting as best as I could without taking a drill to the frame. I used many of the same techniques I applied to my previous dynamo-lighting integration (see this thread) to try to integrate the lighting as well as possible, without drilling into the frame.
Instead, I drilled into my porteur rack. Wiring goes into the rack stay from the dyno hub:
Then out near the top to the headlight:
From the headlight, a second set of wiring for the taillight goes back into the rack, down to the bottom, then loops back up the rear half of the stay thanks to the smooth continuous curve at the bottom, then it exits at top and goes into the front fender (not shown).
Headlight bracket made from a Weinmann centerpull:
From the rack, the wiring goes into the fender in front of the brake, back out behind the fork crown, and down along the down tube. I coiled the wire using my proprietary coil-it (tm) technology to take up the excess slack at the fork crown:
Little pieces of unshrunk shrink tubing glued onto down tube act as cable guides:
The wiring goes underneath the BB shell, then into the fender through a grommet. It runs along the inside of the fender and exits into the taillight housing.
Requisite full bike shots:
The guts of the B&M taillight were retrofitted into the vintage Soubitez fender-mounted taillight. I also added a round Cateye fender reflector (an eBay.jp find), just because I thought it looked neat. I keep a blinkie hooked onto my saddlebag and a big strip of DOT-grade reflector tape slapped on, just in case. I was once ass-ended while riding, so I'm a little paranoid about my rear end
.
Last edited by southpawboston; 12-12-11 at 01:55 PM.
 12-12-11, 01:48 PM
#2
Wookie Jesus inspires me.
Join Date: Mar 2011
Location: Seattle, WA
Posts: 2,215
Mentioned: 0 Post(s)
Tagged: 0 Thread(s)
Quoted: 4 Post(s)
Likes: 0
Liked 2 Times
in
2 Posts
Always a pleasure to see this bike. It recently inspired me to redo my Nishiki into a commuter/bar bike.
12-12-11, 02:38 PM
#3

Senior Member

Join Date: Aug 2009
Location: Berkeley, CA
Posts: 7,236
Bikes: '72 Cilo Pacer, '72 Gitane Gran Tourisme, '72 Peugeot PX10, '73 Speedwell Ti, '74 Peugeot UE-8, '75 Peugeot PR-10L, '80 Colnago Super, '85 De Rosa Pro, '86 Look Equipe 753, '86 Look KG86, '89 Parkpre Team, '90 Parkpre Team MTB, '90 Merlin
Mentioned: 87 Post(s)
Tagged: 0 Thread(s)
Quoted: 830 Post(s)
Liked 2,110 Times
in
553 Posts
+1. Nice modifications, especially the inventive use of the Weinmann centerpull arm as a lighting mount. My only concern is the glue on the cable guides--specifically, that the glue may turn brittle in the winter weather, and that it may damage the beautiful paint if you decide to remove the guides. Nonetheless,  .
.
.
__________________
-Randy
'72 Cilo Pacer � '72 Peugeot PX10 � '73 Speedwell Ti � '74 Nishiki Competition � '74 Peugeot UE-8 � '86 Look Equipe 753 � '86 Look KG86 � '89 Parkpre Team Road � '90 Parkpre Team MTB � '90 Merlin Ti
Avatar photo courtesy of jeffveloart.com, contact: contact: jeffnil8 (at) gmail.com.
-Randy
'72 Cilo Pacer � '72 Peugeot PX10 � '73 Speedwell Ti � '74 Nishiki Competition � '74 Peugeot UE-8 � '86 Look Equipe 753 � '86 Look KG86 � '89 Parkpre Team Road � '90 Parkpre Team MTB � '90 Merlin Ti
Avatar photo courtesy of jeffveloart.com, contact: contact: jeffnil8 (at) gmail.com.
12-12-11, 02:41 PM
#4
Senior Member
__________________
Bikes on Flickr
I prefer email to private messages. You can contact me at justinhughes@me.com
Bikes on Flickr
I prefer email to private messages. You can contact me at justinhughes@me.com
12-12-11, 08:25 PM
#5
Senior Member
Thread Starter
Yeah, that's a concern of mine, too, but this adhesive is pretty rubbery and doesn't become brittle (Automotive Goop). It has held the my helmet lights in place for a couple of years now. If anything, if it ever comes loose, it should just peel off the powdercoat.
12-12-11, 08:40 PM
#6
Senior Member

Join Date: Jul 2008
Location: Nampa Idaho
Posts: 1,081
Bikes: 76' Centrurion Pro-Tour, 86' Specialized Rock Hopper, 88' Centurion Iron Man, 89' Bruce Gordon "Hikari", 95' Rock Hopper Ultra.
Mentioned: 1 Post(s)
Tagged: 0 Thread(s)
Quoted: 14 Post(s)
Likes: 0
Liked 3 Times
in
3 Posts
Well done Sir!
Thank you for sharing.
Cheers,
Chris
Thank you for sharing.
Cheers,
Chris
12-12-11, 08:50 PM
#7
Senior Member

Join Date: Jun 2008
Location: Atlanta
Posts: 2,978
Bikes: Cannondale T700s and a few others
Mentioned: 0 Post(s)
Tagged: 0 Thread(s)
Quoted: 4 Post(s)
Likes: 0
Liked 2 Times
in
2 Posts
Love seeing that bike. Your bike and one of Cobrabyte's just made me fall in love with Porteurs. Really like the way you overcame some of the issues of wiring the lights and keeping the wiring tucked up and hidden for a clean look.
I'm turning my Fuji Touring III into a Porteur and hope it comes out as nice as yours.
I'm turning my Fuji Touring III into a Porteur and hope it comes out as nice as yours.
12-12-11, 09:30 PM
#9

Disraeli Gears

Nice commuter! I'm envious. I've got a Jeunet frame, about the same size, that's currently way back in the build queue -- maybe I should bump it up a few! Needs a paint job, though.
12-12-11, 09:31 PM
#10
Senior Member
Thread Starter
12-12-11, 09:49 PM
#11
Senior Member
That looks great, you clearly put a lot of thought and effort into your wrenching!
It puts my Jeunet commuter to shame, even if mine does have internal wiring (that I don't use.)
It puts my Jeunet commuter to shame, even if mine does have internal wiring (that I don't use.)
 12-13-11, 07:50 AM
#13
Senior Member

Join Date: Dec 2008
Location: Jamaica Plain, MA
Posts: 186
Bikes: Boulder AllRoad67cm; 1990 Nobilette 65cm;Fuji S12-S LTD 63cm; xtracycle; panasonic gran tourer 68cm
Mentioned: 1 Post(s)
Tagged: 0 Thread(s)
Quoted: 0 Post(s)
Likes: 0
Liked 0 Times
in
0 Posts
great work Anton! looks beautiful.
A couple questions: when the cable gets to the rear fender, what do you use inside the fender to keep the cable in place? Also, where did you get those little rubber grommets? is that a standard HW store kind of thing?
A couple questions: when the cable gets to the rear fender, what do you use inside the fender to keep the cable in place? Also, where did you get those little rubber grommets? is that a standard HW store kind of thing?
12-13-11, 09:19 AM
#14
Senior Member
Thread Starter
Thanks, all, for the comments!
Geoff, the wiring is glued to the underside of the fender with a rubbery glue that never gets brittle. I can't feed the wire through the rolled fender edge like some others do, because I choose to use twin-conductor cabling throughout and keep the frame electrically isolated. Twin conductor wire is too wide to fit inside the rolled edge.
The grommets are a standard HW store item, a few cents a piece. Radio Shack also sells them in small variety packs for a couple of dollars.
The grommets are a standard HW store item, a few cents a piece. Radio Shack also sells them in small variety packs for a couple of dollars.
12-13-11, 10:29 AM
#15
Senior Member

Join Date: Aug 2006
Location: Knoxville, TN
Posts: 1,977
Bikes: Schwinn Paramount P15, Fisher Montare, Proteus, Rivendell Quickbeam
Mentioned: 1 Post(s)
Tagged: 0 Thread(s)
Quoted: 12 Post(s)
Likes: 0
Liked 4 Times
in
4 Posts
Looks great! A couple questions on your build.
How about adding a chain guard?
Do your knees ever hit the bars when turning? I also notice the bars are oriented parallel to the top tube instead of angled down as is usual with North Roads. Is this comfortable?
How about adding a chain guard?
Do your knees ever hit the bars when turning? I also notice the bars are oriented parallel to the top tube instead of angled down as is usual with North Roads. Is this comfortable?
 12-13-11, 12:04 PM
#17
Senior Member
Thread Starter
Re: chain guard: I have a nice old art-nouveau French alloy chain guard just begging to get fitted to this bike, but this is the dilemma: I'm running a 114mm French BB spindle with TA cranks, which means a very low Q factor (somewhere around 135mm). Probably lower than most if not all French city bikes. This means that in the smallest cog of the 5sp freewheel, the chain barely clears the crank as the crank rotates past the chain. We're talking 2mm at most. The only way for any chain guard to fit without rubbing on either the chain or the crank would be to run a longer BB spindle, thereby increasing the Q. Certainly doable, but I've come to be a big fan of low Q, so I scrapped plans to add the chain guard. But I keep thinking about it. I could probably manage with a 118mm spindle.
Re: knees hitting the bars: it only happens when I'm making a U-turn or something. Ideally I should increase the stem length by another 20-30mm, but I really like my arm reach just as it is. When I first set up the bars, I was striving for equal saddle / bar height, and hence the horizontal rotation of the grip area. I've since lowered the bars a bit, and plan to lower them even more. I'll probably rotate them a little downward as well.
 12-13-11, 01:13 PM
#20
Senior Member
Thread Starter
But I do agree, a bike like mine would probably look out of place being ridden as a commuter in Holland and would probably draw the wrong type of attention.
Last edited by southpawboston; 12-13-11 at 01:16 PM.

Thread
Thread Starter
Forum
Replies
Last Post
Barchettaman
Electronics, Lighting, & Gadgets
6
05-17-11 11:15 AM


