


Any pics of "guzzied up" 70's NR FDs and RDs out there I can look at??
 04-23-12, 05:55 PM
#1
Senior Member
Thread Starter
Join Date: Jul 2009
Posts: 11,128
Bikes: 1986 Alan Record Carbonio, 1985 Vitus Plus Carbone 7, 1984 Peugeot PSV, 1972 Line Seeker, 1986(est.) Medici Aerodynamic (Project), 1985(est.) Peugeot PY10FC
Mentioned: 22 Post(s)
Tagged: 0 Thread(s)
Quoted: 150 Post(s)
Likes: 0
Liked 34 Times
in
27 Posts
Any pics of "guzzied up" 70's NR FDs and RDs out there I can look at??
I've been stuck for a while now with what to decide to do with the NR derailleurs (especially the FD) I got with my latest project bike from 1972.
I keep looking at these 1st gen NR derailleurs that came with it and they just look very crude with their kinda lumpy castings and their very dull anozised finish. Frankly, they look like pot metal items to me and not what you'd expexct from Campagnolo. Would it be blasphemouse to remove the clear anodizing on them and polish them up to a smoother or maybe even mirror finish, or would that look tacky. Might refinishing these components have been a common thing to do back in the 70's. I just never realize how inferior the finishes on these would be compared to what I have been used to expect for Campy stuff from the 80's.
Maybe if some here can post up pics of NR componentes that they have polished up, I can make that decision to do so easier with the inspiration they could provide (just a link to a pic library you might have will be great too!).
Another solution might be for me to just mount on later NR derailleurs from the 80's instead.....anyway, NR's NR....right?...but then the original derailleurs will never forgive me for separating them from the 40 year old bike!....drat!
Chombi
80's bike guy trying to deal with/understand 70's bikes.....
 04-23-12, 06:22 PM
#2

my name is Jim

You can definitely polish them and I don't think they are anodized if I am remembering correctly. It can be a bit hard to get into all the nooks and crannies without disassembling the bodies (which I probably wouldn't do as they are held together with pins). I think the "crudity" of their appearance is a part of their attraction. They are more interesting in some ways. Look at any of the pics on my website (in sig), I usually have one closeup of the rear derailleur and they will include polished and painted NR rear derailleurs.
Here is one in particular:

Here is one in particular:
__________________
Flickr Albums
ebay: cicloclassico
70 Pogliaghi ItalCorse, 72 De Rosa, 72 Masi Gran Criterium, 75 Masi Gran Criterium, 77 Melton, 79 Bianchi Super Leggera, 79 Gios Super Record, 81 Picchio Special, 82 Guerciotti Super Record, 82 Colnago Profil CX, 83 Colnago Superissimo, 84 Fuso
Flickr Albums
ebay: cicloclassico
70 Pogliaghi ItalCorse, 72 De Rosa, 72 Masi Gran Criterium, 75 Masi Gran Criterium, 77 Melton, 79 Bianchi Super Leggera, 79 Gios Super Record, 81 Picchio Special, 82 Guerciotti Super Record, 82 Colnago Profil CX, 83 Colnago Superissimo, 84 Fuso
Last edited by BlueDevil63; 04-23-12 at 06:26 PM.
04-23-12, 06:43 PM
#3
Banned.

Join Date: Jul 2009
Location: PAZ
Posts: 12,294
Mentioned: 255 Post(s)
Tagged: 0 Thread(s)
Quoted: 2588 Post(s)
Liked 4,824 Times
in
1,709 Posts
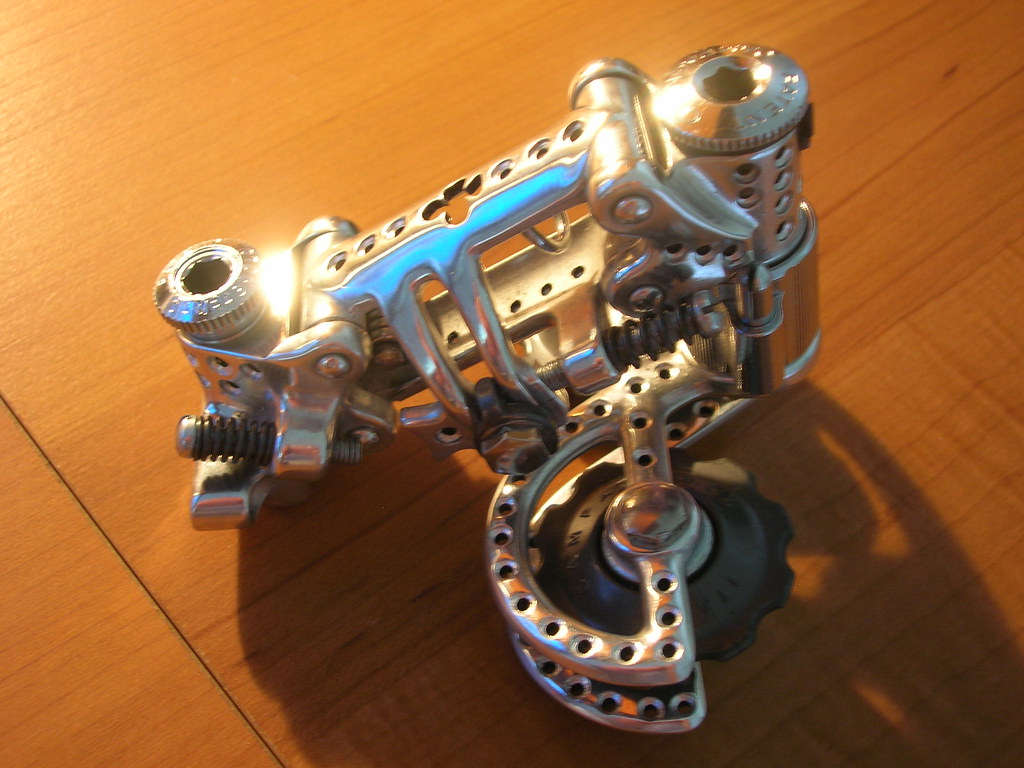
They are both anodized and they'll clean up well - however, as BlueDevil63 points out, you'll have the devil of a time getting to every nook and cranny without disassembling the works. You may not want to in the case of the RD - just ask rootboy 
This can be done on the RD, however - see below - but you'll still have some areas you're just not really going to be able to get at.
However, you can get great results by simply stripping the anodizing in a bath of Jestco Products anodizing remover, clearing the residue with 0000 brass wool and then taking the body to a buffing wheel.
Yes, the below NRs have been drilliumed, but you get the idea:

DD
This can be done on the RD, however - see below - but you'll still have some areas you're just not really going to be able to get at.
However, you can get great results by simply stripping the anodizing in a bath of Jestco Products anodizing remover, clearing the residue with 0000 brass wool and then taking the body to a buffing wheel.
Yes, the below NRs have been drilliumed, but you get the idea:
DD
 04-23-12, 06:55 PM
#4

Senior Member

Join Date: Apr 2005
Location: Ann Arbor, MI
Posts: 16,874
Bikes: 1980 Masi, 1984 Mondonico, 1984 Trek 610, 1980 Woodrup Giro, 2005 Mondonico Futura Leggera ELOS, 1967 PX10E, 1971 Peugeot UO-8
Mentioned: 49 Post(s)
Tagged: 0 Thread(s)
Quoted: 1856 Post(s)
Liked 664 Times
in
506 Posts
I've been stuck for a while now with what to decide to do with the NR derailleurs (especially the FD) I got with my latest project bike from 1972.
I keep looking at these 1st gen NR derailleurs that came with it and they just look very crude with their kinda lumpy castings and their very dull anozised finish. Frankly, they look like pot metal items to me and not what you'd expexct from Campagnolo. Would it be blasphemouse to remove the clear anodizing on them and polish them up to a smoother or maybe even mirror finish, or would that look tacky. Might refinishing these components have been a common thing to do back in the 70's. I just never realize how inferior the finishes on these would be compared to what I have been used to expect for Campy stuff from the 80's.
Maybe if some here can post up pics of NR componentes that they have polished up, I can make that decision to do so easier with the inspiration they could provide (just a link to a pic library you might have will be great too!).
Another solution might be for me to just mount on later NR derailleurs from the 80's instead.....anyway, NR's NR....right?...but then the original derailleurs will never forgive me for separating them from the 40 year old bike!....drat!
Chombi
80's bike guy trying to deal with/understand 70's bikes.....
I keep looking at these 1st gen NR derailleurs that came with it and they just look very crude with their kinda lumpy castings and their very dull anozised finish. Frankly, they look like pot metal items to me and not what you'd expexct from Campagnolo. Would it be blasphemouse to remove the clear anodizing on them and polish them up to a smoother or maybe even mirror finish, or would that look tacky. Might refinishing these components have been a common thing to do back in the 70's. I just never realize how inferior the finishes on these would be compared to what I have been used to expect for Campy stuff from the 80's.
Maybe if some here can post up pics of NR componentes that they have polished up, I can make that decision to do so easier with the inspiration they could provide (just a link to a pic library you might have will be great too!).
Another solution might be for me to just mount on later NR derailleurs from the 80's instead.....anyway, NR's NR....right?...but then the original derailleurs will never forgive me for separating them from the 40 year old bike!....drat!
Chombi
80's bike guy trying to deal with/understand 70's bikes.....
As far as polishing: anything can be polished, but not everything should be.
04-23-12, 06:57 PM
#5
Banned.
Join Date: Jul 2009
Location: PAZ
Posts: 12,294
Mentioned: 255 Post(s)
Tagged: 0 Thread(s)
Quoted: 2588 Post(s)
Liked 4,824 Times
in
1,709 Posts
04-23-12, 07:09 PM
#6
What??? Only 2 wheels?

Join Date: Apr 2010
Location: Boston-ish, MA
Posts: 13,434
Bikes: 72 Peugeot UO-8, 82 Peugeot TH8, 87 Bianchi Brava, 76? Masi Grand Criterium, 74 Motobecane Champion Team, 86 & 77 Gazelle champion mondial, 81? Grandis, 82? Tommasini, 83 Peugeot PF10
Mentioned: 189 Post(s)
Tagged: 0 Thread(s)
Quoted: 1222 Post(s)
Liked 645 Times
in
232 Posts
I'm just a novice at this Campagnolo thing but I like the satin finish.
You want bling? You gotta' make it!

You want bling? You gotta' make it!
__________________
Real cyclists use toe clips.
With great bikes comes great responsibility.
jimmuller
Real cyclists use toe clips.
With great bikes comes great responsibility.
jimmuller
04-23-12, 09:39 PM
#7
Senior Member
Join Date: Aug 2007
Location: New Jersey
Posts: 241
Bikes: 2000 GT I-Drive Team MTB, 2005 Specialized Sirrus, 1973 Schwinn World Voyager (frame only), 1975 Peugeot Mixte, 1980 Raleigh Sport, 1980(?) Peugeot, Giant ATX MTB, 2006 GT I-Drive MTB Frame, 2005 Jamis Dakar XLT MTB
Mentioned: 1 Post(s)
Tagged: 0 Thread(s)
Quoted: 30 Post(s)
Likes: 0
Liked 0 Times
in
0 Posts
Drillium, your derailleurs are gorgeous! Do you apply a wax or anything after polishing them?
04-23-12, 09:42 PM
#8
my name is Jim
They are both anodized and they'll clean up well - however, as BlueDevil63 points out, you'll have the devil of a time getting to every nook and cranny without disassembling the works. You may not want to in the case of the RD - just ask rootboy
This can be done on the RD, however - see below - but you'll still have some areas you're just not really going to be able to get at.
However, you can get great results by simply stripping the anodizing in a bath of Jestco Products anodizing remover, clearing the residue with 0000 brass wool and then taking the body to a buffing wheel.
__________________
Flickr Albums
ebay: cicloclassico
70 Pogliaghi ItalCorse, 72 De Rosa, 72 Masi Gran Criterium, 75 Masi Gran Criterium, 77 Melton, 79 Bianchi Super Leggera, 79 Gios Super Record, 81 Picchio Special, 82 Guerciotti Super Record, 82 Colnago Profil CX, 83 Colnago Superissimo, 84 Fuso
Flickr Albums
ebay: cicloclassico
70 Pogliaghi ItalCorse, 72 De Rosa, 72 Masi Gran Criterium, 75 Masi Gran Criterium, 77 Melton, 79 Bianchi Super Leggera, 79 Gios Super Record, 81 Picchio Special, 82 Guerciotti Super Record, 82 Colnago Profil CX, 83 Colnago Superissimo, 84 Fuso
04-24-12, 08:35 AM
#9
Senior Member
Join Date: Mar 2006
Posts: 2,754
Mentioned: 8 Post(s)
Tagged: 0 Thread(s)
Quoted: 83 Post(s)
Likes: 0
Liked 13 Times
in
11 Posts
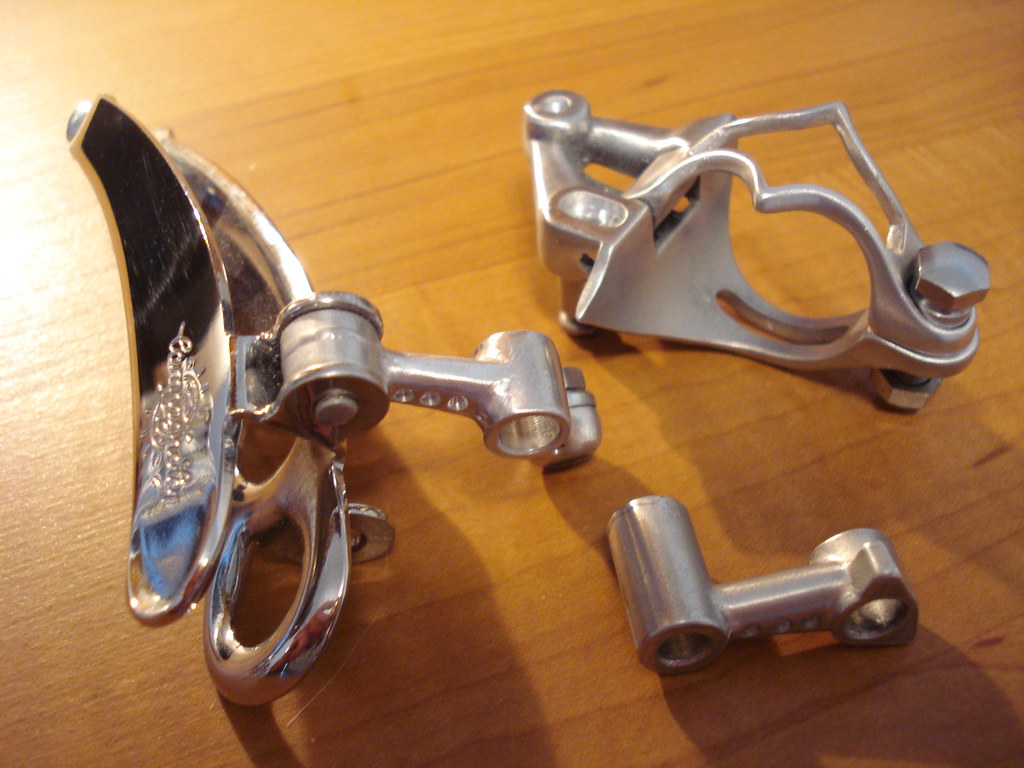
For the record (no pun intended) the rear derailleurs are anodized, the front clamps and pivot arms are not anodized. Here's another "smooth" one to check out.

 04-24-12, 11:50 AM
#12
Senior Member

I reckon Chombi meant "gussied up".
Does gussying them up make them shift any better?
Does gussying them up make them shift any better?
__________________
Bikes on Flickr
I prefer email to private messages. You can contact me at justinhughes@me.com
Bikes on Flickr
I prefer email to private messages. You can contact me at justinhughes@me.com
04-24-12, 12:17 PM
#13
Senior Member
Join Date: Jun 2006
Posts: 20,305
Mentioned: 130 Post(s)
Tagged: 0 Thread(s)
Quoted: 3464 Post(s)
Liked 2,828 Times
in
1,995 Posts
I held the opinion that the rear derailleur got more attention prior to 1971, the transition of the surface at the top pivot was hand dressed often to an organic surface flow, the later ones were not dressed.
On the front mechanism, Campagnolo did it appears make some process change, material or casting method or post casting finish that leaves the body and clamp on the earlier units (before the extension to beef up the top pivot root)
dull and sometimes rougher.
It was the lack of a cir-clip on these intermediate pieces with no screw retention that caused more than a few to bend the upper pivot, I had to replace the body on my 1971-72 production front to fix this. It caused slow downshifts as the pivots were no longer parallel.
04-24-12, 01:17 PM
#14
Senior Member
Thread Starter
Join Date: Jul 2009
Posts: 11,128
Bikes: 1986 Alan Record Carbonio, 1985 Vitus Plus Carbone 7, 1984 Peugeot PSV, 1972 Line Seeker, 1986(est.) Medici Aerodynamic (Project), 1985(est.) Peugeot PY10FC
Mentioned: 22 Post(s)
Tagged: 0 Thread(s)
Quoted: 150 Post(s)
Likes: 0
Liked 34 Times
in
27 Posts
Thanks guys, for posting the pics!
The pictures remind me of how a component can be made so beautiful and intricate to compliment a bike aesthetically, but after seeing the pics, I think such elaborate looking mods will work best only on certain bikes. Such elaborate "filligree" work might look lost on bike that have plain graphics and lugwork.....Which is the case with my project bike that has plain (but chromed) lugwork without any cutouts, but the paintjob on it is a very deep looking clear Imron finsh over CF (which I think what clashes with the crudish nature of the finish on the original NR derailleurs that came with it). The frame looks really slick, but does not have enough elaborate detail like cutouts and pantographing to match up to drillium and cutout mods that one might do on the derailleurs or crank...except for maybe polishing to mirror finish.I think I will just short cut the process by just mounting my better finished Pat. 83 NR RD on the bike and look for a similarly newer FD to match it. This, with a Campy SR crank will complete the cleaned up picture for the bike, drivetrain-wise. The 1972 bike would still look correct generally with the newer NR/SR drivetrain. It won't take any elbow grease on my part but I guess it will be hard on my wallet. I'll just keep the 72-pat RD, FD and the odd custom drilled 1st gen DA crank that came with the bike stashed away, so they can be reinstalled back on the frame as original, if I so desire one day.
Chombi
Last edited by Chombi; 04-24-12 at 03:24 PM.
04-24-12, 02:08 PM
#15
www.theheadbadge.com

Join Date: Sep 2005
Location: Southern Florida
Posts: 28,513
Bikes: https://www.theheadbadge.com
Mentioned: 124 Post(s)
Tagged: 0 Thread(s)
Quoted: 2422 Post(s)
Liked 4,390 Times
in
2,092 Posts
-Kurt
__________________


04-24-12, 03:27 PM
#16
Senior Member
Thread Starter
Join Date: Jul 2009
Posts: 11,128
Bikes: 1986 Alan Record Carbonio, 1985 Vitus Plus Carbone 7, 1984 Peugeot PSV, 1972 Line Seeker, 1986(est.) Medici Aerodynamic (Project), 1985(est.) Peugeot PY10FC
Mentioned: 22 Post(s)
Tagged: 0 Thread(s)
Quoted: 150 Post(s)
Likes: 0
Liked 34 Times
in
27 Posts
They are both anodized and they'll clean up well - however, as BlueDevil63 points out, you'll have the devil of a time getting to every nook and cranny without disassembling the works. You may not want to in the case of the RD - just ask rootboy
This can be done on the RD, however - see below - but you'll still have some areas you're just not really going to be able to get at.
However, you can get great results by simply stripping the anodizing in a bath of Jestco Products anodizing remover, clearing the residue with 0000 brass wool and then taking the body to a buffing wheel.
Yes, the below NRs have been drilliumed, but you get the idea:
DD
That De Rosa(?) FD looks just perfect!
Chombi
04-24-12, 08:18 PM
#17
Banned.
Join Date: Jul 2009
Location: PAZ
Posts: 12,294
Mentioned: 255 Post(s)
Tagged: 0 Thread(s)
Quoted: 2588 Post(s)
Liked 4,824 Times
in
1,709 Posts
DD
04-24-12, 08:23 PM
#18
Banned.
Join Date: Jul 2009
Location: PAZ
Posts: 12,294
Mentioned: 255 Post(s)
Tagged: 0 Thread(s)
Quoted: 2588 Post(s)
Liked 4,824 Times
in
1,709 Posts
Otis, that RD is a stunner, as always!
DD
DD
04-24-12, 08:23 PM
#19
Banned.
Join Date: Jul 2009
Location: PAZ
Posts: 12,294
Mentioned: 255 Post(s)
Tagged: 0 Thread(s)
Quoted: 2588 Post(s)
Liked 4,824 Times
in
1,709 Posts
Just wondering DD, what are your basic tools you use to do your fantastic drillium work. Other than exceptional artistic talent, I'm just wondering if it takes something more specialized than a nice drill press and maybe a Dremel set?
That De Rosa(?) FD looks just perfect!
Chombi
That De Rosa(?) FD looks just perfect!
Chombi
I just use a Dremel - along with a boatload of pre-prior-planning and patience

One day I will get my lazy arse in gear and finish up the third installment of my tutorial thread. For one, I need some nice weather and for another, I need to feel I have crappy legs on a beautiful day for riding.
Watch this space; I have a small pay-it-forward drillium project that I may just be doing this weekend. I'll take in-work pics to give an idea on how I do some of this stuff.
DD
 05-03-12, 09:17 PM
#21
Senior Member
Join Date: Aug 2007
Location: New Jersey
Posts: 241
Bikes: 2000 GT I-Drive Team MTB, 2005 Specialized Sirrus, 1973 Schwinn World Voyager (frame only), 1975 Peugeot Mixte, 1980 Raleigh Sport, 1980(?) Peugeot, Giant ATX MTB, 2006 GT I-Drive MTB Frame, 2005 Jamis Dakar XLT MTB
Mentioned: 1 Post(s)
Tagged: 0 Thread(s)
Quoted: 30 Post(s)
Likes: 0
Liked 0 Times
in
0 Posts
I just use a Dremel - along with a boatload of pre-prior-planning and patience 
One day I will get my lazy arse in gear and finish up the third installment of my tutorial thread...
Drillium Dude, You mentioned a "tutorial thread" in post #19....is that for real? If so, can you give a link for it, or tell me how to find it? I love the DIY info even if I can't do it myself. Thanks!
05-03-12, 10:17 PM
#22
Banned.
Join Date: Jul 2009
Location: PAZ
Posts: 12,294
Mentioned: 255 Post(s)
Tagged: 0 Thread(s)
Quoted: 2588 Post(s)
Liked 4,824 Times
in
1,709 Posts
I just use a Dremel - along with a boatload of pre-prior-planning and patience
One day I will get my lazy arse in gear and finish up the third installment of my tutorial thread...
Drillium Dude, You mentioned a "tutorial thread" in post #19....is that for real? If so, can you give a link for it, or tell me how to find it? I love the DIY info even if I can't do it myself. Thanks!
I did these two tutorials about a year ago - unfortunately, most of the pics are gone because they were hosted to my Flickr account before I went Pro (and there wasn't room for everything before going Pro).
But the writeups may still be able to tell the story
Part One: https://www.bikeforums.net/showthread...%29?highlight=
Part Two: https://www.bikeforums.net/showthread...%29?highlight=
The biggest issue I've had with the drilling part (Part Three) is the need for a second-party to take the photos while I drill. I only have two hands, you know
I suppose I could go back through my archives and see if I still have pics to update the two original threads again - or take new ones. But I'm really stuck with the drilling issue unless I take photos with the part/Dremel in situ and not actually doing the drilling at the time.
Would that work, do you think?
DD
05-04-12, 01:04 AM
#23
Senior Member
Join Date: Aug 2007
Location: New Jersey
Posts: 241
Bikes: 2000 GT I-Drive Team MTB, 2005 Specialized Sirrus, 1973 Schwinn World Voyager (frame only), 1975 Peugeot Mixte, 1980 Raleigh Sport, 1980(?) Peugeot, Giant ATX MTB, 2006 GT I-Drive MTB Frame, 2005 Jamis Dakar XLT MTB
Mentioned: 1 Post(s)
Tagged: 0 Thread(s)
Quoted: 30 Post(s)
Likes: 0
Liked 0 Times
in
0 Posts
DD, THANK YOU for the links to your first 2 writeups. They're fantastic! I would love to have seen the actual photos, but you give such clear and detailed information in your writeups that it's easy to visualize most of what you're doing. I would never ask you to go to the time and effort to repost your original photos just for my interest. I'm grateful you're willing to share your talents with all of us here on C&V.
I wish I lived near you, I love taking "action" shots. I think your idea of taking photos of yourself with everything in "situ", as if you were actually doing the drilling, would work fine. I don't think there would be significantly more to see in a still shot even if you actually were drilling. And your so very professional descriptive writing of what you're doing could cover whatever little that might be missed.
You might need a tripod or table, etc. to hold the camera and use a shutter release "timer" on the camera, but I think it would work out fine.
Thanks again!!

Thread
Thread Starter
Forum
Replies
Last Post
dadoflam
Classic & Vintage
3
08-21-12 02:00 AM
