


what is your secret technique for clean paint in pantograhped parts
 07-16-12, 04:34 PM
#1

Senior Member
Thread Starter

Join Date: Jul 2006
Location: San Jose (Willow Glen) Ca
Posts: 9,845
Bikes: Kirk Custom JK Special, '84 Team Miyata,(dura ace old school) 80?? SR Semi-Pro 600 Arabesque
Mentioned: 106 Post(s)
Tagged: 0 Thread(s)
Quoted: 2338 Post(s)
Liked 2,822 Times
in
1,541 Posts
what is your secret technique for clean paint in pantograhped parts
I am cleaning up and repainting as needed torpado pantographed seat post, crank, stem, seat stay and fork sholder.
Any suggestions on getting a nice durable paint fill and keeping the paint in the engraved area?
thanks
Any suggestions on getting a nice durable paint fill and keeping the paint in the engraved area?
thanks
__________________
Life is too short not to ride the best bike you have, as much as you can
(looking for Torpado Super light frame/fork or for Raleigh International frame fork 58cm)
Life is too short not to ride the best bike you have, as much as you can
(looking for Torpado Super light frame/fork or for Raleigh International frame fork 58cm)
 07-16-12, 04:38 PM
#2
Hopelessly addicted...

Join Date: Aug 2009
Location: Central Maryland
Posts: 4,955
Bikes: 1949 Hercules Kestrel, 1950 Norman Rapide, 1970 Schwinn Collegiate, 1972 Peugeot UE-8, 1976 Raleigh Sports, 1977 Raleigh Sports, 1977 Jack Taylor Tandem, 1984 Davidson Tandem, 2010 Bilenky "BQ" 650B Constructeur Tandem, 2011 Linus Mixte
Mentioned: 13 Post(s)
Tagged: 0 Thread(s)
Quoted: 3 Post(s)
Likes: 0
Liked 10 Times
in
9 Posts
what is your secret technique for clean paint in pantograhped parts
I think you wanted this in the main C&V forum. 
07-16-12, 04:40 PM
#3
Senior Member
Thread Starter
Join Date: Jul 2006
Location: San Jose (Willow Glen) Ca
Posts: 9,845
Bikes: Kirk Custom JK Special, '84 Team Miyata,(dura ace old school) 80?? SR Semi-Pro 600 Arabesque
Mentioned: 106 Post(s)
Tagged: 0 Thread(s)
Quoted: 2338 Post(s)
Liked 2,822 Times
in
1,541 Posts
you are correct I will get mods to move
__________________
Life is too short not to ride the best bike you have, as much as you can
(looking for Torpado Super light frame/fork or for Raleigh International frame fork 58cm)
Life is too short not to ride the best bike you have, as much as you can
(looking for Torpado Super light frame/fork or for Raleigh International frame fork 58cm)
07-16-12, 04:45 PM
#4

Senior Member

Join Date: Aug 2009
Location: Berkeley, CA
Posts: 7,244
Bikes: '72 Cilo Pacer, '72 Gitane Gran Tourisme, '72 Peugeot PX10, '73 Speedwell Ti, '74 Peugeot UE-8, '75 Peugeot PR-10L, '80 Colnago Super, '85 De Rosa Pro, '86 Look Equipe 753, '86 Look KG86, '89 Parkpre Team, '90 Parkpre Team MTB, '90 Merlin
Mentioned: 87 Post(s)
Tagged: 0 Thread(s)
Quoted: 834 Post(s)
Liked 2,125 Times
in
554 Posts
This must have been meant for the regular forum, and not the sales sub-forum. Mods, can you move this? (^Beat me to it while writing)
Meanwhile, I'll start...I did quite a bit of fill paint on my last build. I simply applied a generous amount of paint right over the panto/engraved area, waited 15 minutes or so until it started to get a little tacky, and then wiped of the excess with a clean rag. You can also wait a little longer, maybe an hour, and scratch off the excess with your fingernail. I used a fine model brush with a flat brush tip. The hard bristles help to push in the paint into the panto/engraved areas. I've only done this for one bike, so I'd be curios to hear how some of the experts such as Drillium Dude and Otis go about it.
Meanwhile, I'll start...I did quite a bit of fill paint on my last build. I simply applied a generous amount of paint right over the panto/engraved area, waited 15 minutes or so until it started to get a little tacky, and then wiped of the excess with a clean rag. You can also wait a little longer, maybe an hour, and scratch off the excess with your fingernail. I used a fine model brush with a flat brush tip. The hard bristles help to push in the paint into the panto/engraved areas. I've only done this for one bike, so I'd be curios to hear how some of the experts such as Drillium Dude and Otis go about it.
__________________
-Randy
'72 Cilo Pacer � '72 Peugeot PX10 � '73 Speedwell Ti � '74 Nishiki Competition � '74 Peugeot UE-8 � '86 Look Equipe 753 � '86 Look KG86 � '89 Parkpre Team Road � '90 Parkpre Team MTB � '90 Merlin Ti
Avatar photo courtesy of jeffveloart.com, contact: contact: jeffnil8 (at) gmail.com.
-Randy
'72 Cilo Pacer � '72 Peugeot PX10 � '73 Speedwell Ti � '74 Nishiki Competition � '74 Peugeot UE-8 � '86 Look Equipe 753 � '86 Look KG86 � '89 Parkpre Team Road � '90 Parkpre Team MTB � '90 Merlin Ti
Avatar photo courtesy of jeffveloart.com, contact: contact: jeffnil8 (at) gmail.com.
 07-16-12, 06:58 PM
#5
Senior Member
Join Date: Mar 2006
Posts: 2,754
Mentioned: 8 Post(s)
Tagged: 0 Thread(s)
Quoted: 83 Post(s)
Likes: 0
Liked 13 Times
in
11 Posts
Since I just spent an hour doing a five color group for a Kessels I'll give you a few tips.
Clean your parts with q-tips, toothpicks, and some thinner before you start.
If you are doing flutes on a post, stem, or crank it's really worth buying a good sign-painters brush (about $13). I also suggest buying One-Shot sign paint over model enamels, but if you are only doing a few parts that might be too much money. But One-Shot flows out nice and is meant for signs and pin-striping so it will hold up really well. Again, not a big issue for filling lettering and logos, but if you want a long flute to look nice with no lap marks it's the way to go.
The best way to get a clean line and take overage off is first not to get too much overage (again why a good brush is handy). But basically fill your designs and flutes. Let sit up a bit (5-20 minutes). Take a smooth rag or not so linty paper towel. Fold and hold over the opening of your thinner can and splash on some thinner. Blot that on a clean rag (you don't want it soaking wet. I wrap a bit over my index finger and then wipe away any excess paint. THE most important tip is wipe only ONCE in ONE direction (no back to front jokes here, children). Do not go back and forth, and always pick a clean spot on your rag before making a another pass. That sounds simple, but it's common nature to try to keep wiping missed spots as you go, and this just makes a mess. Always use a fresh part of the rag.
If you are doing multiple colors you might find it easier to do one at a time and let them dry completely before moving on to the next.
 07-16-12, 08:04 PM
#7
Banned.

Join Date: Jul 2009
Location: PAZ
Posts: 12,294
Mentioned: 255 Post(s)
Tagged: 0 Thread(s)
Quoted: 2588 Post(s)
Liked 4,824 Times
in
1,709 Posts
Since someone asked 
I do it quick and sloppy - and 24 hours later take off all the excess paint with some Goof-Off on a rag. Similar process to what gaucho777 suggests, just with a paint remover on the rag, in other words.
I use a paint brush - nothing fancy, just Testors modelling brushes - on component pantographs/flutes/engravings.
I use a toothpick if I'm doing something like a frame cutout/window - in those instances, Goof-Off on a rag is not a good idea!
And once I used a spraycan of Tamiya acrylic black on a Super Record seatpost I milled out; I painted the inside and the edges of the flutes this way, taping off the head of the post. Once done, I did the Goof-Off on a rag trick.
The result:
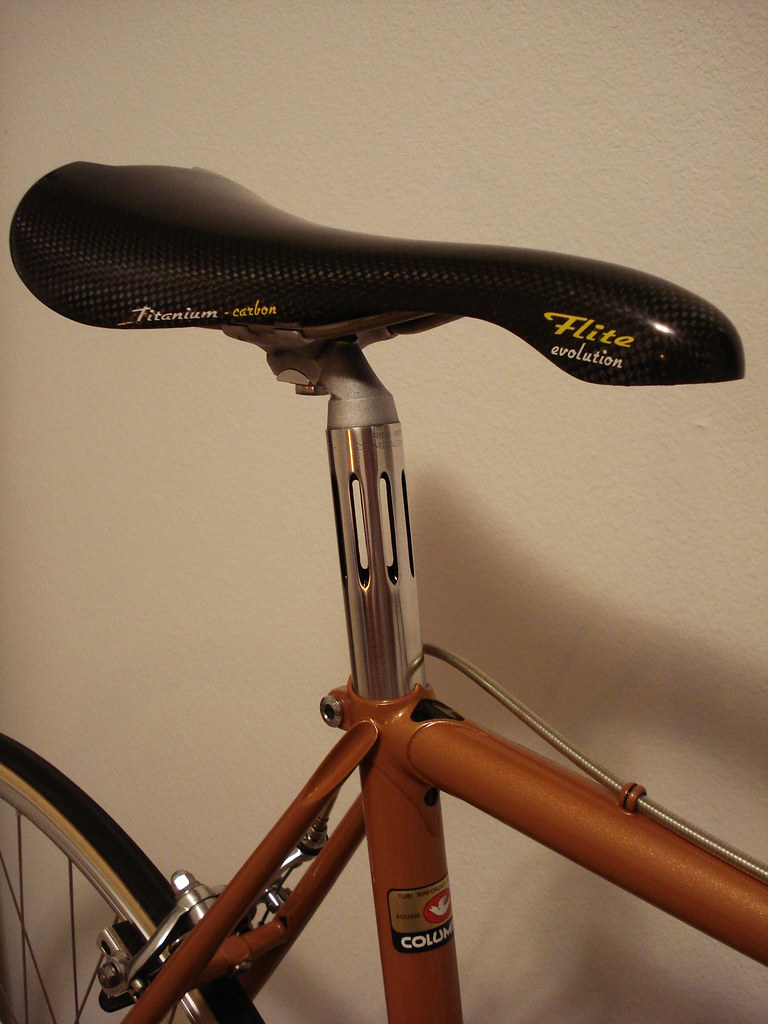
One last thing: whether it's a frame cutout/window or a component engraving, keep it level when you apply the paint and while it dries; you don't want it pooling at one end.
Good luck - and I hope we get to see your results. I like pantographing
DD
I do it quick and sloppy - and 24 hours later take off all the excess paint with some Goof-Off on a rag. Similar process to what gaucho777 suggests, just with a paint remover on the rag, in other words.
I use a paint brush - nothing fancy, just Testors modelling brushes - on component pantographs/flutes/engravings.
I use a toothpick if I'm doing something like a frame cutout/window - in those instances, Goof-Off on a rag is not a good idea!
And once I used a spraycan of Tamiya acrylic black on a Super Record seatpost I milled out; I painted the inside and the edges of the flutes this way, taping off the head of the post. Once done, I did the Goof-Off on a rag trick.
The result:
One last thing: whether it's a frame cutout/window or a component engraving, keep it level when you apply the paint and while it dries; you don't want it pooling at one end.
Good luck - and I hope we get to see your results. I like pantographing
DD


Thread
Thread Starter
Forum
Replies
Last Post
scale
Classic & Vintage
4
02-10-13 05:57 PM
