


Making a custom saddle bag out of leather. The process, with pics.
 08-14-12, 09:50 AM
#1

Senior Member
Thread Starter

Join Date: Apr 2005
Location: Wherever
Posts: 16,748
Mentioned: 92 Post(s)
Tagged: 0 Thread(s)
Quoted: 556 Post(s)
Likes: 0
Liked 132 Times
in
78 Posts
Making a custom saddle bag out of leather. The process, with pics.
I decided to delve into leather working after a 30 year hiatus. I wanted to make my own saddle bag out of leather. I had some of the tools still laying around, but even back then I was strictly an amateur. I will say up front, I�ve never done anything quite like this before. This project was all seat-of-the-pants stuff. I made it up as I went along, with only a general idea of what I was after.
The goals were these:
1) I wanted something a little different. A more rigid bag than the canvas or nylon ones commonly available.
2) I wanted the bag shaped so that the bulk of the bag rode parallel to the axis of the bike frame rather than perpendicular to it, as with many saddle bags. This was done to avoid thigh rub, a problem I�ve experienced with wide bags which stick out to the sides of the saddle. And also to give the bag a more sleek look when mounted.
This created a problem, however, as much of the bulk of the bag sits well aft of the saddle, a design that wouldn�t work with softer materials.
I wanted the bag to hold a spare tubular tire, a few tools and a couple of granola bars, etc.
I wanted something unique and one-of-a-kind.
The challenges were:
I�ve never built anything like this before. I wasn�t even sure it was going to work. However, if one is unaware of the limitations, one isn�t restricted by acquired knowledge and pre-conceived notions of what will work and what will not. This is risky, with failure always possible, but it also allows for a lot of freedom. I kind of like working like this.
With the leather I bought, heavy, 7 1/2 - 8 ounce chrome tanned, the edges where the leather was hand-stitched together would be bulky and unsightly. I decided to bevel the edges the best I could to 45 degrees, a technique more commonly used in case work with vegetable tanned saddle leather. It doesn�t work as well with softer chrome tanned leather, but worked well enough to make for better looking corners and edges.
The finished bag could be HEAVY. But, the bag turned out to be lighter than I thought it would be, weighing in at 1.03 pounds. A pleasant surprise.
For those interested only in the finished product, scroll down to the pics of the bag mounted to my bike. For those who might be interested in the process, I�ll add a bunch of pics with descriptions. Thanks for looking.
 08-14-12, 09:52 AM
#2
Senior Member
Thread Starter
Join Date: Apr 2005
Location: Wherever
Posts: 16,748
Mentioned: 92 Post(s)
Tagged: 0 Thread(s)
Quoted: 556 Post(s)
Likes: 0
Liked 132 Times
in
78 Posts
The materials. Back in the ’70’s I used to tinker with a couple square feet of leather at a time. This time I decided to order a couple of sides. Something I’ve never done before. I had forgotten how big cows can be!
08-14-12, 09:53 AM
#3
Senior Member
Thread Starter
Join Date: Apr 2005
Location: Wherever
Posts: 16,748
Mentioned: 92 Post(s)
Tagged: 0 Thread(s)
Quoted: 556 Post(s)
Likes: 0
Liked 132 Times
in
78 Posts
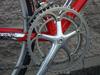
The tools. Here’s a shot of some of the tools I used. I had most of them but purchased a couple of chisels to punch holes for stitching. The tools consist of various cutters, edgers, skivers and setting tools for rivets and snaps. The bag was hand sewn using waxed nylon cord. 

08-14-12, 09:54 AM
#4
Senior Member
Thread Starter
Join Date: Apr 2005
Location: Wherever
Posts: 16,748
Mentioned: 92 Post(s)
Tagged: 0 Thread(s)
Quoted: 556 Post(s)
Likes: 0
Liked 132 Times
in
78 Posts
First I had to come up with a suitable shape. With this side profile shape decided on, I made the width of the bag narrow at the seat post attachment point, gradually widening to 4 inches at the cap.
08-14-12, 09:55 AM
#5
Senior Member
Thread Starter
Join Date: Apr 2005
Location: Wherever
Posts: 16,748
Mentioned: 92 Post(s)
Tagged: 0 Thread(s)
Quoted: 556 Post(s)
Likes: 0
Liked 132 Times
in
78 Posts
All the straps and keeper loops were hand made, but required skiving the heavy leather to about half its original thickness. Hardware is high quality solid brass, nickel plated. 


08-14-12, 09:58 AM
#6
Senior Member
Thread Starter
Join Date: Apr 2005
Location: Wherever
Posts: 16,748
Mentioned: 92 Post(s)
Tagged: 0 Thread(s)
Quoted: 556 Post(s)
Likes: 0
Liked 132 Times
in
78 Posts
Since I was going to all this trouble, I figured I’d customize the bag with these hand-cut Motobecane logos inlaid into the sides of the case. I made this bag to use on my Champion Team. Thin 2 ounce black leather was used for the overlay, then backed with thin orange leather, then the assembly inset into crest-shaped cutouts in the sides. The trickiest part of the whole operation. 


08-14-12, 10:00 AM
#7
Senior Member
Thread Starter
Join Date: Apr 2005
Location: Wherever
Posts: 16,748
Mentioned: 92 Post(s)
Tagged: 0 Thread(s)
Quoted: 556 Post(s)
Likes: 0
Liked 132 Times
in
78 Posts
A thin layer of stiff pebble grain brown was applied to the interior of the sides to provide backing for the inlays as well as add a bit more rigidity to the case.  The location of the straps was a bit of a gamble. Since this bag would be used on a Brooks Pro, with no strap loops, I decided on a crossover strap just behind the seat post clamp, and a pair of longer straps that would wrap around the seat rails and buckle in out toward the cap of the bag. A wide loop with snap was sewn on for securing the nose to the seat post. The back of the snap is covered with thin leather to avoid marring the post.

The location of the straps was a bit of a gamble. Since this bag would be used on a Brooks Pro, with no strap loops, I decided on a crossover strap just behind the seat post clamp, and a pair of longer straps that would wrap around the seat rails and buckle in out toward the cap of the bag. A wide loop with snap was sewn on for securing the nose to the seat post. The back of the snap is covered with thin leather to avoid marring the post.
08-14-12, 10:01 AM
#8
Senior Member
Thread Starter
Join Date: Apr 2005
Location: Wherever
Posts: 16,748
Mentioned: 92 Post(s)
Tagged: 0 Thread(s)
Quoted: 556 Post(s)
Likes: 0
Liked 132 Times
in
78 Posts
Hand stitching and fitting the cap.The cap is attached with two snaps at the bottom, and a strap and buckle up top. It is removable.


08-14-12, 10:02 AM
#9
Senior Member
Thread Starter
Join Date: Apr 2005
Location: Wherever
Posts: 16,748
Mentioned: 92 Post(s)
Tagged: 0 Thread(s)
Quoted: 556 Post(s)
Likes: 0
Liked 132 Times
in
78 Posts
There were a couple of hiccups. I had to remove one side when it turned out I was two holes off on the stitching, making the whole case twisted and skewed. Live and learn. 
08-14-12, 10:05 AM
#10
Senior Member
Thread Starter
Join Date: Apr 2005
Location: Wherever
Posts: 16,748
Mentioned: 92 Post(s)
Tagged: 0 Thread(s)
Quoted: 556 Post(s)
Likes: 0
Liked 132 Times
in
78 Posts
The finished bag. It took a lot longer than I figured it would, but the next one should go more quickly. The good news is that it fits the saddle perfectly. 

 IMG]https://i1227.photobucket.com/albums/ee430/slipangle99/saddle%20bag/saddlebagfinished5.jpg[/IMG]


IMG]https://i1227.photobucket.com/albums/ee430/slipangle99/saddle%20bag/saddlebagfinished5.jpg[/IMG]
08-14-12, 10:15 AM
#12
Senior Member
Whoa. That is friggin' awesome work.
__________________
Bikes on Flickr
I prefer email to private messages. You can contact me at justinhughes@me.com
Bikes on Flickr
I prefer email to private messages. You can contact me at justinhughes@me.com
08-14-12, 10:21 AM
#13
Senior Member
Thread Starter
Join Date: Apr 2005
Location: Wherever
Posts: 16,748
Mentioned: 92 Post(s)
Tagged: 0 Thread(s)
Quoted: 556 Post(s)
Likes: 0
Liked 132 Times
in
78 Posts
Thanks Colonel. With this "box" type construction it came out a little more like bike luggage than a bag. The next one will be of a little more conventional shape.
08-14-12, 10:39 AM
#14
MIKE is my name!

Join Date: Mar 2012
Location: finland,baltimore
Posts: 2,846
Bikes: hans lutz, , puch mistral ultima,2x Austro Daimler Smoked chrome Ultima,Austro Daimler Mixte,Austro Daimler 531 mixte, flying arrow,F Moser,
Mentioned: 5 Post(s)
Tagged: 0 Thread(s)
Quoted: 7 Post(s)
Liked 20 Times
in
4 Posts
rootboy- it was a pleasure to read your post.
fantastic workmanship.
I am more inspired to do some leather work again.
being around wooden boats its something everyone wants a bit of.
I got 2-3 handlebars that wait for winter to get the almarc treatment.
a question- why did you chose the lower angle of the bag as you did?
how many hours in your creation?

 08-14-12, 10:49 AM
#16
Senior Member
Thread Starter
Join Date: Apr 2005
Location: Wherever
Posts: 16,748
Mentioned: 92 Post(s)
Tagged: 0 Thread(s)
Quoted: 556 Post(s)
Likes: 0
Liked 132 Times
in
78 Posts
Hi Puch,
Thank you. The design started with the idea of wanting to lay a folded tubular in the bottom, which dictated the length of the bottom side of the bag. Turns out a folded tire barely fits! But it does. With the slim width of the bag, I decided I needed sort of a "wedge" shape, in order to fit everything I wanted to carry in there. The spare takes up a lot of room. So, I opted for that low-slung, wedge shape, since I was going long instead of wide, if you follow me.
How many hours? Not sure. Too many, that's for sure, but, like I say, the next one will take a lot less.
08-14-12, 11:31 AM
#17
Senior Member
Join Date: Jul 2011
Location: Phoenix, AZ
Posts: 524
Bikes: Colnago C40 HP, De Rosa-Primato, Titus Ti FCR, MOOTS YBB-SL, Pogliaghi Pista
Mentioned: 0 Post(s)
Tagged: 0 Thread(s)
Quoted: 1 Post(s)
Likes: 0
Liked 0 Times
in
0 Posts
Very cool, the shape of the bag looks like it would fit really well between the top and down tube butted up to the head tube too.
08-14-12, 11:36 AM
#18
Senior Member

Join Date: Aug 2009
Location: Berkeley, CA
Posts: 7,238
Bikes: '72 Cilo Pacer, '72 Gitane Gran Tourisme, '72 Peugeot PX10, '73 Speedwell Ti, '74 Peugeot UE-8, '75 Peugeot PR-10L, '80 Colnago Super, '85 De Rosa Pro, '86 Look Equipe 753, '86 Look KG86, '89 Parkpre Team, '90 Parkpre Team MTB, '90 Merlin
Mentioned: 87 Post(s)
Tagged: 0 Thread(s)
Quoted: 831 Post(s)
Liked 2,124 Times
in
554 Posts
Great job! Really impressive work. The Motobecane cutout is nice touch and looks great with the bike. The bag looks really sturdy & even heavier than 1-lb.
__________________
-Randy
'72 Cilo Pacer � '72 Peugeot PX10 � '73 Speedwell Ti � '74 Nishiki Competition � '74 Peugeot UE-8 � '86 Look Equipe 753 � '86 Look KG86 � '89 Parkpre Team Road � '90 Parkpre Team MTB � '90 Merlin Ti
Avatar photo courtesy of jeffveloart.com, contact: contact: jeffnil8 (at) gmail.com.
-Randy
'72 Cilo Pacer � '72 Peugeot PX10 � '73 Speedwell Ti � '74 Nishiki Competition � '74 Peugeot UE-8 � '86 Look Equipe 753 � '86 Look KG86 � '89 Parkpre Team Road � '90 Parkpre Team MTB � '90 Merlin Ti
Avatar photo courtesy of jeffveloart.com, contact: contact: jeffnil8 (at) gmail.com.
08-14-12, 12:08 PM
#19
Extraordinary Magnitude

Join Date: Aug 2009
Location: Waukesha WI
Posts: 13,646
Bikes: 1978 Trek TX700; 1978/79 Trek 736; 1984 Specialized Stumpjumper Sport; 1984 Schwinn Voyageur SP; 1985 Trek 620; 1985 Trek 720; 1986 Trek 400 Elance; 1987 Schwinn High Sierra; 1990 Miyata 1000LT
Mentioned: 84 Post(s)
Tagged: 0 Thread(s)
Quoted: 2608 Post(s)
Liked 1,699 Times
in
935 Posts
That is incredible!
Great job!
Great job!
__________________
*Recipient of the 2006 Time Magazine "Person Of The Year" Award*
Commence to jigglin� huh?!?!
"But hey, always love to hear from opinionated amateurs." -says some guy to Mr. Marshall.
Commence to jigglin� huh?!?!
"But hey, always love to hear from opinionated amateurs." -says some guy to Mr. Marshall.
 08-14-12, 01:08 PM
#21
Senior Member
Join Date: Oct 2009
Location: Minneapolis
Posts: 2,470
Bikes: -1973 Motobecane Mirage -197? Velosolex L'Etoile -'71 Raleigh Super Course
Mentioned: 0 Post(s)
Tagged: 0 Thread(s)
Quoted: 0 Post(s)
Likes: 0
Liked 2 Times
in
2 Posts
I am seriously impressed. And of course the pictures make it looks so easy.
I ordered some waterproof Sunbrella fabric in a Pacific blue, which should complement the orange my VeloSoleX is getting repainted to; I'm going to make an attempt on a saddlebag myself, but of a more conventional shape. If my results are a quarter as good as yours, I'll call it a success.
The crest is a very, very nice touch.
08-14-12, 01:22 PM
#22
Senior Member
Join Date: Jul 2012
Location: Colorado
Posts: 69
Bikes: All-City Space Horse, Peugeot UO-18 mixte, Schwinn Sprint (my childhood 10-speed), Trek 820 (husband's)
Mentioned: 0 Post(s)
Tagged: 0 Thread(s)
Quoted: 1 Post(s)
Likes: 0
Liked 0 Times
in
0 Posts
Wow! I love, love, love it. Very sophisticated. The logo is very elegant. I want one! A Peugeot lion wouldn't be too tricky, right? 
08-14-12, 02:13 PM
#25
incazzare.

That is very nicely made.
...but why the odd shape? It doesn't seem to conform to the bike.
...but why the odd shape? It doesn't seem to conform to the bike.
__________________
1964 JRJ (Bob Jackson), 1973 Wes Mason, 1974 Raleigh Gran Sport, 1986 Schwinn High Sierra, 2000ish Colian (Colin Laing), 2011 Dick Chafe, 2013 Velo Orange Pass Hunter
1964 JRJ (Bob Jackson), 1973 Wes Mason, 1974 Raleigh Gran Sport, 1986 Schwinn High Sierra, 2000ish Colian (Colin Laing), 2011 Dick Chafe, 2013 Velo Orange Pass Hunter