


Photography questions, light box project
 11-02-12, 09:23 PM
#1

Rustbelt Rider
Thread Starter

Join Date: Oct 2008
Location: Canton, OH
Posts: 9,104
Bikes: 1990 Trek 1420 - 1978 Raleigh Professional - 1973 Schwinn Collegiate - 1974 Schwinn Suburban
Mentioned: 20 Post(s)
Tagged: 0 Thread(s)
Quoted: 261 Post(s)
Liked 372 Times
in
177 Posts
Photography questions, light box project
First, I am not a photographer.... but I want to take at least decent pictures. I don't own a really fancy DSLR camera, just a little point and shoot. I'm looking for tips from people who really do know about this stuff.
That said, i've been obsessing over taking pictures of my new rear derailleur. After a lot of failed pictures over the past couple days, I decided to make a light box. I made the box today. I think i'm on the right track, but i'm still not getting the results that I am after. I have not covered the holes yet. I've read online that some people like using muslin soften the light. Can anyone confirm that? Any recommendations on light bulbs (cost is a factor)? How about cheap light fixtures?
Here is my box:
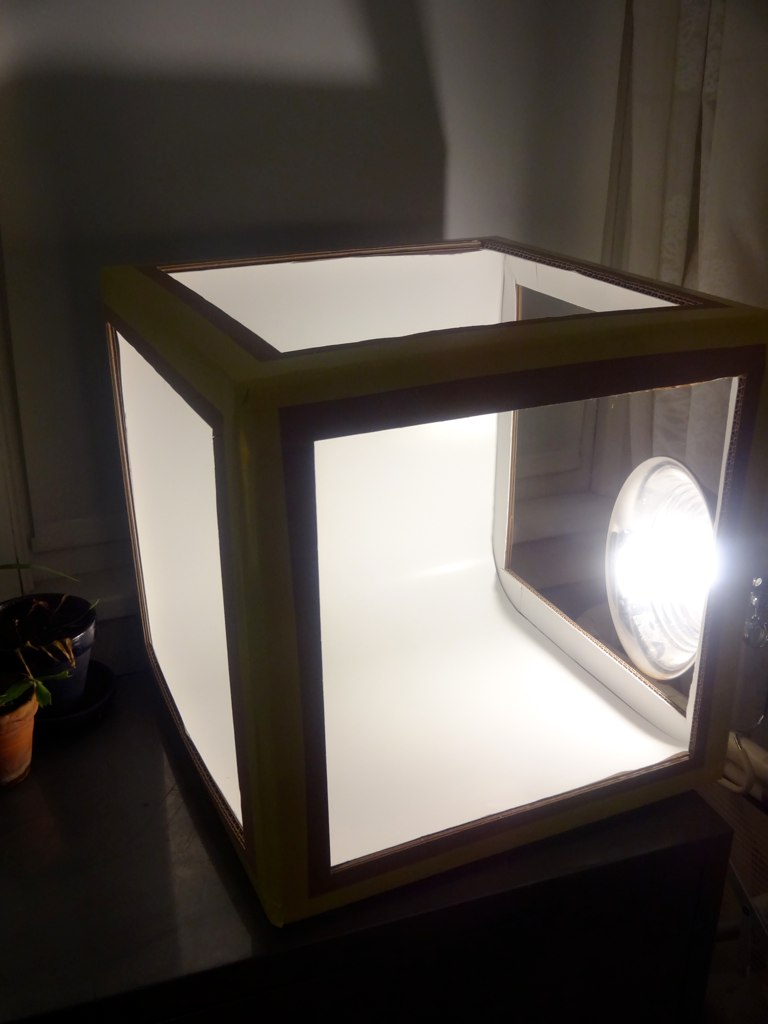
DSC00988 by mkeller234, on Flickr
Here it is with my curtain used to soften the light.
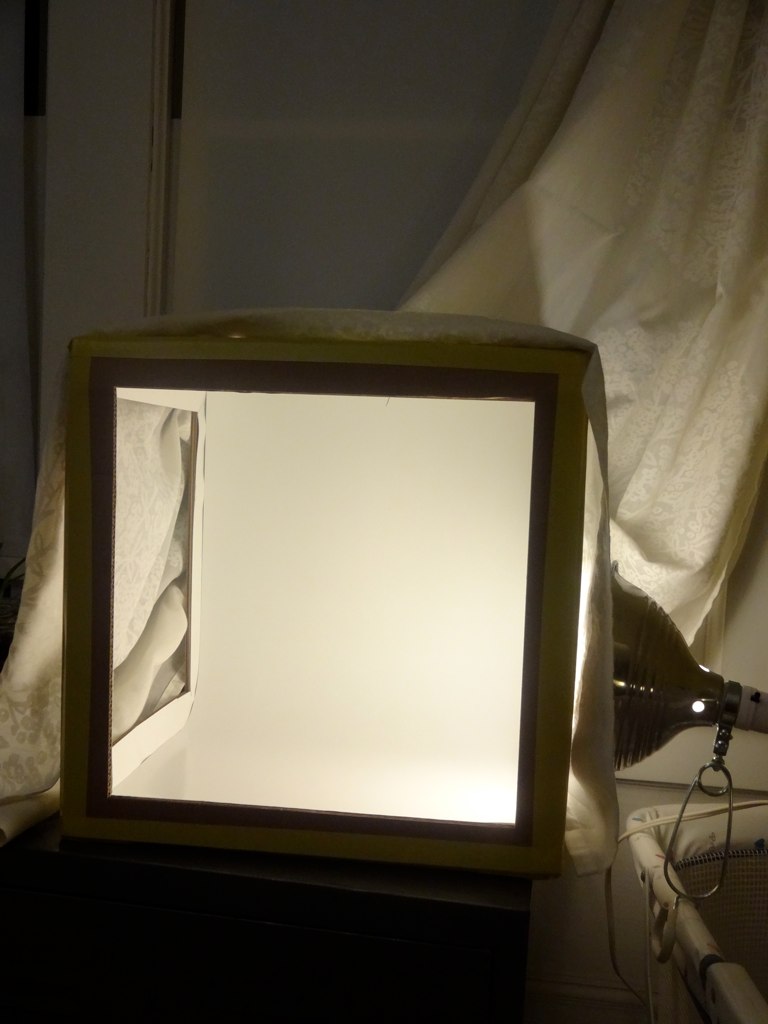
DSC00987 by mkeller234, on Flickr
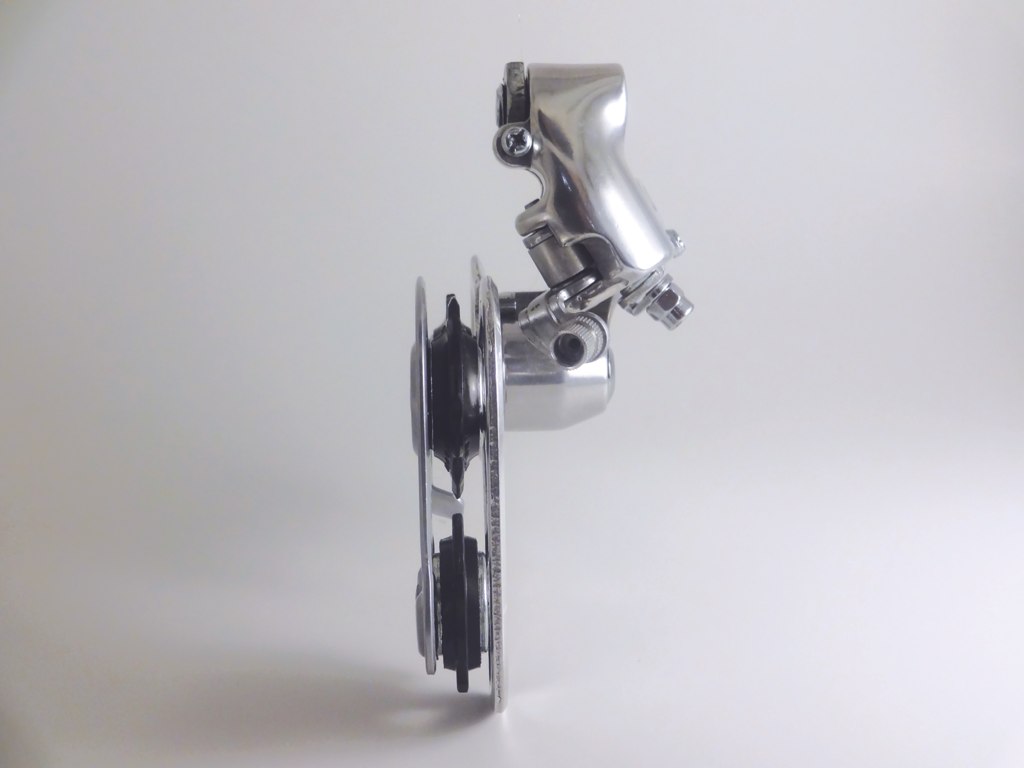
Here is a raw photo from the box:

DSC00985 by mkeller234, on Flickr
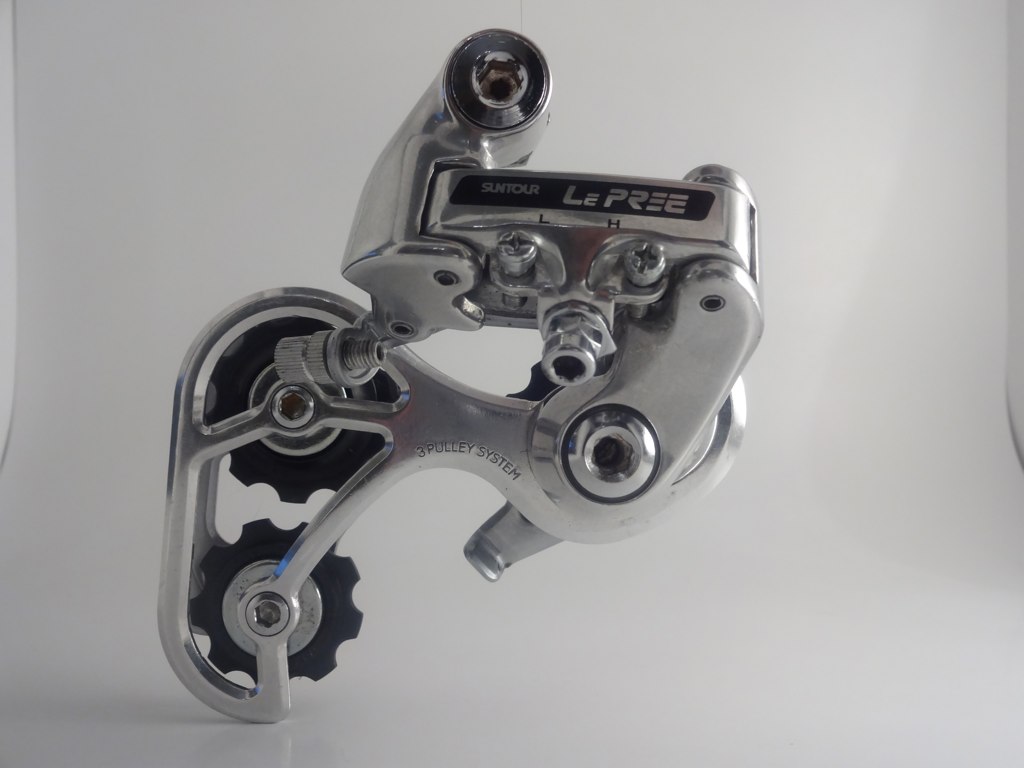
Here is one after I messed with it in photoshop. This is closer to what I want to start with... but not exactly what I was hoping for. It looks washed out and blueish to me.... really that is my fault in photoshop, but it shows more of what I am after.
DSC00986 by mkeller234, on Flickr
That said, i've been obsessing over taking pictures of my new rear derailleur. After a lot of failed pictures over the past couple days, I decided to make a light box. I made the box today. I think i'm on the right track, but i'm still not getting the results that I am after. I have not covered the holes yet. I've read online that some people like using muslin soften the light. Can anyone confirm that? Any recommendations on light bulbs (cost is a factor)? How about cheap light fixtures?
Here is my box:
DSC00988 by mkeller234, on Flickr
Here it is with my curtain used to soften the light.
DSC00987 by mkeller234, on Flickr
Here is a raw photo from the box:
DSC00985 by mkeller234, on Flickr
Here is one after I messed with it in photoshop. This is closer to what I want to start with... but not exactly what I was hoping for. It looks washed out and blueish to me.... really that is my fault in photoshop, but it shows more of what I am after.
DSC00986 by mkeller234, on Flickr
__________________
|^^^^^^^^^^^^^^| ||
|......GO.BROWNS........| ||'|";, ___.
|_..._..._______===|=||_|__|..., ] -
"(@)'(@)"""''"**|(@)(@)*****''(@)
|^^^^^^^^^^^^^^| ||
|......GO.BROWNS........| ||'|";, ___.
|_..._..._______===|=||_|__|..., ] -
"(@)'(@)"""''"**|(@)(@)*****''(@)
 11-02-12, 09:32 PM
#2
Senior Member

Join Date: Aug 2008
Location: San Francisco
Posts: 1,332
Bikes: 1989 Team Miyata, 1989 Miyata 1400, 1989 Miyata 1400, 1986 Miyata 610, 2007 Specialized Stumpjumper Hardtail
Mentioned: 3 Post(s)
Tagged: 0 Thread(s)
Quoted: 16 Post(s)
Likes: 0
Liked 0 Times
in
0 Posts
Looks like you're on the right track. Just get one or two more clip lights like the one you have and two more identical bulbs. You can probably stick with the curtain you're using there if you want to save money, overlap it if it's not softening the light enough. Put one light on top and one on the opposite side of the existing light. Make sure they're all equidistant from the subject to ensure even lighting. In order to eliminate reflections from the camera side you can use a piece of white poster board and cut a hole in it to stick the lens through.
Photographing highly reflective objects in artificial light is varsity-level stuff so you've picked a pretty challenging subject to start out with.
Photographing highly reflective objects in artificial light is varsity-level stuff so you've picked a pretty challenging subject to start out with.
11-02-12, 09:49 PM
#3
Rustbelt Rider
Thread Starter
Join Date: Oct 2008
Location: Canton, OH
Posts: 9,104
Bikes: 1990 Trek 1420 - 1978 Raleigh Professional - 1973 Schwinn Collegiate - 1974 Schwinn Suburban
Mentioned: 20 Post(s)
Tagged: 0 Thread(s)
Quoted: 261 Post(s)
Liked 372 Times
in
177 Posts
Looks like you're on the right track. Just get one or two more clip lights like the one you have and two more identical bulbs. You can probably stick with the curtain you're using there if you want to save money, overlap it if it's not softening the light enough. Put one light on top and one on the opposite side of the existing light. Make sure they're all equidistant from the subject to ensure even lighting. In order to eliminate reflections from the camera side you can use a piece of white poster board and cut a hole in it to stick the lens through.
Photographing highly reflective objects in artificial light is varsity-level stuff so you've picked a pretty challenging subject to start out with.
Photographing highly reflective objects in artificial light is varsity-level stuff so you've picked a pretty challenging subject to start out with.
__________________
|^^^^^^^^^^^^^^| ||
|......GO.BROWNS........| ||'|";, ___.
|_..._..._______===|=||_|__|..., ] -
"(@)'(@)"""''"**|(@)(@)*****''(@)
|^^^^^^^^^^^^^^| ||
|......GO.BROWNS........| ||'|";, ___.
|_..._..._______===|=||_|__|..., ] -
"(@)'(@)"""''"**|(@)(@)*****''(@)
11-02-12, 10:18 PM
#4
Rustbelt Rider
Thread Starter
Join Date: Oct 2008
Location: Canton, OH
Posts: 9,104
Bikes: 1990 Trek 1420 - 1978 Raleigh Professional - 1973 Schwinn Collegiate - 1974 Schwinn Suburban
Mentioned: 20 Post(s)
Tagged: 0 Thread(s)
Quoted: 261 Post(s)
Liked 372 Times
in
177 Posts
This time I set the white point in the camera. Here is another attempt, straight from the camera, no photoshop.
DSC00992 by mkeller234, on Flickr
DSC00990 by mkeller234, on Flickr
DSC00992 by mkeller234, on Flickr
DSC00990 by mkeller234, on Flickr
__________________
|^^^^^^^^^^^^^^| ||
|......GO.BROWNS........| ||'|";, ___.
|_..._..._______===|=||_|__|..., ] -
"(@)'(@)"""''"**|(@)(@)*****''(@)
|^^^^^^^^^^^^^^| ||
|......GO.BROWNS........| ||'|";, ___.
|_..._..._______===|=||_|__|..., ] -
"(@)'(@)"""''"**|(@)(@)*****''(@)
11-02-12, 10:27 PM
#5
Senior Member
Join Date: Jul 2012
Location: Las Vegas, NV
Posts: 624
Bikes: 1949 'Italian' , 1950 San Giusto, 1897 Union, and a number of "projects"... 198? Grandis, a couple of Mixte's...
Mentioned: 0 Post(s)
Tagged: 0 Thread(s)
Quoted: 1 Post(s)
Likes: 0
Liked 1 Time
in
1 Post
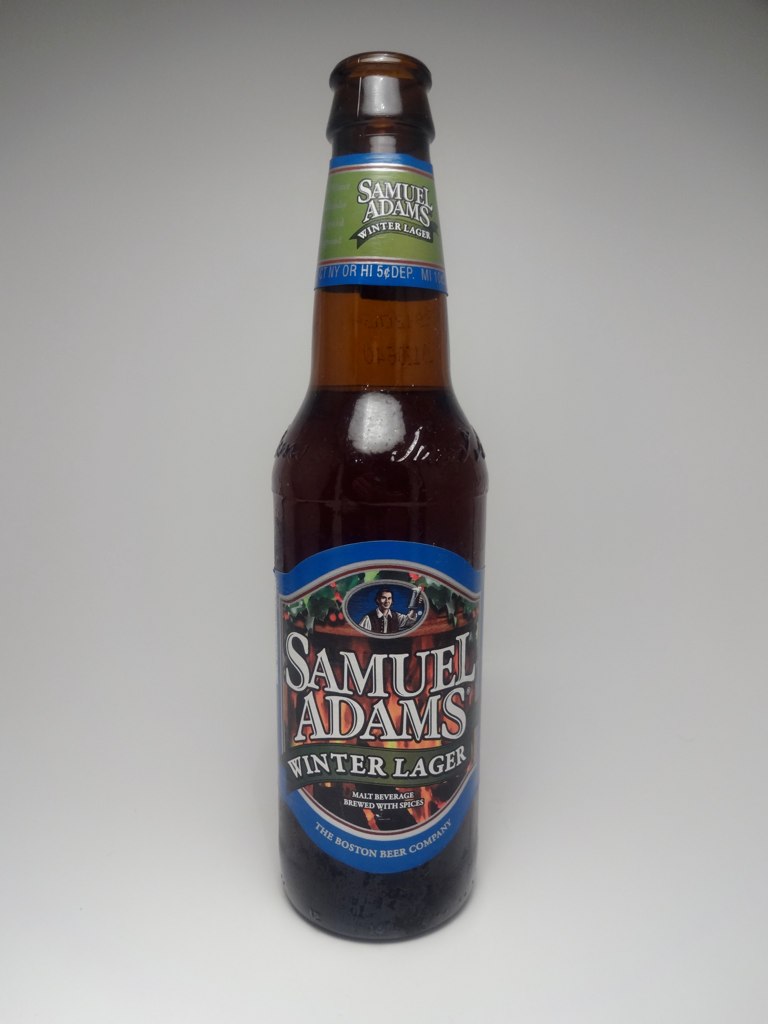
Well, one problem I see right off, is that the Sam Adams bottle is TOO FULL ! 
Cheers,
Joe
Cheers,
Joe
11-02-12, 10:44 PM
#6
Rustbelt Rider
Thread Starter
Join Date: Oct 2008
Location: Canton, OH
Posts: 9,104
Bikes: 1990 Trek 1420 - 1978 Raleigh Professional - 1973 Schwinn Collegiate - 1974 Schwinn Suburban
Mentioned: 20 Post(s)
Tagged: 0 Thread(s)
Quoted: 261 Post(s)
Liked 372 Times
in
177 Posts
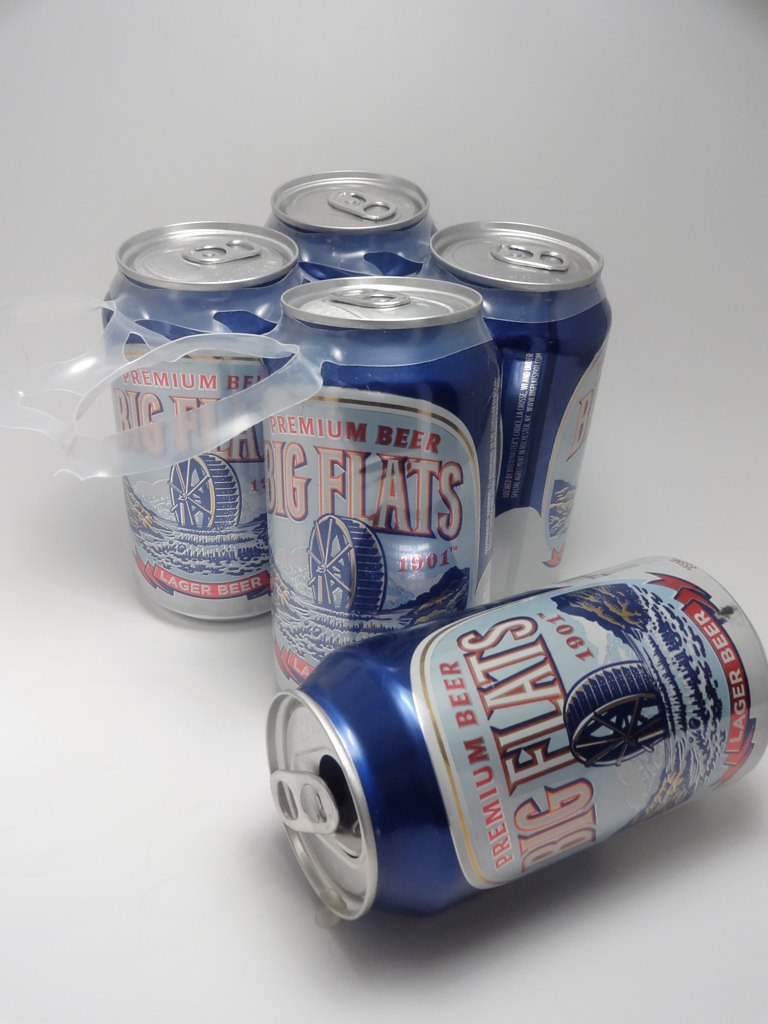
Ha.... i've taken about three more sips since then. My wife brought this and some REALLY bad stuff in cans called "Big Flats". The can probably would have been funnier to put in the box.
__________________
|^^^^^^^^^^^^^^| ||
|......GO.BROWNS........| ||'|";, ___.
|_..._..._______===|=||_|__|..., ] -
"(@)'(@)"""''"**|(@)(@)*****''(@)
|^^^^^^^^^^^^^^| ||
|......GO.BROWNS........| ||'|";, ___.
|_..._..._______===|=||_|__|..., ] -
"(@)'(@)"""''"**|(@)(@)*****''(@)
11-02-12, 10:51 PM
#7
Rustbelt Rider
Thread Starter
Join Date: Oct 2008
Location: Canton, OH
Posts: 9,104
Bikes: 1990 Trek 1420 - 1978 Raleigh Professional - 1973 Schwinn Collegiate - 1974 Schwinn Suburban
Mentioned: 20 Post(s)
Tagged: 0 Thread(s)
Quoted: 261 Post(s)
Liked 372 Times
in
177 Posts
__________________
|^^^^^^^^^^^^^^| ||
|......GO.BROWNS........| ||'|";, ___.
|_..._..._______===|=||_|__|..., ] -
"(@)'(@)"""''"**|(@)(@)*****''(@)
|^^^^^^^^^^^^^^| ||
|......GO.BROWNS........| ||'|";, ___.
|_..._..._______===|=||_|__|..., ] -
"(@)'(@)"""''"**|(@)(@)*****''(@)
11-02-12, 11:32 PM
#8
Senior Member
Join Date: Oct 2010
Location: New Orleans, Louisiana
Posts: 74
Bikes: 2010 Torker T-300, with drop bars. A vintage lugged Mercier 12 speed. A repainted, rebuilt 1986 Raleigh Pursuit road bike. 1988 Panasonic DX3000 is my fave new ride
Mentioned: 0 Post(s)
Tagged: 0 Thread(s)
Quoted: 0 Post(s)
Likes: 0
Liked 0 Times
in
0 Posts
You said it might seem a little too blue to you. It doesn't seem blue on my monitor. You can dial in the color temperature from your specific lighting. For my film setup I use a filter, but it can be done in software as well. Your derailleur looks pretty good from a point and shoot! If you take a liking to this sort of thing, you will benefit from a basic SLR macro lens. A basic 55mm or 60mm macro lens is purpose designed close focus sharpness and extra aperture control. The closer your subject, the shallower your depth of field. If you want good depth of field, sharpness, and a super closup at the same time, you need a lens that stops down to at least f/32. With my 55mm Nikkor lens at f/8 I can easily expose a dime from just a couple of inches away because it's flat. At f/32 I can shoot a closeup of an egg where the most distant part of the egg is just as sharp as the closest part of the egg. The dime or the egg looks breathtakingly big and sharp in the blowups (yep, wet print red lighted blowups). The only trick when you get that close is lighting the subject evenly without shadows. Although your derailleur photo is nice, not all parts of it are equally sharp, as you would get from a macro lens.
You don't say if you used a tripod or not. Since you took such pains to make this sweet lighting setup I guess you thought of that already? No matter how carefully you handhold, a tripod improves the sharpness from the slightest motion blur. On my manual nikons I use a cable release and mirror lockup (MLU) so my finger doesn't touch the body at all. My wife uses an electronic wireless trigger for her DSLR to do the same thing. You don't have to splurge on the remote trigger if you have any kind of self timer. Set the longest self timer you can and the tiny vibrations from pressing the trigger will have finished by the time the shutter fires.
Ah, one more thing. It's far better to nail the exposure in the camera than to fiddle with the photoshop to make it right. Even if you don't "nail it", it will be much easier to manipulate from a better starting point at the editing phase. More time on the bike or shooting, and less at the computer.
Last edited by Aristotle80; 11-02-12 at 11:35 PM. Reason: one more thing
11-03-12, 12:00 AM
#9
Senior Member

When I make a lightbox I use tracing paper for the holes. Take a photo of a grey card and use that as your grey point.
11-03-12, 12:52 AM
#10

Senior Member
all you need to do is adjust the white balance do you have a fuji point and shoot?
__________________
riding
riding
 11-03-12, 06:36 AM
#11
Senior Member

Join Date: Apr 2005
Location: Wherever
Posts: 16,748
Mentioned: 92 Post(s)
Tagged: 0 Thread(s)
Quoted: 556 Post(s)
Likes: 0
Liked 132 Times
in
78 Posts
Can't add much to what some have suggested so far. Aristotle08's set up sounds similar to what I use. I like using my old Nikkor 55 mm Micro lens on my Canon DSLR via an adapter. Super sharp lens. A couple more light sources will help. Also, sometimes you can reduce glare from reflective objects by shooting the lights through a diffusing material. I set my parts on top of a light table to provide light from below, and sometimes use a canopy in front of the lights made from a thin, translucent white nylon material. I'm still a mere piker at this though. Taking great close ups of parts is very difficult, I've found.


11-03-12, 06:42 AM
#12
Senior Member
Join Date: May 2010
Location: Hurricane Alley , Florida
Posts: 3,903
Bikes: Treks (USA), Schwinn Paramount, Schwinn letour,Raleigh Team Professional, Gazelle GoldLine Racing, 2 Super Mondias, Carlton Professional.
Mentioned: 10 Post(s)
Tagged: 0 Thread(s)
Quoted: 78 Post(s)
Liked 30 Times
in
22 Posts
Great looking brakes.
11-03-12, 06:51 AM
#13
Senior Member

Join Date: Apr 2007
Location: Thunder Bay, Ontario, Canada - burrrrr!
Posts: 11,674
Bikes: 1958 Rabeneick 120D, 1968 Legnano Gran Premio, 196? Torpado Professional, 2000 Marinoni Piuma
Mentioned: 210 Post(s)
Tagged: 0 Thread(s)
Quoted: 1372 Post(s)
Likes: 0
Liked 1,751 Times
in
938 Posts
I really like the light box and will be making one up very soon. As for beer...

__________________
"98% of the bikes I buy are projects".
"98% of the bikes I buy are projects".
11-03-12, 08:11 AM
#14
Super Course fan
Join Date: Sep 2006
Location: Lost on the windswept plains of the Great Black Swamp
Posts: 2,720
Mentioned: 0 Post(s)
Tagged: 0 Thread(s)
Quoted: 6 Post(s)
Likes: 0
Liked 8 Times
in
8 Posts
Matt,
I wish I was closer,
Usually a light box/light tent is made with thinner corners so that you have more translucent material. But what you have done seems to be working pretty well. Reflective metal is a real bear to photograph.
Is that a daylight balanced bulb in your work light?
You might try two more lights and rip stop nylon diffusion material in the top and opposite sides of your box.
__________________
I have a white PX-10, a Green Dawes Galaxy and an Orange Falcon, now I'm done.
I have a white PX-10, a Green Dawes Galaxy and an Orange Falcon, now I'm done.
11-03-12, 08:15 AM
#15
Rustbelt Rider
Thread Starter
Join Date: Oct 2008
Location: Canton, OH
Posts: 9,104
Bikes: 1990 Trek 1420 - 1978 Raleigh Professional - 1973 Schwinn Collegiate - 1974 Schwinn Suburban
Mentioned: 20 Post(s)
Tagged: 0 Thread(s)
Quoted: 261 Post(s)
Liked 372 Times
in
177 Posts
I'll have to try the tracing paper to cover the holes, I have that on hand.
I did not use a tripod. Suppose that should have been obvious, but it didn't click in my brain.
I used clear sewing thread to hang the object. How does everyone else position their objects? That was an awesome post Aristotle. Camera equipment might be a long term future goal.
I did not use a tripod. Suppose that should have been obvious, but it didn't click in my brain.
I used clear sewing thread to hang the object. How does everyone else position their objects? That was an awesome post Aristotle. Camera equipment might be a long term future goal.
__________________
|^^^^^^^^^^^^^^| ||
|......GO.BROWNS........| ||'|";, ___.
|_..._..._______===|=||_|__|..., ] -
"(@)'(@)"""''"**|(@)(@)*****''(@)
|^^^^^^^^^^^^^^| ||
|......GO.BROWNS........| ||'|";, ___.
|_..._..._______===|=||_|__|..., ] -
"(@)'(@)"""''"**|(@)(@)*****''(@)
Last edited by mkeller234; 11-03-12 at 08:19 AM.
11-03-12, 08:18 AM
#16
Rustbelt Rider
Thread Starter
Join Date: Oct 2008
Location: Canton, OH
Posts: 9,104
Bikes: 1990 Trek 1420 - 1978 Raleigh Professional - 1973 Schwinn Collegiate - 1974 Schwinn Suburban
Mentioned: 20 Post(s)
Tagged: 0 Thread(s)
Quoted: 261 Post(s)
Liked 372 Times
in
177 Posts
Matt,
I wish I was closer,
Usually a light box/light tent is made with thinner corners so that you have more translucent material. But what you have done seems to be working pretty well. Reflective metal is a real bear to photograph.
Is that a daylight balanced bulb in your work light?
You might try two more lights and rip stop nylon diffusion material in the top and opposite sides of your box.
I wish I was closer,
Usually a light box/light tent is made with thinner corners so that you have more translucent material. But what you have done seems to be working pretty well. Reflective metal is a real bear to photograph.
Is that a daylight balanced bulb in your work light?
You might try two more lights and rip stop nylon diffusion material in the top and opposite sides of your box.
Lots of variables, huh? Its fun though, and I think I am learning.
__________________
|^^^^^^^^^^^^^^| ||
|......GO.BROWNS........| ||'|";, ___.
|_..._..._______===|=||_|__|..., ] -
"(@)'(@)"""''"**|(@)(@)*****''(@)
|^^^^^^^^^^^^^^| ||
|......GO.BROWNS........| ||'|";, ___.
|_..._..._______===|=||_|__|..., ] -
"(@)'(@)"""''"**|(@)(@)*****''(@)
11-03-12, 08:24 AM
#17
Rustbelt Rider
Thread Starter
Join Date: Oct 2008
Location: Canton, OH
Posts: 9,104
Bikes: 1990 Trek 1420 - 1978 Raleigh Professional - 1973 Schwinn Collegiate - 1974 Schwinn Suburban
Mentioned: 20 Post(s)
Tagged: 0 Thread(s)
Quoted: 261 Post(s)
Liked 372 Times
in
177 Posts
One more thing, this might just be lightbox version 1.0. I cut it out on one of these:

It didn't take long to make.
It didn't take long to make.
__________________
|^^^^^^^^^^^^^^| ||
|......GO.BROWNS........| ||'|";, ___.
|_..._..._______===|=||_|__|..., ] -
"(@)'(@)"""''"**|(@)(@)*****''(@)
|^^^^^^^^^^^^^^| ||
|......GO.BROWNS........| ||'|";, ___.
|_..._..._______===|=||_|__|..., ] -
"(@)'(@)"""''"**|(@)(@)*****''(@)
11-03-12, 08:28 AM
#18
Senior Member
Join Date: Apr 2005
Location: Wherever
Posts: 16,748
Mentioned: 92 Post(s)
Tagged: 0 Thread(s)
Quoted: 556 Post(s)
Likes: 0
Liked 132 Times
in
78 Posts
They're shiny, eh? Normally I wouldn't remove the pearly anodizing from Campy brakes, as I love it, but the finish on these was compromised so I reluctantly stripped and polished them.
I think your beer can shot looks very good, Matt. Nice even lighting.
I think your beer can shot looks very good, Matt. Nice even lighting.
11-03-12, 09:14 AM
#19
Senior Member
Join Date: Sep 2007
Location: Scottsdale, AZ
Posts: 4,466
Bikes: many
Mentioned: 0 Post(s)
Tagged: 0 Thread(s)
Quoted: 18 Post(s)
Likes: 0
Liked 16 Times
in
13 Posts
Yes, you are on the right track. Keep adjusting.
Just a note: a large Tupperware type container makes a great light box. The translucent material does a good job of diffusing light.
Just a note: a large Tupperware type container makes a great light box. The translucent material does a good job of diffusing light.
11-03-12, 09:17 AM
#20
Super Course fan
Join Date: Sep 2006
Location: Lost on the windswept plains of the Great Black Swamp
Posts: 2,720
Mentioned: 0 Post(s)
Tagged: 0 Thread(s)
Quoted: 6 Post(s)
Likes: 0
Liked 8 Times
in
8 Posts
+1 to everything in Aristotle's post.
Keep up the good work!!
Keep up the good work!!
__________________
I have a white PX-10, a Green Dawes Galaxy and an Orange Falcon, now I'm done.
I have a white PX-10, a Green Dawes Galaxy and an Orange Falcon, now I'm done.
11-03-12, 09:57 AM
#21
Senior Member
Join Date: Mar 2006
Posts: 2,754
Mentioned: 8 Post(s)
Tagged: 0 Thread(s)
Quoted: 83 Post(s)
Likes: 0
Liked 13 Times
in
11 Posts
I'm all for DIY projects, but when it came to this I bought one of these:
https://www.buy.com/prod/loadstone-st...ngId=244451510
It was more expensive when I bought it from a local camera shop but still a good deal. I've since added a light to the top. Works fine.
https://www.buy.com/prod/loadstone-st...ngId=244451510
It was more expensive when I bought it from a local camera shop but still a good deal. I've since added a light to the top. Works fine.
11-03-12, 10:55 AM
#22
Senior Member
Join Date: Aug 2008
Location: San Francisco
Posts: 1,332
Bikes: 1989 Team Miyata, 1989 Miyata 1400, 1989 Miyata 1400, 1986 Miyata 610, 2007 Specialized Stumpjumper Hardtail
Mentioned: 3 Post(s)
Tagged: 0 Thread(s)
Quoted: 16 Post(s)
Likes: 0
Liked 0 Times
in
0 Posts
In regard to the daylight bulb questions, it doesn't make a difference as long as you properly set your white balance. The only lights you don't want to shoot with are fluorescents because most of them do not emit the full spectrum of light and will result in color casts. I'd go with simple incandescent bulbs which usually end up around 2800-3200 kelvin. The incandescent setting on your camera will work for this. Daylight balanced bulbs are only necessary when you're using them in conjunction with natural daylight like for instance, if you were shooting your bike outside and needed to add fill light to it.
11-03-12, 12:22 PM
#23
Senior Member
Join Date: Aug 2010
Location: Liberty, Missouri
Posts: 3,120
Bikes: 1966 Paramount | 1971 Raleigh International | ca. 1970 Bernard Carre | 1989 Waterford Paramount | 2012 Boulder Brevet | 2019 Specialized Diverge
Mentioned: 23 Post(s)
Tagged: 0 Thread(s)
Quoted: 129 Post(s)
Liked 77 Times
in
40 Posts
Those pre-built light boxes work very well. Many of us in the photo biz embrace the DIY lifestyle, either because we enjoy it or because we're cheap (usually both.) One suggestion for the sides of the light box that I would add to those materials already listed (window sheers, tracing paper) is a material called Denril Vellum, available at finer art supply stores. It's a milky white translucent material, and it is a spectacular material for diffusing light (it's actually a drawing surface.) It also is pretty darned tough and can be cleaned easily. I've constructed table top light boxes using PVC pipe and joints for the box frame and then attached the Denril to the top and sides. For the swoop backdrop, I've used heavier black (or white or whatever floats your boat) felt. Two lights on either side (or top) can be adjusted by simply moving one further away from the sides to provide a key light and a shadow side light. And for beautiful white backgrounds I use a lighted lightbox (sorry for the confusion of two different items with the exact same name, but for this latter I'm referring to the type of light box that has an actual light in it.) Diffused lights on 45 degree angles from above for the key lighting and the lightbox blowing out all tones from behind with careful balancing of the light will render incredibly perfect white backgrounds.
11-03-12, 08:33 PM
#25
Senior Member
Join Date: Aug 2006
Location: Land of Cheese
Posts: 1,078
Mentioned: 8 Post(s)
Tagged: 0 Thread(s)
Quoted: 111 Post(s)
Liked 213 Times
in
105 Posts
Lotsa quick and cheap strobe lighting solutions here at strobist:
https://strobist.blogspot.com/
https://strobist.blogspot.com/