


Ladies 1960 Robin Hood Sports
 03-07-13, 08:06 PM
#1
Junior Member
Thread Starter
Join Date: Mar 2013
Location: New Zealand
Posts: 10
Mentioned: 0 Post(s)
Tagged: 0 Thread(s)
Quoted: 0 Post(s)
Likes: 0
Liked 0 Times
in
0 Posts
Ladies 1960 Robin Hood Sports
A lot of this is copied from my intro post but with pictures
I spent most of yesterday cleaning up my new ladies 1960 Robin Hood Sport. She is Dark Red with white mudguards. This photo from the seller
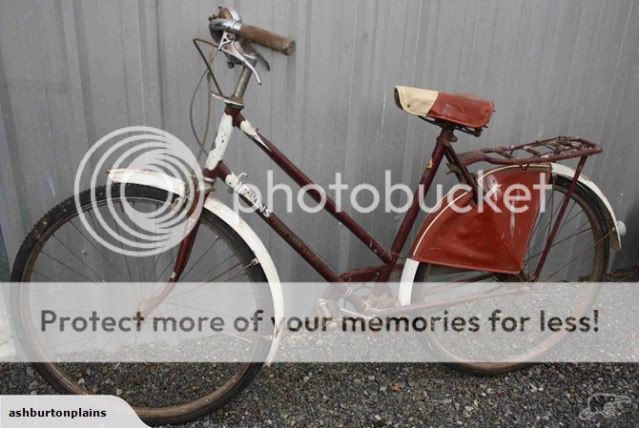
Ive only cleaned what i could without taking it apart (2 preschool helpers) and barely touched the metalwork but it looks a wee bit better now the rims and brakes especially need a lot more rust removal work but the brakes and gears seem to work and I got the bell working again

From reading the posts on here Robin Hood seems to have been a more common model elsewhere than it was here. I've never seen one before. This bike was sold by the the "Somme Cycle Works" (L.S. Hopkins) here in Ashburton and has decals and a huge "Hopkins" on the frame (which luckily cleaned up from white to a much less hideous dull gold) leading me to suspect it might have been a shop bike for them. I can't see a customer being happy with that degree of shop branding.
All the visible parts including the bell are Raleigh stamped (Sir W rather than the bird). And seem in working order.
It has a Sturmley Archer AW Hub marked 1960 4. Carrier is there and a vinyl skirt protector but no lights, pump or kick stand
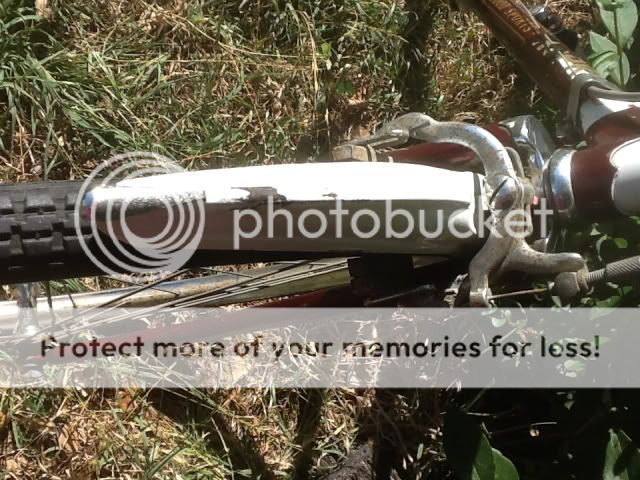
The paint and some of the chrome are pretty rough; paint nearly gone in exposed areas but pretty where the skirt protector was covering it. The chrome is wrinkled in places and the chrome on the rims isn't looking very flash even where I have managed to get the rust off.
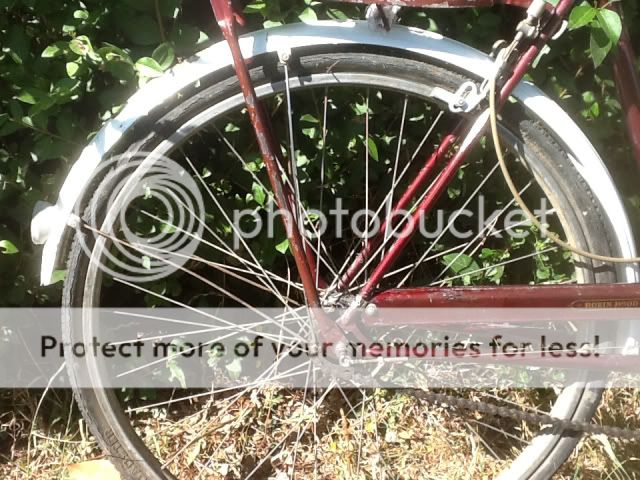
The rear wheel is sporting the most deceased tyre I've ever seen but the frame and wheels seem to be pretty straight.
I know that it will never be pretty without more time and $ than I have spent on it but i like it. it's a nice fitting bike for me and I'm hoping it will be fit to ride once I put some new tubes and tyres on it. I'll be happy if I can get it rideable and respectable looking on our fairly minimal budget. The kids are very excited at the thought of going riding with me LOL
We have various tools already but nothing bike specific. I'd really appreciate a short list of essentials for this bike. Please can anyone recommend a polish or sealant to protect the areas where I have sucessfully removed rust from the paintwork and chrome and something to protect the remains of the decals? I need to make sure it doesnt get any more rust and protect all that sad bare metal. We are not very far from the coast and have strong winds here that will really sandblast anything exposed to them if the weather has been dry (which is nearly always) hot summers and cold winters so I'd like to give it the best protection I can manage.
Any links you can share with me with tyre changing advice would also be very much appreciated. I've done it before but not for ages and never with a SA hub and I'm picking up two sets of tyres and tubes next Tuesday.
Any input appreciated. I only know what I've managed to google in the last week and most of that came from you guys
I spent most of yesterday cleaning up my new ladies 1960 Robin Hood Sport. She is Dark Red with white mudguards. This photo from the seller
Ive only cleaned what i could without taking it apart (2 preschool helpers) and barely touched the metalwork but it looks a wee bit better now
the rims and brakes especially need a lot more rust removal work but the brakes and gears seem to work and I got the bell working again From reading the posts on here Robin Hood seems to have been a more common model elsewhere than it was here. I've never seen one before. This bike was sold by the the "Somme Cycle Works" (L.S. Hopkins) here in Ashburton and has decals and a huge "Hopkins" on the frame (which luckily cleaned up from white to a much less hideous dull gold) leading me to suspect it might have been a shop bike for them. I can't see a customer being happy with that degree of shop branding.
All the visible parts including the bell are Raleigh stamped (Sir W rather than the bird). And seem in working order.
It has a Sturmley Archer AW Hub marked 1960 4. Carrier is there and a vinyl skirt protector but no lights, pump or kick stand
The paint and some of the chrome are pretty rough; paint nearly gone in exposed areas but pretty where the skirt protector was covering it. The chrome is wrinkled in places and the chrome on the rims isn't looking very flash even where I have managed to get the rust off.
The rear wheel is sporting the most deceased tyre I've ever seen but the frame and wheels seem to be pretty straight.
I know that it will never be pretty without more time and $ than I have spent on it but i like it. it's a nice fitting bike for me and I'm hoping it will be fit to ride once I put some new tubes and tyres on it. I'll be happy if I can get it rideable and respectable looking on our fairly minimal budget. The kids are very excited at the thought of going riding with me LOL
We have various tools already but nothing bike specific. I'd really appreciate a short list of essentials for this bike. Please can anyone recommend a polish or sealant to protect the areas where I have sucessfully removed rust from the paintwork and chrome and something to protect the remains of the decals? I need to make sure it doesnt get any more rust and protect all that sad bare metal. We are not very far from the coast and have strong winds here that will really sandblast anything exposed to them if the weather has been dry (which is nearly always) hot summers and cold winters so I'd like to give it the best protection I can manage.
Any links you can share with me with tyre changing advice would also be very much appreciated. I've done it before but not for ages and never with a SA hub and I'm picking up two sets of tyres and tubes next Tuesday.
Any input appreciated. I only know what I've managed to google in the last week and most of that came from you guys
Last edited by Ericajane; 03-09-13 at 07:04 PM.
 03-07-13, 08:30 PM
#2
Hopelessly addicted...

Join Date: Aug 2009
Location: Central Maryland
Posts: 4,955
Bikes: 1949 Hercules Kestrel, 1950 Norman Rapide, 1970 Schwinn Collegiate, 1972 Peugeot UE-8, 1976 Raleigh Sports, 1977 Raleigh Sports, 1977 Jack Taylor Tandem, 1984 Davidson Tandem, 2010 Bilenky "BQ" 650B Constructeur Tandem, 2011 Linus Mixte
Mentioned: 13 Post(s)
Tagged: 0 Thread(s)
Quoted: 3 Post(s)
Likes: 0
Liked 10 Times
in
9 Posts
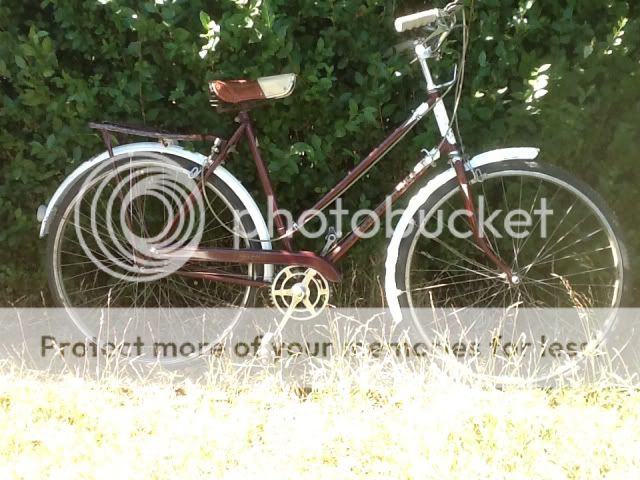
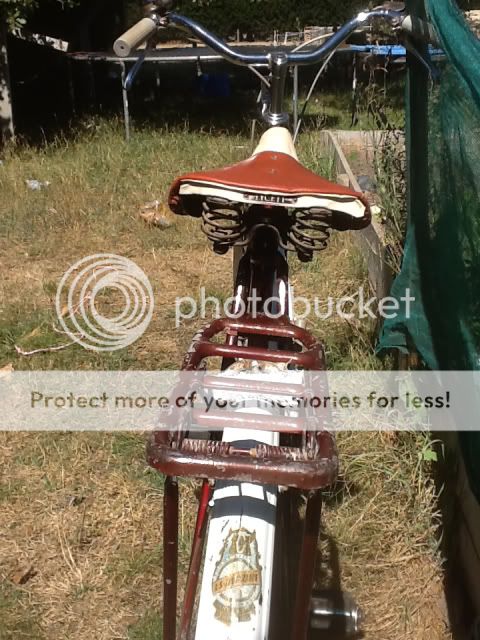
Hello Ericajane and welcome to the forum. That is a nice find you have there. I find the mudguards/fenders to be quite interesting, because they don't look like the standard issue Raleigh versions. What does the label on the rear mudguard/fender say? Can you take more pictures of both of them, please?
For changing out the tires, I'd try to remove the old ones with a tire lever only if you can't remove it by hand and then install the new ones by rolling the tire onto the rim so as not to damage the inner tube. For installation, there are videos on YouTube showing the technique if you look around. Be careful that you don't cut your fingers on the edge of the tire as sometimes there is an exposed wire bead if the tire has deteriorated. I know that one from personal experience.
I find the mudguards/fenders to be quite interesting, because they don't look like the standard issue Raleigh versions. What does the label on the rear mudguard/fender say? Can you take more pictures of both of them, please?For changing out the tires, I'd try to remove the old ones with a tire lever only if you can't remove it by hand and then install the new ones by rolling the tire onto the rim so as not to damage the inner tube. For installation, there are videos on YouTube showing the technique if you look around. Be careful that you don't cut your fingers on the edge of the tire as sometimes there is an exposed wire bead if the tire has deteriorated. I know that one from personal experience.
03-07-13, 09:23 PM
#3
Junior Member
Thread Starter
Join Date: Mar 2013
Location: New Zealand
Posts: 10
Mentioned: 0 Post(s)
Tagged: 0 Thread(s)
Quoted: 0 Post(s)
Likes: 0
Liked 0 Times
in
0 Posts
Thanks photogravity
i like her
i hope one of these shows what you are looking for
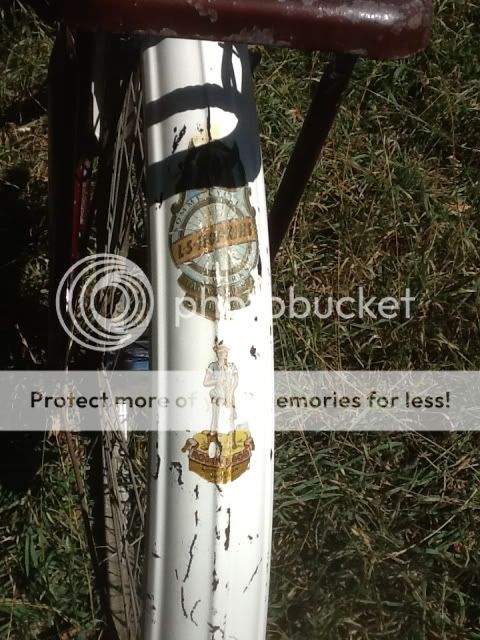
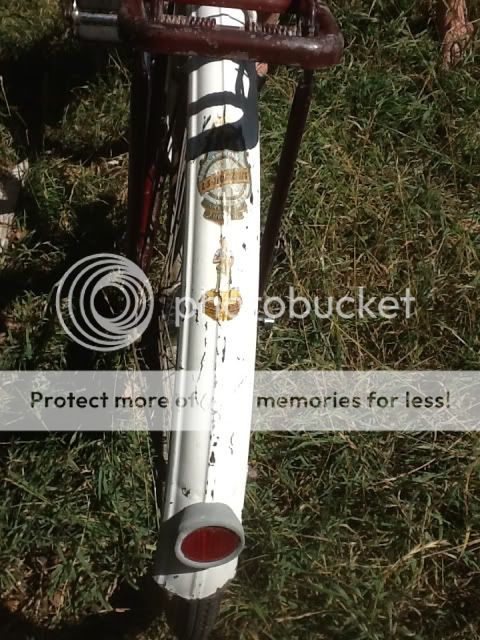
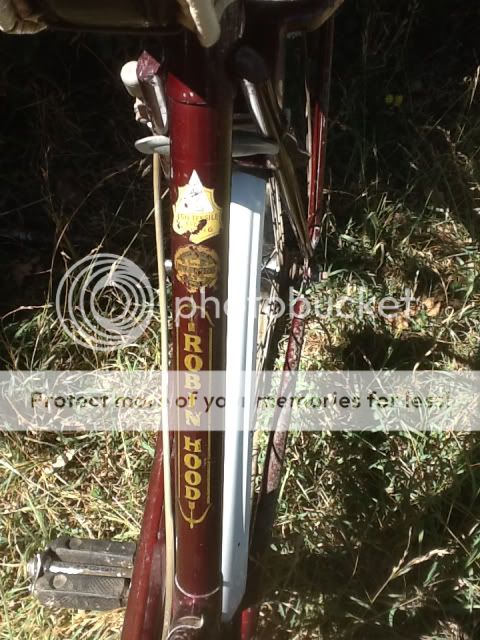
The decal on the rear 'guard above Robin Hood is one of the "Somme Bicycle Works" ones (the most elaborite one) The bottom edge of the 'guard is very rough but I dont think anything is missing as I found another bike online which looks the same here;
https://www.flickr.com/photos/jmarkbe...7622592251234/
The rubber around the reflector is gray and starting to be sticky. Do you know what I should use on that?
ETA
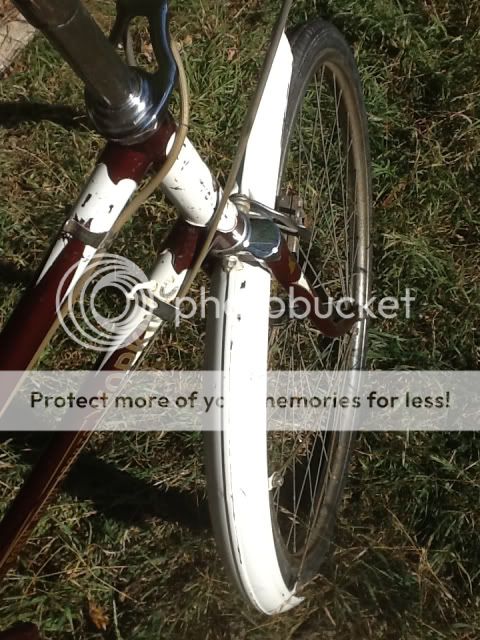
The front 'guard is a really pretty shape but hard to photograph. The owner of the bike in the above link makes a much better job of it
i like her
i hope one of these shows what you are looking for
The decal on the rear 'guard above Robin Hood is one of the "Somme Bicycle Works" ones (the most elaborite one) The bottom edge of the 'guard is very rough but I dont think anything is missing as I found another bike online which looks the same here;
https://www.flickr.com/photos/jmarkbe...7622592251234/
The rubber around the reflector is gray and starting to be sticky. Do you know what I should use on that?
ETA
The front 'guard is a really pretty shape but hard to photograph. The owner of the bike in the above link makes a much better job of it
Last edited by Ericajane; 03-09-13 at 06:57 PM. Reason: Added photo spelling
03-08-13, 11:01 AM
#4
Hopelessly addicted...
Join Date: Aug 2009
Location: Central Maryland
Posts: 4,955
Bikes: 1949 Hercules Kestrel, 1950 Norman Rapide, 1970 Schwinn Collegiate, 1972 Peugeot UE-8, 1976 Raleigh Sports, 1977 Raleigh Sports, 1977 Jack Taylor Tandem, 1984 Davidson Tandem, 2010 Bilenky "BQ" 650B Constructeur Tandem, 2011 Linus Mixte
Mentioned: 13 Post(s)
Tagged: 0 Thread(s)
Quoted: 3 Post(s)
Likes: 0
Liked 10 Times
in
9 Posts
Thanks for the additional pictures of the mudguards/fenders. The in the picture from Flickr has the steel stays on it, whereas your bicycle has the wire stays. I take it that Somme Bicycle Works was affiliated with Hopkins and they were a distributor of Robin Hood in NZ at one time... Interesting stuff, to me at least. 
Regarding the gummy/sticky reflector, I would just leave it alone. Be careful about getting chemicals on the rubber as you won't want to damage it any more.
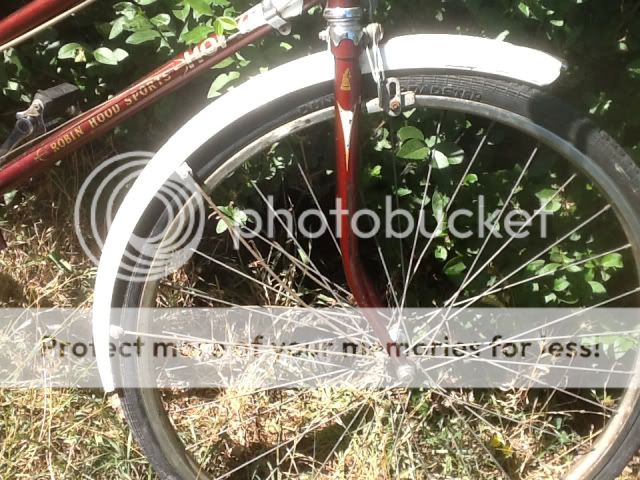
I do see one thing that is a bit concerning after looking at the pictures: It appears the fork is damaged. If you have a bike shop nearby, you might consider asking their opinion of it. Sometimes it is a problem as there can be structural damage to the fork, but often the blades are just bent back which makes the bike look funny and could negatively affect the handling a bit.
Regarding the gummy/sticky reflector, I would just leave it alone. Be careful about getting chemicals on the rubber as you won't want to damage it any more.
I do see one thing that is a bit concerning after looking at the pictures: It appears the fork is damaged. If you have a bike shop nearby, you might consider asking their opinion of it. Sometimes it is a problem as there can be structural damage to the fork, but often the blades are just bent back which makes the bike look funny and could negatively affect the handling a bit.
03-08-13, 03:21 PM
#5
Junior Member
Thread Starter
Join Date: Mar 2013
Location: New Zealand
Posts: 10
Mentioned: 0 Post(s)
Tagged: 0 Thread(s)
Quoted: 0 Post(s)
Likes: 0
Liked 0 Times
in
0 Posts
The red bar in the centre of the Somme transfer says L S Hopkins and so does the gold bit at the bottom and also Tancred Street (which is a street in town) I think that the Somme Cycle works was his business. But haven't managed to find a local who can tell me about it yet. They were definitely operating before 1920 as there are ads in the local paper for that time. There is someone on Flickr with an older bike with the same stickers too from Geraldine which is the next big town south of here.
Eeek! Bent forks! Thank you for telling me
 And there was a wailing and a knashing of teeth. I was wondering why the front wheel seemed to fit more closely into the mudguard than the back one. Initially I thought it was the wrong wheel but it has a Raleigh hub and the tire was the right size. I figured it must be because my back tyre is a pancake but I guess that bent forks explains it.
Is fixing them likely to be a big production? I'm a bit shy of bringing it into the local bike shop. It's all high incomes and Lycra cycling around here
Eeek! Bent forks! Thank you for telling me
And there was a wailing and a knashing of teeth. I was wondering why the front wheel seemed to fit more closely into the mudguard than the back one. Initially I thought it was the wrong wheel but it has a Raleigh hub and the tire was the right size. I figured it must be because my back tyre is a pancake but I guess that bent forks explains it. Is fixing them likely to be a big production? I'm a bit shy of bringing it into the local bike shop. It's all high incomes and Lycra cycling around here
Last edited by Ericajane; 03-08-13 at 03:22 PM. Reason: Spelling
03-08-13, 04:57 PM
#6
Senior Member

Join Date: Apr 2009
Location: Detroit
Posts: 10,303
Mentioned: 6 Post(s)
Tagged: 0 Thread(s)
Quoted: 17 Post(s)
Likes: 0
Liked 41 Times
in
33 Posts
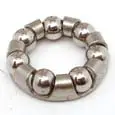
The nice thing about steel is that if it's not bent too badly, it can be bent back. I think that your fork is quite repairable, but you'll have to disassemble things a bit to get at the fork. You will want to lube and replace the ball bearings in there when you reassemble things. They're balls are normally 5/32" diameter (rarely 1/8") and can be purchased on-line quite inexpensively. There are about 40 of them. You can use marine or axle grease to lube them, which also holds them in place during reassembly.
I've had good luck bending forks with this sort of a car-jack apparatus:
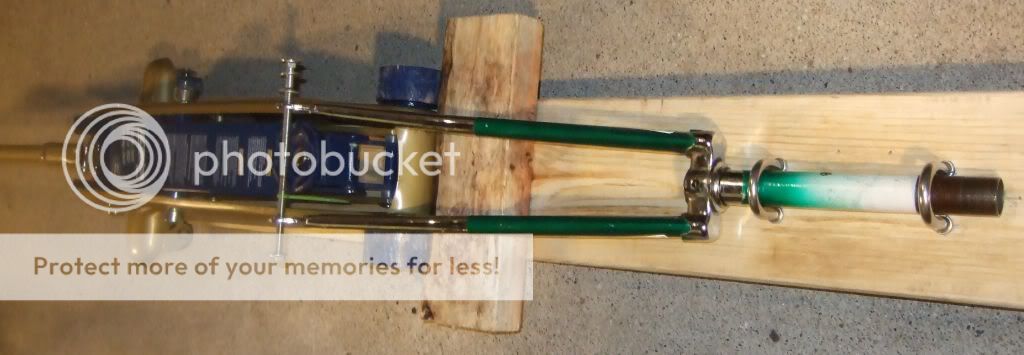
I like it because it applies the fore-aft load at the same point as the original impact - but in the opposite direction. The amount of force you apply with it is incremental, and very controllable.
If there is any lateral displacement of the fork blades as well, you will notice the bike pulling rt/lt, especially when riding no hands.
This can generally be bent back into position by hand on the bike, a little at a time, until it's good. The best way is to lay the bike down with the wheel removed, and pull up on one blade to move it a couple of mm, then measure the distance to the other fork blade, and pull up on it until you effect a distance that is equal to the width or the front axle, from locknut to locknut. Test and repeat if necessary.
(blades too far right = bike pulls to the left and vice versa.) - And make sure the axle is fully seated in the dropout before attempting to correct anything!
__________________
- Auchen
- Auchen
Last edited by auchencrow; 03-08-13 at 05:02 PM.
03-08-13, 10:01 PM
#7
Junior Member
Thread Starter
Join Date: Mar 2013
Location: New Zealand
Posts: 10
Mentioned: 0 Post(s)
Tagged: 0 Thread(s)
Quoted: 0 Post(s)
Likes: 0
Liked 0 Times
in
0 Posts
Thanks very much Auchen
Nice fork straightening machine! I'm pretty sure I can manage that
Is there any way I can tell how much I need to bend them back? Are they supposed to be straight?
Apologies for the bunny questions. I'm hugely ignorant and I really don't want to kill the bike trying to fix it.
Nice fork straightening machine! I'm pretty sure I can manage that
Is there any way I can tell how much I need to bend them back? Are they supposed to be straight?
Apologies for the bunny questions. I'm hugely ignorant and I really don't want to kill the bike trying to fix it.
03-08-13, 10:14 PM
#8
Senior Member
I went to a bike store that specializes in used older bikes and they bent my fork back for $20.
03-09-13, 03:46 AM
#9
Hopelessly addicted...
Join Date: Aug 2009
Location: Central Maryland
Posts: 4,955
Bikes: 1949 Hercules Kestrel, 1950 Norman Rapide, 1970 Schwinn Collegiate, 1972 Peugeot UE-8, 1976 Raleigh Sports, 1977 Raleigh Sports, 1977 Jack Taylor Tandem, 1984 Davidson Tandem, 2010 Bilenky "BQ" 650B Constructeur Tandem, 2011 Linus Mixte
Mentioned: 13 Post(s)
Tagged: 0 Thread(s)
Quoted: 3 Post(s)
Likes: 0
Liked 10 Times
in
9 Posts
Nobody has chimed in yet about protecting the metal bits, so here's a suggestion: Coat the parts with linseed oil. It is very oily to start, but forms a hard coating once it is dry.
Now regarding tools, since the sizes on these things are the old Whitworth sizes, I just keep an adjustable wrench handy. You'll also want to get a cotter tool to remove the crank arms to work on the bottom bracket.
Now regarding tools, since the sizes on these things are the old Whitworth sizes, I just keep an adjustable wrench handy. You'll also want to get a cotter tool to remove the crank arms to work on the bottom bracket.
03-09-13, 03:48 AM
#10
Hopelessly addicted...
Join Date: Aug 2009
Location: Central Maryland
Posts: 4,955
Bikes: 1949 Hercules Kestrel, 1950 Norman Rapide, 1970 Schwinn Collegiate, 1972 Peugeot UE-8, 1976 Raleigh Sports, 1977 Raleigh Sports, 1977 Jack Taylor Tandem, 1984 Davidson Tandem, 2010 Bilenky "BQ" 650B Constructeur Tandem, 2011 Linus Mixte
Mentioned: 13 Post(s)
Tagged: 0 Thread(s)
Quoted: 3 Post(s)
Likes: 0
Liked 10 Times
in
9 Posts
Hmmm. . . It sounds like the Lycra-clad boys down at the local hoity-toity bike shop will not be of much help anyway.
The nice thing about steel is that if it's not bent too badly, it can be bent back. I think that your fork is quite repairable, but you'll have to disassemble things a bit to get at the fork. You will want to lube and replace the ball bearings in there when you reassemble things. They're balls are normally 5/32" diameter (rarely 1/8") and can be purchased on-line quite inexpensively. There are about 40 of them. You can use marine or axle grease to lube them, which also holds them in place during reassembly.
I've had good luck bending forks with this sort of a car-jack apparatus:
I like it because it applies the fore-aft load at the same point as the original impact - but in the opposite direction. The amount of force you apply with it is incremental, and very controllable.
If there is any lateral displacement of the fork blades as well, you will notice the bike pulling rt/lt, especially when riding no hands.
This can generally be bent back into position by hand on the bike, a little at a time, until it's good. The best way is to lay the bike down with the wheel removed, and pull up on one blade to move it a couple of mm, then measure the distance to the other fork blade, and pull up on it until you effect a distance that is equal to the width or the front axle, from locknut to locknut. Test and repeat if necessary.
(blades too far right = bike pulls to the left and vice versa.) - And make sure the axle is fully seated in the dropout before attempting to correct anything!
03-09-13, 03:55 AM
#11
Hopelessly addicted...
Join Date: Aug 2009
Location: Central Maryland
Posts: 4,955
Bikes: 1949 Hercules Kestrel, 1950 Norman Rapide, 1970 Schwinn Collegiate, 1972 Peugeot UE-8, 1976 Raleigh Sports, 1977 Raleigh Sports, 1977 Jack Taylor Tandem, 1984 Davidson Tandem, 2010 Bilenky "BQ" 650B Constructeur Tandem, 2011 Linus Mixte
Mentioned: 13 Post(s)
Tagged: 0 Thread(s)
Quoted: 3 Post(s)
Likes: 0
Liked 10 Times
in
9 Posts
Thanks very much Auchen
Nice fork straightening machine! I'm pretty sure I can manage that
Is there any way I can tell how much I need to bend them back? Are they supposed to be straight?
Apologies for the bunny questions. I'm hugely ignorant and I really don't want to kill the bike trying to fix it.
Nice fork straightening machine! I'm pretty sure I can manage that
Is there any way I can tell how much I need to bend them back? Are they supposed to be straight?
Apologies for the bunny questions. I'm hugely ignorant and I really don't want to kill the bike trying to fix it.
03-09-13, 05:01 AM
#12
Senior Member
Join Date: Apr 2009
Location: Detroit
Posts: 10,303
Mentioned: 6 Post(s)
Tagged: 0 Thread(s)
Quoted: 17 Post(s)
Likes: 0
Liked 41 Times
in
33 Posts
Now when you're ready to service the crank (sometime before you ride the bike and damage the bearing surfaces - the grease has probably long ago turned to varnish) you'll want to read up what the late Sheldon Brown says about servicing cottered cranks.
(PS_ His website is the pretty much the bible for maintaining these old C&V bikes - and thankfully it is being maintained and continually augmented by John Allen.)
__________________
- Auchen
- Auchen
03-09-13, 05:08 AM
#13
Senior Member
Join Date: Apr 2009
Location: Detroit
Posts: 10,303
Mentioned: 6 Post(s)
Tagged: 0 Thread(s)
Quoted: 17 Post(s)
Likes: 0
Liked 41 Times
in
33 Posts
By the way - I think I'm speaking for all the old 3-speed fans here when I say we like your bike, chips, scratches, HOPKINS, sway-backed-rack and all.
There is something about it that is especially endearing, and we would love nothing better that to see that old mare back on the road!
There is something about it that is especially endearing, and we would love nothing better that to see that old mare back on the road!
__________________
- Auchen
- Auchen
03-09-13, 08:44 PM
#14
Junior Member
Thread Starter
Join Date: Mar 2013
Location: New Zealand
Posts: 10
Mentioned: 0 Post(s)
Tagged: 0 Thread(s)
Quoted: 0 Post(s)
Likes: 0
Liked 0 Times
in
0 Posts
Aw. Thanks guys. Im glad I'm not the only one who likes her. My Husband thinks I'm mad. He's probably right. I'm a bit (well actually a lot) out of my depth here I think but I'll have a go.
Linseed oil sounds good. I need some of that for painting a beehive anyway. I'm getting raw for that. Should I boil a bit of it up for the bike or is raw OK?
I didn't realize that the carrier was bent too Auchen. I guess that's why it's vicously attacking the back mudguard What an eye for detail I have! Should I try and bend that straight too? The protective bit of old towel wrapped around it is probably not enhancing the appearance of the bike a lot.
Actually oh bike Gurus, are there any other vital tasks I don't know need doing? Apart from cosmetic stuff and cleaning up the metalwork I have -change tyres, -straighten forks, and -service the crank so far. Is there anything else I really should do before I take her out on the road to play with the combine harvesters?
Linseed oil sounds good. I need some of that for painting a beehive anyway. I'm getting raw for that. Should I boil a bit of it up for the bike or is raw OK?
I didn't realize that the carrier was bent too Auchen. I guess that's why it's vicously attacking the back mudguard
What an eye for detail I have! Should I try and bend that straight too? The protective bit of old towel wrapped around it is probably not enhancing the appearance of the bike a lot.Actually oh bike Gurus, are there any other vital tasks I don't know need doing? Apart from cosmetic stuff and cleaning up the metalwork I have -change tyres, -straighten forks, and -service the crank so far. Is there anything else I really should do before I take her out on the road to play with the combine harvesters?
03-09-13, 08:58 PM
#15
Senior Member
Join Date: Apr 2009
Location: Detroit
Posts: 10,303
Mentioned: 6 Post(s)
Tagged: 0 Thread(s)
Quoted: 17 Post(s)
Likes: 0
Liked 41 Times
in
33 Posts
....
Actually oh bike Gurus, are there any other vital tasks I don't know need doing? Apart from cosmetic stuff and cleaning up the metalwork I have -change tyres, -straighten forks, and -service the crank so far. Is there anything else I really should do before I take her out on the road to play with the combine harvesters?
Actually oh bike Gurus, are there any other vital tasks I don't know need doing? Apart from cosmetic stuff and cleaning up the metalwork I have -change tyres, -straighten forks, and -service the crank so far. Is there anything else I really should do before I take her out on the road to play with the combine harvesters?
You need to service the wheel hubs as well - for the same reason as that crank - The grease is probably like concrete! Sheldon Brown, once again to the rescue.
__________________
- Auchen
- Auchen
03-09-13, 11:18 PM
#16
Senior Member

Join Date: Mar 2008
Location: Rhode Island (an obscure suburb of Connecticut)
Posts: 5,630
Bikes: one of each
Mentioned: 5 Post(s)
Tagged: 0 Thread(s)
Quoted: 8 Post(s)
Likes: 0
Liked 12 Times
in
12 Posts
Don't attempt to boil your own. It's potentially explosive. Get the "boiled" kind Raw doesn't really dry. Boiled isn't actually boiled these days. They add chemicals to it but it works more or less the same.
03-10-13, 01:43 AM
#17
Junior Member
Thread Starter
Join Date: Mar 2013
Location: New Zealand
Posts: 10
Mentioned: 0 Post(s)
Tagged: 0 Thread(s)
Quoted: 0 Post(s)
Likes: 0
Liked 0 Times
in
0 Posts
Yes.
You need to service the wheel hubs as well - for the same reason as that crank - The grease is probably like concrete! Sheldon Brown, once again to the rescue.
You need to service the wheel hubs as well - for the same reason as that crank - The grease is probably like concrete! Sheldon Brown, once again to the rescue.
You're scaring me now Auchenhmm
where is that huge can of worms smilie
Last edited by Ericajane; 03-10-13 at 01:51 AM.
03-10-13, 07:46 AM
#18
Senior Member
Join Date: Apr 2009
Location: Detroit
Posts: 10,303
Mentioned: 6 Post(s)
Tagged: 0 Thread(s)
Quoted: 17 Post(s)
Likes: 0
Liked 41 Times
in
33 Posts
E.J. - Many people just flush their SA hubs with WD40 and oil them up again. That's OK if everything is in good order (and with SA it usually is). Maybe I'm a little more obsessive in tearing them down and (at least) replacing the ball retainers. (Available from Harris Cyclery).
Servicing the front hub is easy -as Sheldon describes - but I agree, doing the rear gear hub is quite a bit more involved. So for this first round anyway, maybe you should take the easier path - but there are others here who would recommend the full-Monte too. There are some good resources to help you in getting through it, if you want to go that way. (Like this Youtube Video)
Servicing the front hub is easy -as Sheldon describes - but I agree, doing the rear gear hub is quite a bit more involved. So for this first round anyway, maybe you should take the easier path - but there are others here who would recommend the full-Monte too. There are some good resources to help you in getting through it, if you want to go that way. (Like this Youtube Video)
__________________
- Auchen
- Auchen
Last edited by auchencrow; 03-10-13 at 07:55 AM.
03-10-13, 08:19 AM
#19
Hopelessly addicted...
Join Date: Aug 2009
Location: Central Maryland
Posts: 4,955
Bikes: 1949 Hercules Kestrel, 1950 Norman Rapide, 1970 Schwinn Collegiate, 1972 Peugeot UE-8, 1976 Raleigh Sports, 1977 Raleigh Sports, 1977 Jack Taylor Tandem, 1984 Davidson Tandem, 2010 Bilenky "BQ" 650B Constructeur Tandem, 2011 Linus Mixte
Mentioned: 13 Post(s)
Tagged: 0 Thread(s)
Quoted: 3 Post(s)
Likes: 0
Liked 10 Times
in
9 Posts
I do not suggest doing anything to the rear hub unless it is acting up. If it's shifting OK, leave it alone!
I recently had one that wasn't shifting properly that I flushed with kerosene and then added lubricant back once it was flushed out, and it is fine. I'd put the kerosene in, shake it up inside the hub and then drain it out, repeating until it came out clear. You'll get lots of opinions on what lubricant to add to the hub, but I usually use automobile motor (engine) oil.
I recently had one that wasn't shifting properly that I flushed with kerosene and then added lubricant back once it was flushed out, and it is fine. I'd put the kerosene in, shake it up inside the hub and then drain it out, repeating until it came out clear. You'll get lots of opinions on what lubricant to add to the hub, but I usually use automobile motor (engine) oil.

Thread
Thread Starter
Forum
Replies
Last Post
CriticalThought
Classic & Vintage
9
07-07-17 11:45 AM
jitterymonkey
Classic and Vintage Bicycles: Whats it Worth? Appraisals.
8
07-17-11 06:04 PM
