


cracked seatpost clamp on 531 frame - what to do?
 03-10-13, 05:38 PM
#1
Senior Member
Thread Starter

cracked seatpost clamp on 531 frame - what to do?
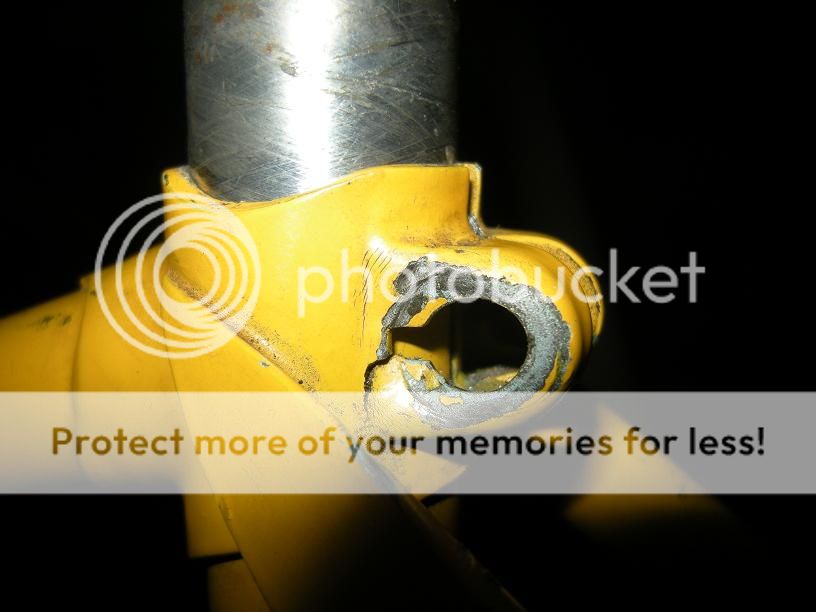 discovered this crack on my ron kitching frame today. from previous owner. worried about it. i was going to install one of these on it
  when i realized it didnt fit, because the holes on the clamp are kind of ovalized. and i noticed the crack. could i just use a washer and it wont get bigger? why wont a regular bolt fit through? do i need to get a mallet out? eeeek. this bike was supposed to be a cheap quick build and rode to work for the next few years. this crack bugs me. and i HATE when my saddle moves around. it says "72" on the seat lug, assuming it requires a 27.2 seatpost, not sure if thats whats in there now, it came with the bike. along with a quick release that was too long and missing a part.
 03-10-13, 06:11 PM
#2

Senior Member
Join Date: May 2010
Location: Hurricane Alley , Florida
Posts: 3,903
Bikes: Treks (USA), Schwinn Paramount, Schwinn letour,Raleigh Team Professional, Gazelle GoldLine Racing, 2 Super Mondias, Carlton Professional.
Mentioned: 10 Post(s)
Tagged: 0 Thread(s)
Quoted: 78 Post(s)
Liked 30 Times
in
22 Posts
72 degrees. The lug can be fixed. A good frame shop can do it. I had one fixed that was almost as bad, my frame builder back filled
The lug with silver braze. I just had to redrill the bolt hole and repaint it.
The lug with silver braze. I just had to redrill the bolt hole and repaint it.
03-10-13, 06:15 PM
#3

multimodal commuter

Join Date: Nov 2006
Location: NJ, NYC, LI
Posts: 19,808
Bikes: 1940s Fothergill, 1959 Allegro Special, 1963? Claud Butler Olympic Sprint, Lambert 'Clubman', 1974 Fuji "the Ace", 1976 Holdsworth 650b conversion rando bike, 1983 Trek 720 tourer, 1984 Counterpoint Opus II, 1993 Basso Gap, 2010 Downtube 8h, and...
Mentioned: 584 Post(s)
Tagged: 0 Thread(s)
Quoted: 1908 Post(s)
Liked 574 Times
in
339 Posts
The 72 on the lug probably refers to the angle between the top tube and the seat tube, says nothing about the post size. I'm afraid your frame needs the attentions of someone who knows how to braze, and is going to need a partial repaint when he's done. At the moment i don't think it's a very serious job. Whether you can put this off for a while and ride it safely, I don't know. I don't think there's a major safety issue. My chief concern would be making it so much worse that it becomes a serious repair. I don't know.
03-10-13, 06:42 PM
#4
Senior Member
Join Date: Jun 2006
Posts: 20,305
Mentioned: 130 Post(s)
Tagged: 0 Thread(s)
Quoted: 3464 Post(s)
Liked 2,829 Times
in
1,995 Posts
The 72 on the lug probably refers to the angle between the top tube and the seat tube, says nothing about the post size. I'm afraid your frame needs the attentions of someone who knows how to braze, and is going to need a partial repaint when he's done. At the moment i don't think it's a very serious job. Whether you can put this off for a while and ride it safely, I don't know. I don't think there's a major safety issue. My chief concern would be making it so much worse that it becomes a serious repair. I don't know.
As mentioned, this will require removal of paint in the adjacent region and probably push you to a refinish. The reason to consider silver is it melts at a lower temperature, and that will make it easier to do the repair and not effect the original construction.
Or, you could buy a seatpost with a self expanding feature, think quill stem, there are a few of them around, Bicycleville in Philly had a 27.2 American classic with this feature for sale for example, and push off the repair.
Set the post, add a true bolt with washers for appearance and be off.
If you have not ridden this bike to assess how much you really like it, I would go that way for sure.
03-10-13, 07:26 PM
#5
In the right lane

I'd head down to your local bicycle co-op and see if you can find a seatpost collar that would fit.
Unfortunately the curvature of the top of the seat tube is going to present an issue finding one big enough... but you might get lucky.
Unfortunately the curvature of the top of the seat tube is going to present an issue finding one big enough... but you might get lucky.
03-10-13, 07:29 PM
#6
Senior Member

Join Date: Jul 2011
Location: San Francisco
Posts: 360
Bikes: koga miyata road gentleman, raleigh crested butte, raleigh comp 650b
Mentioned: 0 Post(s)
Tagged: 0 Thread(s)
Quoted: 1 Post(s)
Likes: 0
Liked 0 Times
in
0 Posts
If it is indeed a common size, try to find a quill seatpost
03-10-13, 07:34 PM
#7
Senior Member
Join Date: Mar 2007
Posts: 6,401
Mentioned: 2 Post(s)
Tagged: 0 Thread(s)
Quoted: 2 Post(s)
Likes: 0
Liked 13 Times
in
13 Posts
I might try repairing with brazing, but that's not a really great place for it, IMO. Any kind of silver wants an absolutely clean surface to stick to, and getting that kind of ragged surface really clean can be tough. Even an acid wash with a lot of brushing might not get into all the nooks and crannies. Beyond that, brazing doesn't really make for great butt joints (yeah yeah yeah, you in the peanut gallery) even under ideal circumstances. So I wonder if a simple brazing repair would last.
Welding probably has more potential. Done quickly it probably will not seriously affect the nearby brazing. It will almost certainly be strong enough. It's not likely to look very good, though.
A "proper" repair, IMO, involves grinding off the existing clamp entirely and silver brazing in a new one. Something like this would probably be the ticket.
03-10-13, 08:04 PM
#8
Senior Member

Join Date: Mar 2012
Location: santa barbara CA
Posts: 1,087
Mentioned: 1 Post(s)
Tagged: 0 Thread(s)
Quoted: 96 Post(s)
Liked 30 Times
in
21 Posts
Thats an easy fix for a framebulider, grind off the ears and braze on a new barrel, the higher cost would be new paint/powder. If the seat willl stay put when you tighten it I would ride it with no concern, its not a part that will have a catatrosphic failure and throw you on your head.
__________________
Brian
Brian
03-10-13, 08:07 PM
#9
Senior Member
Join Date: Jun 2006
Posts: 20,305
Mentioned: 130 Post(s)
Tagged: 0 Thread(s)
Quoted: 3464 Post(s)
Liked 2,829 Times
in
1,995 Posts
I might try repairing with brazing, but that's not a really great place for it, IMO. Any kind of silver wants an absolutely clean surface to stick to, and getting that kind of ragged surface really clean can be tough. Even an acid wash with a lot of brushing might not get into all the nooks and crannies. Beyond that, brazing doesn't really make for great butt joints (yeah yeah yeah, you in the peanut gallery) even under ideal circumstances. So I wonder if a simple brazing repair would last.
Welding probably has more potential. Done quickly it probably will not seriously affect the nearby brazing. It will almost certainly be strong enough. It's not likely to look very good, though.
A "proper" repair, IMO, involves grinding off the existing clamp entirely and silver brazing in a new one. Something like this would probably be the ticket.
Welding probably has more potential. Done quickly it probably will not seriously affect the nearby brazing. It will almost certainly be strong enough. It's not likely to look very good, though.
A "proper" repair, IMO, involves grinding off the existing clamp entirely and silver brazing in a new one. Something like this would probably be the ticket.
Welding a small repair still required things to be clean, I do not like the paint stress also showing at the root of the damage.
If you really wanted to go cheap, I would file out the lug ears to have an 8 mm bolt fit, set the post and drill and set a screw at the base of the frame slot, tap for an allen key bolt add some compression to the lug ears as they are with the new bolt and washers, and be off. Most 8 mm ID washers will be too big for typical use, in this application a bit bigger would help.
03-11-13, 01:00 AM
#10
Senior Member
Either the seatpost is the wrong size or the person who tightened that bolt should be forbidden from ever touching a wrench again. You first need to determine if you have the correct size there. Another option for the fix is to braze a correctly sized washer on each side. 45% silver would allow the person doing the repair to fill where needed and file down to a good looking shape.
03-11-13, 02:49 AM
#11
Senior Member

Join Date: Apr 2010
Location: vermont
Posts: 3,081
Bikes: Many
Mentioned: 8 Post(s)
Tagged: 0 Thread(s)
Quoted: 5 Post(s)
Likes: 0
Liked 10 Times
in
10 Posts
Once you have it straightened out, a decent TIG welder should be able to do that in 30 seconds and require a dime-size paint touch-up.
03-11-13, 03:08 AM
#12

Bicycle Repair Man !!!

Thats an easy fix for a framebulider, grind off the ears and braze on a new barrel, the higher cost would be new paint/powder. If the seat willl stay put when you tighten it I would ride it with no concern, its not a part that will have a catatrosphic failure and throw you on your head.
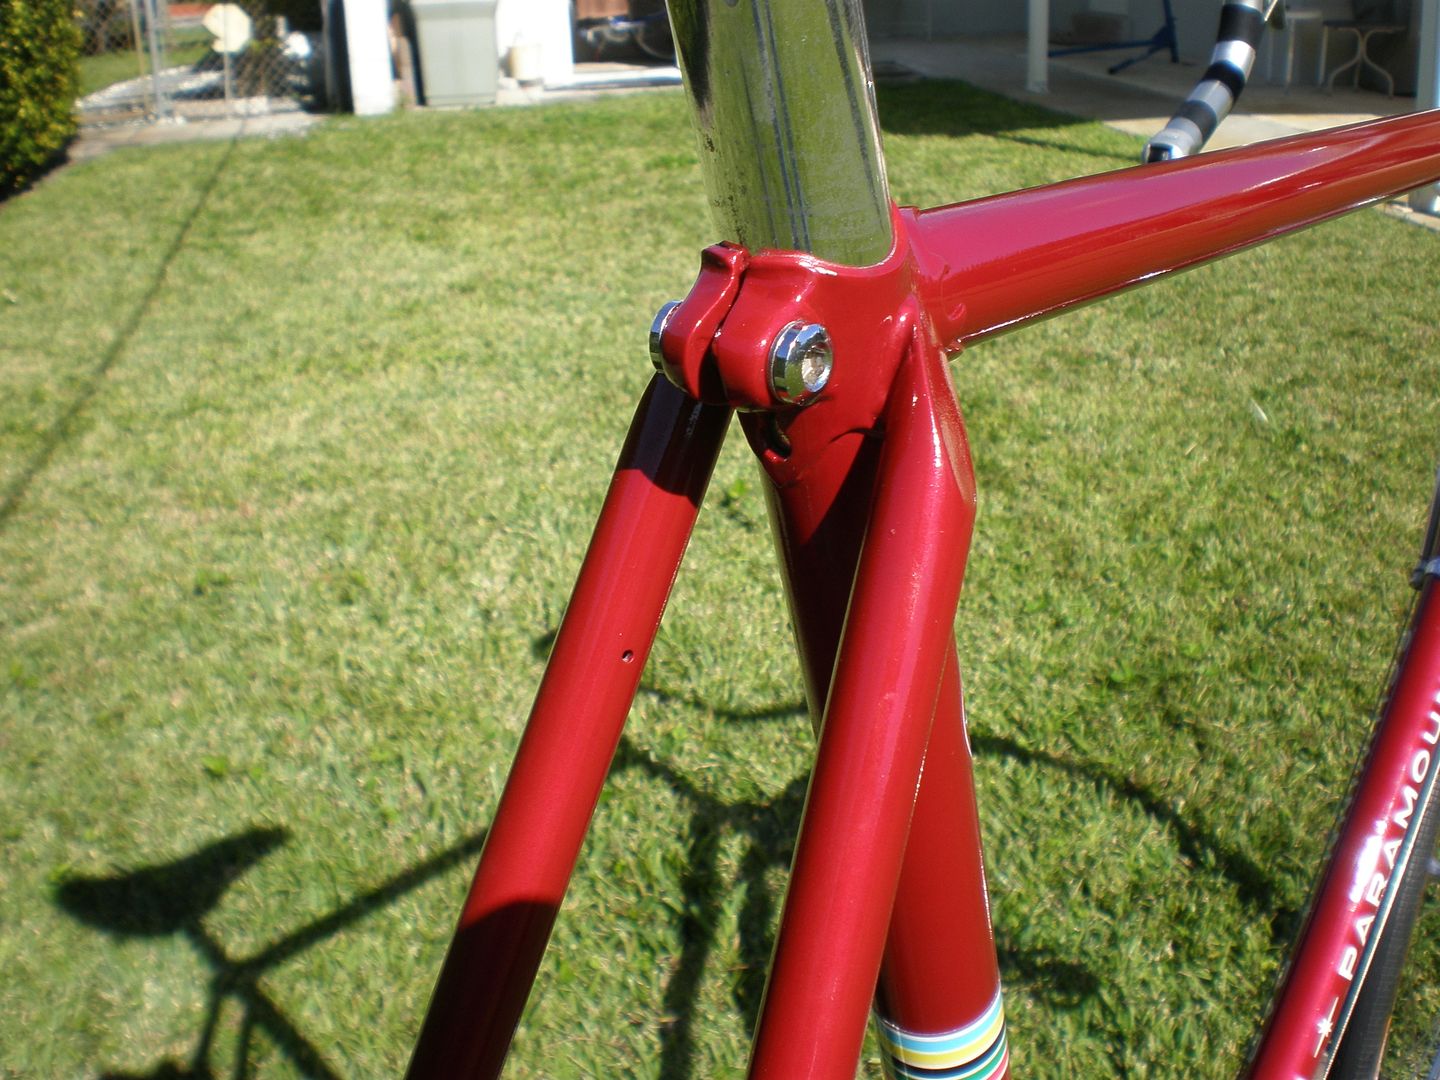
I'd replace those lighter stamped ears that are added to the lug with a modern threaded barrel and then you'd only need a single threaded bolt to keep everything tight. It is a small job that, if done properly, would not effect the surrounding joints.
You can see the new seatpost clamp on this frame that used to have a collar... we use brass on these fittings because they do need more strength and even with the higher heat, it does not travel far before the job is done.
 03-11-13, 03:09 AM
#13
Bicycle Repair Man !!!
 03-11-13, 04:47 AM
#14
Senior Member
Join Date: May 2010
Location: Hurricane Alley , Florida
Posts: 3,903
Bikes: Treks (USA), Schwinn Paramount, Schwinn letour,Raleigh Team Professional, Gazelle GoldLine Racing, 2 Super Mondias, Carlton Professional.
Mentioned: 10 Post(s)
Tagged: 0 Thread(s)
Quoted: 78 Post(s)
Liked 30 Times
in
22 Posts
A while back I bought a Paramount that had the seat lugs mashed, very similar to the OP's pictures but mine was not cracked. I had our local Frame Builder Mike Terraferma, straighten the lugs and back fill each lug ear completely. I had to redrill for the new bolt, and cleanup the area, before paint.
This picture shows what he basically did. ( Picture from the Net)
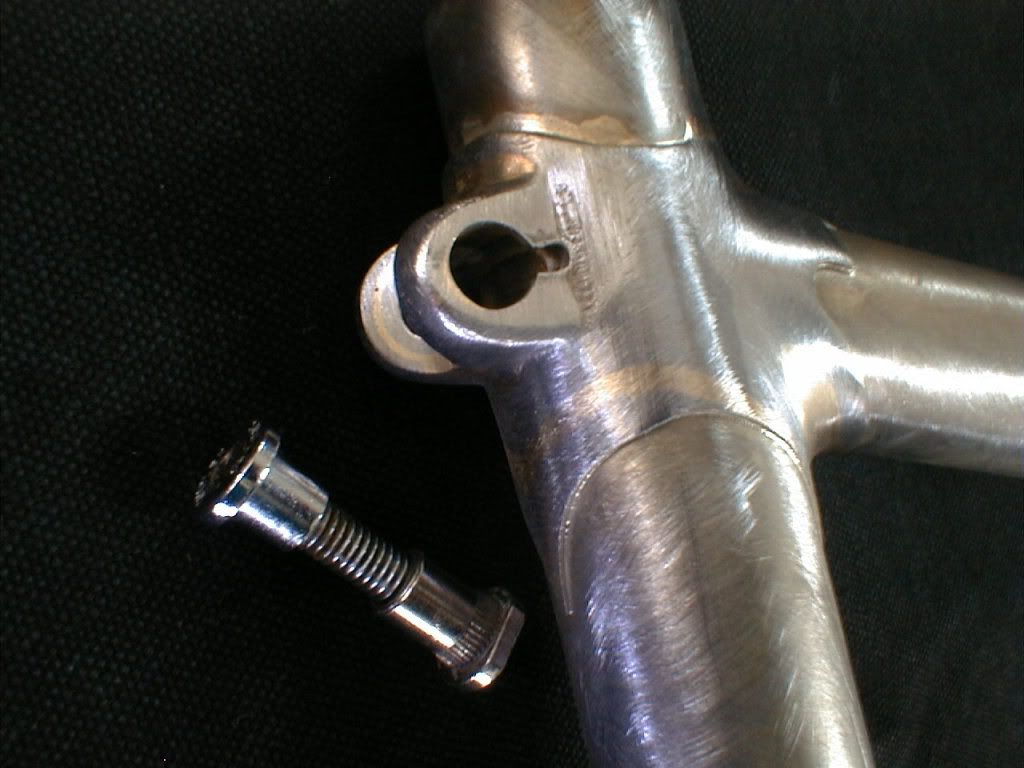
After painting
This picture shows what he basically did. ( Picture from the Net)
After painting
03-11-13, 08:25 AM
#15
Old fart

Join Date: Nov 2004
Location: Appleton WI
Posts: 24,784
Bikes: Several, mostly not name brands.
Mentioned: 153 Post(s)
Tagged: 0 Thread(s)
Quoted: 3588 Post(s)
Liked 3,400 Times
in
1,934 Posts
A while back I bought a Paramount that had the seat lugs mashed, very similar to the OP's pictures but mine was not cracked. I had our local Frame Builder Mike Terraferma, straighten the lugs and back fill each lug ear completely. I had to redrill for the new bolt, and cleanup the area, before paint.
This picture shows what he basically did. ( Picture from the Net)
This picture shows what he basically did. ( Picture from the Net)
When building frames with that style seat lug, I put a short piece of seat stay scrap inside the ears and braze it solid as Terraferma did in the picture above. It's easier before the frame is built, because you can drop the tube section in the opening the seat tube will cover, but as above it can be done after the fact as well, with some judicious filing of the lug ears to open them enough to insert the tube section.

Thread
Thread Starter
Forum
Replies
Last Post
wernst
Framebuilders
7
11-24-11 10:53 AM
