


1977 Schwinn Le Tour II All Original - Am I Going Down A Slippery Slope? Photos
 10-23-14, 01:35 PM
#26
Senior Member
Thread Starter

 So maybe you can tell me, my derailleur does not have a "B" tension screw. I did a google search & actually saw a post on another forum by @Jeff Wills - where he mentioned springs at both pivot points. Are these springs adjustable? I notice the guide pulley teeth are almost touching the largest cog teeth. No way to adjust and the chain is as short as safely allows, so removing a link to change the derailleur angle while in that combo doesn't seem like a good idea. I'd appreciate any insights or instruction. Thanks.
 10-23-14, 01:42 PM
#27
Senior Member
Close but not quite, see post no. 8 in this topic. The Schwinn GT-420 (rebadged Shimano 500) came out in '75 and was used on the Le Tour from '75 through '78 and the Traveler for '77 only. However both the Le Tour and the Traveler did use the Shimano 400 in '79.
10-23-14, 01:55 PM
#28

Aspiring curmudgeon

Join Date: Aug 2014
Location: Saint Louis
Posts: 2,486
Bikes: Guerciotti, Serotta, Gaulzetti
Mentioned: 10 Post(s)
Tagged: 0 Thread(s)
Quoted: 111 Post(s)
Likes: 0
Liked 26 Times
in
13 Posts
@Velocivixen, I'm not sure about the spring tension, as I've never had to adjust it on this bike. I'll take a look when I get home.
__________________
"Party on comrades" -- Lenin, probably
"Party on comrades" -- Lenin, probably
10-23-14, 02:13 PM
#29
Aspiring curmudgeon
Join Date: Aug 2014
Location: Saint Louis
Posts: 2,486
Bikes: Guerciotti, Serotta, Gaulzetti
Mentioned: 10 Post(s)
Tagged: 0 Thread(s)
Quoted: 111 Post(s)
Likes: 0
Liked 26 Times
in
13 Posts
Not that it's helpful to your spring issue, but I found this piece on the RD. Seems like you own a piece of history, as this was apparently the last Schwinn rebranded Shimano model.
__________________
"Party on comrades" -- Lenin, probably
"Party on comrades" -- Lenin, probably
10-23-14, 02:28 PM
#30
Senior Member
Thread Starter
Not that it's helpful to your spring issue, but I found this piece on the RD. Seems like you own a piece of history, as this was apparently the last Schwinn rebranded Shimano model.
10-23-14, 03:25 PM
#31
Senior Member
I did a google search & actually saw a post on another forum by @Jeff Wills - where he mentioned springs at both pivot points. Are these springs adjustable?
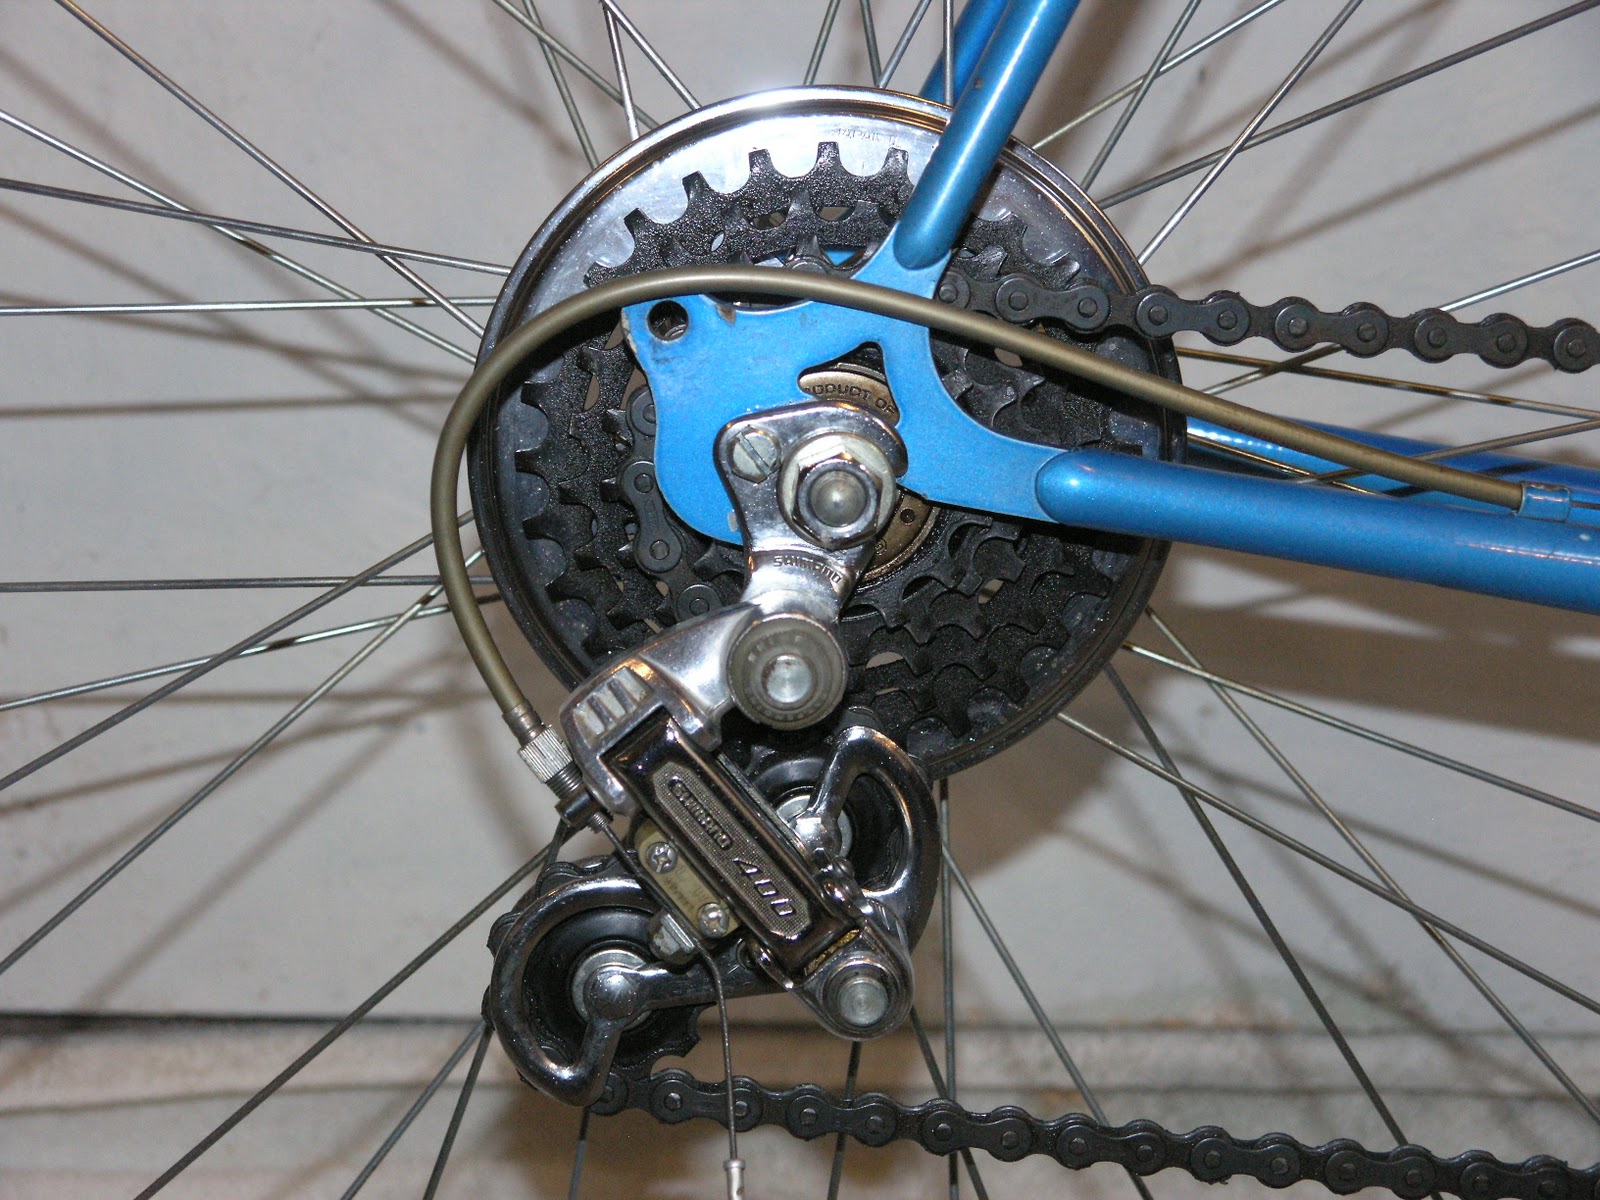
In the following pics you can see the two holes in question, the lower of the two holes is where the end of the spring is currently inserted in this example. By re-installing the spring with the end in the upper (higher tension) hole the cage tension will be increased, which should in turn cause the upper spring to pivot more during operation, hopefully moving the jockey wheel further from the large cog.
As a matter of trivia the CC stamp on the plate near the spring holes indicates this particular derailleur was made in 1978, March.
10-23-14, 07:06 PM
#32
Aspiring curmudgeon
Join Date: Aug 2014
Location: Saint Louis
Posts: 2,486
Bikes: Guerciotti, Serotta, Gaulzetti
Mentioned: 10 Post(s)
Tagged: 0 Thread(s)
Quoted: 111 Post(s)
Likes: 0
Liked 26 Times
in
13 Posts
@Metacortex is right on the money. I have the two spring holes on the 400 as well.
__________________
"Party on comrades" -- Lenin, probably
"Party on comrades" -- Lenin, probably
10-23-14, 10:39 PM
#33

Insane Bicycle Mechanic

Join Date: Mar 2008
Location: other Vancouver
Posts: 9,836
Mentioned: 34 Post(s)
Tagged: 0 Thread(s)
Quoted: 805 Post(s)
Liked 704 Times
in
376 Posts
We're the same height but our proportions a are totally different. Of course he's welcome to ride any of my bikes, but he is really comfortable on either his commuter bike (Trek 200 SU) or his college bike (Nishiki Pueblo, which he allowed me to totally overhaul). The official color name is "Violet" and I will likely refer to it as such, although our cat is called "Violet" so it could get confusing.

__________________
Jeff Wills
Comcast nuked my web page. It will return soon..
Jeff Wills
Comcast nuked my web page. It will return soon..
10-24-14, 12:16 AM
#34
Senior Member
Thread Starter
There are indeed springs at both pivot points, and the lower (pulley cage) spring is adjustable. There are two holes for the end of the cage pivot spring to insert into the outer cage plate, and from the factory it is normally installed in the lower tension hole.
In the following pics you can see the two holes in question, the lower of the two holes is where the end of the spring is currently inserted in this example. By re-installing the spring with the end in the upper (higher tension) hole the cage tension will be increased, which should in turn cause the upper spring to pivot more during operation, hopefully moving the jockey wheel further from the large cog.


As a matter of trivia the CC stamp on the plate near the spring holes indicates this particular derailleur was made in 1978, March.
In the following pics you can see the two holes in question, the lower of the two holes is where the end of the spring is currently inserted in this example. By re-installing the spring with the end in the upper (higher tension) hole the cage tension will be increased, which should in turn cause the upper spring to pivot more during operation, hopefully moving the jockey wheel further from the large cog.
As a matter of trivia the CC stamp on the plate near the spring holes indicates this particular derailleur was made in 1978, March.
Feel free to give me a brief rundown on what I can expect. Thanks.
10-24-14, 09:40 AM
#35
Insane Bicycle Mechanic
Join Date: Mar 2008
Location: other Vancouver
Posts: 9,836
Mentioned: 34 Post(s)
Tagged: 0 Thread(s)
Quoted: 805 Post(s)
Liked 704 Times
in
376 Posts
OK Great to know. Am I going to need 3 hands to do this? Or a bench vice? I know an m6 hex key fits in the hold on the lower pivot adjustment plastic piece (don't know what it's called). So do I unscrew that? Will the spring go flying? I understand that I should undo the whole thing, insert the end of the spring into the other hole on my derailleur, then reassemble. I just don't know exactly how to do it. I mean, I have an idea. I have to take the plastic spring housing off, move the spring end to the other hole then reassemble. I just don't know what to expect when I take it apart or reassemble. My hands aren't very strong, so if it involves twisting a spring while trying to reassemble, I usually end up bleeding.
Feel free to give me a brief rundown on what I can expect. Thanks.
Feel free to give me a brief rundown on what I can expect. Thanks.
It doesn't take three hands, but strong hands help. I did it freehand- a bench vice gets in the way. Making sure the tension spring stays engaged while winding it back up is the tricky part.
__________________
Jeff Wills
Comcast nuked my web page. It will return soon..
Jeff Wills
Comcast nuked my web page. It will return soon..
10-24-14, 11:14 AM
#36
Senior Member
Thread Starter
@Jeff Wills - thanks for the quick reply. I'm not sure I'm up for that project today, but I may try it. So far I've only ridden it once for about 10 blocks on the test ride. On the stand the teeth of large cog/guide pulley are very close but may not be an issue on a ride.
Update. I removed the brake calipers and hardware, ultrasonic cleaned, polished, lubed pivots and reassembled with Kool Stop continental pads. I replaced the brake cable as well as the cable housing, as the original housing was cracked all the way through where it exited the brake lever barrel adjusters. I decided to leave the cable/housing about 2" longer, as it seemed to exit the adjuster at a sharp vs gentle angle, which I believe contributed to it's cracking in that spot. I have some Jagwire housing in "Ice Grey", which is slightly darker than the original light grey, but oh well.
My final stop was repacking the front wheel hub - oh joy. One locknut was completely broken in half....hmmmm...Cleaned and upon reassembly the new locknut was not going on due to the starter thread on the axle being ever so slightly bent plus the cone wouldn't budge. (A bench vise & a cone vice? is my next expenditure). My LBS was able to get the cone off and undoing so smoothed out the wayward thread, plus got a matching lock nut! So the front wheel is peachy and spins smoothly. The wheel got a bath in the kitchen sink and a polish with chrome polish.
On the right shift lever this is a white plastic washer between the center (phillips head bolt) and the rest of the shift body (see photo), which is broken. Is this washer crucial? Does it help hold the pressure of the shift lever when in low gear? Do I need to find some replacement? If so, what?
10-24-14, 11:29 AM
#37
Senior Member
OK, I just reset the tension on a GT-420 and it literally took only a minute or two using only my hands and a 6mm hex wrench. Here's how: Hold the derailleur in one hand horizontally with the outside part facing down, cage up. Use a 6mm hex wrench in your other hand to unscrew the cage pivot bolt. While loosening the bolt put upwards pressure on it so that the bolt head remains against the derailleur body, forcing the cage to rise up while the bolt is unscrewing. When the bolt is almost unscrewed the cage will rise past the pivot stop allowing the spring pressure to rotate it clockwise until there is no longer any tension on the spring. The following pic shows the pivot stop:

Finish unscrewing the bolt, then pull the cage straight up and away. At this point it is disassembled, you can see all of the parts in order in the following pic:

To reassemble put all of the parts except the cage back together in order, it is best to do this with the derailleur positioned horizontally with the bolt head down. Note that the longer end of the spring goes into the hole in the plastic spring housing. Install the cage on the spring and bolt, making sure the end of the spring goes into the desired tension hole while you start the bolt into the threaded hole in the cage. Turn the bolt a couple turns until a few threads engage, then pull on the cage and rotate it against the spring tension counter-clockwise past the pivot stop. Once it is past the stop fully tighten the bolt and you're done.
All of this takes much longer to read/write than it does to actually do it, and it feels like it noticeably increased the cage tension. Hope this helps!
Finish unscrewing the bolt, then pull the cage straight up and away. At this point it is disassembled, you can see all of the parts in order in the following pic:
To reassemble put all of the parts except the cage back together in order, it is best to do this with the derailleur positioned horizontally with the bolt head down. Note that the longer end of the spring goes into the hole in the plastic spring housing. Install the cage on the spring and bolt, making sure the end of the spring goes into the desired tension hole while you start the bolt into the threaded hole in the cage. Turn the bolt a couple turns until a few threads engage, then pull on the cage and rotate it against the spring tension counter-clockwise past the pivot stop. Once it is past the stop fully tighten the bolt and you're done.
All of this takes much longer to read/write than it does to actually do it, and it feels like it noticeably increased the cage tension. Hope this helps!
10-24-14, 11:38 AM
#38
Senior Member
Thread Starter
OK, I just reset the tension on a GT-420 and it literally took only a minute or two using only my hands and a 6mm hex wrench. Here's how: Hold the derailleur in one hand horizontally with the outside part facing down, cage up. Use a 6mm hex wrench in your other hand to unscrew the cage pivot bolt. While loosening the bolt put upwards pressure on it so that the bolt head remains against the derailleur body, forcing the cage to rise up while the bolt is unscrewing. When the bolt is almost unscrewed the cage will rise past the pivot stop allowing the spring pressure to rotate it clockwise until there is no longer any tension on the spring. The following pic shows the pivot stop:
Finish unscrewing the bolt, then pull the cage straight up and away. At this point it is disassembled, you can see all of the parts in order in the following pic:
To reassemble put all of the parts except the cage back together in order, it is best to do this with the derailleur positioned horizontally with the bolt head down. Note that the longer end of the spring goes into the hole in the plastic spring housing. Install the cage on the spring and bolt, making sure the end of the spring goes into the desired tension hole while you start the bolt into the threaded hole in the cage. Turn the bolt a couple turns until a few threads engage, then pull on the cage and rotate it against the spring tension counter-clockwise past the pivot stop. Once it is past the stop fully tighten the bolt and you're done.
All of this takes much longer to read/write than it does to actually do it, and it feels like it noticeably increased the cage tension. Hope this helps!
You happen to know about that white plastic washer on the shift lever?
10-24-14, 03:01 PM
#40
Senior Member
10-24-14, 03:29 PM
#41
aka Tom Reingold

Join Date: Jan 2009
Location: New York, NY, and High Falls, NY, USA
Posts: 40,502
Bikes: 1962 Rudge Sports, 1971 Raleigh Super Course, 1971 Raleigh Pro Track, 1974 Raleigh International, 1975 Viscount Fixie, 1982 McLean, 1996 Lemond (Ti), 2002 Burley Zydeco tandem
Mentioned: 511 Post(s)
Tagged: 0 Thread(s)
Quoted: 7348 Post(s)
Liked 2,465 Times
in
1,433 Posts
Are you going to change the handlebars? 
That's one of the nicest steel-rimmed ten speeds I've seen in a while. Great color, too.
That's one of the nicest steel-rimmed ten speeds I've seen in a while. Great color, too.
__________________
Tom Reingold, tom@noglider.com
New York City and High Falls, NY
Blogs: The Experienced Cyclist; noglider's ride blog
�When man invented the bicycle he reached the peak of his attainments.� � Elizabeth West, US author
Please email me rather than PM'ing me. Thanks.
Tom Reingold, tom@noglider.com
New York City and High Falls, NY
Blogs: The Experienced Cyclist; noglider's ride blog
�When man invented the bicycle he reached the peak of his attainments.� � Elizabeth West, US author
Please email me rather than PM'ing me. Thanks.
10-24-14, 06:46 PM
#42
Senior Member
Thread Starter
@noglider - thanks! Those wheels are heavy. Maybe that has something to do with why I could ride with no hands forever on my 1976-77 Le Tour way back when. Who knows? Maybe the weight of the whole bike contributed. You should see the front rim - I cleaned it/polished it and WOW. It's blinding. I'll leave the handlebars as is, and I won't change anything. I'll ride it over the winter and if I decide I don't want it will sell in the Spring.
I went to my local hardware store and bought what they had labeled as "finishing washers" - white plastic washers. They're about .5 mm thicker than the original, but it's what I could find. Also, the bar tape is original I believe and whoever did it must have been a magician, because I can't find the end of it! I won't remove it, but wondering your thoughts as to covering it if I decide I want something with more cushion. I have black Fizik Microtek wrap that I could put over the original. Thoughts? I don't want to mess up the original in case I sell it. I know that this is not a collector's item or expensive, but Portland has a hot bike market and sometimes people like all original just to be different.
More photos:

 See original plastic washer on the left right under phillip's head bolt. See broken & replacements.
 Thanks to @Metacortex & @Jeff Wills I was successfully able to disassemble and change the tension on the rear derailleur.

 @noglider, these are for you. The handlebars are narrow (I take a 38) and they curve down toward the stem. I think those are Randonneur bars??? Please let me know if they are and, if not, what style they are.

 I've never seen a front reflector mounted like this one. And yes, I'm leaving all 4 reflectors as well as the chrome spoke protector and safety levers. Bar tape is plastic I presume. Seems like it's original.
 Ten points for anyone who can identify this. As you can see it's super clean.
I went to my local hardware store and bought what they had labeled as "finishing washers" - white plastic washers. They're about .5 mm thicker than the original, but it's what I could find. Also, the bar tape is original I believe and whoever did it must have been a magician, because I can't find the end of it! I won't remove it, but wondering your thoughts as to covering it if I decide I want something with more cushion. I have black Fizik Microtek wrap that I could put over the original. Thoughts? I don't want to mess up the original in case I sell it. I know that this is not a collector's item or expensive, but Portland has a hot bike market and sometimes people like all original just to be different.
More photos:
The handlebars are narrow (I take a 38) and they curve down toward the stem. I think those are Randonneur bars??? Please let me know if they are and, if not, what style they are.
10-24-14, 07:17 PM
#43
aka Tom Reingold
Join Date: Jan 2009
Location: New York, NY, and High Falls, NY, USA
Posts: 40,502
Bikes: 1962 Rudge Sports, 1971 Raleigh Super Course, 1971 Raleigh Pro Track, 1974 Raleigh International, 1975 Viscount Fixie, 1982 McLean, 1996 Lemond (Ti), 2002 Burley Zydeco tandem
Mentioned: 511 Post(s)
Tagged: 0 Thread(s)
Quoted: 7348 Post(s)
Liked 2,465 Times
in
1,433 Posts
Yes, those are randonneur bars, and they're really very nice. You might like them.
You can't find the end of the handlebar tape because it's done top to bottom. That's how we did it in those days. And by the way, I happen to like vinyl tape. I don't know why, but I just do. For cushioning, I use gloves.
You can't find the end of the handlebar tape because it's done top to bottom. That's how we did it in those days. And by the way, I happen to like vinyl tape. I don't know why, but I just do. For cushioning, I use gloves.
__________________
Tom Reingold, tom@noglider.com
New York City and High Falls, NY
Blogs: The Experienced Cyclist; noglider's ride blog
�When man invented the bicycle he reached the peak of his attainments.� � Elizabeth West, US author
Please email me rather than PM'ing me. Thanks.
Tom Reingold, tom@noglider.com
New York City and High Falls, NY
Blogs: The Experienced Cyclist; noglider's ride blog
�When man invented the bicycle he reached the peak of his attainments.� � Elizabeth West, US author
Please email me rather than PM'ing me. Thanks.
10-24-14, 09:04 PM
#44
Senior Member
+1 on the original tape and using gloves. I'd also consider replacing the black tape with color matching Violet: New Old Stock Schwinn Handle Bar Tape Violet | eBay
That is a chainstay brace that also serves as a kickstand (and fender) mounting bracket. Those are very nice as it allows you to install a bolt-on kickstand without crushing the chainstays.
That is a chainstay brace that also serves as a kickstand (and fender) mounting bracket. Those are very nice as it allows you to install a bolt-on kickstand without crushing the chainstays.
10-24-14, 10:28 PM
#45
Senior Member
Thread Starter
+1 on the original tape and using gloves. I'd also consider replacing the black tape with color matching Violet: New Old Stock Schwinn Handle Bar Tape Violet | eBay
That is a chainstay brace that also serves as a kickstand (and fender) mounting bracket. Those are very nice as it allows you to install a bolt-on kickstand without crushing the chainstays.
That is a chainstay brace that also serves as a kickstand (and fender) mounting bracket. Those are very nice as it allows you to install a bolt-on kickstand without crushing the chainstays.
I might just get that bar tape in Violet. Seems like it would be too "matchy-matchy" though. I've got gloves with gel on the palms, so I guess I'll wear those - they're white & violet!
@Metacortex - does one roll of the Schwinn bar tape do the entire handlebar (both sides) or would I have to order 2 rolls? Another one on ebay says it's 5 yards long.
Last edited by Velocivixen; 10-24-14 at 10:35 PM.
10-24-14, 11:19 PM
#46
Senior Member
While the Le Tour II did originally come with black "Flexon" (vinyl) tape, the use of matching color tape was standard for Schwinn on most 10-speeds from 1964 through the '70s, and to me it is an iconic feature of the brand. When wrapped as they did originally (start 2" from the stem, overlap 1/8", figure 8 over/around the brake lever hoods) then one 5-yard roll covers both sides.
10-24-14, 11:38 PM
#47
Senior Member
Thread Starter
While the Le Tour II did originally come with black "Flexon" (vinyl) tape, the use of matching color tape was standard for Schwinn on most 10-speeds from 1964 through the '70s, and to me it is an iconic feature of the brand. When wrapped as they did originally (start 2" from the stem, overlap 1/8", figure 8 over/around the brake lever hoods) then one 5-yard roll covers both sides.
Some miscellaneous photos:
10-25-14, 12:06 AM
#48
Senior Member
Schwinn was very involved in design even for components they didn't manufacture. "Schwinn Approved" actually meant something back in the day!
10-25-14, 05:35 PM
#49
Senior Member
Thread Starter
OK, experts. Another question. The bolt on kickstand, original to this bike, is loose laterally. Not where the plate bolts to the kickstand plate on the bike, but the "innards" of the kickstand. Looks like it's riveted in with no way to adjust. See photos:
 The outside (left side) view.
  View from the rear - innards.
  Rivet?
I don't see a way to tighten anything. Thought about putting something in there around the pivot bolt, but not sure that's a good idea.
I don't see a way to tighten anything. Thought about putting something in there around the pivot bolt, but not sure that's a good idea.
10-25-14, 07:43 PM
#50
SE Wis
Join Date: Apr 2005
Location: Milwaukee, WI
Posts: 10,509
Bikes: '68 Raleigh Sprite, '02 Raleigh C500, '84 Raleigh Gran Prix, '91 Trek 400, 2013 Novara Randonee, 1990 Trek 970
Mentioned: 40 Post(s)
Tagged: 0 Thread(s)
Quoted: 2746 Post(s)
Liked 3,390 Times
in
2,053 Posts
You may be able to slide the Kickstand innards over and slip a body shim (which come in different thicknesses) in to tighten it up. On my Raleigh the pin was knurled on the end (where yours is peened over) and I drove it out and installed a brass washer. Eventually the knurling didn't hold up and I ended up drilling and threading a hole in the end of the pin and installing a washer and screw to hold the pin in.