


Frankenparts: Tell us about your DIY'd components made from non-original parts
 12-02-14, 07:53 PM
#51


Senior Member
Join Date: Dec 2005
Posts: 17,159
Mentioned: 481 Post(s)
Tagged: 0 Thread(s)
Quoted: 3811 Post(s)
Liked 6,709 Times
in
2,613 Posts
I recently made this shop stool out of a trashed Motorbacon frame:

 12-02-14, 09:05 PM
#52
Senior Guest
Join Date: Jan 2008
Location: Upstate NY, USA
Posts: 375
Bikes: Jamis Endura, Cannondale CAAD, Raleigh Cross, Fausto Coppi.
Mentioned: 3 Post(s)
Tagged: 0 Thread(s)
Quoted: 81 Post(s)
Liked 47 Times
in
31 Posts
I am in Rosendale and I do follow the Riding the Catskill blog. Are you one of the writers?
12-02-14, 09:13 PM
#53
Senior Member
Thread Starter

Yep, I am. I'm the guy up in the western end of the Catskills, near Andes. I only get there a few times a year but get in as much riding there as I can.
12-02-14, 10:33 PM
#54
aka Tom Reingold

Join Date: Jan 2009
Location: New York, NY, and High Falls, NY, USA
Posts: 40,503
Bikes: 1962 Rudge Sports, 1971 Raleigh Super Course, 1971 Raleigh Pro Track, 1974 Raleigh International, 1975 Viscount Fixie, 1982 McLean, 1996 Lemond (Ti), 2002 Burley Zydeco tandem
Mentioned: 511 Post(s)
Tagged: 0 Thread(s)
Quoted: 7348 Post(s)
Liked 2,474 Times
in
1,437 Posts
Hey, Andrey, my wife and I are in High Falls most weekends! We visit Rosendale often.
__________________
Tom Reingold, tom@noglider.com
New York City and High Falls, NY
Blogs: The Experienced Cyclist; noglider's ride blog
�When man invented the bicycle he reached the peak of his attainments.� � Elizabeth West, US author
Please email me rather than PM'ing me. Thanks.
Tom Reingold, tom@noglider.com
New York City and High Falls, NY
Blogs: The Experienced Cyclist; noglider's ride blog
�When man invented the bicycle he reached the peak of his attainments.� � Elizabeth West, US author
Please email me rather than PM'ing me. Thanks.
12-03-14, 12:57 AM
#55
Senior Member

Join Date: Sep 2009
Location: EagleRiver AK
Posts: 1,306
Mentioned: 0 Post(s)
Tagged: 0 Thread(s)
Quoted: 28 Post(s)
Likes: 0
Liked 60 Times
in
33 Posts
https://www.circleacycles.com/cantile...i-geometry.pdf
Your alpha angle now is pretty close to 90�. Benefit of this setup is that the mechanical advantage is very linear as the brakes are actuated (but the mechanical advantage is relatively low). A medium profile setup with narrower alpha will yield higher initial mechanical advantage but the down side is that the pads need to be setup closer to the rim and the dynamic response is regressive, the mechanical advantage decreases as the brakes are pulled.
First - Push the pad mounting post all the way into the cantilever arm, so that the arm will swing inward more. You want the alpha angle as defined in the link above to be as narrow as possible to maximize the mechanical advantage. It may be necessary to cut/grind the protruding ends off the pad mounting post so the saddle cable does not interfere them.
Second- Shorten the saddle cable as much as possible (and lower the saddle hangar height).
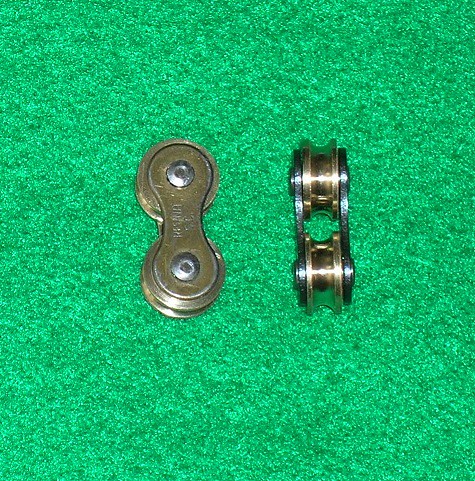
Another option to double the mechanical advantage of cantilevers is to instead use a link of roller chain as the saddle hangar. Instead of fixing the main brake cable to the hangar, use a long piece of brake cable that loops through the chain link hangar, back up toward the cable stop and then anchors back onto the frame (custom anchor needed). This forms a 2:1 pulley that doubles the mechanical advantage (at expense of the lever travel pull distance)
12-03-14, 10:24 AM
#56
Senior Member
Thread Starter
12-03-14, 10:47 AM
#58
What??? Only 2 wheels?

Join Date: Apr 2010
Location: Boston-ish, MA
Posts: 13,434
Bikes: 72 Peugeot UO-8, 82 Peugeot TH8, 87 Bianchi Brava, 76? Masi Grand Criterium, 74 Motobecane Champion Team, 86 & 77 Gazelle champion mondial, 81? Grandis, 82? Tommasini, 83 Peugeot PF10
Mentioned: 189 Post(s)
Tagged: 0 Thread(s)
Quoted: 1222 Post(s)
Liked 645 Times
in
232 Posts
Good advice but with this caution. Shortening the straddle cable works only if the anchor, i.e. end of the cable where it attaches to the arm, is higher than the arm pivot (when the pad is in contact with the rim). If the pivot and straddle cable anchor are the same height then the effect of shortening the cable is exactly canceled by the loss of mechanical advantage, with the net effect being just more stress in the whole system. However it looks like your brakes already have the anchor higher than the pivot, and would go higher still if the pads were pushed further into the arm, so this doesn't apply to you.
__________________
Real cyclists use toe clips.
With great bikes comes great responsibility.
jimmuller
Real cyclists use toe clips.
With great bikes comes great responsibility.
jimmuller
12-03-14, 11:37 AM
#59
Senior Member
Join Date: Dec 2005
Posts: 17,159
Mentioned: 481 Post(s)
Tagged: 0 Thread(s)
Quoted: 3811 Post(s)
Liked 6,709 Times
in
2,613 Posts
12-03-14, 11:43 AM
#60
Banned
Join Date: Aug 2013
Posts: 6,480
Mentioned: 93 Post(s)
Tagged: 0 Thread(s)
Quoted: 1361 Post(s)
Likes: 0
Liked 424 Times
in
283 Posts
While on the subject of brake mods, has anyone made a straddle cable 2 pulley similar to the Alex Singer? I realize it will use more lever travel, but I'm considering modifying a chain link and use on centerpull Mafac Comp calipers (not cantilever). Good or bad idea?

12-03-14, 11:52 AM
#61
Senior Member
Thread Starter
While on the subject of brake mods, has anyone made a straddle cable 2 pulley similar to the Alex Singer? I realize it will use more lever travel, but I'm considering modifying a chain link and use on centerpull Mafac Comp calipers (not cantilever). Good or bad idea?
12-03-14, 12:01 PM
#62
Banned
Join Date: Aug 2013
Posts: 6,480
Mentioned: 93 Post(s)
Tagged: 0 Thread(s)
Quoted: 1361 Post(s)
Likes: 0
Liked 424 Times
in
283 Posts
^Certainly was going on doubling the ME, rim crusher. I would like them for both a tandem with Mafac cantilevers and also for a current build vintage gravel rider w/ Mafac Comp- centerpulls.
Lever travel might be an issue. Does it double the travel? Curious if I need to change the lever fulcrum or other to make it all work. I don't even know how the modulation would feel.
I'm sure there's many ways to improve brakes but my goal is to keep within the vintage components and visual appeal.
Last edited by crank_addict; 12-03-14 at 12:05 PM.
12-03-14, 12:12 PM
#63
Senior Member
Join Date: Nov 2005
Location: NW Ohio
Posts: 3,421
Bikes: 1984 Miyata 310, 1986 Schwinn Sierra, 2011 Jamis Quest, 1980 Peugeot TH8 Tandem, 1992 Performance Parabola, 1987 Ross Mt. Hood, 1988 Schwinn LeTour, 1988 Trek 400T, 1981 Fuji S12-S LTD, 197? FW Evans
Mentioned: 24 Post(s)
Tagged: 0 Thread(s)
Quoted: 532 Post(s)
Liked 1,007 Times
in
516 Posts

Bendix 2 speed manual hub with a Shimano 333 bell crank with a hacksawed pin to be the proper depth to shift between 1 & 2. Also used the Shimano 333 shifter for this. First gear on shifter was actually 2nd gear and third gear was 1st gear on the Bendix.
Credit to Bikecamper for this hack.
edit: looking at the pic, there is also a Sturmey Archer cable stop attached via a hose clamp to the chainstay.
This was my first build with the Bendix & I didn't use spoke washers. Within a week I had 5 broken spokes . . .
12-03-14, 12:59 PM
#64
Cisalpinist

Join Date: Jan 2011
Location: Holland
Posts: 5,557
Bikes: blue ones.
Mentioned: 0 Post(s)
Tagged: 0 Thread(s)
Quoted: 5 Post(s)
Likes: 0
Liked 16 Times
in
11 Posts
While on the subject of brake mods, has anyone made a straddle cable 2 pulley similar to the Alex Singer? I realize it will use more lever travel, but I'm considering modifying a chain link and use on centerpull Mafac Comp calipers (not cantilever). Good or bad idea?
12-03-14, 01:25 PM
#65
Member
Join Date: Mar 2014
Location: Wethersfield, CT
Posts: 30
Mentioned: 0 Post(s)
Tagged: 0 Thread(s)
Quoted: 2 Post(s)
Likes: 0
Liked 0 Times
in
0 Posts
Did you just cold work these or did you heat them up? I have a set of Schwinn rando bars that I would like to try this with for my mid eighties scott sawtooth.
Between house rehabbing, I'm slowly getting this project gravel grinder / randonnee together. Just a little fun thing. This unknown brand bar was badly scratched up yet found it light in weight (285gm) and has a nice resilience. I wanted a bit of a flare end drop bar and after looking at many, just decided to modify this one. Lastly, I added a fixed cap and the other end threaded to use as a flask.


12-03-14, 01:58 PM
#66
Senior Member
Join Date: Jan 2012
Location: Indianapolis, IN
Posts: 310
Bikes: AR Cycles Randonneuse, Raleigh Competition, VeloOrange Piolet Prototype, LeJeune Townie, Motobecane Campeur, AR Cycles roadie, Rickert track, Cannondale SM 500, '55 Schwinn
Mentioned: 0 Post(s)
Tagged: 0 Thread(s)
Quoted: 0 Post(s)
Likes: 0
Liked 1 Time
in
1 Post
Between house rehabbing, I'm slowly getting this project gravel grinder / randonnee together. Just a little fun thing. This unknown brand bar was badly scratched up yet found it light in weight (285gm) and has a nice resilience. I wanted a bit of a flare end drop bar and after looking at many, just decided to modify this one. Lastly, I added a fixed cap and the other end threaded to use as a flask.
12-03-14, 02:58 PM
#67
Banned
Join Date: Aug 2013
Posts: 6,480
Mentioned: 93 Post(s)
Tagged: 0 Thread(s)
Quoted: 1361 Post(s)
Likes: 0
Liked 424 Times
in
283 Posts
Bending the bar was done at ambient room temp. At first I was over-thinking it. I have a press and mandrel tube bender but it really wasn't necessary. Its something I've never done before, the bars had no name and were scored with nasty scratches, so I figured why not?! The plus side was the nice compliance, flexibility properties and lightweight.
To prevent tube kink or damage, it was done by clamping between wood bracing, leverage pulled closest to the area I wanted to bend. I only took a few pulls, stop and inspect. The goal was not overdoing it and certainly wouldn't reverse the bend. I used an angle gauge as a guide and keep both sides uniform. I haven't completed this build to test it yet while static feels just right and more natural for my wrist. I had a few mishaps years ago on moto-X and age is catching up with me. If the new angle helps, I might do the same for a few other bikes.
The flask cap was something I've wanted to do for years so this was the bar to experiment with. Its an aluminum pill container with o-ring. (samples found on Amzon / fleabay for only a couple of bucks. Also available in anodized colors). The container is cut in half. The ends of the bar were slightly undersized so I reamed them to where the container half press fits tightly. Its a one time press fit and once in, its not coming out but just to be sure, I used a Loctite metal sealant (very small amount smeared to the ends) before inserting. Positively is leakproof. For a test, I poured boiling water to lacquer thinner in it. Surely its a novelty and its funny how the liquid has an air-lock on the drop style bars. I have to lean the bike to the side allowing flow to the closed end. Holds 9 oz.. Could be neat for a flat bar setup.
Last edited by crank_addict; 12-03-14 at 03:05 PM.
12-03-14, 06:31 PM
#68
What??? Only 2 wheels?
Join Date: Apr 2010
Location: Boston-ish, MA
Posts: 13,434
Bikes: 72 Peugeot UO-8, 82 Peugeot TH8, 87 Bianchi Brava, 76? Masi Grand Criterium, 74 Motobecane Champion Team, 86 & 77 Gazelle champion mondial, 81? Grandis, 82? Tommasini, 83 Peugeot PF10
Mentioned: 189 Post(s)
Tagged: 0 Thread(s)
Quoted: 1222 Post(s)
Liked 645 Times
in
232 Posts
Re that straddle cable pulley - a clever idea. I'd be concerned about fatiguing the main cable where it is always bending and unbending as it passes around the pulley. They aren't but so flexible. Keep an eye on it for strands breaking.
__________________
Real cyclists use toe clips.
With great bikes comes great responsibility.
jimmuller
Real cyclists use toe clips.
With great bikes comes great responsibility.
jimmuller
 12-04-14, 01:15 AM
#70
elcraft
Thanks to the help from fellow BF/CR members, this thing went thru some transformation to make it work. Running a 3x3x2 that also uses the original 1/2x1/8 pitch chain. After some punishing miles, I had to re-tweak adjust everything but it's now been super reliable bulletproof. I finally acquired a correct rear wingnut for the shift side yet I have to drill and tap for the non-drive side (anyone have Whitworth thread taps?).


I recall reading on BF that the proprietor of Bikesmith Tools is rumored to have one of these taps. Perhaps, he could be persuaded to re-tap your NDS wing nut. Good luck finding a solution for ths situation- I am creating a similar set up and recently purchased a set of GB lever style wingnuts on eBay that were mismatched in the same way as yours, the NDS side wasn't correct. The seller was less than "timely" about making an adjustment (monetarily speaking) concerning this nearly useless set.
12-04-14, 08:24 AM
#71

Senior Member

Join Date: Jan 2005
Location: Baltimore, MD
Posts: 5,374
Mentioned: 15 Post(s)
Tagged: 0 Thread(s)
Quoted: 2483 Post(s)
Liked 2,955 Times
in
1,678 Posts
About bending handlebars: I read many years ago that, to avoid creating kinks and stress risers at the bend, the handlebar should first be filled with sand.
 12-04-14, 11:21 AM
#72
Banned
Join Date: Aug 2013
Posts: 6,480
Mentioned: 93 Post(s)
Tagged: 0 Thread(s)
Quoted: 1361 Post(s)
Likes: 0
Liked 424 Times
in
283 Posts
The SA hub threading is NOT Whitworth threading. It is 13/32" x 26tpi BSC (British Standard Cycle) Threading. The thread pitch is 55 degrees rather than the usual 60 degrees. I saw a tap for this threading once listed on UK eBay for about $180!!!!!! They are otherwise unobtainable.
I recall reading on BF that the proprietor of Bikesmith Tools is rumored to have one of these taps. Perhaps, he could be persuaded to re-tap your NDS wing nut. Good luck finding a solution for ths situation- I am creating a similar set up and recently purchased a set of GB lever style wingnuts on eBay that were mismatched in the same way as yours, the NDS side wasn't correct. The seller was less than "timely" about making an adjustment (monetarily speaking) concerning this nearly useless set.
I recall reading on BF that the proprietor of Bikesmith Tools is rumored to have one of these taps. Perhaps, he could be persuaded to re-tap your NDS wing nut. Good luck finding a solution for ths situation- I am creating a similar set up and recently purchased a set of GB lever style wingnuts on eBay that were mismatched in the same way as yours, the NDS side wasn't correct. The seller was less than "timely" about making an adjustment (monetarily speaking) concerning this nearly useless set.
However for the non-drive side, I'm temporarily using a -drive side- and inserted a crank cotter / nut through the indicator hole.
--edit: Out of my league trying to figure out differences between Whitworth, BSC (Brit. Std. Cycle), BSB (Brit. Std. Brass)-- Whew! Apparently and depending on the UK suppliers, they all use a 26 tpi. Difference could be in the thread angles of 55 or 60 degree. So far nothing for 13/32" diameter.
AND.... It’s a German bike thread standard called FG 10.3, it means 10.3 mm diameter and 26 TPI, (also called 13/32″). I haven't verified this but found it in some obscure site.
Funny thing, my IGH is an Austrian made Styria, a clone of SA. I have the original documentation and even specifies the parts interchange. The only difference might be in the shell or design.
---edit II: Forgot to mention CEI (Cycle Engineers Institute).
Cycle Engineers' Institute (CEI) or British Standard Cycle (BSC)
These are different names commonly used for the same threads. 60 degree thread angle, rather than the 55 degree of BSW and BSF. For sizes from 1/4" through 1/2" by far the most common are 26 tpi, although 24 tpi appear as well. Most, but by no means all, fasteners on post-War BSA's (through the late '60's, when it got more complicated) were CEI. Although the thread form and pitch is different, the head sizes on CEI-threaded fasteners use the same wrenches as BSW/BSF.
----edit III: Think its time for a dedicated thread on threads

Anyhow, has anyone tried a cobbled DIY tap by cutting grooves in an old SA axle?
Last edited by crank_addict; 12-04-14 at 02:47 PM.
12-04-14, 12:58 PM
#73
Ride, Wrench, Swap, Race

Join Date: Jan 2010
Location: Northern California
Posts: 9,194
Bikes: Cheltenham-Pedersen racer, Boulder F/S Paris-Roubaix, Varsity racer, '52 Christophe, '62 Continental, '92 Merckx, '75 Limongi, '76 Presto, '72 Gitane SC, '71 Schwinn SS, etc.
Mentioned: 132 Post(s)
Tagged: 0 Thread(s)
Quoted: 1565 Post(s)
Liked 1,296 Times
in
866 Posts
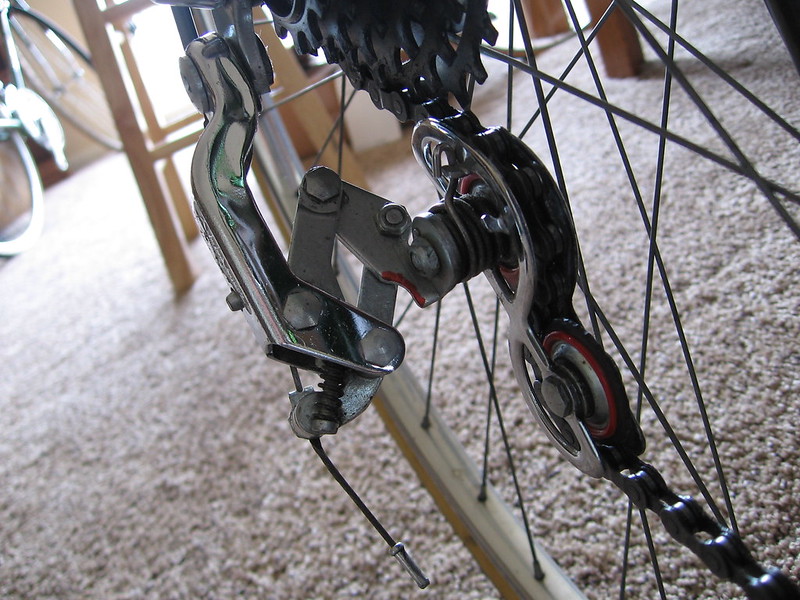
Here's a caliper I modified for more-solid delivery of braking forces. Anchor cord straps control forward flex, homemade booster plate controls post splay flexing, and for leverage I had to take the caliper pivots apart to install the super-short Suntour straddle that I think was once part of a "Power Hanger".
Good enough for the steeper, wet descents of XC racing, which was the goal here.

Here I had to adjust the claw-hanger's b-pivot stop with a file (and modify the red-marked para link in order to get just enough travel) to get the Allvit to shift fully and solidly across a modified 6s Uniglide freewheel.
2nd-smallest cog needed "kicker ramps" beveled into the tips of a few teeth to achieve a reliable shift out to top gear.
All three of my Allvit-equipped bikes are now similarly fitted with 6-speeds, using three different Allvit variants.
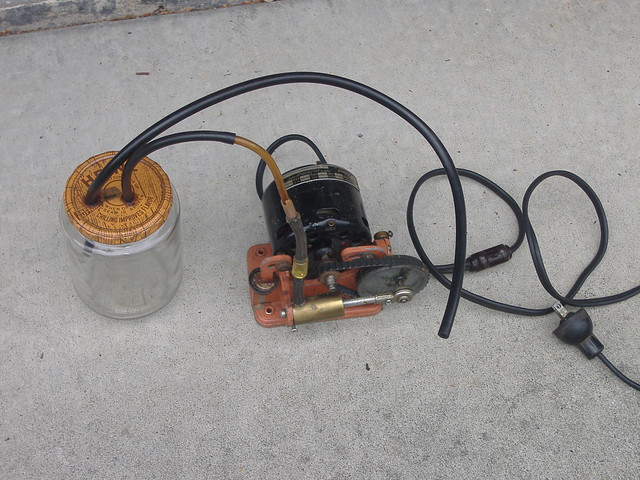
This is one of the tools that I've made from re-purposed parts, this one I made in the late 70's.
1940's fish-tank pump reversed to pull a vacuum by tilting the cylinder mounting using a 4mm screw as a wedge.
Pickle jar would have been trash but has since served all these years as a reservoir for vacuum-extracting brake fluid during system flush/bleed.
Good enough for the steeper, wet descents of XC racing, which was the goal here.
Here I had to adjust the claw-hanger's b-pivot stop with a file (and modify the red-marked para link in order to get just enough travel) to get the Allvit to shift fully and solidly across a modified 6s Uniglide freewheel.
2nd-smallest cog needed "kicker ramps" beveled into the tips of a few teeth to achieve a reliable shift out to top gear.
All three of my Allvit-equipped bikes are now similarly fitted with 6-speeds, using three different Allvit variants.
This is one of the tools that I've made from re-purposed parts, this one I made in the late 70's.
1940's fish-tank pump reversed to pull a vacuum by tilting the cylinder mounting using a 4mm screw as a wedge.
Pickle jar would have been trash but has since served all these years as a reservoir for vacuum-extracting brake fluid during system flush/bleed.
12-05-14, 05:50 AM
#74
elcraft
[QUOTE=dddd;17362058]Here's a caliper I modified for more-solid delivery of braking forces. Anchor cord straps control forward flex, homemade booster plate controls post splay flexing, and for leverage I had to take the caliper pivots apart to install the super-short Suntour straddle that I think was once part of a "Power Hanger".
Good enough for the steeper, wet descents of XC racing, which was the goal here.
Is this a Dursley Pedersen???
Good enough for the steeper, wet descents of XC racing, which was the goal here.
Is this a Dursley Pedersen???
12-05-14, 06:05 AM
#75
elcraft
--edit: Out of my league trying to figure out differences between Whitworth, BSC (Brit. Std. Cycle), BSB (Brit. Std. Brass)-- Whew! Apparently and depending on the UK suppliers, they all use a 26 tpi. Difference could be in the thread angles of 55 or 60 degree. So far nothing for 13/32" diameter.
AND.... It�s a German bike thread standard called FG 10.3, it means 10.3 mm diameter and 26 TPI, (also called 13/32″). I haven't verified this but found it in some obscure site.
Funny thing, my IGH is an Austrian made Styria, a clone of SA. I have the original documentation and even specifies the parts interchange. The only difference might be in the shell or design.
---edit II: Forgot to mention CEI (Cycle Engineers Institute).
Cycle Engineers' Institute (CEI) or British Standard Cycle (BSC)
These are different names commonly used for the same threads. 60 degree thread angle, rather than the 55 degree of BSW and BSF. For sizes from 1/4" through 1/2" by far the most common are 26 tpi, although 24 tpi appear as well. Most, but by no means all, fasteners on post-War BSA's (through the late '60's, when it got more complicated) were CEI. Although the thread form and pitch is different, the head sizes on CEI-threaded fasteners use the same wrenches as BSW/BSF.
----edit III: Think its time for a dedicated thread on threads
Anyhow, has anyone tried a cobbled DIY tap by cutting grooves in an old SA axle?[/QUOTE]
I think I looked at the same site, in German, on "Fahrad Gewinde". The 13/32" measurement should be more accurately rendered as 10.34 mm. Since this threading is securing a rear axle, I just feel like it needs to be more precise. These antique wingnuts are so scarce that one would be loathe to mess one up! I did as much research as I could about this threading for my IGH project.