


Rattlecan painting finesse?
 01-06-15, 05:05 AM
#1

Senior Curmudgeon
Thread Starter

Join Date: Jan 2005
Location: Directly above the center of the earth
Posts: 3,856
Bikes: Varies by day
Mentioned: 0 Post(s)
Tagged: 0 Thread(s)
Quoted: 5 Post(s)
Likes: 0
Liked 2 Times
in
1 Post
Rattlecan painting finesse?
I have an old Schwinn Sprint 1986 frame that I plan to convert to a single speed.
The original paint & decals are virtually gone. I'm thinking of a rattle-can paint job, but just for fun, I'd like to see how good I can make it.
Is it feasible to do "candy" colors? This was a popular method back in the 1970s, but I saw it done on autos, not bikes. The method involves using a metallic paint (typically gold or silver) as a base coat and then applying a translucent top coat of the desired color such that the undercoat color can still be seen. The variation was to use a "metal flake" base coat with the translucent top color. The metal flakes were still visible through the top coat, and added depth to the paint job.
Assuming that this is feasible (the translucent top coat would be the most difficult), could one then use a small brush to do detail work on the lugs & bottom bracket? How visible would small brush marks be? Can one outline lugs in a contrasting color with a tiny brush? I'm pretty sure that the last is a yes, but you'd need to have a steady hand...
If I wanted "chrome look" stays and fork tips, should that be done with a spray can or a brush?
I've already read Sheldon Brown's article on painting and several more via Google, but I don't see anyone really talking about multi-layer paint jobs (other than clear coats). I have questions about polyurethane paints vs. enamels as well, please. The enamels are harder, if I understand correctly, but more likely to chip. The polyurethanes are softer and more likely to scuff, but can be "blended" with another top coat which will actually "melt" the existing polyurethane layer & fuse with it. Any recommendations on one or the other? Might it be possible to enamel the base and then clear-coat with polyurethane, or will there be compatibility problems?
Last, is there any way to apply "local heat treatment" to a frame to harden the finish prior to build? I'm thinking something like a hair dryer or propane torch? Alternately is there any chemical treatment that would accomplish the same thing without needing heat?
If any of youse guys have done "candy apple" colors, would you be so kind as to post your photos so I could see what to expect? I'd prefer a powder coat on this frame, but the price is prohibitive.
Thanks - FarHorizon
PS: Can you print your own decals on a self-adhesive clear page, cut them out, & stick them on the frame? I assume that these would go under the clear coat? Would there be any bubbling or fish-eye effects over the decals with a sprayed clear coat?
Last edited by FarHorizon; 01-06-15 at 05:08 AM.
 01-06-15, 05:34 AM
#2

Senior Member
Join Date: May 2010
Location: Hurricane Alley , Florida
Posts: 3,903
Bikes: Treks (USA), Schwinn Paramount, Schwinn letour,Raleigh Team Professional, Gazelle GoldLine Racing, 2 Super Mondias, Carlton Professional.
Mentioned: 10 Post(s)
Tagged: 0 Thread(s)
Quoted: 78 Post(s)
Liked 30 Times
in
22 Posts
If you want to go the spray can route, use automotive paint in spray cans. There's a kid in my neighborhood that painted his fixed gear bike with this stuff, looks very good. Pick out your favorite color, get the base primer, colors and clear.
automotivetouchup.com
Manufacturers
automotivetouchup.com
Manufacturers
01-06-15, 06:02 AM
#5
Senior Member

Join Date: Apr 2007
Location: Thunder Bay, Ontario, Canada - burrrrr!
Posts: 11,674
Bikes: 1958 Rabeneick 120D, 1968 Legnano Gran Premio, 196? Torpado Professional, 2000 Marinoni Piuma
Mentioned: 210 Post(s)
Tagged: 0 Thread(s)
Quoted: 1372 Post(s)
Likes: 0
Liked 1,751 Times
in
938 Posts
Using either a paint brush or rattle can, I can, with care and effort, achieve results just like this...
Rattle can application...

Paint brush application...

Lug lining and such can be easily achieved with a paint pen(fender red stripe) or automotive decorative pin striping tape(red on stays and black on seat tube)...

Home made decals are an option but better off buying stickers, if available(my opinion). This Cambio Rino 2000, sports rattle can and home made decals...

Home painted efforts lack one thing - proper curing. I found a way to bake my paint. Use a bicycle box, painted flat black, place the painted frame, fork or object in the box. Put the box outside in the sun. And then get baked. The sun will do the rest(sorry no pictures yet).
Rattle can application...
Paint brush application...
Lug lining and such can be easily achieved with a paint pen(fender red stripe) or automotive decorative pin striping tape(red on stays and black on seat tube)...
Home made decals are an option but better off buying stickers, if available(my opinion). This Cambio Rino 2000, sports rattle can and home made decals...
Home painted efforts lack one thing - proper curing. I found a way to bake my paint. Use a bicycle box, painted flat black, place the painted frame, fork or object in the box. Put the box outside in the sun. And then get baked. The sun will do the rest(sorry no pictures yet).
__________________
"98% of the bikes I buy are projects".
"98% of the bikes I buy are projects".
01-06-15, 06:06 AM
#6
Senior Curmudgeon
Thread Starter
Join Date: Jan 2005
Location: Directly above the center of the earth
Posts: 3,856
Bikes: Varies by day
Mentioned: 0 Post(s)
Tagged: 0 Thread(s)
Quoted: 5 Post(s)
Likes: 0
Liked 2 Times
in
1 Post
Thank you kindly, @randyjawa - That's exactly what I wanted to see. What brand spray did you use? What brand brush paint?
01-06-15, 06:15 AM
#7
Senior Member
Join Date: Jul 2004
Location: northern michigan
Posts: 13,317
Bikes: '77 Colnago Super, '76 Fuji The Finest, '88 Cannondale Criterium, '86 Trek 760, '87 Miyata 712
Mentioned: 19 Post(s)
Tagged: 0 Thread(s)
Quoted: 659 Post(s)
Liked 595 Times
in
313 Posts
I hand sanded, primed and painted with a spray can. Dont let anyone disparage the medium of application. On large surfaces? Yes. Bike frames, no. The trick is always in the prep.
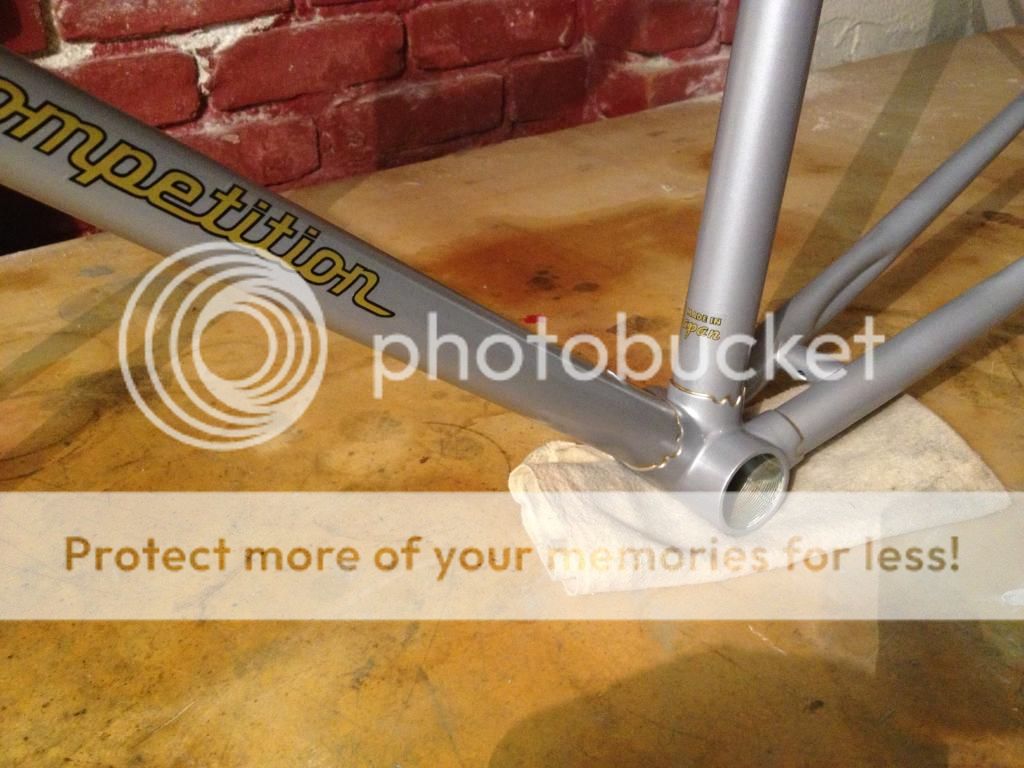
Candy paint was the use of many coats of hand-rubbed lacquer. Here is my hand-rubbed, lacquer paint job using (11.00) acrylic lacquer. If you later have need for touch up, a quick sanding of 400gr and straight shot of your finish coat will work. No trouble with primer overspray. Let it cure, rub it out. The acrylic will go on more shiny/finished than oldschool lacquer.
I do not regret the choice of finishing:
 01-06-15, 06:17 AM
#8
Senior Member
Join Date: Apr 2007
Location: Thunder Bay, Ontario, Canada - burrrrr!
Posts: 11,674
Bikes: 1958 Rabeneick 120D, 1968 Legnano Gran Premio, 196? Torpado Professional, 2000 Marinoni Piuma
Mentioned: 210 Post(s)
Tagged: 0 Thread(s)
Quoted: 1372 Post(s)
Likes: 0
Liked 1,751 Times
in
938 Posts
Thank you kindly, @randyjawa - That's exactly what I wanted to see. What brand spray did you use? What brand brush paint?
For the Peugeot(white bike), I used Tremclad, RustOleum or something very similar. The paint goes on thick and flows out to a glassy finish. But you must bake the paint or be prepared to wait about a year, for the paint to dry thoroughly. If you don't, the paint will squish out when you install things like the front derailleur, etc.
Use a good quality paint brush, a one incher is best, in my opinion. Varying sized brushes can be selected for finer work, such as painting lugs or head tubes...

__________________
"98% of the bikes I buy are projects".
"98% of the bikes I buy are projects".
01-06-15, 06:59 AM
#9
Mr. Anachronism
Join Date: Jan 2013
Location: Somewhere west of Tobie's
Posts: 2,087
Bikes: fillet-brazed Chicago Schwinns, and some other stuff
Mentioned: 29 Post(s)
Tagged: 0 Thread(s)
Quoted: 526 Post(s)
Liked 256 Times
in
165 Posts
As shown you can obtain fantastic results with a rattle can, but my experience taught me NOT to use lacquer. I used Dupli-color touch up cans over etching primer to create the "chameleon" finish shown below, and the paint turned out looking fantastic. Imagine my frustration when the paint started chipping anywhere I happened to tap a tool against it. It now hangs in my garage as wall art, because I can't build it up and ride it.

Contrast that with the two guitars I spray-painted for friends, using a rattle-can urethane clear. After painting I hung them in the attic for a couple of months in the summer to cure them, and was then able to wet sand the clear to remove all the edges on the flames so you can't feel them. the paint still has a bit of "give" to it, but hasn't chipped off.


One alternative to stickers or decals for the lettering is to have the script created in vinyl by a sign/graphic shop. Then instead of using the letters, you carefully stick the whole vinyl sheet to your project and remove the letters with an Xacto knife. Now you have a mask for spraying the letters onto the frame. That's what I used for the head stock lettering on the bass guitar shown above.
Contrast that with the two guitars I spray-painted for friends, using a rattle-can urethane clear. After painting I hung them in the attic for a couple of months in the summer to cure them, and was then able to wet sand the clear to remove all the edges on the flames so you can't feel them. the paint still has a bit of "give" to it, but hasn't chipped off.
One alternative to stickers or decals for the lettering is to have the script created in vinyl by a sign/graphic shop. Then instead of using the letters, you carefully stick the whole vinyl sheet to your project and remove the letters with an Xacto knife. Now you have a mask for spraying the letters onto the frame. That's what I used for the head stock lettering on the bass guitar shown above.
__________________
"My only true wisdom is in knowing I have none" -Socrates
"My only true wisdom is in knowing I have none" -Socrates
Last edited by Hudson308; 01-06-15 at 07:16 AM. Reason: added lettering tip
01-06-15, 06:59 AM
#10
Senior Member
I've used Duplicator paints from a big box auto parts store with good results. Their self etching primer is the key, I think. Light sanding with 1000 or 2000 grit from the automotive section at wallyworld between coats also. Duplicolor goes on kind of thin but dries to a hard finish quickly so lots of coats would be a good thing. So far the oldest paintjob I've done has about 6000 or so miles with no chipping issues. The right chain stay, where the chain hits it, is in very good shape.
There are also 2 part clear coats out there, in rattle can. You push a button on the bottom of the can to release the hardener and the can is usable for about 24 hours. I've used this once with good results but I've heard afterward that the stuff is really bad for you if you breathe it. I'm still alive though.
Edit: Hudson beat me to it with the Duplicolor experience but as I said above, no chipping problems here.
01-06-15, 07:36 AM
#11
Senior Member
Join Date: Apr 2008
Location: Maidstone, Kent, England
Posts: 2,637
Bikes: 1970 Holdsworth Mistral, Vitus 979, Colnago Primavera, Corratec Hydracarbon, Massi MegaTeam, 1935 Claud Butler Super Velo, Carrera Virtuoso, Viner, 1953 Claud Butler Silver Jubilee, 1954 Holdsworth Typhoon, 1966 Claud Butler Olympic Road, 1982 Claud
Mentioned: 0 Post(s)
Tagged: 0 Thread(s)
Quoted: 10 Post(s)
Liked 11 Times
in
10 Posts
What others have said re: rattlecan spray painting. The secret's in meticulous preparation and paint choice. Always try to use primer, colur and clear coat from the same manufacturer/range.
Re: decals. Yes, you can print your own on water slide paper (available on the web, e-bay in either clear or white background) - if you need white lettering then use white, if you just need colour with a strong contrast to your paint colour, use clear. Carefully allow the printed sheet to dry thoroughly after printing, I always leave it in a warm room for at least an hour, which may be overkill but it doesn't hurt.
Gently spray with acrylic clear lacquer to seal the ink. Too much in the first coat and the ink will run. Allow this first 'dusted coat' to dry, then repeat until the ink is sealed and the build up of lacquer reaches the desirable level. Too much and the finished decal will have raised edges, not enough and it will be fragile. I aim for the same thickness as I remember from model airplane kits I built as a boy!
Let the lacquer dry and harden (overnight) then cut around it, soak in tepid water for around 45 seconds then slide off the backing sheet on to the frame, carefully position and let it dry thoroughly. Do this before clear coating the frame. Cover the decal and paint with light coats of clear coat until the desired level of gloss is achieved.
On baking paint, I stand the painted frame once the surface has dried on top of a hot double radiator in my dining room and leave it there, turning daily for a week or three. This has been really successful for me in producing a hard, chip resistant finish.
Hope this helps. The advantage of making your own decals is that you can alter or create your own designs, make different colours, sizes and so on. I'll try and find some photos to post of some down tube decals I recreated by drawing from a photo and head tube seat crests I created from my own imagination on my 1966 Camile Dardenne frame - this one I painted using a low pressure spray ***, but rattle can might have given a similar result.
01-06-15, 08:18 AM
#12
Senior Curmudgeon
Thread Starter
Join Date: Jan 2005
Location: Directly above the center of the earth
Posts: 3,856
Bikes: Varies by day
Mentioned: 0 Post(s)
Tagged: 0 Thread(s)
Quoted: 5 Post(s)
Likes: 0
Liked 2 Times
in
1 Post
Hi @Oldpeddaller -
Am I correct in assuming that your decals were printed on an ink jet printer? That would be what necessitated the clear coating with lacquer?
If I print with a color laser, would such coating still be needed? The laser toner is already "baked on" by the drum of the printer... Since my bike won't be "original" in any way, I have no particular desire to have the stock decals reproduced.
Thanks - FH
01-06-15, 08:21 AM
#13
Mr. Anachronism
Join Date: Jan 2013
Location: Somewhere west of Tobie's
Posts: 2,087
Bikes: fillet-brazed Chicago Schwinns, and some other stuff
Mentioned: 29 Post(s)
Tagged: 0 Thread(s)
Quoted: 526 Post(s)
Liked 256 Times
in
165 Posts
I've used Duplicator paints from a big box auto parts store with good results. Their self etching primer is the key, I think. Light sanding with 1000 or 2000 grit from the automotive section at wallyworld between coats also. Duplicolor goes on kind of thin but dries to a hard finish quickly so lots of coats would be a good thing. So far the oldest paintjob I've done has about 6000 or so miles with no chipping issues. The right chain stay, where the chain hits it, is in very good shape.
Edit: Hudson beat me to it with the Duplicolor experience but as I said above, no chipping problems here.
Edit: Hudson beat me to it with the Duplicolor experience but as I said above, no chipping problems here.
__________________
"My only true wisdom is in knowing I have none" -Socrates
"My only true wisdom is in knowing I have none" -Socrates
01-06-15, 08:35 AM
#14
Senior Curmudgeon
Thread Starter
Join Date: Jan 2005
Location: Directly above the center of the earth
Posts: 3,856
Bikes: Varies by day
Mentioned: 0 Post(s)
Tagged: 0 Thread(s)
Quoted: 5 Post(s)
Likes: 0
Liked 2 Times
in
1 Post
And by the bye - It's winter here, and even if I put a black box in the sun with my frame in it, it wouldn't cure the paint. Same with the "leave it in the attic" idea. Both of these are excellent ideas, but they won't work in the winter. So is it feasible to use a hair-dryer or a propane torch? I realize that the latter will take some finesse, but it might be feasible?
I hear the idea, also, that I should stick with a single brand of primer/paint/clearcoat to avoid incompatibilities?
Thanks again - FH
I hear the idea, also, that I should stick with a single brand of primer/paint/clearcoat to avoid incompatibilities?
Thanks again - FH
01-06-15, 11:20 AM
#15
Senior Member
Join Date: Jul 2004
Location: Yukon, Canada
Posts: 8,759
Mentioned: 13 Post(s)
Tagged: 0 Thread(s)
Quoted: 113 Post(s)
Likes: 0
Liked 16 Times
in
14 Posts
And by the bye - It's winter here, and even if I put a black box in the sun with my frame in it, it wouldn't cure the paint. Same with the "leave it in the attic" idea. Both of these are excellent ideas, but they won't work in the winter. So is it feasible to use a hair-dryer or a propane torch? I realize that the latter will take some finesse, but it might be feasible?
I hear the idea, also, that I should stick with a single brand of primer/paint/clearcoat to avoid incompatibilities?
Thanks again - FH
I hear the idea, also, that I should stick with a single brand of primer/paint/clearcoat to avoid incompatibilities?
Thanks again - FH
__________________
1 Super Record bike, 1 Nuovo Record bike, 1 Pista, 1 Road, 1 Cyclocross/Allrounder, 1 MTB, 1 Touring, 1 Fixed gear
1 Super Record bike, 1 Nuovo Record bike, 1 Pista, 1 Road, 1 Cyclocross/Allrounder, 1 MTB, 1 Touring, 1 Fixed gear
01-06-15, 11:40 AM
#16
Senior Member
Join Date: Jul 2009
Posts: 806
Mentioned: 4 Post(s)
Tagged: 0 Thread(s)
Quoted: 249 Post(s)
Likes: 0
Liked 29 Times
in
22 Posts
I used that 2 part clear coat rattlecan with good results. The paint guy would not sell it to me without selling the respirator too. Not just paper masks, you need a real mask with filters and make sure its on tight. The proof is if you cant smell the paint you have it on right.
01-06-15, 11:44 AM
#17
Wood
Join Date: Jun 2009
Location: Beaumont, Tx
Posts: 2,293
Bikes: Raleigh Sports: hers. Vianelli Professional & Bridgestone 300: mine
Mentioned: 1 Post(s)
Tagged: 0 Thread(s)
Quoted: 8 Post(s)
Likes: 0
Liked 12 Times
in
10 Posts
I spray painted my International frame with auto enamel (Dulux) and clear enamel. I let it hang a day or so, then propped it in a corner lined with foil, and placed cardboard lined with foil for the outer sides of the boxed-in frame. A flood-lamp placed on the floor heated the enclosure very well. I don't remember how long I heated it.
Danger here, don't try this at home, warning, take necessary precaution, etc.
The paint was tough as nails.
Danger here, don't try this at home, warning, take necessary precaution, etc.
The paint was tough as nails.
01-06-15, 11:47 AM
#18
Senior Member
I used that 2 part clear coat rattlecan with good results. The paint guy would not sell it to me without selling the respirator too. Not just paper masks, you need a real mask with filters and make sure its on tight. The proof is if you cant smell the paint you have it on right.
01-06-15, 11:59 AM
#19
Banned.
Join Date: Jun 2009
Posts: 964
Mentioned: 0 Post(s)
Tagged: 0 Thread(s)
Quoted: 0 Post(s)
Likes: 0
Liked 2 Times
in
2 Posts
I have an old Schwinn Sprint 1986 frame that I plan to convert to a single speed.
The original paint & decals are virtually gone. I'm thinking of a rattle-can paint job, but just for fun, I'd like to see how good I can make it.
Is it feasible to do "candy" colors? This was a popular method back in the 1970s, but I saw it done on autos, not bikes. The method involves using a metallic paint (typically gold or silver) as a base coat and then applying a translucent top coat of the desired color such that the undercoat color can still be seen. The variation was to use a "metal flake" base coat with the translucent top color. The metal flakes were still visible through the top coat, and added depth to the paint job.
Assuming that this is feasible (the translucent top coat would be the most difficult), could one then use a small brush to do detail work on the lugs & bottom bracket? How visible would small brush marks be? Can one outline lugs in a contrasting color with a tiny brush? I'm pretty sure that the last is a yes, but you'd need to have a steady hand...
If I wanted "chrome look" stays and fork tips, should that be done with a spray can or a brush?
I've already read Sheldon Brown's article on painting and several more via Google, but I don't see anyone really talking about multi-layer paint jobs (other than clear coats). I have questions about polyurethane paints vs. enamels as well, please. The enamels are harder, if I understand correctly, but more likely to chip. The polyurethanes are softer and more likely to scuff, but can be "blended" with another top coat which will actually "melt" the existing polyurethane layer & fuse with it. Any recommendations on one or the other? Might it be possible to enamel the base and then clear-coat with polyurethane, or will there be compatibility problems?
Last, is there any way to apply "local heat treatment" to a frame to harden the finish prior to build? I'm thinking something like a hair dryer or propane torch? Alternately is there any chemical treatment that would accomplish the same thing without needing heat?
If any of youse guys have done "candy apple" colors, would you be so kind as to post your photos so I could see what to expect? I'd prefer a powder coat on this frame, but the price is prohibitive.
Thanks - FarHorizon
PS: Can you print your own decals on a self-adhesive clear page, cut them out, & stick them on the frame? I assume that these would go under the clear coat? Would there be any bubbling or fish-eye effects over the decals with a sprayed clear coat?
The original paint & decals are virtually gone. I'm thinking of a rattle-can paint job, but just for fun, I'd like to see how good I can make it.
Is it feasible to do "candy" colors? This was a popular method back in the 1970s, but I saw it done on autos, not bikes. The method involves using a metallic paint (typically gold or silver) as a base coat and then applying a translucent top coat of the desired color such that the undercoat color can still be seen. The variation was to use a "metal flake" base coat with the translucent top color. The metal flakes were still visible through the top coat, and added depth to the paint job.
Assuming that this is feasible (the translucent top coat would be the most difficult), could one then use a small brush to do detail work on the lugs & bottom bracket? How visible would small brush marks be? Can one outline lugs in a contrasting color with a tiny brush? I'm pretty sure that the last is a yes, but you'd need to have a steady hand...
If I wanted "chrome look" stays and fork tips, should that be done with a spray can or a brush?
I've already read Sheldon Brown's article on painting and several more via Google, but I don't see anyone really talking about multi-layer paint jobs (other than clear coats). I have questions about polyurethane paints vs. enamels as well, please. The enamels are harder, if I understand correctly, but more likely to chip. The polyurethanes are softer and more likely to scuff, but can be "blended" with another top coat which will actually "melt" the existing polyurethane layer & fuse with it. Any recommendations on one or the other? Might it be possible to enamel the base and then clear-coat with polyurethane, or will there be compatibility problems?
Last, is there any way to apply "local heat treatment" to a frame to harden the finish prior to build? I'm thinking something like a hair dryer or propane torch? Alternately is there any chemical treatment that would accomplish the same thing without needing heat?
If any of youse guys have done "candy apple" colors, would you be so kind as to post your photos so I could see what to expect? I'd prefer a powder coat on this frame, but the price is prohibitive.
Thanks - FarHorizon
PS: Can you print your own decals on a self-adhesive clear page, cut them out, & stick them on the frame? I assume that these would go under the clear coat? Would there be any bubbling or fish-eye effects over the decals with a sprayed clear coat?
01-06-15, 12:00 PM
#20
Senior Member

Join Date: Jul 2006
Location: San Jose (Willow Glen) Ca
Posts: 9,845
Bikes: Kirk Custom JK Special, '84 Team Miyata,(dura ace old school) 80?? SR Semi-Pro 600 Arabesque
Mentioned: 106 Post(s)
Tagged: 0 Thread(s)
Quoted: 2338 Post(s)
Liked 2,822 Times
in
1,541 Posts
I have painted two frames, one rattle can (using duplic color) , one using automotive finishes with a preval spray can
My experience (from this limited sample)
you can get a great looking job from rattle can, but it will not in any way as durable as automotive finish.
Rattle can will cost more than you think (at least for me who was king of thin coats and lots of over spray, but no run)
Automotive is a lot more expensive again. (partially be cause of quantities)
as noted prep is key..... this is my quick list of steps
frame to bare metal.....use chemical stripper
use an acid etch primer to seal
use a high build up primer
sand
2-4 thin coats of color
3-4 thin coats of clear
pay close attention to recoat times
and adding use a good respirator it is a critical
ymmv
__________________
Life is too short not to ride the best bike you have, as much as you can
(looking for Torpado Super light frame/fork or for Raleigh International frame fork 58cm)
Life is too short not to ride the best bike you have, as much as you can
(looking for Torpado Super light frame/fork or for Raleigh International frame fork 58cm)
Last edited by squirtdad; 01-06-15 at 01:18 PM.
01-06-15, 12:24 PM
#21
Senior Member

Join Date: Nov 2011
Location: Port Angeles, WA
Posts: 7,922
Bikes: A green one, "Ragleigh," or something.
Mentioned: 194 Post(s)
Tagged: 0 Thread(s)
Quoted: 1627 Post(s)
Liked 630 Times
in
356 Posts
What? Only a caveman would be dumb enough to to do something like that! 
Another thing not mentioned here that could be helpful: if you already have an air compressor - or have always wanted an excuse to get one - you might consider getting a cheap airbrush kit and some low-VOC automotive grade airbrushable colors and skip the rattlecan business altogether. (Well, except maybe priming) This avoids the waste of typical rattlecan overspray, gives you greater control on application, and eschews the nasty fumes in your workspace and the environment as a whole. My airbrush kit was $9.95 at Harbor Freight, hobby stores stock similar ones for $20 and up. Each rattle can of primer, color and clear is bound to cost you from $5 to $25 depending on type, so it does add pretty fast.
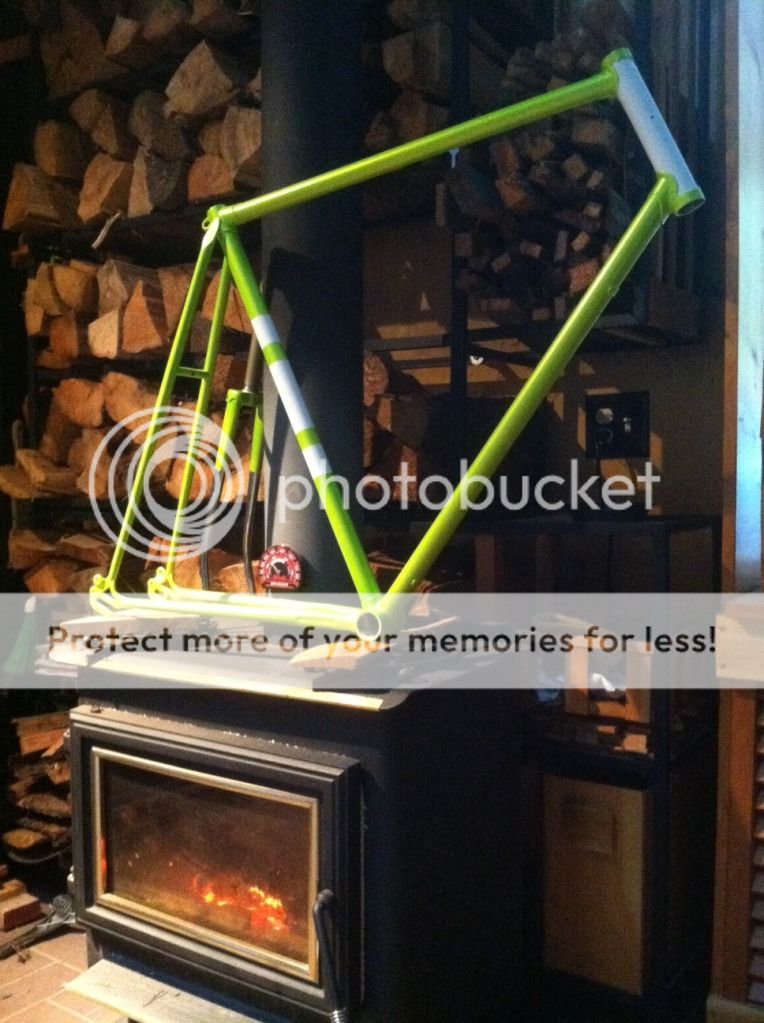
I haven't striped or clearcoated this one yet, but I'm really happy the way the pearl lime color has finished this frame so far, and with about a week of curing (some of that over a woodstove) the surface feels nice and hard and ready to take a clear. The green on this frame was done with exactly 2.5 oz of color and reducer, for the whole frame and fork. The white is the white primer undercoat.
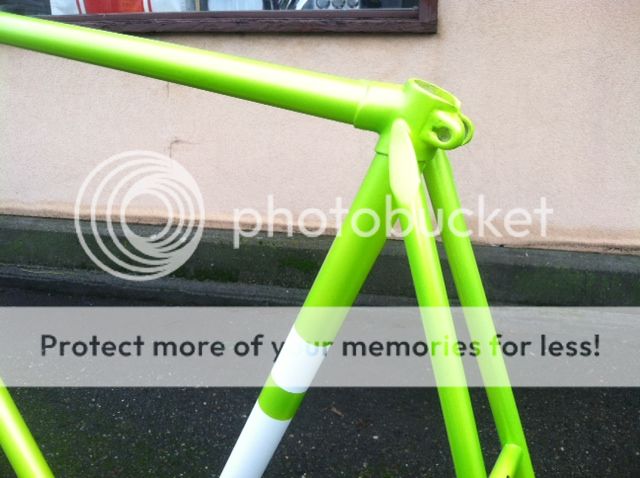
As many have mentioned above, the prep work is key, and you need a nice smooth solid base whether it's primer, the original finish clean and sanded smooth or a combo of both. Then once you have it all done and cleared, buffing out the clearcoat with rubbing compound helps make it look more finished and professional.

Another thing not mentioned here that could be helpful: if you already have an air compressor - or have always wanted an excuse to get one - you might consider getting a cheap airbrush kit and some low-VOC automotive grade airbrushable colors and skip the rattlecan business altogether. (Well, except maybe priming) This avoids the waste of typical rattlecan overspray, gives you greater control on application, and eschews the nasty fumes in your workspace and the environment as a whole. My airbrush kit was $9.95 at Harbor Freight, hobby stores stock similar ones for $20 and up. Each rattle can of primer, color and clear is bound to cost you from $5 to $25 depending on type, so it does add pretty fast.
I haven't striped or clearcoated this one yet, but I'm really happy the way the pearl lime color has finished this frame so far, and with about a week of curing (some of that over a woodstove) the surface feels nice and hard and ready to take a clear. The green on this frame was done with exactly 2.5 oz of color and reducer, for the whole frame and fork. The white is the white primer undercoat.

As many have mentioned above, the prep work is key, and you need a nice smooth solid base whether it's primer, the original finish clean and sanded smooth or a combo of both. Then once you have it all done and cleared, buffing out the clearcoat with rubbing compound helps make it look more finished and professional.
__________________
● 1971 Grandis SL ● 1972 Lambert Grand Prix frankenbike ● 1972 Raleigh Super Course fixie ● 1973 Nishiki Semi-Pro ● 1979 Motobecane Grand Jubile ●1980 Apollo "Legnano" ● 1984 Peugeot Vagabond ● 1985 Shogun Prairie Breaker ● 1986 Merckx Super Corsa ● 1987 Schwinn Tempo ● 1988 Schwinn Voyageur ● 1989 Bottechia Team ADR replica ● 1990 Cannondale ST600 ● 1993 Technium RT600 ● 1996 Kona Lava Dome ●
● 1971 Grandis SL ● 1972 Lambert Grand Prix frankenbike ● 1972 Raleigh Super Course fixie ● 1973 Nishiki Semi-Pro ● 1979 Motobecane Grand Jubile ●1980 Apollo "Legnano" ● 1984 Peugeot Vagabond ● 1985 Shogun Prairie Breaker ● 1986 Merckx Super Corsa ● 1987 Schwinn Tempo ● 1988 Schwinn Voyageur ● 1989 Bottechia Team ADR replica ● 1990 Cannondale ST600 ● 1993 Technium RT600 ● 1996 Kona Lava Dome ●
Last edited by Lascauxcaveman; 01-06-15 at 01:33 PM.
01-06-15, 12:38 PM
#22
Senior Member

Join Date: May 2012
Location: Point Reyes Station, California
Posts: 4,528
Bikes: Indeed!
Mentioned: 92 Post(s)
Tagged: 0 Thread(s)
Quoted: 1507 Post(s)
Liked 3,473 Times
in
1,132 Posts
I've heard good things about these paints that are specifically matched to vintage Schwinn colors:
Vintage Schwinn - Welcome! Schwinn Bike Paint, Custom Parts, Decals and Gallery of Pictures
I would caution against the propane torch or the heat ***: Most of the pros seem to prefer a fairly low temperature, between 150f and 180f, for at least several hours and up to several days depending on the paint. Patience is indeed a virtue when it comes to painting.
Brent
01-06-15, 12:46 PM
#23
Senior Member
Join Date: Nov 2010
Location: Magnolia State, 100� with 110% humidity
Posts: 1,230
Bikes: American, Italian, and Japanese.. in no particular order.
Mentioned: 21 Post(s)
Tagged: 0 Thread(s)
Quoted: 350 Post(s)
Liked 276 Times
in
128 Posts
I repainted my Torelli with Dupli-Color metallic spraycan paint and finished with Spraymax 2-part urethane spraycan. The Dupli-color had a grainy finish but the Spraymax glossed it over. You can spray the clear over the decals but it won't bury the edges unless you're willing to spend lots of $$ on extra clear and alot of sanding between coats.
01-06-15, 12:49 PM
#24
Senior Member
Join Date: Apr 2011
Location: Maryland, USA
Posts: 2,433
Bikes: Drysdale/Gitane/Zeus/Masi/Falcon/Palo Alto/Raleigh/Legnano
Mentioned: 34 Post(s)
Tagged: 0 Thread(s)
Quoted: 983 Post(s)
Liked 632 Times
in
403 Posts
Is it feasible to do "candy" colors? This was a popular method back in the 1970s, but I saw it done on autos, not bikes. The method involves using a metallic paint (typically gold or silver) as a base coat and then applying a translucent top coat of the desired color such that the undercoat color can still be seen.
__________________
Larry:1958 Drysdale, 1961 Gitane Gran Sport, 1974 Zeus track, 1988 Masi Gran Corsa, 1974 Falcon, 1980 Palo Alto, 1973 Raleigh Gran Sport, 1974 Legnano. Susan: 1976 Windsor Profesional.
Larry:1958 Drysdale, 1961 Gitane Gran Sport, 1974 Zeus track, 1988 Masi Gran Corsa, 1974 Falcon, 1980 Palo Alto, 1973 Raleigh Gran Sport, 1974 Legnano. Susan: 1976 Windsor Profesional.
01-06-15, 01:17 PM
#25
Senior Member

Join Date: Aug 2009
Location: Berkeley, CA
Posts: 7,244
Bikes: '72 Cilo Pacer, '72 Gitane Gran Tourisme, '72 Peugeot PX10, '73 Speedwell Ti, '74 Peugeot UE-8, '75 Peugeot PR-10L, '80 Colnago Super, '85 De Rosa Pro, '86 Look Equipe 753, '86 Look KG86, '89 Parkpre Team, '90 Parkpre Team MTB, '90 Merlin
Mentioned: 87 Post(s)
Tagged: 0 Thread(s)
Quoted: 834 Post(s)
Liked 2,125 Times
in
554 Posts
Here's an example of a two-part (grey with pearl) rattle can paint job I did with automotive paint. I added the lug lining with a brush.
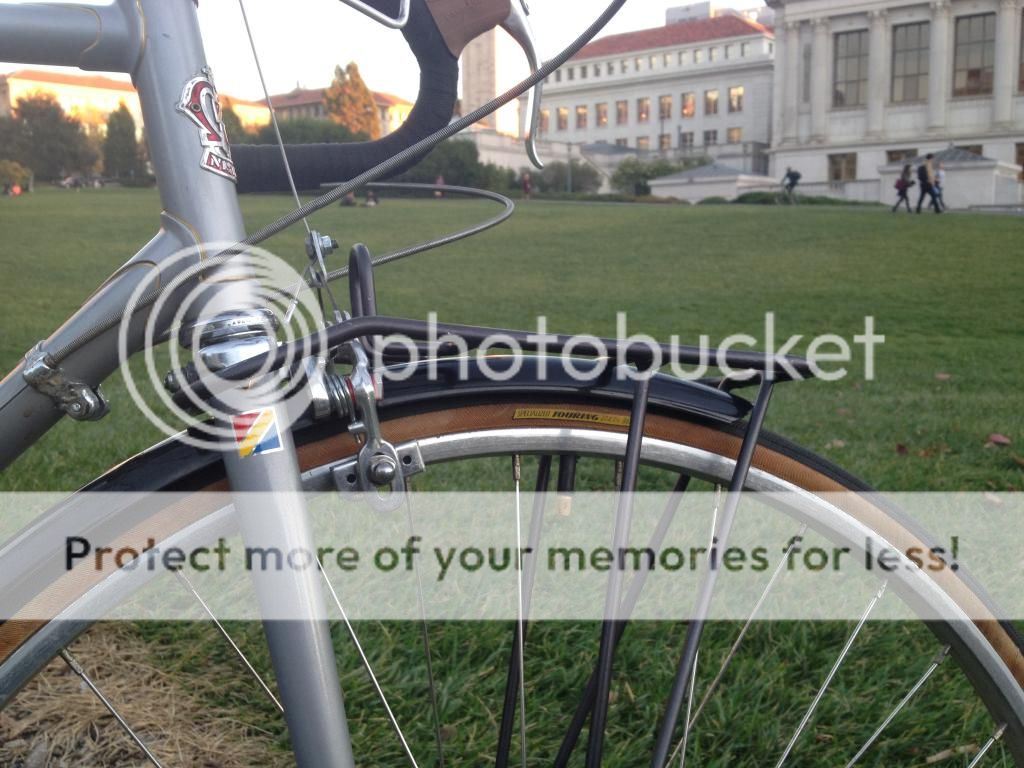
If you go to your local auto paint store, they will have huge number of color options in standard colors as well as pearls and metallics. I second the recommendation for automotive paints. They go on thinner (so the lug lines are cleaner), cure more quickly, and are more scratch/chip-resistent. It's a lot of work to properly prep and paint a frame, so if you're spending all that time & energy, it's worth the extra ~$10 per can for auto paint, IMO. But there is a major caveat--with any paint, but especially auto paints: Get yourself a good paint mask. That stuff is hazardous to breath!
If you go to your local auto paint store, they will have huge number of color options in standard colors as well as pearls and metallics. I second the recommendation for automotive paints. They go on thinner (so the lug lines are cleaner), cure more quickly, and are more scratch/chip-resistent. It's a lot of work to properly prep and paint a frame, so if you're spending all that time & energy, it's worth the extra ~$10 per can for auto paint, IMO. But there is a major caveat--with any paint, but especially auto paints: Get yourself a good paint mask. That stuff is hazardous to breath!