


Replacing a chain hanger on an old Nishiki?
 02-25-15, 10:38 PM
#1
Full Member
Thread Starter
Replacing a chain hanger on an old Nishiki?
I have an '85 Nishiki that's missing one itty-bitty part. It has a threaded hole where a chain hanger used to be (y'know, that weird little nub on the inside of the right seat stay). Does anyone know whether something like this is replaceable? I have one on a damaged Fuji frame that I've got hanging around, but it looks to be not only firmly attached, but painted over as well, so I doubt that it would be as easy as simply switching it over from one frame to the other. I realize that it's not a necessary part, nor even a particularly useful one, but it bugs me to have an empty hole on there. 


 02-26-15, 08:11 AM
#3

Senior Member
Join Date: Jan 2013
Posts: 2,679
Bikes: too many sparkly Italians, some sweet Americans and a couple interesting Japanese
Mentioned: 10 Post(s)
Tagged: 0 Thread(s)
Quoted: 569 Post(s)
Liked 581 Times
in
409 Posts
S stainless screw with the head filed down to the screwdriver flat would look just like a keeper.
02-26-15, 10:18 AM
#4
Full Member
Thread Starter
I've actually tried putting a small bolt in there, but it will only go in a couple of millimeters before stopping, leaving too much of the bolt sticking out. I'll see if I can't find something of a slightly smaller diameter, or possibly see if I can clean the threads out.
02-26-15, 10:58 AM
#5
Senior Member
Join Date: Nov 2013
Location: Near Pottstown, PA: 30 miles NW of Philadelphia
Posts: 2,186
Bikes: 2 Trek Mtn, Cannondale R600 road, 6 vintage road bikes
Mentioned: 83 Post(s)
Tagged: 0 Thread(s)
Quoted: 472 Post(s)
Liked 1,028 Times
in
404 Posts
Since I'm quite sure no one would ever look at it I'd either cut a rubber plug with a hole punch just the right size (maybe punch that plug out of an old mouse pad) OR I'd daub some black Plastic-Dip into the hole, maybe a couple of times until the surface, when fully cured, is flush with the stay. Then just go ride.
02-26-15, 11:20 AM
#6
Senior Member

Join Date: May 2008
Location: Fredericksburg, Va
Posts: 9,579
Bikes: '65 Frejus TDF, '73 Bottecchia Giro d'Italia, '83 Colnago Superissimo, '84 Trek 610, '84 Trek 760, '88 Pinarello Veneto, '88 De Rosa Pro, '89 Pinarello Montello, '94 Burley Duet, 97 Specialized RockHopper, 2010 Langster, Tern Link D8
Mentioned: 73 Post(s)
Tagged: 0 Thread(s)
Quoted: 1607 Post(s)
Liked 2,216 Times
in
1,103 Posts
@Lanovran Couple of comments:
1. Was the "small bolt" you tried smaller than the threads or did you screw it in?
2. A couple of millimeters is meaningless without knowing 1. A better measurement is the number of complete turns the fastener makes before bottoming out. Two full rotations might be enough.
3. If the "bolt" is sticking out to far, you can cut the threads to make the thread length shorter. How did you determine that it was too far? It needs to be far enough to hold the chain. Typically the "head" is like a disk that fits between the links on the rollers.
4. Cleaning out the threads on a hole that shallow can be a problem if you use a tap as the tap will bottom out before the tap threads are either engaged, at worst, or fully engaged to clean. My approach would be to determine the right size (5mm) then file a slope on the end of the thread shank to create an edge to effectively clean the threads as you screw it in. I would make sure the fastener at least started well before filing the end of it.
Actually I like this approach. I have a MASI frame which has a broken off head. Typically they are brazed on:
[IMG]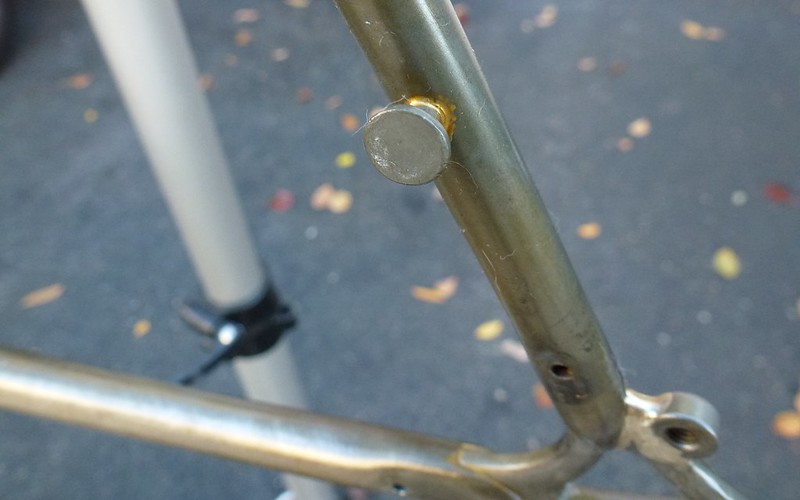 P1000868 by superissimo_83, on Flickr[/IMG]
1. Was the "small bolt" you tried smaller than the threads or did you screw it in?
2. A couple of millimeters is meaningless without knowing 1. A better measurement is the number of complete turns the fastener makes before bottoming out. Two full rotations might be enough.
3. If the "bolt" is sticking out to far, you can cut the threads to make the thread length shorter. How did you determine that it was too far? It needs to be far enough to hold the chain. Typically the "head" is like a disk that fits between the links on the rollers.
4. Cleaning out the threads on a hole that shallow can be a problem if you use a tap as the tap will bottom out before the tap threads are either engaged, at worst, or fully engaged to clean. My approach would be to determine the right size (5mm) then file a slope on the end of the thread shank to create an edge to effectively clean the threads as you screw it in. I would make sure the fastener at least started well before filing the end of it.
Actually I like this approach. I have a MASI frame which has a broken off head. Typically they are brazed on:
[IMG]
P1000868 by superissimo_83, on Flickr[/IMG]
02-26-15, 01:41 PM
#7
Full Member
Thread Starter
Ok, I apparently didn't try hard enough to get a bolt in there... I used a Q-tip and some isopropyl to clean out the old dirt and gunk that had collected in the threads, then gave it some new grease. I was able to find a relatively shiny new SPD cleat bolt, onto which I put a bit of locktite, and it screwed right into the hole without a problem. It's just the right length, and it still works as a chain hanger.  Thanks for all the replies!

Thanks for all the replies!
02-26-15, 01:58 PM
#8
Senior Member
Join Date: Oct 2014
Location: Portland, OR
Posts: 12,904
Bikes: (2) ti TiCycles, 2007 w/ triple and 2011 fixed, 1979 Peter Mooney, ~1983 Trek 420 now fixed and ~1973 Raleigh Carlton Competition gravel grinder
Mentioned: 129 Post(s)
Tagged: 0 Thread(s)
Quoted: 4806 Post(s)
Liked 3,928 Times
in
2,553 Posts
I was going to suggest the same thing. I had a custom ti fix gear made and asked for a welded on hanger but we waited until I had ridden it a bit to see where that hanger could best be located for on-the-road wheel flips. The route we went (at the builder's suggestion) was a threaded hole through the dropout above the slot. I used a pan head SS bolt with a nut tighten against the dropout. Looks not too different from yours (except different location) and works really well. (I think I will get a flathead though based on what I see here.)
Best part of the threaded approach for me? When I got my hands on a 12t cog, it came with a special lock-ring since with a standard lockring, the chain would be riding on it, not the much smaller cog. But that lockring is a bell shaped piece that extends much further outboard that a standard one. And made real contact with my chain hanger. But with wrench and hex wrench and 2 minutes, problem solved for good! A thank you to the builder.
Ben


Thread
Thread Starter
Forum
Replies
Last Post
UrbanPoet
Bicycle Mechanics
2
09-10-12 06:02 PM
