


How To Fabricate Suntour Cyclone !st Gen. Cable Pinch Bolt
 02-25-15, 11:49 PM
#1
Senior Member
Thread Starter

How To Fabricate Suntour Cyclone !st Gen. Cable Pinch Bolt
I purchased a 1st generation Suntour Cyclone rear derailleur from a co-op in Portland for $10. Other than a little grease it was in great condition. It was, of course, missing the cable pinch bolt. The bike shop cobbled together a m5 allen bolt and some washers & a nut on the back that would certainly "pinch" the cable in place, but didn't look great. It was also missing the b limit screw, which I took off a "parts" Suntour derailleur.
I scoured the internet along with this forum and found that Suntour only used this particular pinch bolt design on two of it's derailleurs, thus they're hard to find. They apparently get stripped and that's what necessitates replacement. I didn't see any specific instruction on how to make a replacement so I decided to post what I did.
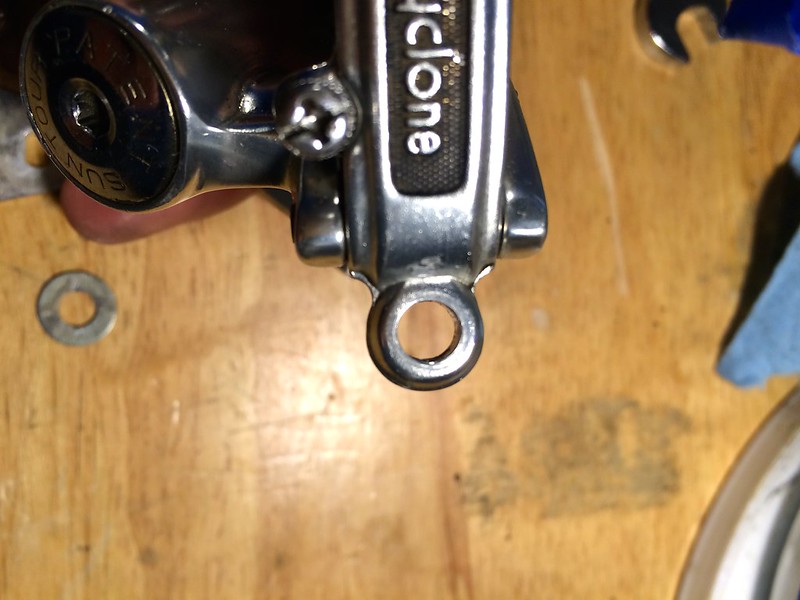
Here is the front view of the tab. The pinch bolt inserts from the rear, to the front where it's held by an "acorn" nut.
 !st Gen. Cyclone Rear Derailleur by velocivixen, on Flickr
Here is the rear of that tab. Notice the trough which ends on a "lip" then the metal dips to the circular tab. The shift cable exits the derailleur via that trough, passes through a hole in the pinch bolt, which is then secured via the acorn nut on the front.
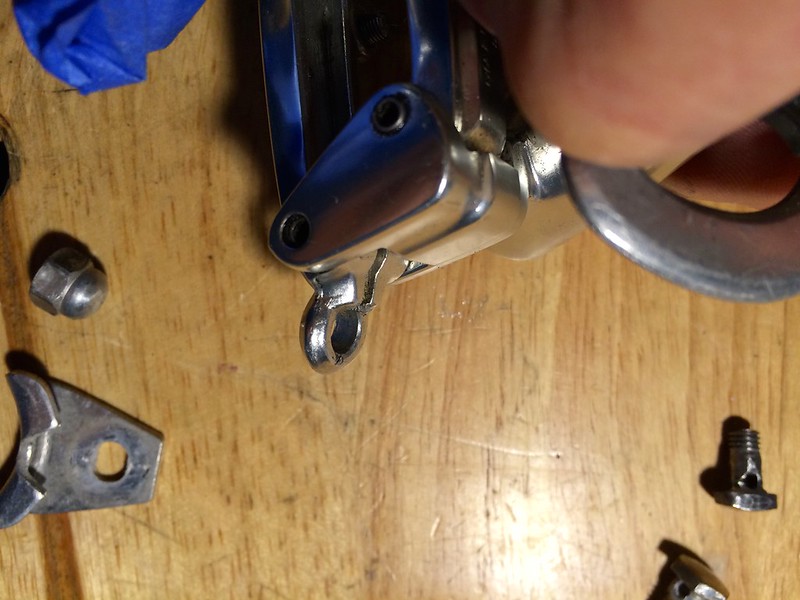 Cable trough rear by velocivixen, on Flickr
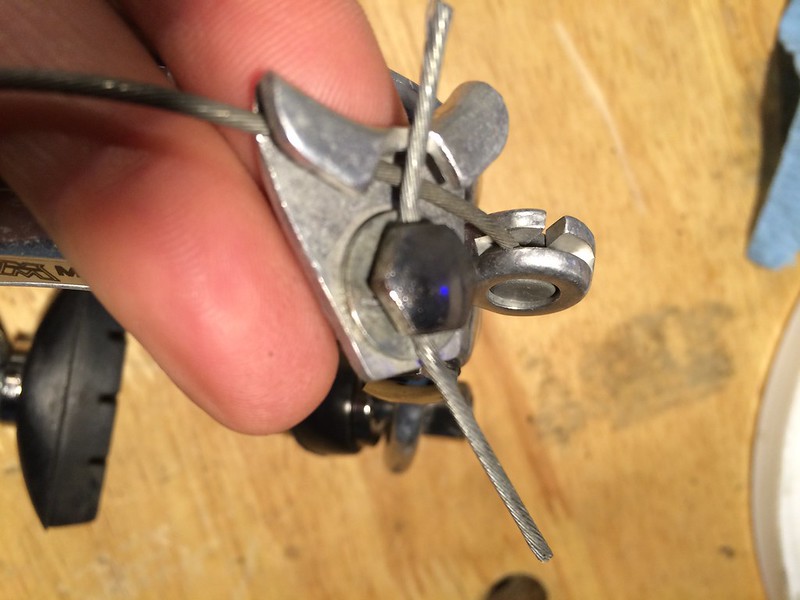
Here is the straddle cable hanger nut/bolt from an old Dia Compe cantilever brake setup. The original acorn nut on the Suntour Cyclone was 8mm, and the straddle cable nut is 9mm, so it's a little bigger but looks ok. We will use this acorn nut and the accompanying pinch bolt from the back side to modify.
 Eye bolt by velocivixen, on Flickr
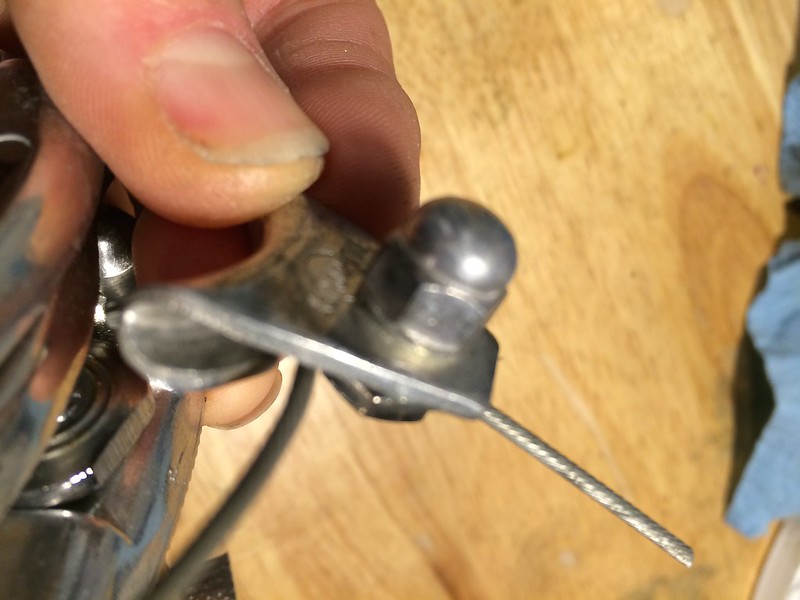
Here is the rear of the straddle cable hanger. Notice where the cable passes through the bolt. You can't see the hole because it's under the head of the bolt. We will file a "flat" on one side of the head of this bolt, so that it will seat properly on the rear of the tab on the derailleur.
 Bolt Holding Cable by velocivixen, on Flickr
I don't have any big grinding wheels or tools, but I do own a Dremel with various attachments. I used this attachment and it worked well.
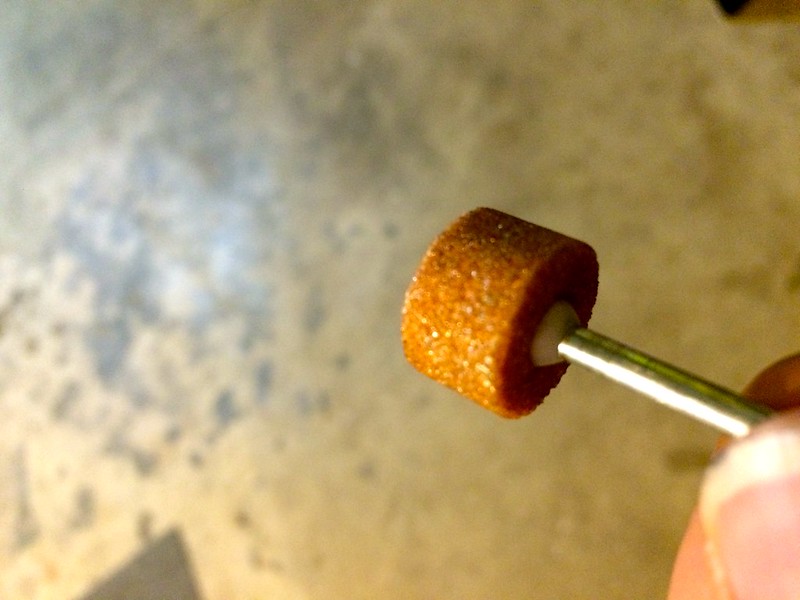 Dremel Grinding Attachment by velocivixen, on Flickr
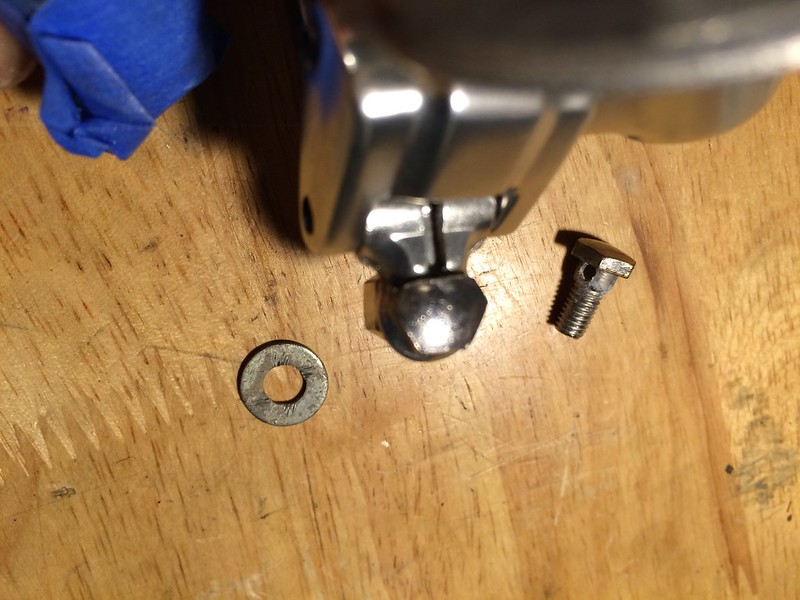
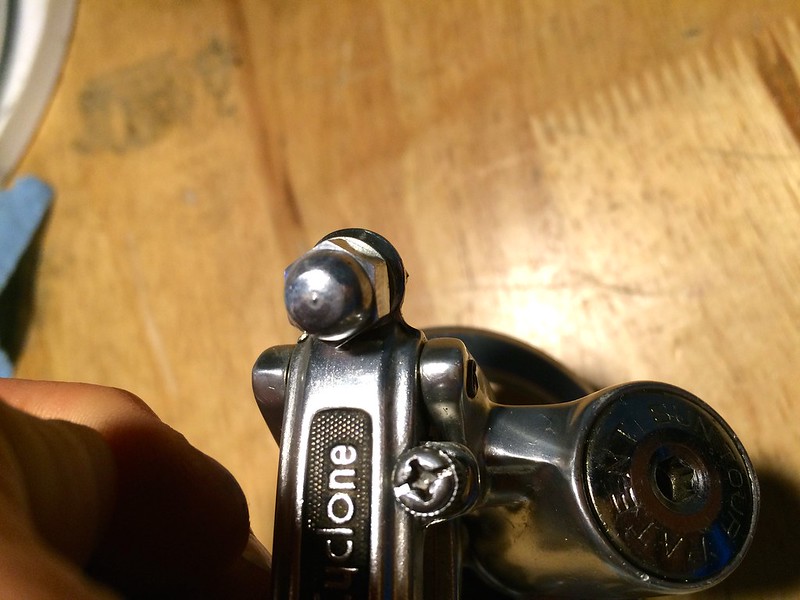
The pinch bolt must be situated through the rear of the derailleur tab coming forward (acorn nut will be on the front of the derailleur). The hole, which traverses the bolt must align with that cable trough. The cable will come through the trough, through the hole in the nut and will be "pinched" down when you tighten the acorn nut on the front. See here how I've ground down a flat spot on the head of the bolt. It now fits down against that "lip" I illustrated earlier. Original bolt on the table and modified bolt in the tab of the derailleur (back side).
Finished bolt head in derailleur by velocivixen, on Flickr
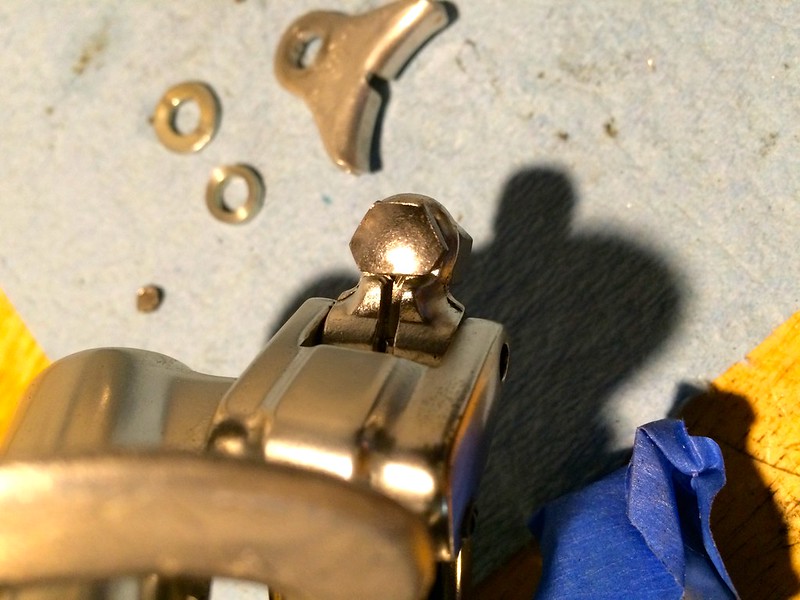
A couple more angles from the back side of the tab on the derailleur. Notice how that newly formed "flat" allows the head of the bolt to sit snugly against the lip by the cable trough.
NOTE: I had to cut about 3-4 mm off the end of the bolt. I used a metal cutting wheel attachment on the Dremel. It took a bit to get the acorn nut to want to thread onto the bolt, but I worked at it and it finally worked out.
 Side of bolt head ground down by velocivixen, on Flickr
 View Suntour Cyclone 1st Gen by velocivixen, on Flickr
Underneath the head of the original pinch bolt there are "flats" on the sides where the holes are. It's the other sides of the bolt, perpendicular to the holes, which are a little wider and I focused my grinding on those two sides. I polished the acorn nut and here's what it looks like on the front of the derailleur.
 Acorn nut front of derailleur. by velocivixen, on Flickr
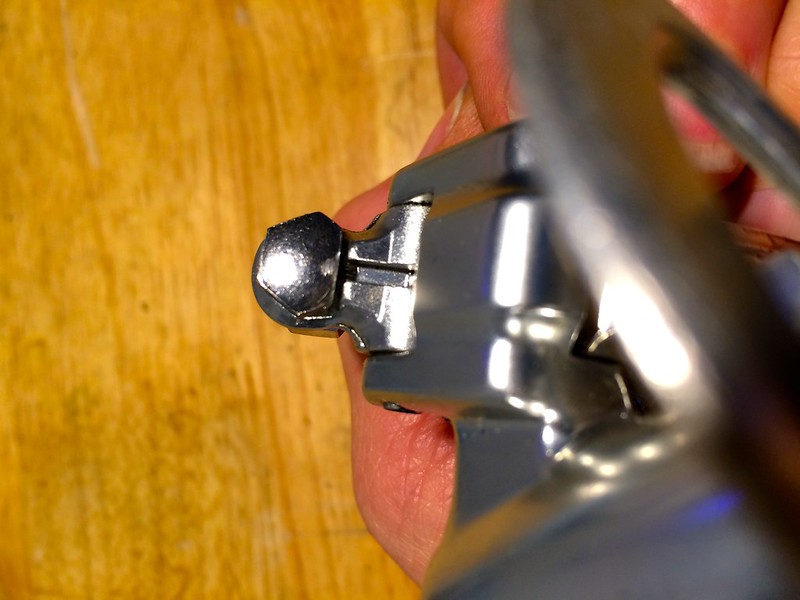
Here's what the finished product looks like from the side. I may go to the hardware store tomorrow and see about finding an acorn nut that's 8mm that will fit the threads.
 IMG_5084 by velocivixen, on Flickr
I inserted a cable in there and tightened it up just to see if the pinch bolt would really hold a cable and it did great. I hope this tutorial with photos was helpful. When you think about it, it really is quite simple and makes sense. Just use some creativity and don't be afraid to try something "outside the box".
Cheers.
I scoured the internet along with this forum and found that Suntour only used this particular pinch bolt design on two of it's derailleurs, thus they're hard to find. They apparently get stripped and that's what necessitates replacement. I didn't see any specific instruction on how to make a replacement so I decided to post what I did.
Here is the front view of the tab. The pinch bolt inserts from the rear, to the front where it's held by an "acorn" nut.
!st Gen. Cyclone Rear Derailleur by velocivixen, on FlickrHere is the rear of that tab. Notice the trough which ends on a "lip" then the metal dips to the circular tab. The shift cable exits the derailleur via that trough, passes through a hole in the pinch bolt, which is then secured via the acorn nut on the front.
Cable trough rear by velocivixen, on FlickrHere is the straddle cable hanger nut/bolt from an old Dia Compe cantilever brake setup. The original acorn nut on the Suntour Cyclone was 8mm, and the straddle cable nut is 9mm, so it's a little bigger but looks ok. We will use this acorn nut and the accompanying pinch bolt from the back side to modify.
Eye bolt by velocivixen, on FlickrHere is the rear of the straddle cable hanger. Notice where the cable passes through the bolt. You can't see the hole because it's under the head of the bolt. We will file a "flat" on one side of the head of this bolt, so that it will seat properly on the rear of the tab on the derailleur.
Bolt Holding Cable by velocivixen, on FlickrI don't have any big grinding wheels or tools, but I do own a Dremel with various attachments. I used this attachment and it worked well.
Dremel Grinding Attachment by velocivixen, on FlickrThe pinch bolt must be situated through the rear of the derailleur tab coming forward (acorn nut will be on the front of the derailleur). The hole, which traverses the bolt must align with that cable trough. The cable will come through the trough, through the hole in the nut and will be "pinched" down when you tighten the acorn nut on the front. See here how I've ground down a flat spot on the head of the bolt. It now fits down against that "lip" I illustrated earlier. Original bolt on the table and modified bolt in the tab of the derailleur (back side).
Finished bolt head in derailleur by velocivixen, on Flickr
A couple more angles from the back side of the tab on the derailleur. Notice how that newly formed "flat" allows the head of the bolt to sit snugly against the lip by the cable trough.
NOTE: I had to cut about 3-4 mm off the end of the bolt. I used a metal cutting wheel attachment on the Dremel. It took a bit to get the acorn nut to want to thread onto the bolt, but I worked at it and it finally worked out.
Side of bolt head ground down by velocivixen, on FlickrView Suntour Cyclone 1st Gen by velocivixen, on FlickrUnderneath the head of the original pinch bolt there are "flats" on the sides where the holes are. It's the other sides of the bolt, perpendicular to the holes, which are a little wider and I focused my grinding on those two sides. I polished the acorn nut and here's what it looks like on the front of the derailleur.
Acorn nut front of derailleur. by velocivixen, on FlickrHere's what the finished product looks like from the side. I may go to the hardware store tomorrow and see about finding an acorn nut that's 8mm that will fit the threads.
IMG_5084 by velocivixen, on FlickrI inserted a cable in there and tightened it up just to see if the pinch bolt would really hold a cable and it did great. I hope this tutorial with photos was helpful. When you think about it, it really is quite simple and makes sense. Just use some creativity and don't be afraid to try something "outside the box".
Cheers.
Last edited by Velocivixen; 02-26-15 at 12:45 AM.
 02-26-15, 12:03 AM
#2


Fresh Garbage

Yeah, that's what I did for a couple of mine.
That's one clean derailleur. How did you get it so spotless?
That's one clean derailleur. How did you get it so spotless?
Last edited by hairnet; 02-26-15 at 12:07 AM.
02-26-15, 12:15 AM
#3
verktyg

Join Date: Jul 2006
Location: SF Bay Area
Posts: 4,030
Bikes: Current favorites: 1988 Peugeot Birraritz, 1984 Gitane Super Corsa, 1980s DeRosa, 1981 Bianchi Campione Del Mondo, 1992 Paramount OS, 1988 Colnago Technos, 1985 RalieghUSA SBDU Team Pro
Mentioned: 207 Post(s)
Tagged: 0 Thread(s)
Quoted: 1036 Post(s)
Liked 1,238 Times
in
654 Posts
Suntour Cyclone Cable Clamp
vv, that's what I was going to recommend too. Looks like you have a handle on it. Great job. 
verktyg
verktyg
__________________
Don't believe everything you think! History is written by those who weren't there....
Chas. ;-)
Don't believe everything you think! History is written by those who weren't there....
Chas. ;-)
02-26-15, 12:38 AM
#4
Senior Member
Thread Starter
@verktyg - I figured that a bunch of folks did this on their own. I know I've come up with some creative solutions, but never took the time to post. I just wanted future cyclists to find this if they did a search. Maybe give a person, who doesn't have as much experience or live near a co-op, the idea of how to find a solution.
02-26-15, 04:40 AM
#5
Senior Member
Join Date: Jul 2004
Location: northern michigan
Posts: 13,317
Bikes: '77 Colnago Super, '76 Fuji The Finest, '88 Cannondale Criterium, '86 Trek 760, '87 Miyata 712
Mentioned: 19 Post(s)
Tagged: 0 Thread(s)
Quoted: 659 Post(s)
Liked 595 Times
in
313 Posts
Nice job. That should hold it just fine. You've inspired me to spiff up my 1st gen cyclone. It's on my '80 Centurion Elite with barcons and deserves a shining up.
02-26-15, 06:25 AM
#6

Death fork? Naaaah!!

I'm surprised one doesn't see more of these, as Sun Tour pinch bolts of all flavors were rather soft. I've snapped many over the years.
Top
Top
__________________
You know it's going to be a good day when the stem and seatpost come right out.
(looking for a picture and not seeing it? Thank the Photobucket fiasco.PM me and I'll link it up.)
You know it's going to be a good day when the stem and seatpost come right out.
(looking for a picture and not seeing it? Thank the Photobucket fiasco.PM me and I'll link it up.)
Last edited by top506; 02-26-15 at 04:54 PM.
02-26-15, 07:29 AM
#7
Senior Member

Join Date: Jun 2005
Location: In transit
Posts: 1,897
Bikes: 07 Vanilla, 98 IRD road frame built up with 25th Ann DA, Surly cross check with 105 comp, 78 Raleigh Comp GS, 85 Centurionelli
Mentioned: 8 Post(s)
Tagged: 0 Thread(s)
Quoted: 87 Post(s)
Liked 923 Times
in
191 Posts
Great tutorial VelociV! You ever thought of starting a blog?
 02-26-15, 01:07 PM
#10
Stop reading my posts!

Join Date: Sep 2004
Posts: 12,579
Mentioned: 89 Post(s)
Tagged: 0 Thread(s)
Quoted: 1443 Post(s)
Liked 1,059 Times
in
784 Posts
I'm a bit late to this but that's a great How-to...I'm amazed at how well these are made by several of our members who have done them over the years. It's no easy thing to make good ones with clear written instructions and clear, close-up pix, so kudos to Velocivixen!
On a tangent/hijack: I have 10 NOS SunTour cable anchor bolts in a bag, these are from earlier days than the Cyclone, probably will fit many of the V series derailleurs, see the pix.
(I think they take an 8mm wrench and the 5M shaft is approx 8mm long)...
I will give ONE BOLT FREE one to a customer for the cost of postage, let's say $1 via PayPal or you could mail me a SSAE and I'll mail you one back in your envelope.
Once all 10 have been spoken for the deal shuts off.
PM me your address if you want one.
02-27-15, 04:20 AM
#11
Senior Member
I use a 2.5 liter ultrasonic cleaner. Interesting what's your day job?
great work my cyclone is missing that bolt. Thank you for the photo diy.
great work my cyclone is missing that bolt. Thank you for the photo diy.

Thread
Thread Starter
Forum
Replies
Last Post
kewlkevkev
Bicycle Mechanics
17
02-12-16 01:46 PM
Velocivixen
Classic & Vintage
10
02-26-15 12:50 AM
