


BikesDirect Motobecane Fantom CXX Report, with pics
 04-13-13, 11:51 PM
#1
Senior Member
Thread Starter

Join Date: Jun 2012
Location: The Great Pacific NW
Posts: 162
Mentioned: 0 Post(s)
Tagged: 0 Thread(s)
Quoted: 0 Post(s)
Likes: 0
Liked 0 Times
in
0 Posts
BikesDirect Motobecane Fantom CXX Report, with pics
For those of you just tuning in, I took the plunge and ordered one of these from Bikes Direct, which I took delivery of it last Friday. At the same time, I also ordered a stem (FSA OS-190 90mm), a handlebar (FSA Wing 42cm), tires (Vittoria Randonneur Pro RFX 700x32c) and fenders (Velo Orange 45mm hammered alloy). Last evening and this afternoon I worked on installing and assembling all of this stuff at my local co-op. For reasons of my own rustiness/lack of skill and good ol' Murphy's Law, what I've had is an excellent illustration of the maxim:
I am not a BD shill. In fact, I did not even know about BD before I read about it here on BF. What I am posting here is an attempt at an unbiased account of the experience of a BD customer who is fairly mechanically inclined (I've rebuilt car engines in the past, and most automotive mechanical work does not intimidate me), but rusty in the ways of bicycle mechanics and who has never had any experience working on cantilever brakes. In coming to the decision that I could get way more bang for my buck via BD than my LBS, I relied on you folks who posted your BD experiences and pics. This post and the follow-ups to it represents my feeble effort to pay that forward.
Without further ado ....
My overall impression of the bike is that it was exactly as described on BD's website, if not better. All of the components that were supposed to be there were there. The $799 bike is equipped with a full Apex gruppo right down to the crank and bottom bracket (not brakes - those are Tektro cantilevers, again as described - what a joy!) A comparable bike at a Seattle LBS would easily exceed two grand, and anything new at this price point would be equipped with department store-grade components. The only eyebrow-raiser was the no-name handlebar and stem, something BD obviously cheaped out on. As I had already planned to change out the bar and stem, I didn't hardly even look at it and promptly donated it to The Bikery.
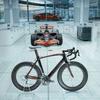
This is how she comes:

When you open it:


Right off the bat, you can see that contrary to what the BD detractors say, it's extremely well packed. There was no shipping damage. Speaking of which, when you de-box it:

Obviously the first task is to cut all the zip ties and remove all the packing. In so doing I managed to drop the fork on the floor as I had forgotten that a threadless fork is held in place by the cap. (Hey, I'm old and I've only ever dealt with forks that were held on by nuts. Deal.) The upshot of this very minor mishap is that I learned that, in fact, the bike is equipped with a sealed bearing headset:

This pic also gives you an idea of what the welds on the bike look like. Nope, no department store bike gorilla welds here!
While we're at it, since I managed to drop it on the floor, here's a pic of the fork and the associated hardware:

Also contrary to what the BD bashers say, the wheels were dead true out of the box and the hub bearings were fine.
In a bizarre twist of fate, instead of an FSA Wing alloy bar, I received an FSA K-Wing carbon bar. Pics:


The company I ordered the bar from sent me an email asking me for my feedback and informing me that they are a new company and are trying to build their reputation or something. I'm tempted to tell them that if they make too many very costly mistakes like this one, they won't be in business for very long. That aside, those of you who who've read my posts know that I'm a bit of a curmudgeon who detests carbon with a passion and views it as unpredictable and unsafe, so I'm really torn as to how to proceed. I could probably sell the bar, buy an alloy Wing locally and still come out ahead. Anyway ...
The first four hours ended with me installing the Randonneur Pros, hooking up the rear brake and adjusting the rear derailer. The brake cable housing presented the first mystery to be solved. The bike comes with zero instructions on setting up cantilever brakes, and you get six or so pieces of cable housing in various lengths along with two inline adjusters. I ultimately figured out that the shortest housing piece was for the rear brake at the stop, but the other pieces could be installed in various configurations. All of them, unfortunately, left the front housing miles too long, so long, in fact, that it would have wrapped all the away around the stem en route to the front cable stop as you can see in this pic:

I also managed to chip the paint where the bar contacted the top tube. Oh well, nothing a little touch-up paint can't take care of, or some "One Less Fixie" stickers.
Having never installed a folding tire, it was an atrocious pain until I figured out that you have to bend them in the middle and slide them over the rim first, i.e., installing them like a regular clincher will keep you busy for hours as the part you just installed pops out as if to taunt you. Oh, and removing the dork disc, which introduced me to the world of a non-pinned cassette. Crawing on hands and knees to pick cogs and spacers up off a shop floor is not fun. Good thing they only go on one way.
When the rear derailer adjustment took a dangerous turn (I heard the awful "clink-clink-clink" of the spokes hitting the cage), I decided to call it a day and re-read Park Tool's website.
Here's what she looked like at the end of the second day, with the rear derailer adjusted, the front brake hooked up and the front fender installed:


You will see that I lopped about two inches off the front brake housing to get rid of the excess length.
As for the fenders, I had to use the supplied L-bracket on the front fender, otherwise the fender line was way off. That said, overall I did not find the front fender to be the awful dreaded job that people make it out to be. The secret? Put everything together loosely at first, then tighten it as you get it where you want it. And after all that work, I had to remove the front fender to stuff the bike in my trunk unless I want to mangle it. Makes me almost want to jump the yuppie shark and pick up a roof rack for my car. Almost.
Tomorrow - check front derailer, install rear fender and pedals and saddle from current bike. Set up new bike per measurements taken from Calfee Sizer Cycle. And, if time and weather permit, take 'er for a test ride (hope I got those brakes right!)
Of course, any thoughts, comments or concerns would be greatly appreciated.
The first 10% of the job takes 90% of the time, and the other 90% of the job takes the other 90% of the time.
I am not a BD shill. In fact, I did not even know about BD before I read about it here on BF. What I am posting here is an attempt at an unbiased account of the experience of a BD customer who is fairly mechanically inclined (I've rebuilt car engines in the past, and most automotive mechanical work does not intimidate me), but rusty in the ways of bicycle mechanics and who has never had any experience working on cantilever brakes. In coming to the decision that I could get way more bang for my buck via BD than my LBS, I relied on you folks who posted your BD experiences and pics. This post and the follow-ups to it represents my feeble effort to pay that forward.
Without further ado ....
My overall impression of the bike is that it was exactly as described on BD's website, if not better. All of the components that were supposed to be there were there. The $799 bike is equipped with a full Apex gruppo right down to the crank and bottom bracket (not brakes - those are Tektro cantilevers, again as described - what a joy!) A comparable bike at a Seattle LBS would easily exceed two grand, and anything new at this price point would be equipped with department store-grade components. The only eyebrow-raiser was the no-name handlebar and stem, something BD obviously cheaped out on. As I had already planned to change out the bar and stem, I didn't hardly even look at it and promptly donated it to The Bikery.
This is how she comes:
When you open it:
Right off the bat, you can see that contrary to what the BD detractors say, it's extremely well packed. There was no shipping damage. Speaking of which, when you de-box it:
Obviously the first task is to cut all the zip ties and remove all the packing. In so doing I managed to drop the fork on the floor as I had forgotten that a threadless fork is held in place by the cap. (Hey, I'm old and I've only ever dealt with forks that were held on by nuts. Deal.) The upshot of this very minor mishap is that I learned that, in fact, the bike is equipped with a sealed bearing headset:
This pic also gives you an idea of what the welds on the bike look like. Nope, no department store bike gorilla welds here!
While we're at it, since I managed to drop it on the floor, here's a pic of the fork and the associated hardware:
Also contrary to what the BD bashers say, the wheels were dead true out of the box and the hub bearings were fine.
In a bizarre twist of fate, instead of an FSA Wing alloy bar, I received an FSA K-Wing carbon bar. Pics:
The company I ordered the bar from sent me an email asking me for my feedback and informing me that they are a new company and are trying to build their reputation or something. I'm tempted to tell them that if they make too many very costly mistakes like this one, they won't be in business for very long. That aside, those of you who who've read my posts know that I'm a bit of a curmudgeon who detests carbon with a passion and views it as unpredictable and unsafe, so I'm really torn as to how to proceed. I could probably sell the bar, buy an alloy Wing locally and still come out ahead. Anyway ...
The first four hours ended with me installing the Randonneur Pros, hooking up the rear brake and adjusting the rear derailer. The brake cable housing presented the first mystery to be solved. The bike comes with zero instructions on setting up cantilever brakes, and you get six or so pieces of cable housing in various lengths along with two inline adjusters. I ultimately figured out that the shortest housing piece was for the rear brake at the stop, but the other pieces could be installed in various configurations. All of them, unfortunately, left the front housing miles too long, so long, in fact, that it would have wrapped all the away around the stem en route to the front cable stop as you can see in this pic:
I also managed to chip the paint where the bar contacted the top tube. Oh well, nothing a little touch-up paint can't take care of, or some "One Less Fixie" stickers.
Having never installed a folding tire, it was an atrocious pain until I figured out that you have to bend them in the middle and slide them over the rim first, i.e., installing them like a regular clincher will keep you busy for hours as the part you just installed pops out as if to taunt you. Oh, and removing the dork disc, which introduced me to the world of a non-pinned cassette. Crawing on hands and knees to pick cogs and spacers up off a shop floor is not fun. Good thing they only go on one way.
When the rear derailer adjustment took a dangerous turn (I heard the awful "clink-clink-clink" of the spokes hitting the cage), I decided to call it a day and re-read Park Tool's website.
Here's what she looked like at the end of the second day, with the rear derailer adjusted, the front brake hooked up and the front fender installed:
You will see that I lopped about two inches off the front brake housing to get rid of the excess length.
As for the fenders, I had to use the supplied L-bracket on the front fender, otherwise the fender line was way off. That said, overall I did not find the front fender to be the awful dreaded job that people make it out to be. The secret? Put everything together loosely at first, then tighten it as you get it where you want it. And after all that work, I had to remove the front fender to stuff the bike in my trunk unless I want to mangle it. Makes me almost want to jump the yuppie shark and pick up a roof rack for my car. Almost.
Tomorrow - check front derailer, install rear fender and pedals and saddle from current bike. Set up new bike per measurements taken from Calfee Sizer Cycle. And, if time and weather permit, take 'er for a test ride (hope I got those brakes right!)
Of course, any thoughts, comments or concerns would be greatly appreciated.
 04-14-13, 05:37 AM
#2

Watching and waiting.

Join Date: Oct 2010
Location: Mattoon,Ill
Posts: 2,023
Bikes: Trek 7300 Trek Madone 4.5 Surly Cross Check
Mentioned: 0 Post(s)
Tagged: 0 Thread(s)
Quoted: 11 Post(s)
Likes: 0
Liked 0 Times
in
0 Posts
With V-brakes and caliper brakes I can look at them and make an adjustment. With cantilever brakes it's like a trial and error ordeal. When I'm done I'm never quite sure exactly which adjustment got them to work properly. It's like everything effects everything else.
As a Clyde, I'm concerned about BD's wheel quality. I'm not saying they're bad, I just couldn't find much info about them.
As a Clyde, I'm concerned about BD's wheel quality. I'm not saying they're bad, I just couldn't find much info about them.
04-14-13, 06:54 AM
#3
Climbers Apprentice
Join Date: Feb 2012
Posts: 1,600
Mentioned: 0 Post(s)
Tagged: 0 Thread(s)
Quoted: 0 Post(s)
Likes: 0
Liked 0 Times
in
0 Posts
On the bars, or you could do the right thing, tell them of their error, and see if they want to ship you an alloy bar and pick up the carbon.
04-14-13, 08:44 AM
#4
Senior Member
Join Date: Apr 2013
Posts: 106
Mentioned: 0 Post(s)
Tagged: 0 Thread(s)
Quoted: 0 Post(s)
Likes: 0
Liked 0 Times
in
0 Posts
I'd call that a cartridge bearing headset. The cable adjusters should be for the downtube derailer mounts, not brakes. The pictures of that bike on the BD site show them.
Agreed on the bars. Notify the company, and let them fix it.
It's an interesting bike. Thanks for posting this!
Agreed on the bars. Notify the company, and let them fix it.
It's an interesting bike. Thanks for posting this!
04-14-13, 10:26 AM
#5
Just Keep Pedaling

Join Date: Mar 2012
Location: Lakewood, CA
Posts: 3,355
Bikes: 99 Schwinn Mesa GS MTB, 15 Trek Domane 5.9 Dura-Ace, 17 Trek Emonda SL6 Pro & 18 Bianchi Vigorelli
Mentioned: 30 Post(s)
Tagged: 0 Thread(s)
Quoted: 251 Post(s)
Likes: 0
Liked 67 Times
in
34 Posts
04-14-13, 01:30 PM
#6
Senior Member
Thread Starter
Join Date: Jun 2012
Location: The Great Pacific NW
Posts: 162
Mentioned: 0 Post(s)
Tagged: 0 Thread(s)
Quoted: 0 Post(s)
Likes: 0
Liked 0 Times
in
0 Posts
I'm referring to the inline adjusters that came in the box. The derailer cable adjusters are at the downtube shifter bosses (the derailer cables come pre-strung). I know - I had to loosen the one for the rear derailer to get it to shift into the highest gear.
04-14-13, 02:15 PM
#7
Senior Member
Join Date: Apr 2013
Posts: 106
Mentioned: 0 Post(s)
Tagged: 0 Thread(s)
Quoted: 0 Post(s)
Likes: 0
Liked 0 Times
in
0 Posts
Sorry, I meant shifter mounts. Inline brake adjusters are not shown in SRam's Apex instructions. I'd guess they are meant to go on the brake cables at the handlebars, so that you could adjust brake clearance without having to get off the bike. One may be peeking out on the photo of the yellow bike.
04-14-13, 02:16 PM
#8
Senior Member
Join Date: Dec 2006
Location: Holly, Michigan, USA
Posts: 80
Mentioned: 0 Post(s)
Tagged: 0 Thread(s)
Quoted: 0 Post(s)
Likes: 0
Liked 0 Times
in
0 Posts
I'm still learning, so I may very well be wrong, but I'm not sure those are adjusters. I put my CXX together about three weeks ago, and I didn't see any way that those would change the length of the cable when turned. I thought they were just junctions outside of the bar wrap?
04-14-13, 02:42 PM
#9
Senior Member
Thread Starter
Join Date: Jun 2012
Location: The Great Pacific NW
Posts: 162
Mentioned: 0 Post(s)
Tagged: 0 Thread(s)
Quoted: 0 Post(s)
Likes: 0
Liked 0 Times
in
0 Posts
I'm still learning, so I may very well be wrong, but I'm not sure those are adjusters. I put my CXX together about three weeks ago, and I didn't see any way that those would change the length of the cable when turned. I thought they were just junctions outside of the bar wrap?
Also, check PMs.
04-14-13, 03:40 PM
#10
Senior Member
Join Date: Dec 2006
Location: Holly, Michigan, USA
Posts: 80
Mentioned: 0 Post(s)
Tagged: 0 Thread(s)
Quoted: 0 Post(s)
Likes: 0
Liked 0 Times
in
0 Posts
I don't have enough posts to reply to your PM. I love my CXX, but it's my first good bike, so I don't have a lot to compare it to. Mine did have a pinched rear dropout, but I worked that out easily with BD. I'm going to try to get in for a bike fit soon, and I also think I will get the wheels checked for true and spoke tension since I'm so heavy. (315 and dropping.)
And I spent some of my childhood in Spokane, and was also stationed at Whidbey Island in the early '80s. I love the PNW.
04-15-13, 10:52 AM
#11
Senior Member
Cool. See when I don't know anything, it's easy to learn a lot.
I don't have enough posts to reply to your PM. I love my CXX, but it's my first good bike, so I don't have a lot to compare it to. Mine did have a pinched rear dropout, but I worked that out easily with BD. I'm going to try to get in for a bike fit soon, and I also think I will get the wheels checked for true and spoke tension since I'm so heavy. (315 and dropping.)
And I spent some of my childhood in Spokane, and was also stationed at Whidbey Island in the early '80s. I love the PNW.
Good work on the bike, btw!
04-17-13, 12:08 AM
#12
Senior Member
Join Date: Jan 2012
Location: Spokane, WA
Posts: 2,243
Bikes: Specialized Sequoia Elite/Motobecane Fantom Cross Team Ti/'85 Trek 520
Mentioned: 0 Post(s)
Tagged: 0 Thread(s)
Quoted: 6 Post(s)
Likes: 0
Liked 3 Times
in
3 Posts
I traded for a BD Fantom Cross Team Ti frameset a couple months ago. I built it up using my own rebuilt wheelset (32 spoke 105 hubs with Mavic open rims) and a 105 9 speed groupset.
Great bike. I have no qualms about riding it even with the carbon fork and I'm 350+ pounds.
Great bike. I have no qualms about riding it even with the carbon fork and I'm 350+ pounds.
08-24-13, 05:09 PM
#14
Senior Member

Join Date: Apr 2012
Location: Middle Earth (aka IA)
Posts: 20,433
Bikes: A bunch of old bikes and a few new ones
Mentioned: 178 Post(s)
Tagged: 0 Thread(s)
Quoted: 5888 Post(s)
Liked 3,471 Times
in
2,079 Posts
Thanks for posting this. Good to know that even for an experienced mechanic, building a bike can be a bit of a mystery,  . Also excellent choice on the bike. I really, really don't need a new bike but the bike you bought is one that I've tried to convince myself a few times that I need. So far without much luck!
. Also excellent choice on the bike. I really, really don't need a new bike but the bike you bought is one that I've tried to convince myself a few times that I need. So far without much luck!
08-24-13, 06:02 PM
#15
Senior Member
Nice bike. Enjoyed reading about your experience.

Thread
Thread Starter
Forum
Replies
Last Post
GregTR
Commuting
29
02-26-13 08:16 PM
