


For all those that own the Dinotte tail light I have a question about the mount.
 10-27-07, 04:15 AM
#1
Senior Member
Thread Starter

Join Date: May 2006
Location: North of the 49th Parallel (GPS grid soon)
Posts: 1,766
Bikes: MTB Peugoet Canyon (forgot the model), Nikishi? roadbike, MTB custom build,
Mentioned: 0 Post(s)
Tagged: 0 Thread(s)
Quoted: 0 Post(s)
Likes: 0
Liked 0 Times
in
0 Posts
For all those that own the Dinotte tail light I have a question about the mount.
I would like to know for those with the new mount or old mount (tho I prefer input from the new mount owners I'd like input from the old mount owners as well as they both use the o-ring) how secure does the mount hold the light?
Will it survive jumping curbs, potholes, bumps, gaps, and offroading? My ride is both on/off road. On the road I've got like a long something like 10km stretch of road that's got all the above conditions that I ride in and it really will be putting the mounts to the test. My previous rack light mount snapped after a year of riding and the light did fall off a few times before until I used Loctite to bind the screw in from loosening often. Last thing I want is to be riding then hearing the Dinotte tail light drop and grind in the back wheel. I ride rough and in rough terrain.
Thanks in advance.
 10-27-07, 05:37 AM
#2
Senior Member
Join Date: Jul 2006
Posts: 2,418
Mentioned: 0 Post(s)
Tagged: 0 Thread(s)
Quoted: 2 Post(s)
Likes: 0
Liked 1 Time
in
1 Post
I am not an owner, but it appears the only difference between the old mount and the new mount is that they give you a bracket to attach to your seat post so that the light can go behind the seat post instead of to the side if the O-ring was wrapped directly around the seat post. Before, you wrapped the O-ring around the seat post and some people rubbed it with their leg since it was off to the side or were forced to improvise or make your own bracket. The O-ring still wraps around the aluminum housing like before. Someone with experience will probably chime in on off-road durability.
10-27-07, 06:36 AM
#3

Senior Member
Join Date: Dec 2005
Location: Reisterstown, MD
Posts: 3,249
Mentioned: 0 Post(s)
Tagged: 0 Thread(s)
Quoted: 19 Post(s)
Likes: 0
Liked 0 Times
in
0 Posts
The mounts are very sturdy. I use the 200L's offroading (which have the same mount) and they stay put. The lights are so small and light that the o-ring holds them fine.
That being said I don't use the o-ring mount for the taillight. The new bracket might work, but the old method (around the seatpost) would cause me to rub my leg on the light, which was annoying.

That being said I don't use the o-ring mount for the taillight. The new bracket might work, but the old method (around the seatpost) would cause me to rub my leg on the light, which was annoying.
10-27-07, 09:49 AM
#4
Senior Member
Join Date: Jun 2007
Posts: 168
Mentioned: 0 Post(s)
Tagged: 0 Thread(s)
Quoted: 0 Post(s)
Likes: 0
Liked 0 Times
in
0 Posts
I've got the dinotte tail light and use the new mounting system requiring 2 o-rings. The mount is super secure so far. The only thing I'd worry about is UV or weathering of the rubber over time. I use the light during the day time as well.
10-27-07, 10:15 AM
#5
Burn-em Upus Icephaltus

Join Date: Oct 2002
Posts: 2,357
Mentioned: 0 Post(s)
Tagged: 0 Thread(s)
Quoted: 2 Post(s)
Liked 0 Times
in
0 Posts
The new mount is very flexible (almost rubber like) horizontally But very solid vertically. Its not the hard plastic you find on a super flash/Cateye mount. I think the new DiNotte mount would be perfect for your conditions. I have a 2 mile section on my commute that is fire road and it hasn't failed yet.
__________________
Sick BubbleGum
Sick BubbleGum
10-27-07, 10:28 AM
#6
Larry G
Join Date: Aug 2007
Location: Morristown, NJ
Posts: 22
Bikes: Trek Mountain Bike, Specialized Globe
Mentioned: 0 Post(s)
Tagged: 0 Thread(s)
Quoted: 0 Post(s)
Likes: 0
Liked 0 Times
in
0 Posts
Just got my Tailight from the recent Nashbar sale. I'm still trying to figure out the best way to mount it also. I want to be able to secure it to the bike and take it on and off quickly for when I go shopping. I also like to have the battery and the light combined into one tight bundle so I can easily place it in my bag or pocket. I'm currently velco strapping it all to my milkcrate on the back of the bike but I haven't gotten totally secure yet. It flops around a bit. I'm Close though. Great light. Still contemplating picking up the 200L headlight this during Dinotte's weekend sale for $99.
10-27-07, 10:45 AM
#7
It's ALL base...

Join Date: Aug 2006
Location: Los Angeles
Posts: 6,716
Mentioned: 0 Post(s)
Tagged: 0 Thread(s)
Quoted: 2 Post(s)
Likes: 0
Liked 1 Time
in
1 Post
James' blog has several discussion (with pics) about mounting the Dinotte tail-light- go here for that: https://acidinmylegs.blogspot.com/search/label/lights
Poke around and you'll see what they came up with before Dinotte releaseed their own mount.
Poke around and you'll see what they came up with before Dinotte releaseed their own mount.
10-27-07, 10:56 AM
#8
shedding fat

Very secure with the new mount. Seriously doubt it will move a single mm regardless of the conditions you stated above.
__________________
Arguing with ignorant people is an exercise in futility. They will bring you down to their level and once there they will beat you with their overwhelming experience.
Arguing with ignorant people is an exercise in futility. They will bring you down to their level and once there they will beat you with their overwhelming experience.
10-27-07, 11:03 AM
#9
Bike ≠ Car ≠ Ped.

James' blog has several discussion (with pics) about mounting the Dinotte tail-light- go here for that: https://acidinmylegs.blogspot.com/search/label/lights
Poke around and you'll see what they came up with before Dinotte releaseed their own mount.
Poke around and you'll see what they came up with before Dinotte releaseed their own mount.
 --
--https://acidinmylegs.blogspot.com/200...ght-mount.html
https://acidinmylegs.blogspot.com/200...nt-part-2.html
https://acidinmylegs.blogspot.com/200...nt-part-3.html
https://acidinmylegs.blogspot.com/200...nt-part-4.html
https://acidinmylegs.blogspot.com/200...-official.html
There was also a BF member who mounted both the battery pack and light housing with a velcro strap to his saddle rails.
10-27-07, 11:45 AM
#10
It's ALL base...
Join Date: Aug 2006
Location: Los Angeles
Posts: 6,716
Mentioned: 0 Post(s)
Tagged: 0 Thread(s)
Quoted: 2 Post(s)
Likes: 0
Liked 1 Time
in
1 Post
After some poking --
https://acidinmylegs.blogspot.com/200...ght-mount.html
https://acidinmylegs.blogspot.com/200...nt-part-2.html
https://acidinmylegs.blogspot.com/200...nt-part-3.html
https://acidinmylegs.blogspot.com/200...nt-part-4.html
https://acidinmylegs.blogspot.com/200...-official.html
There was also a BF member who mounted both the battery pack and light housing with a velcro strap to his saddle rails.
--https://acidinmylegs.blogspot.com/200...ght-mount.html
https://acidinmylegs.blogspot.com/200...nt-part-2.html
https://acidinmylegs.blogspot.com/200...nt-part-3.html
https://acidinmylegs.blogspot.com/200...nt-part-4.html
https://acidinmylegs.blogspot.com/200...-official.html
There was also a BF member who mounted both the battery pack and light housing with a velcro strap to his saddle rails.
Your web-fu is strong, young grasshopper.
 10-27-07, 12:56 PM
#11
Bike ≠ Car ≠ Ped.
10-27-07, 07:14 PM
#12
Senior Member
Join Date: Mar 2006
Location: Perth, Australia and sometimes Penang Malaysia
Posts: 1,916
Bikes: Litespeed L1r, Litespeed Ghisallo 07, TCR Advanced Team SL 0 ISP, Giant TCR Advanced SL, Giant TCR Advanced Team - T-Mobile, Giant Propel Advanced SL
Mentioned: 0 Post(s)
Tagged: 0 Thread(s)
Quoted: 0 Post(s)
Likes: 0
Liked 0 Times
in
0 Posts
 10-27-07, 08:02 PM
#13
Senior Member

Join Date: Jan 2006
Location: Portland, OR
Posts: 96
Bikes: IF Steel Planet Cross SSMerlin, Ridley, Soma DoubleCross SS Griffen, Silk Path, Kona Jake
Mentioned: 0 Post(s)
Tagged: 0 Thread(s)
Quoted: 0 Post(s)
Likes: 0
Liked 0 Times
in
0 Posts
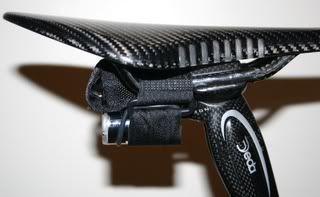
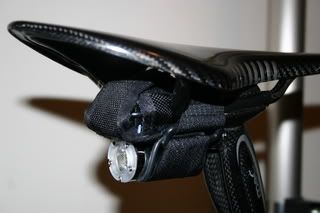
Snap on Dinotte Rear light mount
I use a pump snap on mount and it works great. I've attached a picture on my cross bike and I've also mounted it on my road bike with an articulated arm from another rear light mount. It works great, holds tight, loks professional and allows quick removal.
10-28-07, 04:35 AM
#14
Arrogant Safety Nanny
Join Date: Apr 2007
Location: Santa Maria, CA
Posts: 554
Bikes: 2007 Trek 7.2 FX, 2008 Trek Madone 5.2
Mentioned: 0 Post(s)
Tagged: 0 Thread(s)
Quoted: 0 Post(s)
Likes: 0
Liked 0 Times
in
0 Posts
Here's my method. I used one of the smaller O-rings provided and it seems to be almost perfect for rack tubing. When I arrive at my destination I can just unhook the light and throw it in the side pocket with the battery pack. I've gone over a few curbs (slowly) and it stays put, but haven't done any off roading or anything like that.

10-28-07, 07:20 AM
#15
Baby it's cold outside...

Join Date: Jul 2005
Location: SK, Canada
Posts: 7,310
Bikes: Trek 5000, Rocky Mountain Wedge, GT Karakoram K2, Litespeed Tuscany
Mentioned: 0 Post(s)
Tagged: 0 Thread(s)
Quoted: 0 Post(s)
Likes: 0
Liked 0 Times
in
0 Posts
The new mount fit snug on a 27.2 seat post, and I would have no reservations off roading with it. However even with snug mounting, it does seem to be able to spin sideways on the post easily too. Not a big deal, a smaller O-Ring would fix that.
__________________
-Trek 5000* -Project Litespeed* -The Italian Job* -Rocky Wedge* -The Canadian Connection*


-Trek 5000* -Project Litespeed* -The Italian Job* -Rocky Wedge* -The Canadian Connection*
 10-28-07, 02:09 PM
#16
Senior Member
Join Date: Jul 2007
Location: CA, USA
Posts: 334
Bikes: Surly CrossCheck, Xootr Swift
Mentioned: 0 Post(s)
Tagged: 0 Thread(s)
Quoted: 0 Post(s)
Likes: 0
Liked 0 Times
in
0 Posts
+1. I have the same seatbag (large size Topeak) and mount the light in the same way--under the bag with the loops provided (originally intended for a small pump). The battery pack goes inside the bag for a very clean setup. When I get to where I'm going, I just quick-release the bag and take everything with me.
One thing that I did additionally was to take the 2 o-rings provided with the Dinotte and double-loop them around the taillight in front of and behind the bag loop. This way, the taillight is locked into position and is prevented from slipping forward or backward in the loop. I can post pics if anyone would like.
One thing that I did additionally was to take the 2 o-rings provided with the Dinotte and double-loop them around the taillight in front of and behind the bag loop. This way, the taillight is locked into position and is prevented from slipping forward or backward in the loop. I can post pics if anyone would like.
10-28-07, 03:42 PM
#17
Senior Member
Join Date: Jun 2003
Posts: 18,138
Bikes: 2 many
Mentioned: 13 Post(s)
Tagged: 0 Thread(s)
Quoted: 1266 Post(s)
Liked 323 Times
in
169 Posts
If you clean your bike with Pledge once in a while that will add to that kind of a mount slipping a little.
Wipe off that area with something not very strong like fantastic or windex to get the wax off. Wipe off the part of the light that touches the post too. Same for the handlebars.
They did steal that mount design from Lupine.
10-28-07, 05:44 PM
#18
Senior Member
Thread Starter
Join Date: May 2006
Location: North of the 49th Parallel (GPS grid soon)
Posts: 1,766
Bikes: MTB Peugoet Canyon (forgot the model), Nikishi? roadbike, MTB custom build,
Mentioned: 0 Post(s)
Tagged: 0 Thread(s)
Quoted: 0 Post(s)
Likes: 0
Liked 0 Times
in
0 Posts
The mounts are very sturdy. I use the 200L's offroading (which have the same mount) and they stay put. The lights are so small and light that the o-ring holds them fine.
That being said I don't use the o-ring mount for the taillight. The new bracket might work, but the old method (around the seatpost) would cause me to rub my leg on the light, which was annoying.
That being said I don't use the o-ring mount for the taillight. The new bracket might work, but the old method (around the seatpost) would cause me to rub my leg on the light, which was annoying.
Man forgot about that photo setup you've got on the Topeak bag. I don't want to dig out the posts again but what model and size if your bag again? I still have a credit at my LBS which I've not been to the LBS in 4 months to claim to get that bag. Just not sure which one to order.
10-28-07, 05:49 PM
#19
Senior Member
Join Date: Jul 2007
Location: CA, USA
Posts: 334
Bikes: Surly CrossCheck, Xootr Swift
Mentioned: 0 Post(s)
Tagged: 0 Thread(s)
Quoted: 0 Post(s)
Likes: 0
Liked 0 Times
in
0 Posts
+1. I have the same seatbag (large size Topeak) and mount the light in the same way--under the bag with the loops provided (originally intended for a small pump). The battery pack goes inside the bag for a very clean setup. When I get to where I'm going, I just quick-release the bag and take everything with me.
Doh, zero_enigma's post just reminded me that I have a medium size, not large. So medium, as well as Derath's size, will work.
10-28-07, 07:54 PM
#20
Baby it's cold outside...
Join Date: Jul 2005
Location: SK, Canada
Posts: 7,310
Bikes: Trek 5000, Rocky Mountain Wedge, GT Karakoram K2, Litespeed Tuscany
Mentioned: 0 Post(s)
Tagged: 0 Thread(s)
Quoted: 0 Post(s)
Likes: 0
Liked 0 Times
in
0 Posts
If you clean your bike with Pledge once in a while that will add to that kind of a mount slipping a little.
Wipe off that area with something not very strong like fantastic or windex to get the wax off. Wipe off the part of the light that touches the post too. Same for the handlebars.
They did steal that mount design from Lupine.
Wipe off that area with something not very strong like fantastic or windex to get the wax off. Wipe off the part of the light that touches the post too. Same for the handlebars.
They did steal that mount design from Lupine.
__________________
-Trek 5000* -Project Litespeed* -The Italian Job* -Rocky Wedge* -The Canadian Connection*
-Trek 5000* -Project Litespeed* -The Italian Job* -Rocky Wedge* -The Canadian Connection*
10-28-07, 08:52 PM
#21
Senior Member
Join Date: Dec 2005
Location: Reisterstown, MD
Posts: 3,249
Mentioned: 0 Post(s)
Tagged: 0 Thread(s)
Quoted: 19 Post(s)
Likes: 0
Liked 0 Times
in
0 Posts
The only issue is that the current bags from topeak look a little different. I cannot tell from their site if they still have the straps.
BTW, does anyone know what the little metal tab at the bottom of the bag is for? Never could figure that out.
-D
10-28-07, 09:04 PM
#22
Senior Member
Join Date: Jul 2007
Location: CA, USA
Posts: 334
Bikes: Surly CrossCheck, Xootr Swift
Mentioned: 0 Post(s)
Tagged: 0 Thread(s)
Quoted: 0 Post(s)
Likes: 0
Liked 0 Times
in
0 Posts
Yea mine is medium or large. Can't remember.
The only issue is that the current bags from topeak look a little different. I cannot tell from their site if they still have the straps.
BTW, does anyone know what the little metal tab at the bottom of the bag is for? Never could figure that out.
-D
The only issue is that the current bags from topeak look a little different. I cannot tell from their site if they still have the straps.
BTW, does anyone know what the little metal tab at the bottom of the bag is for? Never could figure that out.
-D
10-28-07, 09:38 PM
#23
Senior Member
Thread Starter
Join Date: May 2006
Location: North of the 49th Parallel (GPS grid soon)
Posts: 1,766
Bikes: MTB Peugoet Canyon (forgot the model), Nikishi? roadbike, MTB custom build,
Mentioned: 0 Post(s)
Tagged: 0 Thread(s)
Quoted: 0 Post(s)
Likes: 0
Liked 0 Times
in
0 Posts
Holy rapid responses Batman! Thanks for all the replies guys and gals. I just pulled the trigger and got the taillight. $115ish CDN for it shipped. Expensive but in my area I keep getting buzzed a lot even withthe PB Superflash. I plan to still do my DIY setup but wish to incorperate a commercially made tailight for safety should the DIY not work. I'm thinking of making the DIY as more a brake light now. Muhahaha... Make a momentary button switch and tap it as I'm braking. Sure owuld wake some poeple up.
I wishe dI could pull the trigger on the headlight. I really wanted to .... but it would have costed $205 for it and while shipping gets cheaper with each extra item I can't do it tho I recally would love to have a front light like that. I figure tailight for now for the safety and the front light I'll DIY and if/when I have more funds and a sweet deal like this happens again I'd get a front light. Perhaps then they might have a SSC P4 XYZ-bin or a Cree XYZ-bin with 30-50% more light.
 I hope some of you are upgrade-a-holics in the next 2-3 months and can sell me your used Dinotte front light for cheap.
I wishe dI could pull the trigger on the headlight. I really wanted to .... but it would have costed $205 for it and while shipping gets cheaper with each extra item I can't do it tho I recally would love to have a front light like that. I figure tailight for now for the safety and the front light I'll DIY and if/when I have more funds and a sweet deal like this happens again I'd get a front light. Perhaps then they might have a SSC P4 XYZ-bin or a Cree XYZ-bin with 30-50% more light.
I hope some of you are upgrade-a-holics in the next 2-3 months and can sell me your used Dinotte front light for cheap.
10-28-07, 11:36 PM
#24
Senior Member
Join Date: Dec 2005
Location: Reisterstown, MD
Posts: 3,249
Mentioned: 0 Post(s)
Tagged: 0 Thread(s)
Quoted: 19 Post(s)
Likes: 0
Liked 0 Times
in
0 Posts
10-29-07, 04:18 AM
#25
Senior Member
Thread Starter
Join Date: May 2006
Location: North of the 49th Parallel (GPS grid soon)
Posts: 1,766
Bikes: MTB Peugoet Canyon (forgot the model), Nikishi? roadbike, MTB custom build,
Mentioned: 0 Post(s)
Tagged: 0 Thread(s)
Quoted: 0 Post(s)
Likes: 0
Liked 0 Times
in
0 Posts
Derath,
Think you can unload the bag and find out your bag size/model number and such to find out the size of your bag? I'm going to be going into the LBS to get the bike fixed (6500km) but not till I get the Dinotte tail light to show those guys. Also want that seatbag at the same time as the Voyager bags sucked the left donkey marble. That bag tore after two weeks. Check out my pics here. I got the medium one that had the clip quick release on the seat.
Look for something of same size or as close to it. This is for quick on/off when shopping and such travels. The older velcro model I have has lasted ~2 yrs and keeps on going. Only costed ~$12 CDN on sale and needed a crazy glue job to add exrta velcro for more grip otherwise that bag was abused on the curbs, potholes, offroads, jumps, etc and kept on holding.
It's materials I think is ballistic nylon or nylon for sure. I need a bag that can handle 3lbs of repeated daily abuse. The Voyager manufactuer said it can handle up to 5lbs yet in less then 2 weeks it can't take less then 3 lbs and ripped beyond belief.
I do intend on modding this bag so I can ride light say without a jersey 3 pocket to look more normal when I'm at a store and such. I plan on adding strap loops which when I remove fromt he bike I can make sure of the bungee cord I have for just in case items I need to rack and loop it throught the sewn on strap holes and just walk away leaving the bike totally clean and one less thing to worry about. I might just cut some paracord and use that as a strap which also doulbes as emergency cordage should I need it and use a small and large carabiner at the ends to quick on/off to the bag straps. The biners also double for other uses later. Keeping it all functional if I can.