


Bottomfeeder's DIY Halogen update
 10-29-07, 10:33 PM
#1
Mr. cost-benefit analysis
Thread Starter
Join Date: Dec 2005
Location: Agua Dulce, CA
Posts: 437
Bikes: Surly Crosscheck Single Speed, Novara 9 speed commuter/runabout
Mentioned: 0 Post(s)
Tagged: 0 Thread(s)
Quoted: 0 Post(s)
Likes: 0
Liked 0 Times
in
0 Posts
Bottomfeeder's DIY Halogen update
I decided to spend my money on a nice battery and smart charger from batteryspace.com, and save by fabricating my own 20 watt halogen light. Well, below is an image of my first effort after a paltry maiden burn time of 45 minutes. Let's just say I've learned why indoor track lighting fixtures aren't fabricated from ABS plastic bits from the pluming dept.
DanO
DanO
 10-29-07, 10:50 PM
#2
Senior Member
Join Date: Jun 2007
Posts: 177
Mentioned: 0 Post(s)
Tagged: 0 Thread(s)
Quoted: 0 Post(s)
Likes: 0
Liked 0 Times
in
0 Posts
Haha.. At least the plastic bits from the plumbing supply aren't that expensive. Thanks for sharing, gave me a good laugh and a reminder that the heat has to go somewhere.
Was that a 45 minute run while biking or just standing still on your workbench or table or something? Just wondering if you had airflow over it, cuz that would make a big difference even in a plastic enclosure I'm sure.
Was that a 45 minute run while biking or just standing still on your workbench or table or something? Just wondering if you had airflow over it, cuz that would make a big difference even in a plastic enclosure I'm sure.
10-29-07, 11:00 PM
#3
Mr. cost-benefit analysis
Thread Starter
Join Date: Dec 2005
Location: Agua Dulce, CA
Posts: 437
Bikes: Surly Crosscheck Single Speed, Novara 9 speed commuter/runabout
Mentioned: 0 Post(s)
Tagged: 0 Thread(s)
Quoted: 0 Post(s)
Likes: 0
Liked 0 Times
in
0 Posts
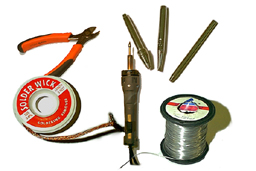
Here are some shots of the parts for my second effort. I found a steel sleeve for sink drains with a twist on collar that fits the MR11 20 watt halogen bulb perfectly - and can take the heat of said bulb. It screws into a heavier schedule 40 PVC cap to complete the housing. Inside, a simple ceramic socket soldered to the male lead supplied with the battery/charger combo complete the 'circuitry'.
I also attached a couple images of the finished light. It's holding up fine. Although it gets alarmingly hot at a standstill. I swear I could light a smoke on it, if I were so inclined. It's better at 15 mph. Even so; I've considered drilling some holes in it to try and get it to run cooler. I'm a fair weather flyer and not really concerned about the light working in the rain.
Thankfully burn times have gotten steadily better with each complete charge and discharge. 1: 45 min. 2: 1 hr 10 min. 3: 2 hrs. 4: 2 hrs. 5: 2 hrs 10 min. I don't think It'll get a whole lot longer. But I'm looking for a 15 watt bulb which could be easily switched out in the event I need to compromise between fewer lumens and a longer burn time.
All in all: it's been a fun project and saved me substantial doe over a store bought system.
DanO
10-30-07, 06:22 AM
#4
Senior Member
Join Date: Oct 2006
Location: Denver Front Range
Posts: 61
Bikes: www.amoebalight.blogspot.com
Mentioned: 0 Post(s)
Tagged: 0 Thread(s)
Quoted: 0 Post(s)
Likes: 0
Liked 0 Times
in
0 Posts
Try applying aluminum tape to the backside of the bulb. The MR series of bulbs was designed for the heat to exit out the back if the bulb. The aluminum tape helps reflect the heat out the front of the bulb. You may smell some the adhesive from the aluminum tape burning off after first use, but you will be amazed how much it will help your heat issue. Check out this thread for gobs of information.
https://forums.mtbr.com/showthread.php?t=245737
https://forums.mtbr.com/showthread.php?t=245737
10-30-07, 06:50 AM
#5
Senior Member
Join Date: Aug 2004
Location: Baltimore/DC
Posts: 2,930
Mentioned: 0 Post(s)
Tagged: 0 Thread(s)
Quoted: 170 Post(s)
Liked 156 Times
in
99 Posts
I've never had this problem before. I've left my lights turned on while on my bike in the basement for over an hour to test battery life(sorry too many prepositions). I use the white plastic, not the black. Maybe it is more heat tolerant??
10-30-07, 07:19 AM
#6
Scott

Join Date: Jun 2006
Posts: 2,393
Bikes: Too Many
Mentioned: 0 Post(s)
Tagged: 0 Thread(s)
Quoted: 1 Post(s)
Likes: 0
Liked 1 Time
in
1 Post
PVC pipe will work fine for LED lights. There is heat generated by high power LED's but nothing like halogen bulbs. Here is a headlight using a 1-watt Luxeon star LED in matching Fraen elipicatal holder and lens mounted in a 1-inch pipe coupler.

Half the connector is used for the optics and LED with the other half of the coupler housing the heat sink. The heat sink is a 1/2-inch copper plumbing pipe cap.
Half the connector is used for the optics and LED with the other half of the coupler housing the heat sink. The heat sink is a 1/2-inch copper plumbing pipe cap.
10-30-07, 10:16 AM
#7
Goggles & Doo-rag ready!

Join Date: Aug 2007
Location: Hampton Roads, VA
Posts: 48
Mentioned: 0 Post(s)
Tagged: 0 Thread(s)
Quoted: 0 Post(s)
Likes: 0
Liked 0 Times
in
0 Posts
Is that a six or 12 volt MR11 20w bulb? The lumens per watt is more than double for the 12 volt MR16 20w bulb versus the 12 volt MR11 20w version. The difference is all in the reflector.
The MR16 has a 2" diameter and the MR11 a 1-3/8" diameter. Apparently that 5/8" makes a big difference. A MR16 would probably help eliminate some of the heat since the heat is due to infra red light that a bigger reflector will put in front of the bulb. As you might guess, I am looking to do this myself but haven't decided on a MR11 or MR16 bulb type and voltage.
Anyway, nice job! I really like that mount for the bike. Where did you get that from?
10-30-07, 10:52 AM
#8
Mr. cost-benefit analysis
Thread Starter
Join Date: Dec 2005
Location: Agua Dulce, CA
Posts: 437
Bikes: Surly Crosscheck Single Speed, Novara 9 speed commuter/runabout
Mentioned: 0 Post(s)
Tagged: 0 Thread(s)
Quoted: 0 Post(s)
Likes: 0
Liked 0 Times
in
0 Posts
That mount is made up of a couple seat post mounts for rear relflectors... or were they blinkies... can't really recall. But I was glad they were in the parts drawer, because they worked out pretty well.
DanO
10-30-07, 12:36 PM
#9
Goggles & Doo-rag ready!
Join Date: Aug 2007
Location: Hampton Roads, VA
Posts: 48
Mentioned: 0 Post(s)
Tagged: 0 Thread(s)
Quoted: 0 Post(s)
Likes: 0
Liked 0 Times
in
0 Posts
According to this guys site: https://nordicgroup.us/s78/wattslumens.html
The MR16 are over twice as bright as MR11's. I haven't compared the two directly, but from everything I've read it seems the MR16 reflector is what makes the difference. Also, it seems applying over voltage turns the MR16 into something like a HID light with a reduced life. It is unclear what that does to the assembly temperature though.
Somewhere on the www, a guy describes building a dive lite using a MR16 and a maglite flashlight. Apparently, a MR16 fits inside a maglite flashlight head. Thanks for the heads up on using the reflector mount brackets. Good idea.
10-30-07, 09:40 PM
#10
Mr. cost-benefit analysis
Thread Starter
Join Date: Dec 2005
Location: Agua Dulce, CA
Posts: 437
Bikes: Surly Crosscheck Single Speed, Novara 9 speed commuter/runabout
Mentioned: 0 Post(s)
Tagged: 0 Thread(s)
Quoted: 0 Post(s)
Likes: 0
Liked 0 Times
in
0 Posts
Hey all. I'm wondering if anyone has ever tried using an MR16 series bulb without the glass front. I know the halogen bulb would be more prone to breakage, but it might run a lot cooler while does run. Besides, the only 20 watt, 12 degree spot I've found in stores is sans glass front.
DanO
DanO
10-31-07, 09:13 AM
#11
Scott
Join Date: Jun 2006
Posts: 2,393
Bikes: Too Many
Mentioned: 0 Post(s)
Tagged: 0 Thread(s)
Quoted: 1 Post(s)
Likes: 0
Liked 1 Time
in
1 Post
Hey all. I'm wondering if anyone has ever tried using an MR16 series bulb without the glass front. I know the halogen bulb would be more prone to breakage, but it might run a lot cooler while does run. Besides, the only 20 watt, 12 degree spot I've found in stores is sans glass front.
DanO
DanO
10-31-07, 09:56 AM
#12
CRIKEY!!!!!!!

Join Date: May 2005
Location: all the way down under
Posts: 4,276
Bikes: several
Mentioned: 37 Post(s)
Tagged: 0 Thread(s)
Quoted: 1589 Post(s)
Liked 687 Times
in
365 Posts
That pretty much resembles one of my first attempts... 
With the MR16 that has a front glass more than half the goes out the back of the bulb.
Here's the last one I built out of plastic plumbing bits before I built my LED light, this one worked the best of all my lights and there was never a heat issue at all. An unplanned bonus was that the light spilled out the back, which would have otherwise been wasted, increased my visibility to drivers approaching from behind.
11-04-07, 12:11 AM
#13
Senior Member
Join Date: Sep 2007
Location: an island in WA
Posts: 272
Bikes: Xtracycle cruiser bike
Mentioned: 0 Post(s)
Tagged: 0 Thread(s)
Quoted: 0 Post(s)
Likes: 0
Liked 3 Times
in
3 Posts
n4zou - I was wondering what the heck was up with your handlebar, until I realized it is a trekking bar!
Cyclaholic - That light is awesome! But how does it handle rain? Does the massive heat just burn rain away? I am very curious because that housing is so compact and looks lightweight. It also looks inexpensive and simple.
I am very keen on building my own light. Like a few guys have done here I bought one of these:

That's as far as I have gotten. I am confident about mounting it on my bike. I am comfortable with wrenching and fabricating. It is the electronics part where I lack confidence.
Cyclaholic - That light is awesome! But how does it handle rain? Does the massive heat just burn rain away? I am very curious because that housing is so compact and looks lightweight. It also looks inexpensive and simple.
I am very keen on building my own light. Like a few guys have done here I bought one of these:
That's as far as I have gotten. I am confident about mounting it on my bike. I am comfortable with wrenching and fabricating. It is the electronics part where I lack confidence.
11-04-07, 09:34 AM
#14

Mad bike riding scientist

Join Date: Nov 2004
Location: Denver, CO
Posts: 27,359
Bikes: Some silver ones, a red one, a black and orange one, and a few titanium ones
Mentioned: 152 Post(s)
Tagged: 1 Thread(s)
Quoted: 6218 Post(s)
Liked 4,214 Times
in
2,362 Posts
n4zou - I was wondering what the heck was up with your handlebar, until I realized it is a trekking bar!
Cyclaholic - That light is awesome! But how does it handle rain? Does the massive heat just burn rain away? I am very curious because that housing is so compact and looks lightweight. It also looks inexpensive and simple.
I am very keen on building my own light. Like a few guys have done here I bought one of these:
That's as far as I have gotten. I am confident about mounting it on my bike. I am comfortable with wrenching and fabricating. It is the electronics part where I lack confidence.
Possible plugs:
Simple crimp connectors. One on each line. Unplug one and the light shuts off.

Or interlocking connectors. You'll need a male and female part.

If you know how to solder, you could use Dean Ultra Connectors

or Sermos connectors

These are more rugged and have lower resistance than the block connectors but a little more involved to connect to the wires.
If you want to be more elaborate, you can drill a hole in the back of the housing and attach a switch to the light. All you need in switch on one wire. Radio Shack has lots of switches. Although unplugging the battery works, a switch is a little more convenient. Dangling wires and spinning wheels don't go together well

")
It's not hard to wire a simple DC light. Just try and think about the way that the energy flows and you'll catch on pretty quickly.
__________________
Stuart Black
Plan Epsilon Around Lake Michigan in the era of Covid
Old School�When It Wasn�t Ancient bikepacking
Gold Fever Three days of dirt in Colorado
Pokin' around the Poconos A cold ride around Lake Erie
Dinosaurs in Colorado A mountain bike guide to the Purgatory Canyon dinosaur trackway
Solo Without Pie. The search for pie in the Midwest.
Picking the Scablands. Washington and Oregon, 2005. Pie and spiders on the Columbia River!
11-04-07, 10:08 AM
#15
Scott
Join Date: Jun 2006
Posts: 2,393
Bikes: Too Many
Mentioned: 0 Post(s)
Tagged: 0 Thread(s)
Quoted: 1 Post(s)
Likes: 0
Liked 1 Time
in
1 Post
Soldering is a must have skill for anyone wanting to DIY. Once you learn how you find it's very easy to do. You'll wonder how you ever got along without knowing how to solder! Here is a good link showing how to do it.
https://www.mediacollege.com/misc/solder/index.html
Considering how cheap a basic soldering iron and accessories are you can just right in and start soldering some junk wires and that sort of thing to learn how. You'll be surprised how fast you pick it up. Then when you want to use the batteries from a Ni-MH R/C battery pack on clearance sale after Christmas at your local X-mart you can confidently purchase it or more, cut it open, and use them for your next project.
11-04-07, 10:54 AM
#16
Senior Member
Join Date: Sep 2007
Location: an island in WA
Posts: 272
Bikes: Xtracycle cruiser bike
Mentioned: 0 Post(s)
Tagged: 0 Thread(s)
Quoted: 0 Post(s)
Likes: 0
Liked 3 Times
in
3 Posts
Thanks guys! Very encouraging! I already took the first step buying that lamp, there's no turning back now.
I hope to have a light built up and installed on my winter bike by December.
I hope to have a light built up and installed on my winter bike by December.
11-04-07, 11:11 AM
#17
Senior_Member2
Join Date: Apr 2006
Location: Finlando NOT: Orlando, Fl
Posts: 1,694
Bikes: Beater + Nishiki Bigfoot X-29
Mentioned: 0 Post(s)
Tagged: 0 Thread(s)
Quoted: 0 Post(s)
Likes: 0
Liked 0 Times
in
0 Posts
The hotter you can get the halogens the better. I use osram irc lights. They have a infared reflecting coat on the inside of the bulb to increase filament temps. Also if you cover the rear of a reflector with al foil or tape the ir and uv will be let out the front, lowering the housing temps ALOT.
11-04-07, 05:42 PM
#18
Mad bike riding scientist
Join Date: Nov 2004
Location: Denver, CO
Posts: 27,359
Bikes: Some silver ones, a red one, a black and orange one, and a few titanium ones
Mentioned: 152 Post(s)
Tagged: 1 Thread(s)
Quoted: 6218 Post(s)
Liked 4,214 Times
in
2,362 Posts
Soldering is a must have skill for anyone wanting to DIY. Once you learn how you find it's very easy to do. You'll wonder how you ever got along without knowing how to solder! Here is a good link showing how to do it.
https://www.mediacollege.com/misc/solder/index.html
Considering how cheap a basic soldering iron and accessories are you can just right in and start soldering some junk wires and that sort of thing to learn how. You'll be surprised how fast you pick it up. Then when you want to use the batteries from a Ni-MH R/C battery pack on clearance sale after Christmas at your local X-mart you can confidently purchase it or more, cut it open, and use them for your next project.
https://www.mediacollege.com/misc/solder/index.html
Considering how cheap a basic soldering iron and accessories are you can just right in and start soldering some junk wires and that sort of thing to learn how. You'll be surprised how fast you pick it up. Then when you want to use the batteries from a Ni-MH R/C battery pack on clearance sale after Christmas at your local X-mart you can confidently purchase it or more, cut it open, and use them for your next project.

__________________
Stuart Black
Plan Epsilon Around Lake Michigan in the era of Covid
Old School�When It Wasn�t Ancient bikepacking
Gold Fever Three days of dirt in Colorado
Pokin' around the Poconos A cold ride around Lake Erie
Dinosaurs in Colorado A mountain bike guide to the Purgatory Canyon dinosaur trackway
Solo Without Pie. The search for pie in the Midwest.
Picking the Scablands. Washington and Oregon, 2005. Pie and spiders on the Columbia River!
Stuart Black
Plan Epsilon Around Lake Michigan in the era of Covid
Old School�When It Wasn�t Ancient bikepacking
Gold Fever Three days of dirt in Colorado
Pokin' around the Poconos A cold ride around Lake Erie
Dinosaurs in Colorado A mountain bike guide to the Purgatory Canyon dinosaur trackway
Solo Without Pie. The search for pie in the Midwest.
Picking the Scablands. Washington and Oregon, 2005. Pie and spiders on the Columbia River!
11-05-07, 12:50 PM
#19
Mr. cost-benefit analysis
Thread Starter
Join Date: Dec 2005
Location: Agua Dulce, CA
Posts: 437
Bikes: Surly Crosscheck Single Speed, Novara 9 speed commuter/runabout
Mentioned: 0 Post(s)
Tagged: 0 Thread(s)
Quoted: 0 Post(s)
Likes: 0
Liked 0 Times
in
0 Posts
3 times' a charm
Well it seems that 3 times� a charm - as with all manner of things. If you�ve followed, or at least reviewed this thread, you know that my first attempt was literally a melt-down, plain and simple. And though my second try was a partial success; in the end my mount proved too weak for the hammering dished out on the mean streets of L.A. Also: though the MR11 20 volt flood was a quantum leap ahead of dual Cayeye EL500�s, it was just a tad dim for the darkest, fastest descent on my commute.
So; submitted for your approval, DanO�s Illuminator 3000 deluxe. First and foremost, I wouldn�t hesitate to go mountain biking, if I that was my bag, with the new mount. I think I could hang a canned ham from it - no problem. Second; the Sylvania Tru-Aim MR16, 20 watt, 8 degree spot, halogen lamp is to the MR11 flood, what the Mr11 flood was to my weak AA powered LED units. By comparison, it looks like a police helicopter is following me around with it�s search light on! 30 mph in the dark? No problem.
I was a bit hesitant to go back to plastic, even though I was using PVC as opposed to the ABS which melted in my first attempt. But Sylvania claims this lamp has a reflector which directs most of the heat out the front. I also used aluminum tape on the inside of the housing. The light still gets pretty hot at a dead standstill, but doesn�t melt. (Still, I wouldn�t leave it left of while the bike was parked for 2 hrs.) And even a 10 mph breeze drops the temp dramatically. So I think that I�m structurally sound. Of course time will tell how many heating/cooling cycles the PVC is up to.
So for now we�re good to go. Anyone considering building one of these should definitely plan the light around the MR16 diameter bulb - even if an MR11 series light would be more convenient. Did I spend as much building 3 lights as I might have simply buying one from Night Rider or Cygolite? Maybe. But this was fun. And I ended up with a WAY better mount.. for my bike, at least.
DanO
11-05-07, 01:41 PM
#21
Mad bike riding scientist
Join Date: Nov 2004
Location: Denver, CO
Posts: 27,359
Bikes: Some silver ones, a red one, a black and orange one, and a few titanium ones
Mentioned: 152 Post(s)
Tagged: 1 Thread(s)
Quoted: 6218 Post(s)
Liked 4,214 Times
in
2,362 Posts
Well it seems that 3 times� a charm - as with all manner of things. If you�ve followed, or at least reviewed this thread, you know that my first attempt was literally a melt-down, plain and simple. And though my second try was a partial success; in the end my mount proved too weak for the hammering dished out on the mean streets of L.A. Also: though the MR11 20 volt flood was a quantum leap ahead of dual Cayeye EL500�s, it was just a tad dim for the darkest, fastest descent on my commute.
So; submitted for your approval, DanO�s Illuminator 3000 deluxe. First and foremost, I wouldn�t hesitate to go mountain biking, if I that was my bag, with the new mount. I think I could hang a canned ham from it - no problem. Second; the Sylvania Tru-Aim MR16, 20 watt, 8 degree spot, halogen lamp is to the MR11 flood, what the Mr11 flood was to my weak AA powered LED units. By comparison, it looks like a police helicopter is following me around with it�s search light on! 30 mph in the dark? No problem.
I was a bit hesitant to go back to plastic, even though I was using PVC as opposed to the ABS which melted in my first attempt. But Sylvania claims this lamp has a reflector which directs most of the heat out the front. I also used aluminum tape on the inside of the housing. The light still gets pretty hot at a dead standstill, but doesn�t melt. (Still, I wouldn�t leave it left of while the bike was parked for 2 hrs.) And even a 10 mph breeze drops the temp dramatically. So I think that I�m structurally sound. Of course time will tell how many heating/cooling cycles the PVC is up to.
So for now we�re good to go. Anyone considering building one of these should definitely plan the light around the MR16 diameter bulb - even if an MR11 series light would be more convenient. Did I spend as much building 3 lights as I might have simply buying one from Night Rider or Cygolite? Maybe. But this was fun. And I ended up with a WAY better mount.. for my bike, at least.
DanO
So; submitted for your approval, DanO�s Illuminator 3000 deluxe. First and foremost, I wouldn�t hesitate to go mountain biking, if I that was my bag, with the new mount. I think I could hang a canned ham from it - no problem. Second; the Sylvania Tru-Aim MR16, 20 watt, 8 degree spot, halogen lamp is to the MR11 flood, what the Mr11 flood was to my weak AA powered LED units. By comparison, it looks like a police helicopter is following me around with it�s search light on! 30 mph in the dark? No problem.
I was a bit hesitant to go back to plastic, even though I was using PVC as opposed to the ABS which melted in my first attempt. But Sylvania claims this lamp has a reflector which directs most of the heat out the front. I also used aluminum tape on the inside of the housing. The light still gets pretty hot at a dead standstill, but doesn�t melt. (Still, I wouldn�t leave it left of while the bike was parked for 2 hrs.) And even a 10 mph breeze drops the temp dramatically. So I think that I�m structurally sound. Of course time will tell how many heating/cooling cycles the PVC is up to.
So for now we�re good to go. Anyone considering building one of these should definitely plan the light around the MR16 diameter bulb - even if an MR11 series light would be more convenient. Did I spend as much building 3 lights as I might have simply buying one from Night Rider or Cygolite? Maybe. But this was fun. And I ended up with a WAY better mount.. for my bike, at least.
DanO

I found a low voltage MR16 spot at mine in black for $20. It's not water proof but it is bright and won't melt. Be careful when choosing the light, however. Don't get the GU-10 pin variety.
__________________
Stuart Black
Plan Epsilon Around Lake Michigan in the era of Covid
Old School�When It Wasn�t Ancient bikepacking
Gold Fever Three days of dirt in Colorado
Pokin' around the Poconos A cold ride around Lake Erie
Dinosaurs in Colorado A mountain bike guide to the Purgatory Canyon dinosaur trackway
Solo Without Pie. The search for pie in the Midwest.
Picking the Scablands. Washington and Oregon, 2005. Pie and spiders on the Columbia River!
Stuart Black
Plan Epsilon Around Lake Michigan in the era of Covid
Old School�When It Wasn�t Ancient bikepacking
Gold Fever Three days of dirt in Colorado
Pokin' around the Poconos A cold ride around Lake Erie
Dinosaurs in Colorado A mountain bike guide to the Purgatory Canyon dinosaur trackway
Solo Without Pie. The search for pie in the Midwest.
Picking the Scablands. Washington and Oregon, 2005. Pie and spiders on the Columbia River!
11-07-07, 08:35 PM
#22
Commuter/Roadie

Join Date: Sep 2004
Location: Laporte, CO
Posts: 127
Bikes: De Rosa Giro d'Italia, Scott Tampico
Mentioned: 0 Post(s)
Tagged: 0 Thread(s)
Quoted: 0 Post(s)
Likes: 0
Liked 0 Times
in
0 Posts
I highly recommend the Optronics QH-7CC fog lamp. $19.99 gets you two lamps, with free 55W bulbs for the heck of it. I swapped in a 20W easy enough. Cheap, totally weatherproof, and good looking. Take out that vertical screw and fit a hose clamp through the mount. I got the idea from that nordicgroup website, it's a hell of a deal. Perhaps not as fun as totally crafting your own housing...but totally hassle free.
Edit: A link for you - https://www.jcwhitney.com/autoparts/I...D:100000201439
Edit: A link for you - https://www.jcwhitney.com/autoparts/I...D:100000201439
11-07-07, 11:12 PM
#23
Reeks of aged cotton duck

Join Date: Oct 2007
Location: Middle Georgia, USA
Posts: 1,176
Bikes: 2008 Kogswell PR mkII, 1976 Raleigh Professional, 1996 Serotta Atlanta, 1984 Trek 520, 1979 Raleigh Comp GS
Mentioned: 0 Post(s)
Tagged: 0 Thread(s)
Quoted: 0 Post(s)
Likes: 0
Liked 5 Times
in
4 Posts
Just swap out the 50W bulbs and you're set to ride...
11-09-07, 09:00 AM
#25
Recumbent Evangelist
Join Date: Mar 2005
Location: Kitchener, Ontario
Posts: 2,991
Bikes: Rebel Cycles Trike, Trek 7500FX
Mentioned: 0 Post(s)
Tagged: 0 Thread(s)
Quoted: 1 Post(s)
Likes: 0
Liked 0 Times
in
0 Posts
I highly recommend the Optronics QH-7CC fog lamp. $19.99 gets you two lamps, with free 55W bulbs for the heck of it. I swapped in a 20W easy enough. Cheap, totally weatherproof, and good looking. Take out that vertical screw and fit a hose clamp through the mount. I got the idea from that nordicgroup website, it's a hell of a deal. Perhaps not as fun as totally crafting your own housing...but totally hassle free.
Edit: A link for you - https://www.jcwhitney.com/autoparts/I...D:100000201439
Edit: A link for you - https://www.jcwhitney.com/autoparts/I...D:100000201439