


problem with P7 light
 01-14-10, 06:16 PM
#1
Very, very Senior Member
Thread Starter

Join Date: May 2009
Location: Chicago
Posts: 1,224
Bikes: 2012 Surly Troll, 1999 Hardtail MTB
Mentioned: 0 Post(s)
Tagged: 0 Thread(s)
Quoted: 1 Post(s)
Likes: 0
Liked 1 Time
in
1 Post
problem with P7 light
I have had my SSC P7-C (8 mode) light for maybe 2-3 months and I started having problems (and it seems to get worse).
When I use it in the evening on my ride home from work, it seems to have only 1/2 of the standard power that it should, no matter what setting/mode I have it on. Giving it a little shock helps sometimes but - of course it switches back to lower power once I hit another bump in the road. I try to get it back by either opening the back at little or hitting it on the palm of my hand. That works sometimes and sometimes it doesnt. However, very strangely, by they time I get home it starts working ok again and even if I try, I can't get it back to "low mode".
Anybody had similar problems, any advice?
Thanks.
 01-15-10, 01:11 PM
#2


Se�ior Member
Join Date: Sep 2005
Location: Michigan
Posts: 13,749
Bikes: Windsor Fens, Giant Seek 0 (2014, Alfine 8 + discs)
Mentioned: 13 Post(s)
Tagged: 0 Thread(s)
Quoted: 446 Post(s)
Likes: 0
Liked 8 Times
in
7 Posts
I've got an UltraFire C3, and it lasted a couple of weeks before getting very flaky, changing modes or shutting off on bumps. In my case the problem is the very poor connection between the battery shell part and the head; it's just a couple of solder blobs that have to be screwed down hard against the shell. If it get even the tiniest bit loose (actually, if it's not tightened down like hell) it'll break contact, and either switch modes or be dim.
Ideally there would be some kind of spring in there so that it could be a little loose and still make contact.
Ideally there would be some kind of spring in there so that it could be a little loose and still make contact.
__________________
Work: the 8 hours that separates bike rides.
Work: the 8 hours that separates bike rides.
01-15-10, 04:44 PM
#3
Very, very Senior Member
Thread Starter
Join Date: May 2009
Location: Chicago
Posts: 1,224
Bikes: 2012 Surly Troll, 1999 Hardtail MTB
Mentioned: 0 Post(s)
Tagged: 0 Thread(s)
Quoted: 1 Post(s)
Likes: 0
Liked 1 Time
in
1 Post
Thanks. I am going to try to put two dimes in it, that might do the trick.
The SSC model actually has springs on both ends.
The SSC model actually has springs on both ends.
01-15-10, 06:29 PM
#4
Se�ior Member
Join Date: Sep 2005
Location: Michigan
Posts: 13,749
Bikes: Windsor Fens, Giant Seek 0 (2014, Alfine 8 + discs)
Mentioned: 13 Post(s)
Tagged: 0 Thread(s)
Quoted: 446 Post(s)
Likes: 0
Liked 8 Times
in
7 Posts
The bad contact on mine is on the negative side, between the case and the LED module, not between the battery and the case or the battery and the LED module. Does the SSC have a spring between the LED module and the case?
The CREE is pretty much a piece of junk, honestly. I think it puts out about 120 lumens on high, when it's working, so it's OK as a backup, but I have a P7 light coming.
The CREE is pretty much a piece of junk, honestly. I think it puts out about 120 lumens on high, when it's working, so it's OK as a backup, but I have a P7 light coming.
__________________
Work: the 8 hours that separates bike rides.
Work: the 8 hours that separates bike rides.
01-15-10, 06:51 PM
#5
Very, very Senior Member
Thread Starter
Join Date: May 2009
Location: Chicago
Posts: 1,224
Bikes: 2012 Surly Troll, 1999 Hardtail MTB
Mentioned: 0 Post(s)
Tagged: 0 Thread(s)
Quoted: 1 Post(s)
Likes: 0
Liked 1 Time
in
1 Post
Does the SSC have a spring between the LED module and the case?
Best of luck with your new P7!
01-16-10, 01:55 AM
#6
Banned
Join Date: Nov 2004
Posts: 10,082
Mentioned: 0 Post(s)
Tagged: 0 Thread(s)
Quoted: 4 Post(s)
Likes: 0
Liked 1 Time
in
1 Post
I had a similar problem with a MTE light from DX. I couldn't find a way to fix it, and after a while the led stopped working all together. It would only extremely lightly glow. I binned it and bought a quality light and am quite happy with it.
This is common with DX lights due to their terrible quality control. I've stopped buying lights from them as all I have bought have died. I suspect that they might be selling seconds. I base this on buying three of the same light, two from DX and one from Shining Beam. The SB light has worked problem free for several years, while both DX lights were flaky out of the box and died early deaths.
This is common with DX lights due to their terrible quality control. I've stopped buying lights from them as all I have bought have died. I suspect that they might be selling seconds. I base this on buying three of the same light, two from DX and one from Shining Beam. The SB light has worked problem free for several years, while both DX lights were flaky out of the box and died early deaths.
01-16-10, 12:16 PM
#8
Senior Member
Join Date: Sep 2006
Location: Down South
Posts: 1,267
Mentioned: 0 Post(s)
Tagged: 0 Thread(s)
Quoted: 10 Post(s)
Likes: 0
Liked 2 Times
in
2 Posts
I had a flashlight that would switch modes on me ... I thought it was a bad switch, but not so. What cured it was wrapping thin plastic around the battery.
This helped keep it in place, so it didn't bounce a bit and loose electrical contact, which apparently is what triggers the mode-switched.
You might give that a try. Certainly was a cheap fix, but took a long time to figure out.
This helped keep it in place, so it didn't bounce a bit and loose electrical contact, which apparently is what triggers the mode-switched.
You might give that a try. Certainly was a cheap fix, but took a long time to figure out.
01-16-10, 05:04 PM
#9
Dirt Bomb
Join Date: Aug 2006
Location: Illinois
Posts: 2,861
Mentioned: 64 Post(s)
Tagged: 0 Thread(s)
Quoted: 5453 Post(s)
Liked 287 Times
in
238 Posts
I have a P7 from DX that started to have problems. I ended up bypassing the circuit board completely. Now it is a single high-mode flashlight, but it is completely reliable.
01-16-10, 07:38 PM
#11
Se�ior Member
Join Date: Sep 2005
Location: Michigan
Posts: 13,749
Bikes: Windsor Fens, Giant Seek 0 (2014, Alfine 8 + discs)
Mentioned: 13 Post(s)
Tagged: 0 Thread(s)
Quoted: 446 Post(s)
Likes: 0
Liked 8 Times
in
7 Posts
I think you just short around the board. A P7 draws at max about 2.8 amps, and that's probably about what a protected 18650 will put out, so I guess it'll run with just the LED, battery and switch in the circuit.
__________________
Work: the 8 hours that separates bike rides.
Work: the 8 hours that separates bike rides.
01-17-10, 07:51 AM
#12
Dirt Bomb
Join Date: Aug 2006
Location: Illinois
Posts: 2,861
Mentioned: 64 Post(s)
Tagged: 0 Thread(s)
Quoted: 5453 Post(s)
Liked 287 Times
in
238 Posts
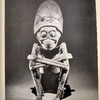
Sorry about the crappy pics, and the crappy soldering job.
If I remember correctly, he's how I did it:
Remove the two small screws that hold the emitter to the base.
Pull up on the emitter. There will be some goo holding it in place.
Two wires will go to the circuit board. De-solder the red+ wire.
Turn the base over and drill a hole in the circuit board through the middle of the spring.
Re-solder the red lead to the same metal pad that the spring is soldered to.
That's it. Now you reassemble.
Before you put the screws back in you might want to add more goo between the emitter and the brass base. The goo is heat-transfer paste that you get from RadioShack. It comes in a small syringe about the size of a AAA battery.
Now just put it all back together and you should have a single-mode light.
If you notice the solder on the spring-side of my circuit board, that's because I removed the circuit board then reattached it. I didn't need to do that.
I hope that explains it. It's really not hard to do.
On second thought, you may need to remove the circuit board to do this. I don't remember exactly.
Last edited by sknhgy; 01-17-10 at 08:24 AM.

Thread
Thread Starter
Forum
Replies
Last Post
tyrion
Electronics, Lighting, & Gadgets
4
01-14-18 08:37 PM
nerys
Electronics, Lighting, & Gadgets
11
06-05-11 05:42 PM
Richard Cranium
Electronics, Lighting, & Gadgets
4
11-16-10 07:49 PM
