


PlanetBike superflash won't turn off
 09-09-10, 12:03 PM
#1
Senior Member
Thread Starter
Join Date: Oct 2009
Location: Seattle, WA
Posts: 148
Bikes: Cervelo S1, Giant OCR3
Mentioned: 0 Post(s)
Tagged: 0 Thread(s)
Quoted: 0 Post(s)
Likes: 0
Liked 0 Times
in
0 Posts
PlanetBike superflash won't turn off
The button on my PlanetBike Superflash appears to be broken, as it won't turn off the light after putting in the batteries. Anything I can possibly do to fix it?
 09-09-10, 12:26 PM
#2
Full Member
Join Date: Dec 2009
Posts: 233
Mentioned: 0 Post(s)
Tagged: 0 Thread(s)
Quoted: 17 Post(s)
Likes: 0
Liked 0 Times
in
0 Posts
Remove the light from the holder base, as you do when you change batteries. There is a small push button on the bottom after the unit has been halved. Try to activate the switch this way. If it still fails to turn off, you require a new switch at which time you will need to be a good solderer or you will need a new light.
09-09-10, 12:51 PM
#3
Senior Member
Thread Starter
Join Date: Oct 2009
Location: Seattle, WA
Posts: 148
Bikes: Cervelo S1, Giant OCR3
Mentioned: 0 Post(s)
Tagged: 0 Thread(s)
Quoted: 0 Post(s)
Likes: 0
Liked 0 Times
in
0 Posts
Remove the light from the holder base, as you do when you change batteries. There is a small push button on the bottom after the unit has been halved. Try to activate the switch this way. If it still fails to turn off, you require a new switch at which time you will need to be a good solderer or you will need a new light.
09-09-10, 03:36 PM
#4
Senior Member

Join Date: Sep 2006
Location: Kansas
Posts: 2,248
Bikes: This list got too long: several �bents, an urban utility e-bike, and a dahon D7 that my daughter has absconded with.
Mentioned: 5 Post(s)
Tagged: 0 Thread(s)
Quoted: 363 Post(s)
Liked 66 Times
in
48 Posts
I have worked with that style of switches quite a bit. If the solder joints are good, then clean the switch with alcohol.
There instructions are generally for when the switch will not turn on; however, they may also work for "wont turn off"
Get some alcohol and q-tip style swab. Turn the switch so the button is pointing up. Then thoroughly wet the swab with alcohol. It should be nearly dripping. Then place the swab on the button and pres repeatedly and frantically. What you are trying to do is to fill the switch chamber with alcohol while repeatedly making and breaking contact. This is to clan any crud off the face of the contacts (like I said, this is normally for won't turn on).
Thinking about this, I have successfully done this for button switches that will not break contact.
I used to work on Copiers and the whole control panel is made up of these type of switches, under the cover. I used to have to repair these switches quite often.
09-09-10, 04:55 PM
#5
Senior Member
Thread Starter
Join Date: Oct 2009
Location: Seattle, WA
Posts: 148
Bikes: Cervelo S1, Giant OCR3
Mentioned: 0 Post(s)
Tagged: 0 Thread(s)
Quoted: 0 Post(s)
Likes: 0
Liked 0 Times
in
0 Posts
I have worked with that style of switches quite a bit. If the solder joints are good, then clean the switch with alcohol.
There instructions are generally for when the switch will not turn on; however, they may also work for "wont turn off"
Get some alcohol and q-tip style swab. Turn the switch so the button is pointing up. Then thoroughly wet the swab with alcohol. It should be nearly dripping. Then place the swab on the button and pres repeatedly and frantically. What you are trying to do is to fill the switch chamber with alcohol while repeatedly making and breaking contact. This is to clan any crud off the face of the contacts (like I said, this is normally for won't turn on).
Thinking about this, I have successfully done this for button switches that will not break contact.
I used to work on Copiers and the whole control panel is made up of these type of switches, under the cover. I used to have to repair these switches quite often.
There instructions are generally for when the switch will not turn on; however, they may also work for "wont turn off"
Get some alcohol and q-tip style swab. Turn the switch so the button is pointing up. Then thoroughly wet the swab with alcohol. It should be nearly dripping. Then place the swab on the button and pres repeatedly and frantically. What you are trying to do is to fill the switch chamber with alcohol while repeatedly making and breaking contact. This is to clan any crud off the face of the contacts (like I said, this is normally for won't turn on).
Thinking about this, I have successfully done this for button switches that will not break contact.
I used to work on Copiers and the whole control panel is made up of these type of switches, under the cover. I used to have to repair these switches quite often.
I used hand sanitizer and a kleenex (I probably should have waited until I got home to use your exact recommendation), but it appears to work! Thanks a ton!
09-09-10, 08:31 PM
#6
Full Member
Join Date: Dec 2009
Posts: 233
Mentioned: 0 Post(s)
Tagged: 0 Thread(s)
Quoted: 17 Post(s)
Likes: 0
Liked 0 Times
in
0 Posts
That's funny. That is my experience as well. Very commonly used as start switches on copiers. Used to carry tons of them and solder new ones in all of the time.
09-10-10, 12:25 PM
#7


Se�ior Member
Join Date: Sep 2005
Location: Michigan
Posts: 13,749
Bikes: Windsor Fens, Giant Seek 0 (2014, Alfine 8 + discs)
Mentioned: 13 Post(s)
Tagged: 0 Thread(s)
Quoted: 446 Post(s)
Likes: 0
Liked 8 Times
in
7 Posts
If you're going to be getting a new light anyway, check out the Radbot. I don't have one but they look like they pretty much spank the SF. I have a fistful of superflashes, but if I ever have to buy another rear light I'll get a Radbot.
__________________
Work: the 8 hours that separates bike rides.
Work: the 8 hours that separates bike rides.
09-10-10, 01:31 PM
#8
Senior Member

Join Date: Jan 2008
Location: Richardson TX
Posts: 1,308
Mentioned: 0 Post(s)
Tagged: 0 Thread(s)
Quoted: 2 Post(s)
Likes: 0
Liked 1 Time
in
1 Post
Got 2 of them to put on the kid's bikes...liked them so much I got 3 more to augment the SF's on the spousal unit's and my own commuters.
__________________
Hey, I'm just this GUY...you know?
>>>Team Critical Mess<<< (You mean it's not SUPPOSE to hurt?)
My nice new Nashbar Touring Build AKA "The Flying Avocadooooooooo!"
1998(?) Trek 700 Multitrack
1995 Trek 1220 AKA "Jimi"
Older Non-suspension Specialized Hardrock
Hey, I'm just this GUY...you know?
>>>Team Critical Mess<<< (You mean it's not SUPPOSE to hurt?)
My nice new Nashbar Touring Build AKA "The Flying Avocadooooooooo!"
1998(?) Trek 700 Multitrack
1995 Trek 1220 AKA "Jimi"
Older Non-suspension Specialized Hardrock
09-10-10, 09:45 PM
#9
Dirt Bomb
Join Date: Aug 2006
Location: Illinois
Posts: 2,865
Mentioned: 64 Post(s)
Tagged: 0 Thread(s)
Quoted: 5471 Post(s)
Liked 288 Times
in
239 Posts
I've had 3 or 4 PBSF's and all the switches were difficult to operate. Maybe it's time some other manufacturer got my business.
09-13-10, 11:02 AM
#10
Senior Member

Join Date: Jul 2008
Location: Austin, TX
Posts: 3,040
Bikes: Bacchetta Giro, Strada
Mentioned: 1 Post(s)
Tagged: 0 Thread(s)
Quoted: 6 Post(s)
Likes: 0
Liked 1 Time
in
1 Post
I'll start out by saying it's not as good as the PBSF. But it's very similar, and I'd say it's 85% as good, and cost 85% less -- at $3.54, if the switch breaks, you don't feel bad about throwing it out. The mount is also compatible with the PBSF one, so it's a drop-in replacement if you want.
The last time I wanted to buy another PBSF, I bought 10 of these lights instead. I mounted two on my bike, keep some more in my bag for friends who need something, and still have some spares in case I need them.
That said, I've got a friend who has the Radbot. It looks like a great light -- similar to the PBSF, but with a more interesting flash pattern. Is it better? Hard to say, but being somebody who pays attention to bike lights, it certainly gets my attention more than the "common" PBSF does now.
09-13-10, 11:39 AM
#11
Se�ior Member
Join Date: Sep 2005
Location: Michigan
Posts: 13,749
Bikes: Windsor Fens, Giant Seek 0 (2014, Alfine 8 + discs)
Mentioned: 13 Post(s)
Tagged: 0 Thread(s)
Quoted: 446 Post(s)
Likes: 0
Liked 8 Times
in
7 Posts
Here's my review of the DX light that Doug mentions above:
https://www.bikeforums.net/showthread...illight-review
If I were buying a small portable light to be my only taillight, I'd get the Radbot anyway, I'm not going to screw around and try to save a few bucks on my main light. But I have a Magicshine rear light, these are just for backup and additional visibility, so I am OK with using these instead. FWIW I think the same of the Superflash - it's OK if you're just riding on low speed streets in good weather, but not good enough for bad weather or high speed roads.
__________________
Work: the 8 hours that separates bike rides.
Work: the 8 hours that separates bike rides.
09-06-20, 03:15 PM
#12
Senior Member
I have worked with that style of switches quite a bit. If the solder joints are good, then clean the switch with alcohol.
There instructions are generally for when the switch will not turn on; however, they may also work for "wont turn off"
Get some alcohol and q-tip style swab. Turn the switch so the button is pointing up. Then thoroughly wet the swab with alcohol. It should be nearly dripping. Then place the swab on the button and pres repeatedly and frantically. What you are trying to do is to fill the switch chamber with alcohol while repeatedly making and breaking contact. This is to clan any crud off the face of the contacts (like I said, this is normally for won't turn on).
Thinking about this, I have successfully done this for button switches that will not break contact.
I used to work on Copiers and the whole control panel is made up of these type of switches, under the cover. I used to have to repair these switches quite often.
There instructions are generally for when the switch will not turn on; however, they may also work for "wont turn off"
Get some alcohol and q-tip style swab. Turn the switch so the button is pointing up. Then thoroughly wet the swab with alcohol. It should be nearly dripping. Then place the swab on the button and pres repeatedly and frantically. What you are trying to do is to fill the switch chamber with alcohol while repeatedly making and breaking contact. This is to clan any crud off the face of the contacts (like I said, this is normally for won't turn on).
Thinking about this, I have successfully done this for button switches that will not break contact.
I used to work on Copiers and the whole control panel is made up of these type of switches, under the cover. I used to have to repair these switches quite often.
Last edited by Richard8655; 09-06-20 at 03:21 PM.
Likes For Richard8655:
09-07-20, 05:04 AM
#13
Senior Member
Join Date: Aug 2010
Location: Madison, WI
Posts: 11,206
Bikes: 1961 Ideor, 1966 Perfekt 3 Speed AB Hub, 1994 Bridgestone MB-6, 2006 Airnimal Joey, 2009 Thorn Sherpa, 2013 Thorn Nomad MkII, 2015 VO Pass Hunter, 2017 Lynskey Backroad, 2017 Raleigh Gran Prix, 1980s Bianchi Mixte on a trainer. Others are now gone.
Mentioned: 48 Post(s)
Tagged: 0 Thread(s)
Quoted: 3460 Post(s)
Liked 1,466 Times
in
1,144 Posts
I would have suggested tuner cleaner, but if sounds like alcohol worked just as well.
I had a cheap copy of a Super Flash that died on a tour, corrosion in the switch. But I have not had any problems with the original Super Flash.
That Radbot 1000 looks interesting, how is battery life compared to Super Flash? Are the mounting brackets for both Radbot and Super Flash interchangeable?
Likes For Tourist in MSN:
09-07-20, 12:20 PM
#14
Senior Member
I would have suggested tuner cleaner, but if sounds like alcohol worked just as well.
I had a cheap copy of a Super Flash that died on a tour, corrosion in the switch. But I have not had any problems with the original Super Flash.
That Radbot 1000 looks interesting, how is battery life compared to Super Flash? Are the mounting brackets for both Radbot and Super Flash interchangeable?
I had a cheap copy of a Super Flash that died on a tour, corrosion in the switch. But I have not had any problems with the original Super Flash.
That Radbot 1000 looks interesting, how is battery life compared to Super Flash? Are the mounting brackets for both Radbot and Super Flash interchangeable?
Last edited by Richard8655; 09-07-20 at 05:29 PM.
09-07-20, 12:31 PM
#15
Senior Member
Join Date: Dec 2006
Location: Houston, TX
Posts: 895
Bikes: 2017 Co-op ADV 1.1; ~1991 Novara Arriba; 1990 Fuji Palisade; mid-90's Moots Tandem; 1985 Performance Superbe
Mentioned: 1 Post(s)
Tagged: 0 Thread(s)
Quoted: 390 Post(s)
Liked 572 Times
in
332 Posts
Older Superflash
My experience with Planet Bike switches 5-7 years ago was bad. They have improved in recent years.
On several older ones I was able to fix �won�t turn off� by cutting off the rubber stub inside the button cover. I just cut it with a razor blade.
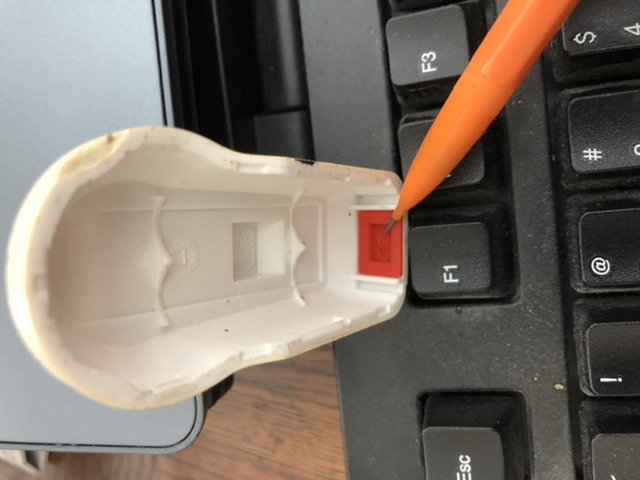
Stub removed from this one.
I was able to rehabilitate several lights doing this.
On several older ones I was able to fix �won�t turn off� by cutting off the rubber stub inside the button cover. I just cut it with a razor blade.
Stub removed from this one.
I was able to rehabilitate several lights doing this.
09-07-20, 06:54 PM
#16
Senior Member
My experience with Planet Bike switches 5-7 years ago was bad. They have improved in recent years.
On several older ones I was able to fix �won�t turn off� by cutting off the rubber stub inside the button cover. I just cut it with a razor blade.
Stub removed from this one.
I was able to rehabilitate several lights doing this.
On several older ones I was able to fix �won�t turn off� by cutting off the rubber stub inside the button cover. I just cut it with a razor blade.
Stub removed from this one.
I was able to rehabilitate several lights doing this.
09-08-20, 04:29 AM
#17
Senior Member
Join Date: Aug 2010
Location: Madison, WI
Posts: 11,206
Bikes: 1961 Ideor, 1966 Perfekt 3 Speed AB Hub, 1994 Bridgestone MB-6, 2006 Airnimal Joey, 2009 Thorn Sherpa, 2013 Thorn Nomad MkII, 2015 VO Pass Hunter, 2017 Lynskey Backroad, 2017 Raleigh Gran Prix, 1980s Bianchi Mixte on a trainer. Others are now gone.
Mentioned: 48 Post(s)
Tagged: 0 Thread(s)
Quoted: 3460 Post(s)
Liked 1,466 Times
in
1,144 Posts
Thanks for the suggestion on tuner cleaner, another possibility. Actually, in addition to the q-tip method, I had to let the Superflash sit overnight after soaking the switch with rubbing alcohol. I've had the same Superflash for 13 years now and after riding in rain and the occasional bike wash, the switch must have been severely corroded. Now works perfectly. Great rear light that's highly visible with original aaa batteries!
For touring I have two taillights on the bike, a Superflash and a Superflash 65. I use one during the day in flash mode. Since the Superflash has a tightly focused beam, I use that when on fairly flat and straight roads. But if on a curvy road where there is a lot of up and down I use the Superflash 65 which has a much wider beam. If heavy overcast or foggy, use both.
Charge up the rechargeable NiMH batteries once a week when touring, they look bright after a week but I want to make sure they stay bright so I charge them once a week anyway.
Great lights.
09-08-20, 10:00 AM
#18
Senior Member
I mentioned above that I had a cheap copy of a Superflash die from corrosion, decided to buy the genuine Superflash after that.
For touring I have two taillights on the bike, a Superflash and a Superflash 65. I use one during the day in flash mode. Since the Superflash has a tightly focused beam, I use that when on fairly flat and straight roads. But if on a curvy road where there is a lot of up and down I use the Superflash 65 which has a much wider beam. If heavy overcast or foggy, use both.
Charge up the rechargeable NiMH batteries once a week when touring, they look bright after a week but I want to make sure they stay bright so I charge them once a week anyway.
Great lights.
Last edited by Richard8655; 09-08-20 at 11:07 AM.

Thread
Thread Starter
Forum
Replies
Last Post
martynaaas
Electronics, Lighting, & Gadgets
9
07-18-16 01:24 AM
kh6idf
Electronics, Lighting, & Gadgets
5
08-25-12 01:24 PM
nerys
Electronics, Lighting, & Gadgets
11
06-05-11 05:42 PM
