


How do you install fenders on Downtube Mini?
 07-04-09, 05:23 AM
#1
Junior Member
Thread Starter
Join Date: Jun 2009
Location: The Garden State
Posts: 16
Bikes: Downtube Mini '08
Mentioned: 0 Post(s)
Tagged: 0 Thread(s)
Quoted: 0 Post(s)
Likes: 0
Liked 0 Times
in
0 Posts
How do you install fenders on Downtube Mini?
I have a 2008 Downtube Mini, and would like to install fenders/mudguards. I got the SKS Dahon 16" mudguards and spent this morning trying to install them, but both the front and rear fenders touch the brakes (brake cable housing) no matter which way I put them on; so I had to give up. This was the first time I ever tried to tinker with a bike, so I didn't want to mess with the brakes (definitely out of my league!) ")
Has anyone successfully installed fenders on the Mini? If then, which product did you use and what did you need to do to fit them? Or is there some special way to fit the SKS fenders? Sudden showers are common in summer where I live, so I'd really like some permanent fenders on the bike. I had asked the tech guy at Downtube but he suggested a quick release mudguard like those from Topeak... but I'd rather not go there unless there's absolutely no permanent-install solution. Please help!
Has anyone successfully installed fenders on the Mini? If then, which product did you use and what did you need to do to fit them? Or is there some special way to fit the SKS fenders? Sudden showers are common in summer where I live, so I'd really like some permanent fenders on the bike. I had asked the tech guy at Downtube but he suggested a quick release mudguard like those from Topeak... but I'd rather not go there unless there's absolutely no permanent-install solution. Please help!
 07-04-09, 09:41 AM
#2
Recently Re-tired.
Join Date: Sep 2005
Location: In my happy place.
Posts: 100
Bikes: Lightfoot Ranger, Maxarya (both recumbents), Strida, Dahon Jetsream E-bike, Dahon Curve SL
Mentioned: 0 Post(s)
Tagged: 0 Thread(s)
Quoted: 0 Post(s)
Likes: 0
Liked 0 Times
in
0 Posts
I recently installed the same fenders (SKS) and Schwalbe Big Apple tires on my Downtube Mini. They definitely do fit, however the rubber "accordian" over the brake cable between the calipers does rub against the fender. No big deal, as it doesn't affect the braking. I used all the orginal mounting hardware that came with the fenders, but I did have to cut about 1/2" off the rear struts. I even installed them without taking the original tires off, as I was still waiting for the Big Apples to arrive.
Have another go at it. Don't be afraid, you won't break anything, and it will be a great learning experience, giving you confidence to go on to bigger and better things. Good bicycles are amazingly tough and hard to break!
Have another go at it. Don't be afraid, you won't break anything, and it will be a great learning experience, giving you confidence to go on to bigger and better things. Good bicycles are amazingly tough and hard to break!
07-04-09, 01:46 PM
#3
Junior Member
Thread Starter
Join Date: Jun 2009
Location: The Garden State
Posts: 16
Bikes: Downtube Mini '08
Mentioned: 0 Post(s)
Tagged: 0 Thread(s)
Quoted: 0 Post(s)
Likes: 0
Liked 0 Times
in
0 Posts
Hi Autoworker, thanks so much for your reply! I'm so glad to hear from someone who has done the job before me. My first reaction after opening up this fender package was "where's the instruction??!" and there are several things that still leave me baffled. (I'm used to following the scant IKEA instructions by now, but no instruction at all is of course much worse. sigh)
Yup that was my biggest concern. Glad to know that it doesn't affect braking. Safety is definitely the first priority and I didn't want to mess with brakes! I'd prefer it if there's any way to install the fenders without having them brush against the brake cable housing, though.
Right, the rear struts were just about that much too long, but I don't have the necessary tool to chop them off.  BTW, the rear struts are the ones that are slightly bent, right? It took me a while to figure that out, too. (sigh)
And as for the original hardware... Only the shortest screws fit for the job and I was short of two of them to finish the installation.
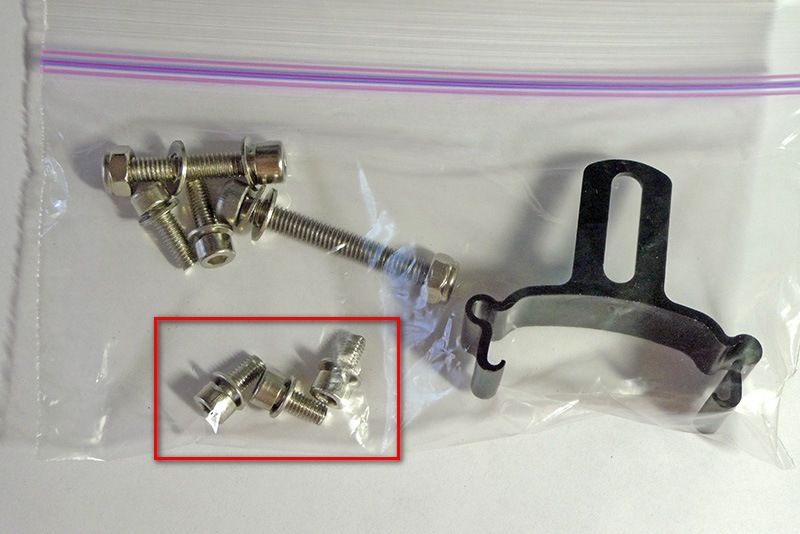
This picture shows all the hardware I received in the package. (The ziploc is mine, BTW. They first came in a sealed plastic together with the struts.) Does this look right? Were yours the same? I could use only the three smallest screws in the red box: two for the front struts, and one for the front-end of the rear fender to the frame. Then I was short of two more screws for the rear struts (if their length were alright, that is.) None of the other screws would fit the rear strut braze-ons.
Was I installing them right? Maybe I should bring the whole thing to the LBS and ask for help, but I don't know whether they would take a job like this, either... Would they? (sigh)
BTW, the rear struts are the ones that are slightly bent, right? It took me a while to figure that out, too. (sigh)And as for the original hardware... Only the shortest screws fit for the job and I was short of two of them to finish the installation.
This picture shows all the hardware I received in the package. (The ziploc is mine, BTW. They first came in a sealed plastic together with the struts.) Does this look right? Were yours the same? I could use only the three smallest screws in the red box: two for the front struts, and one for the front-end of the rear fender to the frame. Then I was short of two more screws for the rear struts (if their length were alright, that is.) None of the other screws would fit the rear strut braze-ons.
Was I installing them right? Maybe I should bring the whole thing to the LBS and ask for help, but I don't know whether they would take a job like this, either... Would they? (sigh)
Last edited by soseono; 07-04-09 at 02:06 PM.
07-04-09, 02:57 PM
#4
Recently Re-tired.
Join Date: Sep 2005
Location: In my happy place.
Posts: 100
Bikes: Lightfoot Ranger, Maxarya (both recumbents), Strida, Dahon Jetsream E-bike, Dahon Curve SL
Mentioned: 0 Post(s)
Tagged: 0 Thread(s)
Quoted: 0 Post(s)
Likes: 0
Liked 0 Times
in
0 Posts
I used a Dremel with a cut-off wheel to shorten the struts. If you don't have one, a hacksaw will do just fine.
I had the same situation as you regarding the screws - used two of the short ones for the front fender, and one to attach the rear fender to the bike frame. I have a large collection small nuts and bolts (This is mandatory when you're retired, you're not allowed to retire unless you have a large collection of screws, nuts and bolts in your workshop!) You could always go to Home Depot and buy a couple of metric nuts and bolts to go through the holes for the struts on the rear dropouts.
Don't worry about the the rubber "accordian" brushing against the fender; it's a non-issue, and won't affect the safety of the bike in any way.
And, yeah, your local LBS would gladly take your money and install them for you, but don't wimp out, YOU CAN DO IT!
I don't know your age, soseono, but I can tell you that the whole time I was growing up, I was always told that I "wasn't good with my hands". I was your typical non-athletic bookworm fat nerd. After I got married, I got a job at General Motors, working on the line. That really opened my eyes as to how even very complex things like an automobile are assembled through a series of logical simple steps. Then I realized, "If a dummies like me can put these things together, then a dummy like me can work on it and fix it." I eventually went on to get an apprenticeship as an Industrial Maintenance Electrician, after working for 9 years on the line, and spent my last 24 years fixing anything and everything electrical that broke down. And many times it was something I'd never seen before; you just had to figure it out as you went along. Frustrating? Yes. Challenging? Yup. Satisfying? You betcha!
So I guess what I'm saying, is, don't be intimidated by technology or things mechanical. Dummies like you and me put them together, so dummies like you and me can figure out how to fix them or modify them to our liking. If you're taking something apart, use your digital camera to take pics every step of the way. Lay out the parts in a straight line, in the order you take them off, and just reverse the order when you put them back. There's hundreds of little "tricks" pros and tradesmen use every day. You can learn them and apply them too, no matter what kind of Do-It-Yourself job you tackle.
So I repeat. "Yeah, your local LBS would gladly take your money and install them for you, but don't wimp out, YOU CAN DO IT! "
07-04-09, 04:26 PM
#5

Part-time epistemologist

I did not have to cut the struts to fit the fenders.
__________________
A narrative on bicycle driving.
A narrative on bicycle driving.
07-04-09, 08:10 PM
#6
Junior Member
Thread Starter
Join Date: Jun 2009
Location: The Garden State
Posts: 16
Bikes: Downtube Mini '08
Mentioned: 0 Post(s)
Tagged: 0 Thread(s)
Quoted: 0 Post(s)
Likes: 0
Liked 0 Times
in
0 Posts
I did it!! Two trips to Home Depot and another hour later, my DT Mini is now proudly fender-ed. I'm so excited! Thank you Autoworker for such a kind message. Your post really did encourage me to pack all the parts and drive to Home Depot.
In the end, all I needed was two 6mm cap screws & 6mm flat washers to secure the two rear struts. It turns out that the fender braze-ons on the rear are 1mm larger in diameter than the front; the original mounting hardware that I used for front was 5mm size, so I bought the same 5mm screws for the rear at first, but I had to go back to exchange them with 6mm ones.
And the 1/2" cut off the rear struts was right on the mark. They were definitely too long and there was no way they would fit without being cut, and 1/2" cut was perfect. The funny thing is that all four struts were of the same length, and fitting the front was not an issue.
In fact, at first I was dreading having to buy & work with a hacksaw (I'm a young petite gal with little muscle power and no garage full of power tools ), but I showed the rear struts to the kind guy at the Hardware section, and he quickly cut & filed them with their machine there. So I was just $1.54 out for the screws & washers, and am now all set. 
The fenders still do rub against the brake, and whenever brake is engaged, both the brake housing and fender move together. But since both of you say it's okay, I won't worry about it too much.
Again, thank you Autoworker and invisiblehand for your replies, and especially Autoworker for your helpful pointers and kind encouragements.
In the end, all I needed was two 6mm cap screws & 6mm flat washers to secure the two rear struts. It turns out that the fender braze-ons on the rear are 1mm larger in diameter than the front; the original mounting hardware that I used for front was 5mm size, so I bought the same 5mm screws for the rear at first, but I had to go back to exchange them with 6mm ones.
And the 1/2" cut off the rear struts was right on the mark. They were definitely too long and there was no way they would fit without being cut, and 1/2" cut was perfect. The funny thing is that all four struts were of the same length, and fitting the front was not an issue.
In fact, at first I was dreading having to buy & work with a hacksaw (I'm a young petite gal with little muscle power and no garage full of power tools
), but I showed the rear struts to the kind guy at the Hardware section, and he quickly cut & filed them with their machine there. So I was just $1.54 out for the screws & washers, and am now all set. The fenders still do rub against the brake, and whenever brake is engaged, both the brake housing and fender move together. But since both of you say it's okay, I won't worry about it too much.
Again, thank you Autoworker and invisiblehand for your replies, and especially Autoworker for your helpful pointers and kind encouragements.
07-05-09, 05:27 AM
#7
Recently Re-tired.
Join Date: Sep 2005
Location: In my happy place.
Posts: 100
Bikes: Lightfoot Ranger, Maxarya (both recumbents), Strida, Dahon Jetsream E-bike, Dahon Curve SL
Mentioned: 0 Post(s)
Tagged: 0 Thread(s)
Quoted: 0 Post(s)
Likes: 0
Liked 0 Times
in
0 Posts
Way to go girl! I knew you could do it.
07-05-09, 10:22 AM
#8
Senior Member
Join Date: Jul 2008
Location: New York City
Posts: 364
Bikes: 2006 Dahon D7, 2015 Kona Minute
Mentioned: 0 Post(s)
Tagged: 0 Thread(s)
Quoted: 15 Post(s)
Likes: 0
Liked 0 Times
in
0 Posts
Congrats! Let's see a picture of your upgraded ride!
I did the same install on my Mini, but I didn't run into any trouble with the rear struts because I didn't install them. My Mini has a rear rack fitted from a Dahon Curve, and the rack is using the fender braze-ons. I used the fender hanger attachment, attached it to the bottom of the rack and bent it around the fender. Holds together just fine.
I did the same install on my Mini, but I didn't run into any trouble with the rear struts because I didn't install them. My Mini has a rear rack fitted from a Dahon Curve, and the rack is using the fender braze-ons. I used the fender hanger attachment, attached it to the bottom of the rack and bent it around the fender. Holds together just fine.
07-05-09, 05:12 PM
#9
Junior Member
Thread Starter
Join Date: Jun 2009
Location: The Garden State
Posts: 16
Bikes: Downtube Mini '08
Mentioned: 0 Post(s)
Tagged: 0 Thread(s)
Quoted: 0 Post(s)
Likes: 0
Liked 0 Times
in
0 Posts
Picture of my upgraded Mini
Here's the pic! 

In addition to the fenders, I had the saddle changed and the kickstand added at the LBS. Both the saddle and kickstand, including the exorbitant installation fee (in addition to paying full retail price for the parts! ), were about $90... I'm glad at least I could install the fenders myself, thanks to all your support here.
And dschwarz, that's great information about the rack and fender installation. I'd like a rack as well, but keep thinking it might add too much weight; my Mini is heavy enough for me already. Maybe in the future when I gain enough arm muscle , your information would come very handy. Thanks!
In addition to the fenders, I had the saddle changed and the kickstand added at the LBS. Both the saddle and kickstand, including the exorbitant installation fee (in addition to paying full retail price for the parts!
), were about $90... I'm glad at least I could install the fenders myself, thanks to all your support here. And dschwarz, that's great information about the rack and fender installation. I'd like a rack as well, but keep thinking it might add too much weight; my Mini is heavy enough for me already. Maybe in the future when I gain enough arm muscle
, your information would come very handy. Thanks!
07-06-09, 04:58 AM
#10
Senior Member
Join Date: Jul 2008
Location: New York City
Posts: 364
Bikes: 2006 Dahon D7, 2015 Kona Minute
Mentioned: 0 Post(s)
Tagged: 0 Thread(s)
Quoted: 15 Post(s)
Likes: 0
Liked 0 Times
in
0 Posts
Looks nice - mine looked a lot like that, before it got all scratched up.
07-06-09, 08:02 AM
#11
Recently Re-tired.
Join Date: Sep 2005
Location: In my happy place.
Posts: 100
Bikes: Lightfoot Ranger, Maxarya (both recumbents), Strida, Dahon Jetsream E-bike, Dahon Curve SL
Mentioned: 0 Post(s)
Tagged: 0 Thread(s)
Quoted: 0 Post(s)
Likes: 0
Liked 0 Times
in
0 Posts
I'll bet that after your success at installing the fenders yourself, you wish you had installed the seat and kickstand yourself, too, and saved a few bucks.
By the way, that's not your normal seat height in the photo, is it? I realize that in one of your previous posts you stated "I'm a young petite gal", but what are you, like 3 feet tall?
P.S. No offence intended if you really are.
By the way, that's not your normal seat height in the photo, is it? I realize that in one of your previous posts you stated "I'm a young petite gal", but what are you, like 3 feet tall?
P.S. No offence intended if you really are.
07-06-09, 02:26 PM
#12
Junior Member
Thread Starter
Join Date: Jun 2009
Location: The Garden State
Posts: 16
Bikes: Downtube Mini '08
Mentioned: 0 Post(s)
Tagged: 0 Thread(s)
Quoted: 0 Post(s)
Likes: 0
Liked 0 Times
in
0 Posts
And I'm getting more itches about a rack. My bike is for commuting and oftentimes I wear shoulder bags that I'd like to just strap on a rack and go, instead of having to change to a backpack or cross-body. I've been looking at the Nashbar front rack all day long today... (Someone please stop me! ) ) Anyway, my business is going to a different shop next time.  I have 26" inseam and short arms, and am not an aggressive rider at all.
  I could raise it a bit more as I get used to the bike, but the seat height would probably never reach the handlebar height (that handle bar is at its lowest in that photo).
Last edited by soseono; 07-06-09 at 03:07 PM.
07-06-09, 03:52 PM
#13
Recently Re-tired.
Join Date: Sep 2005
Location: In my happy place.
Posts: 100
Bikes: Lightfoot Ranger, Maxarya (both recumbents), Strida, Dahon Jetsream E-bike, Dahon Curve SL
Mentioned: 0 Post(s)
Tagged: 0 Thread(s)
Quoted: 0 Post(s)
Likes: 0
Liked 0 Times
in
0 Posts
Boy, did I stick my foot in my mouth! 
Seriously though, even with a 26" inseam, your seat looks really low. When sitting on the seat, with the middle of your foot flat on the pedal, your leg should be fully extended, with no bend in the knee. When you pedal, you should place the ball of your foot on the pedal, so there will be a slight bend in the knee. I have all my bikes set up this way, and when I stop, I can just touch the ground with my toes. This makes for much more efficient pedaling. You might want to try gradually working up to this ideal.
(Hope I'm not coming across as an arrogant know-it-all. If you already knew all this, and just prefer to ride the way you do, I apologize. Whatever works for you is fine with me.)
Seriously though, even with a 26" inseam, your seat looks really low. When sitting on the seat, with the middle of your foot flat on the pedal, your leg should be fully extended, with no bend in the knee. When you pedal, you should place the ball of your foot on the pedal, so there will be a slight bend in the knee. I have all my bikes set up this way, and when I stop, I can just touch the ground with my toes. This makes for much more efficient pedaling. You might want to try gradually working up to this ideal.
(Hope I'm not coming across as an arrogant know-it-all. If you already knew all this, and just prefer to ride the way you do, I apologize. Whatever works for you is fine with me.
)
07-06-09, 05:59 PM
#14
Junior Member
Thread Starter
Join Date: Jun 2009
Location: The Garden State
Posts: 16
Bikes: Downtube Mini '08
Mentioned: 0 Post(s)
Tagged: 0 Thread(s)
Quoted: 0 Post(s)
Likes: 0
Liked 0 Times
in
0 Posts
I might try the toe-touching-the-ground height tomorrow. Thanks!
10-29-09, 04:16 PM
#15
Senior Member
Join Date: Oct 2009
Location: Houston, TX
Posts: 159
Bikes: Brompton H6L, DT Mini, DT 9FS, Dahon Ciao P8, Dahon Classic 3(x2), Dahon TR, R20, Raleigh Chopper III, Auto Mini Jr., Mercier Nano, Giant Anyroad2
Mentioned: 0 Post(s)
Tagged: 0 Thread(s)
Quoted: 0 Post(s)
Likes: 0
Liked 0 Times
in
0 Posts
How do you install fenders on a DT Mini?
I just bought a Mini from Yan (it was one of his floor models) and received it last week and plan on installing Dahon fenders like you did. Could you email me a couple of close-up pics of the fenders on your Mini? I'd like to see the attachment points on the front and rear of each fender. Also, what brand of kickstand did you get and could you include a close-up of that as well? Did you protect the chain stay where the bracket is attached? If you can help me I'll send you my email address or maybe you can post them here.
I, too, have a short inseam (27 1/4) and have to play with the saddle to get the right knee angle but also allow for the correct amount of foot contact with the ground when stopped. Guess the only way I can get a better (hopefully perfect) bike fit is to buy a Rans CF or Electra Townie.
Thanks, soseono.
airwulf
