


My method for setting seat hight on a Brompton
 01-13-11, 03:34 PM
#1
Senior Member
Thread Starter
Join Date: Jan 2008
Location: Cheshire, North West England, UK
Posts: 575
Bikes: Brompton S2L-X, Bridgestone Moulton, 1963 & 1966 Moultons, Scott Mountain bike
Mentioned: 1 Post(s)
Tagged: 0 Thread(s)
Quoted: 10 Post(s)
Likes: 0
Liked 2 Times
in
2 Posts
My method for setting seat hight on a Brompton
I thought that I would share a method I have been using for the last 22 months to set the hight of a Brompton seat.
What you need is a sheet of plastic motorcycle tank protection film.
I bought mine from Hein Gericke but I’m sure that there are other sources of this self adhesive plastic film. It is about 1mm thick and quite hard wearing (I have only needed to change this film once)
https://www.hein-gericke.co.uk/shop/p...oducts_id/7274
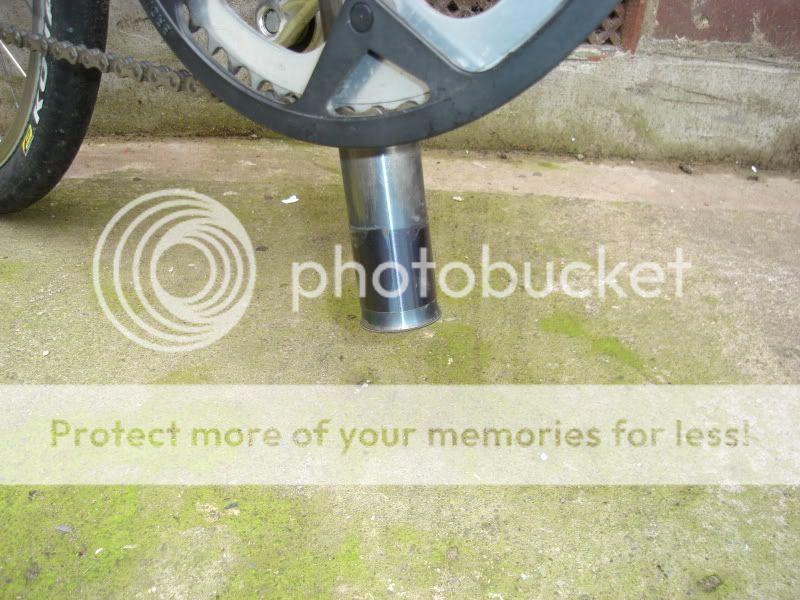
What you need to do is ride around for a while until you have determined the best seat hight for you. Then take a marker pen and mark where the seat post enters the frame.
Now pull the seat post fully up and measure the distance between the pen mark and the frame (in my case it was a little over 1”). Now with the bike still in the ready to ride sate (e.g. the rear wheel NOT folded under in the “park” position), drop the seat post down to the floor to expose the bottom of the seat post. Next cut a strip of plastic that corresponds to the measurement you took between the pen mark with the seat at your comfortable riding height and the fully extended height. Wrap the strip around the bottom of the post, mark where it overlaps and trim it to length so that it forms a collar. Remove the backing paper and wrap the protection film around the bottom of the post just above the flared section.
Now each time you use the bike you can just pull the seat up as far as it will go and it will stop at your perfect height. I have been using this now for nearly 2 years and it works great and as I say, I have only had to replace the film once. It is also a simple task to remove the film if required.
Here is a photo of my Brompton with the film fitted.
takes longer to explain the method than to actually cut and fit the film.
I hope this is of use to other Brompton owners.
What you need is a sheet of plastic motorcycle tank protection film.
I bought mine from Hein Gericke but I’m sure that there are other sources of this self adhesive plastic film. It is about 1mm thick and quite hard wearing (I have only needed to change this film once)
https://www.hein-gericke.co.uk/shop/p...oducts_id/7274
What you need to do is ride around for a while until you have determined the best seat hight for you. Then take a marker pen and mark where the seat post enters the frame.
Now pull the seat post fully up and measure the distance between the pen mark and the frame (in my case it was a little over 1”). Now with the bike still in the ready to ride sate (e.g. the rear wheel NOT folded under in the “park” position), drop the seat post down to the floor to expose the bottom of the seat post. Next cut a strip of plastic that corresponds to the measurement you took between the pen mark with the seat at your comfortable riding height and the fully extended height. Wrap the strip around the bottom of the post, mark where it overlaps and trim it to length so that it forms a collar. Remove the backing paper and wrap the protection film around the bottom of the post just above the flared section.
Now each time you use the bike you can just pull the seat up as far as it will go and it will stop at your perfect height. I have been using this now for nearly 2 years and it works great and as I say, I have only had to replace the film once. It is also a simple task to remove the film if required.
Here is a photo of my Brompton with the film fitted.
takes longer to explain the method than to actually cut and fit the film.
I hope this is of use to other Brompton owners.
 01-13-11, 03:50 PM
#2

Part-time epistemologist

Nice idea.
How come you didn't just mark the tube from the underside?
How come you didn't just mark the tube from the underside?
__________________
A narrative on bicycle driving.
A narrative on bicycle driving.
01-13-11, 04:04 PM
#3
Senior Member
Thread Starter
Join Date: Jan 2008
Location: Cheshire, North West England, UK
Posts: 575
Bikes: Brompton S2L-X, Bridgestone Moulton, 1963 & 1966 Moultons, Scott Mountain bike
Mentioned: 1 Post(s)
Tagged: 0 Thread(s)
Quoted: 10 Post(s)
Likes: 0
Liked 2 Times
in
2 Posts
Because you can't see the end of the seat post with the seat up in the ready to ride position.
01-13-11, 04:11 PM
#4
Banned
So , supposing .. this is Mark minus width of the frame bushing?
since tape wont slide past the plastic bushing..
since tape wont slide past the plastic bushing..
01-13-11, 04:28 PM
#5
Senior Member
Thread Starter
Join Date: Jan 2008
Location: Cheshire, North West England, UK
Posts: 575
Bikes: Brompton S2L-X, Bridgestone Moulton, 1963 & 1966 Moultons, Scott Mountain bike
Mentioned: 1 Post(s)
Tagged: 0 Thread(s)
Quoted: 10 Post(s)
Likes: 0
Liked 2 Times
in
2 Posts
Yes, that is the idea... the plastic is thick / strong enough to stop up inside the frame at the frame bushing (rather than the very end, flared end of the seat post tube).
01-13-11, 04:34 PM
#6
Banned
wonder what the US equivalent source may be for something similar ?,
Generic, that a Polycarbonate film with the sticky stuff ?
only a Marine supply shop here to keep the commercial fishers going out.
or the auto parts shop..
Generic, that a Polycarbonate film with the sticky stuff ?
only a Marine supply shop here to keep the commercial fishers going out.
or the auto parts shop..
01-13-11, 07:06 PM
#7
747 Freight Pilot

Join Date: Aug 2008
Location: Ohio, USA
Posts: 458
Bikes: Rivendell, Bike-Friday Pocket-Rocket and one home made fixed gear
Mentioned: 0 Post(s)
Tagged: 0 Thread(s)
Quoted: 0 Post(s)
Likes: 0
Liked 0 Times
in
0 Posts
I did something similar with my Bike-Friday. I just used a hose clamp secured to the seat post. I slide it down till the clamp rests on the tube and then secure it.

