


Project: Lugged steel frame from the very beginning!
 09-08-16, 02:59 PM
#1
Junior Member
Thread Starter
Join Date: Sep 2016
Posts: 7
Mentioned: 0 Post(s)
Tagged: 0 Thread(s)
Quoted: 1 Post(s)
Likes: 0
Liked 0 Times
in
0 Posts
Project: Lugged steel frame from the very beginning!
Hi to all the bicycle fanatics out there!
As the title says I am a complete framebuilder newbie and at this point I am not sure yet if that will ever change. However, I have set myself the goal to build my own bicycle frame from scratch.
Maybe to give some background first: I am very passionate about bicycles for years now, mostly into touring. Did my first big tour through the southern part of Iceland (great country for cycling by the way!) and the next year 1000km through the hilly south of Norway. It is VERY hilly if you try to avoid the annoying tunnels... we only found out after the trip that we had done the steepest road of Norway, the Stalheimsklava... Until then I had always been using a standard touring bicycle (aluminum frame, nothing fancy), and last year in September I decided to get something else 5 months waiting time later I received my brand new Columbus Zona, fillet-brazed, Rohloff touring bike from a small manufacturer in Germany. I took it to Iceland again this year, around 1900km in the interior and along the ring road and from that point onward... steel all the way! I just love it! So basically for 1 year already I am really fascinated by steel frames, mostly the beauty and the elegance... (I was never really into thick-butted tubes -> now that I am writing this it sounds a bit wrong...) but also the process behind it really fascinated me.
Looong story short: 6 months ago I somehow stumbled over the book "Lugged Bicycle Frame Construction" by M. R. Chimonas and that was the point I asked myself the question: Why not build your own frame?! Plus, winter time is approaching... so why not?! At this point I realized that building bicycle frames was actually "a thing" and not just something where you have to have years and years of training and need equipment which costs thousands of dollars.
So as you can guess by now I am somebody who is very passionate about bikes but has zero experience in framebuilding and the underlying disciplines of brazing and mitering for example. So, I belive this could be exciting (worst case I'll have some really nice wall-decoration! ... or I'll get to see my dentist more often, I know)
What do I want to build?
I want to build a lugged classic geometry road bike frame, made from steel. From what I read, this should be the easiest (I don't expect it to be easy) approach to building a steel frame. The geometry will be pretty basic and simple. Standard sized tubing because I want to have the elegant look that you just can't have with other materials. Slim tires, no fenders. Overall nothing fancy. My main focus for this project is on doing it right, instead of doing the right thing. That can follow later. (if I don't crash this one)
So I started my planning, going a bit more into detail, trying to find what exactly I want to build. Started my planning on paper but quickly realized that I should maybe look for something CAD-based. I stumbled over rattleCAD (https://rattlecad.sourceforge.net/) and found it to be very useful. Maybe it doesn't offer the functionality scope of bikeCAD but in my opinion that is not what such a tool is intended for.
Some more details on the build:
Classic geometry, TT slope of 0.73�
HT� = ST� of 72�
HT 31,8mm
DT 28,6mm 9/6/9
TT 25,4mm 9/6/9
ST 28,6mm 9/6/9
CS 22mm ROR (around 425mm in length)
SS 14mm
with angles (front triangle):
HT-DT 60�
HT-TT 73�
TT-ST 73�
ST-DT 60�
With a ST length of 541mm this will give me BB height of 266mm and enough toe clearance... so I think I should be fine.
Fork will likely be the Columbus Minimal Carbon with a height of 375mm and 45mm rake.
In terms of brazing: I am trying to keep my investment in equipment as low as possible so I was planning on using MAPP gas instead of oxy-ace for example. Any suggestions? What should I take into account when using just MAPP? I read that there is a risk of underheating subassemblies when using a MAPP torch and that flux may get exhausted too early due to the longer time required to heat parts up? At the same time, I've seen a few frames already which were brazed with MAPP so I am wondering if there is any real downside...
I will probably spend a considerable time in this project on learning how to braze because a) I don't want to ruin an expensive tubeset and b) I don't want to risk my life")
Last but not least, I am attaching a screengrab of my frame in rattleCAD.
Looking forward to an exciting project... I'll be using this thread to keep you posted on the process.
Any comments and advice is highly appreciated!!!
Cheers
As the title says I am a complete framebuilder newbie and at this point I am not sure yet if that will ever change. However, I have set myself the goal to build my own bicycle frame from scratch.
Maybe to give some background first: I am very passionate about bicycles for years now, mostly into touring. Did my first big tour through the southern part of Iceland (great country for cycling by the way!) and the next year 1000km through the hilly south of Norway. It is VERY hilly if you try to avoid the annoying tunnels... we only found out after the trip that we had done the steepest road of Norway, the Stalheimsklava... Until then I had always been using a standard touring bicycle (aluminum frame, nothing fancy), and last year in September I decided to get something else
5 months waiting time later I received my brand new Columbus Zona, fillet-brazed, Rohloff touring bike from a small manufacturer in Germany. I took it to Iceland again this year, around 1900km in the interior and along the ring road and from that point onward... steel all the way! I just love it! So basically for 1 year already I am really fascinated by steel frames, mostly the beauty and the elegance... (I was never really into thick-butted tubes -> now that I am writing this it sounds a bit wrong...) but also the process behind it really fascinated me.Looong story short: 6 months ago I somehow stumbled over the book "Lugged Bicycle Frame Construction" by M. R. Chimonas and that was the point I asked myself the question: Why not build your own frame?! Plus, winter time is approaching... so why not?! At this point I realized that building bicycle frames was actually "a thing" and not just something where you have to have years and years of training and need equipment which costs thousands of dollars.
So as you can guess by now I am somebody who is very passionate about bikes but has zero experience in framebuilding and the underlying disciplines of brazing and mitering for example. So, I belive this could be exciting
(worst case I'll have some really nice wall-decoration! ... or I'll get to see my dentist more often, I know)What do I want to build?
I want to build a lugged classic geometry road bike frame, made from steel. From what I read, this should be the easiest (I don't expect it to be easy) approach to building a steel frame. The geometry will be pretty basic and simple. Standard sized tubing because I want to have the elegant look that you just can't have with other materials. Slim tires, no fenders. Overall nothing fancy. My main focus for this project is on doing it right, instead of doing the right thing. That can follow later. (if I don't crash this one)
So I started my planning, going a bit more into detail, trying to find what exactly I want to build. Started my planning on paper but quickly realized that I should maybe look for something CAD-based. I stumbled over rattleCAD (https://rattlecad.sourceforge.net/) and found it to be very useful. Maybe it doesn't offer the functionality scope of bikeCAD but in my opinion that is not what such a tool is intended for.
Some more details on the build:
Classic geometry, TT slope of 0.73�
HT� = ST� of 72�
HT 31,8mm
DT 28,6mm 9/6/9
TT 25,4mm 9/6/9
ST 28,6mm 9/6/9
CS 22mm ROR (around 425mm in length)
SS 14mm
with angles (front triangle):
HT-DT 60�
HT-TT 73�
TT-ST 73�
ST-DT 60�
With a ST length of 541mm this will give me BB height of 266mm and enough toe clearance... so I think I should be fine.
Fork will likely be the Columbus Minimal Carbon with a height of 375mm and 45mm rake.
In terms of brazing: I am trying to keep my investment in equipment as low as possible so I was planning on using MAPP gas instead of oxy-ace for example. Any suggestions? What should I take into account when using just MAPP? I read that there is a risk of underheating subassemblies when using a MAPP torch and that flux may get exhausted too early due to the longer time required to heat parts up? At the same time, I've seen a few frames already which were brazed with MAPP so I am wondering if there is any real downside...
I will probably spend a considerable time in this project on learning how to braze because a) I don't want to ruin an expensive tubeset and b) I don't want to risk my life
Last but not least, I am attaching a screengrab of my frame in rattleCAD.
Looking forward to an exciting project... I'll be using this thread to keep you posted on the process.
Any comments and advice is highly appreciated!!!
Cheers
 09-08-16, 03:56 PM
#2
Banned
1975 , I used stamped Prugnut (or what ever they were called) lugs BB & fork crown were cast .
Columbus Aelle Tube and Brass clean metal thoroughly before fluxing
I still have the frame .. type : Touring , reason to not just buy one ?
made a longer top tube so Toeclips and Front Mudguards got along with each other ..
Mafac cantilevers .. Adjustment 1 was where the bosses were put on the Frame.
09-09-16, 05:56 AM
#3
Junior Member
Thread Starter
Join Date: Sep 2016
Posts: 7
Mentioned: 0 Post(s)
Tagged: 0 Thread(s)
Quoted: 1 Post(s)
Likes: 0
Liked 0 Times
in
0 Posts
Thanks for the hints!
In terms of lugs I plan on getting the LUGS ROAD STD PRUGNAT S-4 SERIES. (LUGS ROAD STD PRUGNAT S-4 SERIES :: LUGS :: Nova Cycles Supply Inc.)
Bottom bracket shell: STANDARD ROAD BB - W/CABLE GUIDES :: BOTTOM BRACKETS :: Nova Cycles Supply Inc.
Dropouts are adjustable, I feel it makes the planning of the geometry much easier: Road Rear Socket Style Two Eyelet for 10.6mm SS / 12.5mm CS :: ROAD DROPOUTS :: STEEL DROPOUTS :: DROPOUTS :: Nova Cycles Supply Inc.
I am realizing that somehow my last attachment got a bit too small in size. So here is a new one.
Silly question: Right now my frame is designed to have 425mm chainstays. In order to have 130mm between the dropouts my CS-CS angle currently measures 8,05�. However, the BB shell I want to get is designed with a 7� CS-CS angle. Will I be able bend the chain stays by 1,05� or should I get longer chain stays to achieve a more narrow angle? What is your advice?
Cheers
Last edited by BastianH; 09-09-16 at 06:18 AM.
09-09-16, 10:55 AM
#4

Team Beer
Join Date: Apr 2004
Location: Sacramento CA
Posts: 6,339
Bikes: Too Many
Mentioned: 3 Post(s)
Tagged: 0 Thread(s)
Quoted: 114 Post(s)
Liked 159 Times
in
104 Posts
I don't think that MAPP or MAPP/Oxy will provide enough heat to braze all the joints with silver. Especially the BB area. I'm not sure where you are but if Oxy/Acy is difficult to source search for Doug Fattic's guide to a Propane/oxy setup. In the US I sourced a portable oxy/acy setup for under $100 but your mileage may vary. Additionally, locate some practice lugs and some 4130 tubing (.35 wall thickness will work) to practice brazing joints before using the good stuff.
__________________
I'm not one for fawning over bicycles, but I do believe that our bikes communicate with us, and what this bike is saying is, "You're an idiot." BikeSnobNYC
I'm not one for fawning over bicycles, but I do believe that our bikes communicate with us, and what this bike is saying is, "You're an idiot." BikeSnobNYC
09-12-16, 09:00 PM
#5
Banned
Stamped lugs are bendable , Investment cast are much less so,
https://www.cycle-frames.com/bicycle-...S-STAMPED.html
I did mine in 1974~5 , more stamped lugs were available than 1, then.
Fork crown from Zeus.. BB from Cinelli. Campag dropouts (Long slot rear)
My Buddies just Burned thru a 531 DB seat tube trying a fast back stay design
I went with straight gage tube and was Better off not pushing past My expertise.
28.6 seat posts go with a straight .9mm wall 9/8" seat tube..
./.
Last edited by fietsbob; 09-12-16 at 09:05 PM.
09-14-16, 07:03 AM
#6
Senior Member
Join Date: Nov 2010
Location: River City, OR
Posts: 672
Mentioned: 0 Post(s)
Tagged: 0 Thread(s)
Quoted: 9 Post(s)
Likes: 0
Liked 1 Time
in
1 Post
Silly question: Right now my frame is designed to have 425mm chainstays. In order to have 130mm between the dropouts my CS-CS angle currently measures 8,05�. However, the BB shell I want to get is designed with a 7� CS-CS angle. Will I be able bend the chain stays by 1,05� or should I get longer chain stays to achieve a more narrow angle? What is your advice?
Cheers[/QUOTE]
Not to worry- There will be enough "slop" in the shell socket to CS to effect a change of a couple degrees either way from the published "7 degrees" included angle. Longer stays help, but stays as short as 410 can still be wiggled around to accommodate 130mm old hubs and 28s.
Cheers[/QUOTE]
Not to worry- There will be enough "slop" in the shell socket to CS to effect a change of a couple degrees either way from the published "7 degrees" included angle. Longer stays help, but stays as short as 410 can still be wiggled around to accommodate 130mm old hubs and 28s.
09-14-16, 08:39 AM
#7
Senior Member
Join Date: Feb 2012
Location: Rochester, NY
Posts: 18,056
Bikes: Stewart S&S coupled sport tourer, Stewart Sunday light, Stewart Commuting, Stewart Touring, Co Motion Tandem, Stewart 3-Spd, Stewart Track, Fuji Finest, Mongoose Tomac ATB, GT Bravado ATB, JCP Folder, Stewart 650B ATB
Mentioned: 0 Post(s)
Tagged: 0 Thread(s)
Quoted: 4195 Post(s)
Liked 3,837 Times
in
2,295 Posts
I will add to this by mentioning that when using socketed shells and lugs where their angles have been manipulated often fit up gaps will grow and become greater then common silver filler wants for best strength and flow/fill. So brass is often suggested for these applications when the builder isn't able to close up said gaps.
This brings us back to the MAPP torch question. MAPP is barely enough to use with silver with low mass joints. With high mass or large surface area joints (like a BB shell with more then two sockets allowing a lot more air flow cooling things off during the brazing) the heat output is REALLY challenged to keep up with silver's needs. BUT then if you decide to play is safe when you've got larger gaps and go to brass MAPP fails and you've got a mess of flux and tubes sort of heated for a really long time but no filler penetration of any amount.
This is why a beginner really (there's that word once again) needs to practice with pieces that truly mimic what an actual frame joint will be like. Simple tube to tube joints don't braze up like a socket or sleeve does. A common practice piece for duplicating a socket or lug is fabbing a sleeve of .058" wall to slide over ta tube that's .125" less in diameter. I make my sleeves with diagonal ends to mimic a lug's shape better then square cut ends do.
Attached are two shots of some of my practice as examples. Note that the after brazing shows some flux burning. This but one reason that I still practice after doing this building for years. Andy
09-14-16, 11:12 AM
#8
Junior Member
Thread Starter
Join Date: Sep 2016
Posts: 7
Mentioned: 0 Post(s)
Tagged: 0 Thread(s)
Quoted: 1 Post(s)
Likes: 0
Liked 0 Times
in
0 Posts
So in conclusion I should be fine to just get a 7� BB shell and get the right OLD by a combination of increasing the length of chain stays (right now it is 395mm which is pretty short I guess, 425mm from BB center to rear axle) and using the "play" of the sockets in the shell.
Just to clarify: So if the gap between socket and chainstay is too large for silver to flow properly, I should use brass for the chainstays and silver for DT and ST?
I just found that close to where I live there is even a distributor for frame parts, so if I am lucky I'll get the chance to maybe test out angles a little bit and see if I will be able to get close to my 8� angle...
Thanks for all advice! That definitely helps me to finalize my planning.
Regarding the torch topic: Basically, my assumption on MAPP gas was relying on this video
but then again he is showing the HT-DT lug which looks much easier to me than a BB shell for example... So yeah, I think you guys convinced me to get a proper Oxy/Acy setup. It seems to be worth the money...
@Andrew Ok, so I'll get a ~1,4mm wall outer tube and an inner tube which is around 3mm less than the sleeve outer diameter. (sorry, the imperial system is giving me a hard time )
)
Will this setup work both for practicing silver and brass brazing oder should I opt for tighter fits when practicing silver?
Also, close to where I live there is a frame builder who offers frame building courses. They offer a 2h course which basically consists of cutting tubes and practicing some brazing... I'll definitely check it out cause it's only 30€... I guess I'll need it
Thanks for answering all my basic questions!
Just to clarify: So if the gap between socket and chainstay is too large for silver to flow properly, I should use brass for the chainstays and silver for DT and ST?
I just found that close to where I live there is even a distributor for frame parts, so if I am lucky I'll get the chance to maybe test out angles a little bit and see if I will be able to get close to my 8� angle...
Thanks for all advice! That definitely helps me to finalize my planning.
Regarding the torch topic: Basically, my assumption on MAPP gas was relying on this video
@Andrew Ok, so I'll get a ~1,4mm wall outer tube and an inner tube which is around 3mm less than the sleeve outer diameter. (sorry, the imperial system is giving me a hard time
)Will this setup work both for practicing silver and brass brazing oder should I opt for tighter fits when practicing silver?
Also, close to where I live there is a frame builder who offers frame building courses. They offer a 2h course which basically consists of cutting tubes and practicing some brazing... I'll definitely check it out cause it's only 30€... I guess I'll need it
Thanks for answering all my basic questions!
Last edited by BastianH; 09-14-16 at 11:16 AM.
09-14-16, 11:54 AM
#9
Banned.
Join Date: Nov 2003
Location: ny
Posts: 1,764
Mentioned: 0 Post(s)
Tagged: 0 Thread(s)
Quoted: 36 Post(s)
Likes: 0
Liked 0 Times
in
0 Posts
The "new" Map will definitely silver braze the 3 main tube lugs. Fork crowns, bottom brackets, and dropouts can be problematic. Note that your referenced video was made in 2009 when the "original Mapp" which was still available from some sources.
10-05-16, 06:20 AM
#10
Junior Member
Thread Starter
Join Date: Sep 2016
Posts: 7
Mentioned: 0 Post(s)
Tagged: 0 Thread(s)
Quoted: 1 Post(s)
Likes: 0
Liked 0 Times
in
0 Posts
Hello people!
I know there hasn't been an update for quite some time but no worries, I did not stop this project!
However, I decided to choose the smart way and so I actually booked a frame building course with a professional frame builder. This should save me from a lot of headaches and bad decisions.
The course takes place from 24th to 28th of October and by the end of it I should hold a finished frame in my hands.
I still plan on documenting the building process here in this thread so make sure to stop by at the end of October!
Cheers,
Bastian
10-07-16, 10:09 AM
#11
Senior Member
Join Date: Feb 2012
Location: Rochester, NY
Posts: 18,056
Bikes: Stewart S&S coupled sport tourer, Stewart Sunday light, Stewart Commuting, Stewart Touring, Co Motion Tandem, Stewart 3-Spd, Stewart Track, Fuji Finest, Mongoose Tomac ATB, GT Bravado ATB, JCP Folder, Stewart 650B ATB
Mentioned: 0 Post(s)
Tagged: 0 Thread(s)
Quoted: 4195 Post(s)
Liked 3,837 Times
in
2,295 Posts
Bastian- When you report back please do include some description of the building course. Where to go, who to learn from are common questions here. Good luck. Andy.
10-24-16, 02:16 PM
#12
Junior Member
Thread Starter
Join Date: Sep 2016
Posts: 7
Mentioned: 0 Post(s)
Tagged: 0 Thread(s)
Quoted: 1 Post(s)
Likes: 0
Liked 0 Times
in
0 Posts
Hi all!
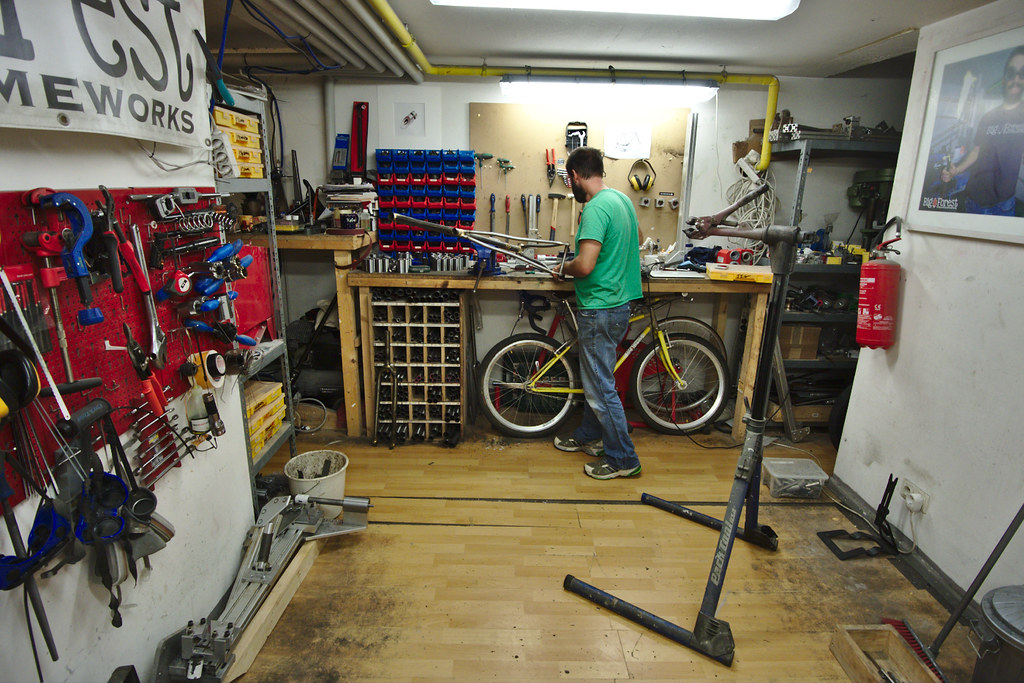
The frame building course has finally begun and the first day (of four) is already over. When Robert (my instructor) is not giving me good advice he is mostly sitting around, taking pictures or working on other bikes, which is good because I get to do most of it (actually all of it!) by myself.
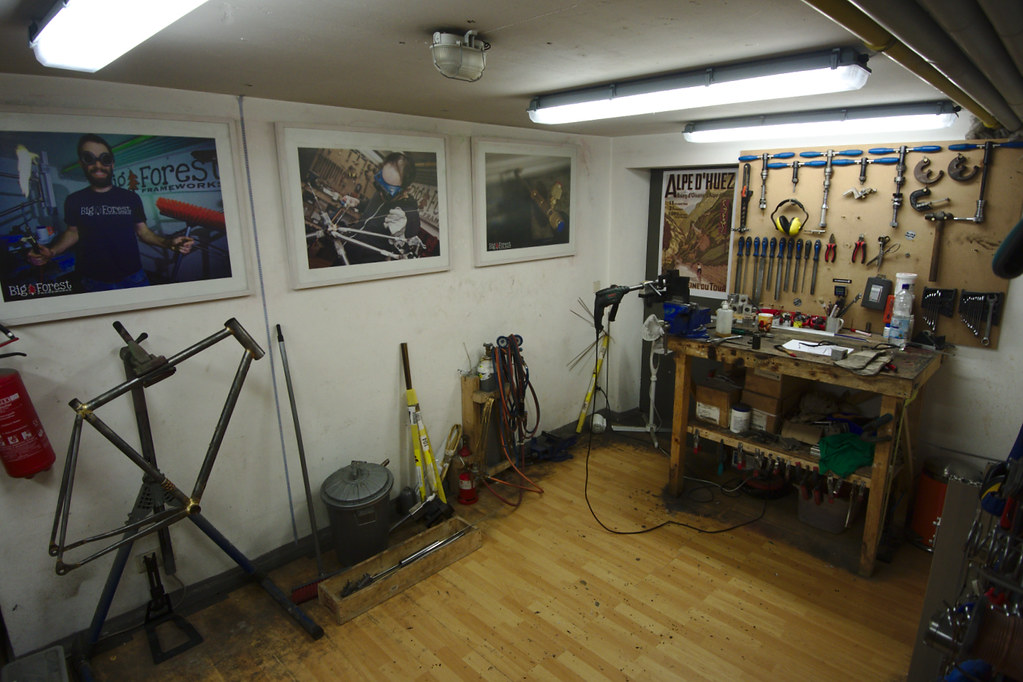
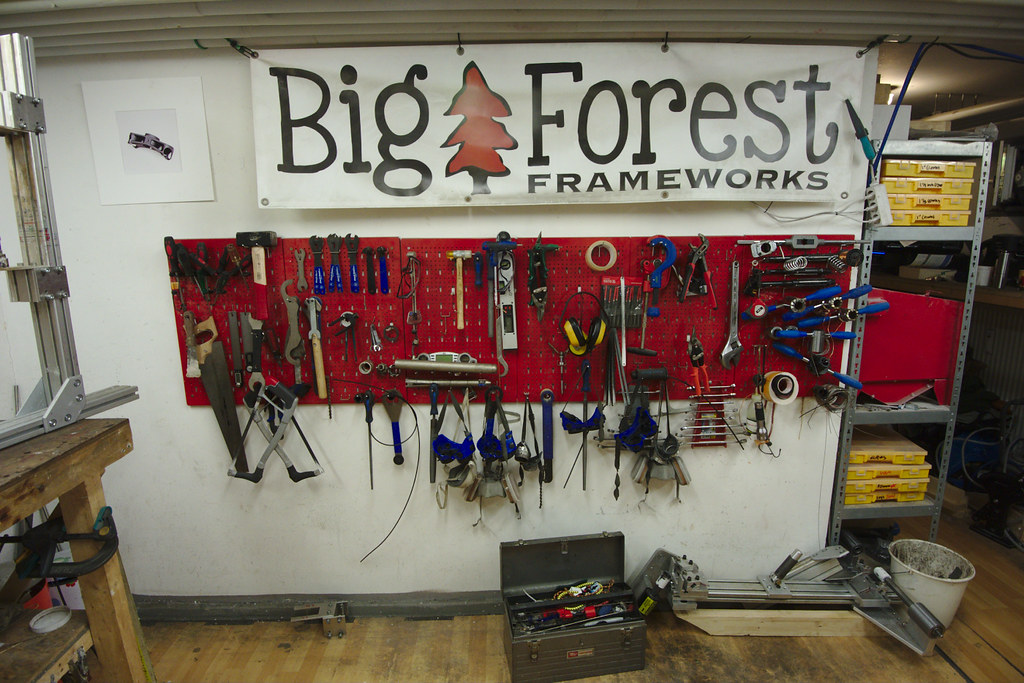
By the way, the course is offered by Robert Piontek from Big Forest Frameworks... check out his work here: Fahrrad Rahmenbau Big Forest Frameworks
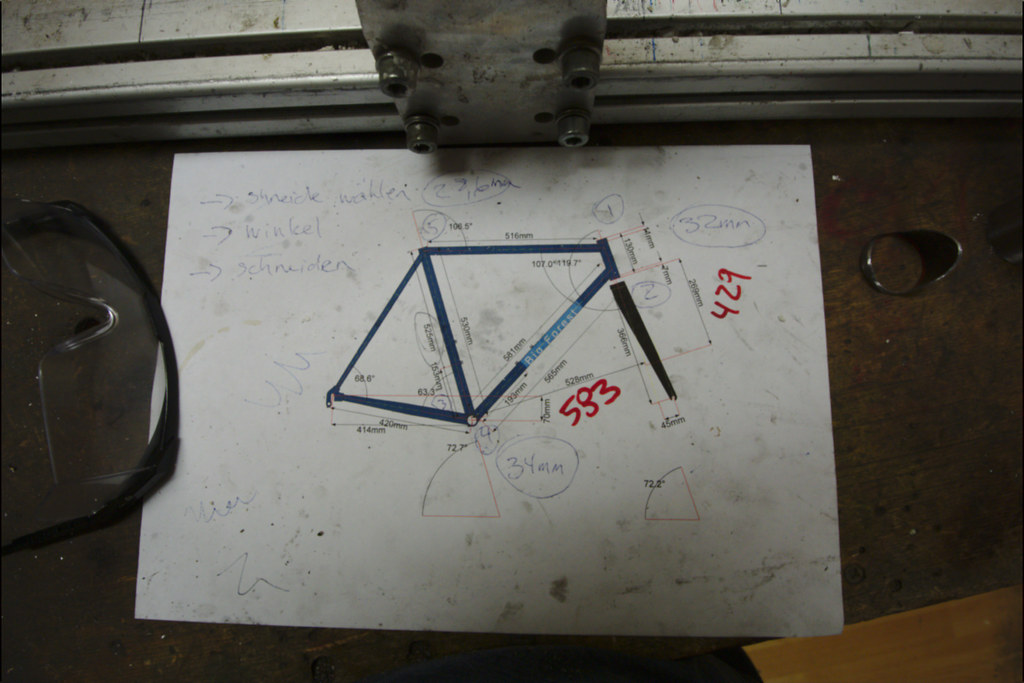
I promised to document the building process, so here you go... day 1
At first we planned the geometry... a classical lugged racing frame with parallel top tube, ~72,5� seat tube / head tube angle. I'll be using a Columbus Minimal Carbon fork. Sead tube and down tube are 28,6mm. Top tube is 25,4mm.
Tubes...
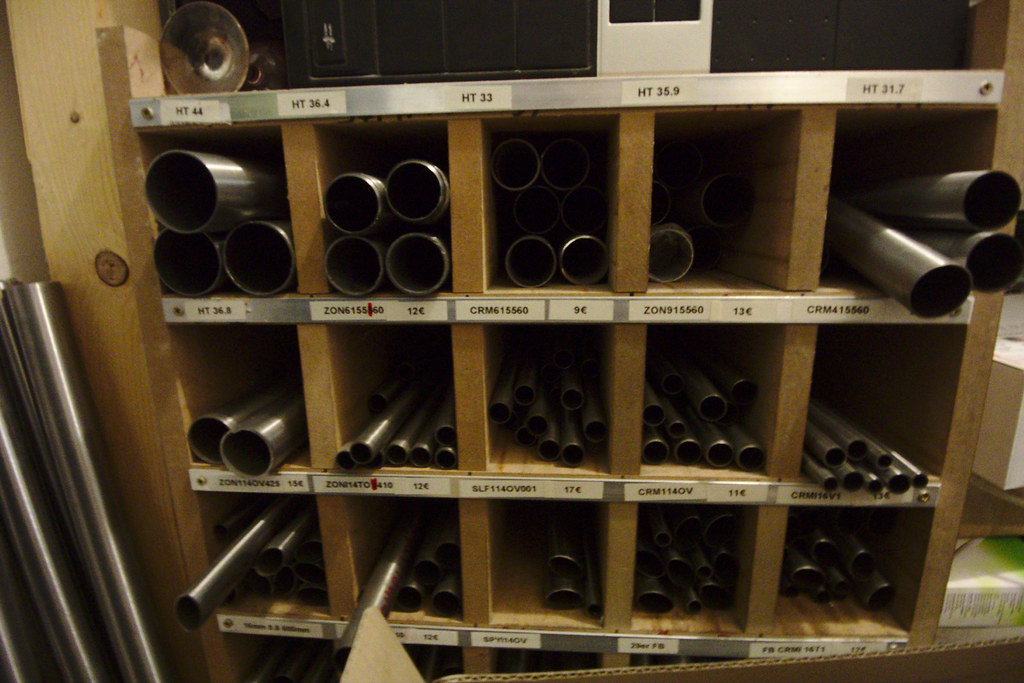
More tubes...
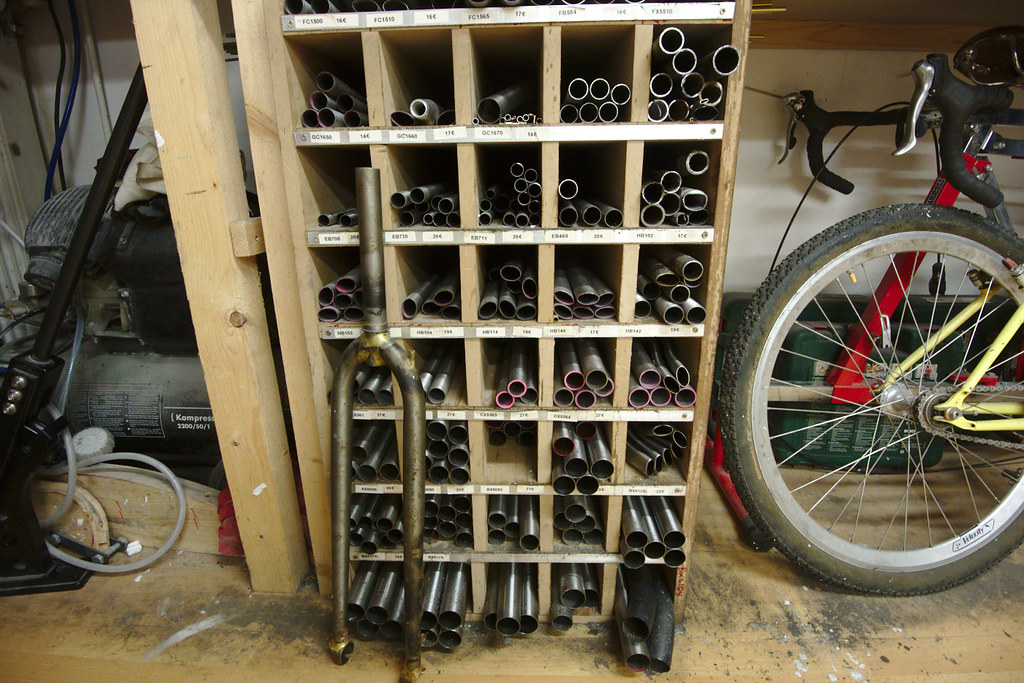
The parts... note the small stainless steel tube which I'll be using for inner tube brake cable guidance. I'm using standard long point lugs.
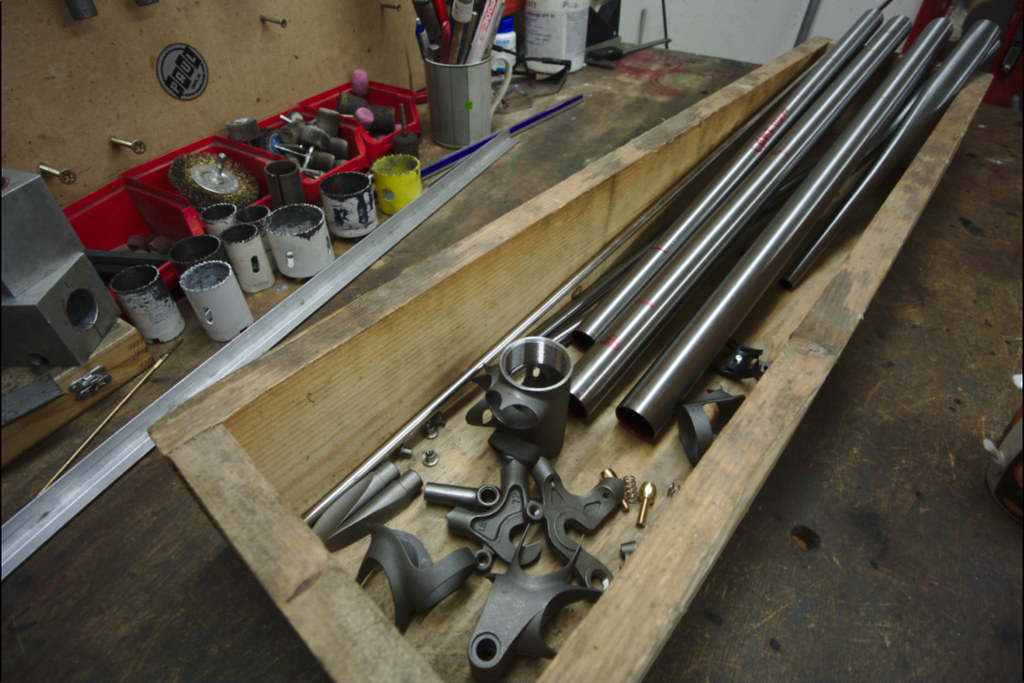
Here's a quick look at the place where we're building, small but it has everything you need to build a frame
...
The frame building course has finally begun and the first day (of four) is already over. When Robert (my instructor) is not giving me good advice he is mostly sitting around, taking pictures or working on other bikes, which is good because I get to do most of it (actually all of it!) by myself.
By the way, the course is offered by Robert Piontek from Big Forest Frameworks... check out his work here: Fahrrad Rahmenbau Big Forest Frameworks
I promised to document the building process, so here you go... day 1
At first we planned the geometry... a classical lugged racing frame with parallel top tube, ~72,5� seat tube / head tube angle. I'll be using a Columbus Minimal Carbon fork. Sead tube and down tube are 28,6mm. Top tube is 25,4mm.
Tubes...
More tubes...
The parts... note the small stainless steel tube which I'll be using for inner tube brake cable guidance. I'm using standard long point lugs.
Here's a quick look at the place where we're building, small but it has everything you need to build a frame
...
07-27-17, 10:14 AM
#13
Junior Member
Thread Starter
Join Date: Sep 2016
Posts: 7
Mentioned: 0 Post(s)
Tagged: 0 Thread(s)
Quoted: 1 Post(s)
Likes: 0
Liked 0 Times
in
0 Posts
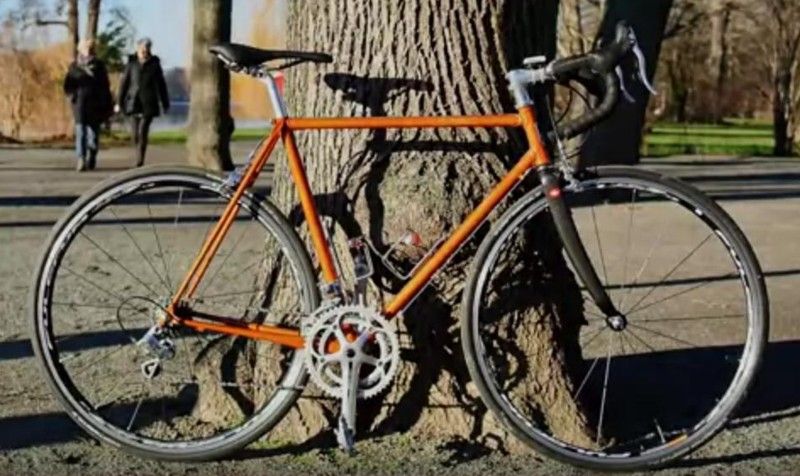
My initial plan to show the progress as I built the frame turned out to not quite work out... I had no time :-)
But I captured the building process with my camera. You can see it on Youtube if you search for "How To Build a Lugged Bicycle Frame in 4 Minutes ".
It was so much fun... cannot wait to do it again!
Cheers,
Bastian
But I captured the building process with my camera. You can see it on Youtube if you search for "How To Build a Lugged Bicycle Frame in 4 Minutes ".
It was so much fun... cannot wait to do it again!
Cheers,
Bastian
07-27-17, 01:59 PM
#14

Decrepit Member

 07-27-17, 02:34 PM
#15
Decrepit Member
Very nice, Bastian.
07-27-17, 03:28 PM
#16


Randomhead
Join Date: Aug 2008
Location: Happy Valley, Pennsylvania
Posts: 24,386
Mentioned: 0 Post(s)
Tagged: 0 Thread(s)
Quoted: 4 Post(s)
Liked 3,686 Times
in
2,509 Posts
nice, orange bikes are faster
09-02-17, 06:13 PM
#17
Senior Member
Join Date: Dec 2014
Posts: 546
Bikes: colnago titanio oval master, pinarello treviso es, centurion prestige, tomac ti 26er, lemond buenos aires, mbk 753, vitus 992 and zx1, rocky mountain hammer disc,bd century titanium, specialized venge expert
Mentioned: 5 Post(s)
Tagged: 0 Thread(s)
Quoted: 130 Post(s)
Liked 39 Times
in
20 Posts
My initial plan to show the progress as I built the frame turned out to not quite work out... I had no time :-)
But I captured the building process with my camera. You can see it on Youtube if you search for "How To Build a Lugged Bicycle Frame in 4 Minutes ".
It was so much fun... cannot wait to do it again!
Cheers,
Bastian
But I captured the building process with my camera. You can see it on Youtube if you search for "How To Build a Lugged Bicycle Frame in 4 Minutes ".
It was so much fun... cannot wait to do it again!
Cheers,
Bastian


