


Build your own truing stand?
 12-18-08, 08:56 AM
#51
Senior Member
Join Date: Oct 2006
Location: Cleveland,Ohio
Posts: 2,766
Mentioned: 1 Post(s)
Tagged: 0 Thread(s)
Quoted: 5 Post(s)
Likes: 0
Liked 5 Times
in
5 Posts
I have used the brake pad method a few times on junker bikes that came from the trash that I was giving away. Bought a Park TS-2 and a base for it last year and only recently started to really use it. The only way to get good at something is to do it a bunch of times, and so far I have worked my way through 24 wheels that have been sitting in my spare parts pile. Had two that had failed rims that are going to scrap.
That was enough practice to move onto the wheels on the bikes that will be flipped come spring. Having the professional stand let me concentrate on the truing task and not the tool, which I found nice. The stand and base cost under $200 and I figure it already paid for itself in this first years use.
Of course I had the money to buy it from the previous years bike flips.
 12-18-08, 09:02 AM
#52
Senior Member
Join Date: Jun 2003
Posts: 668
Mentioned: 0 Post(s)
Tagged: 0 Thread(s)
Quoted: 140 Post(s)
Liked 72 Times
in
48 Posts
em
12-18-08, 09:07 AM
#53
Senior Member
Join Date: Jun 2003
Posts: 668
Mentioned: 0 Post(s)
Tagged: 0 Thread(s)
Quoted: 140 Post(s)
Liked 72 Times
in
48 Posts
Sonatageek
I was never able to see the gap in brake pads well enough to true a road bike wheel, so I only use that method for fast repairs on fat tire wheels. If I had to do 24 wheels I think I would probably get a TS2, but for my 1 or 2 wheels per year production schedule, my homebrew stand works just as well or better, although it takes a little longer to set up properly.
em
12-18-08, 09:16 AM
#54
slowest!

Join Date: Oct 2008
Location: NW WA
Posts: 628
Bikes: Felt, Atala, Kona
Mentioned: 0 Post(s)
Tagged: 0 Thread(s)
Quoted: 0 Post(s)
Likes: 0
Liked 0 Times
in
0 Posts
Thanks eddy m, I was thinking it was more it more complicated then it is. Sounds easy and I should be able to add some posts to my currant dial gauge stand and be able to use it.
And problems getting the round gauge tip to stay centered on a round spoke?
And problems getting the round gauge tip to stay centered on a round spoke?
12-18-08, 09:24 AM
#55
Senior Member
Join Date: Jun 2003
Posts: 668
Mentioned: 0 Post(s)
Tagged: 0 Thread(s)
Quoted: 140 Post(s)
Liked 72 Times
in
48 Posts
em
01-05-09, 12:24 AM
#56
Senior Member
Thread Starter
Well, I finally finished my homemade truing stand. I'm extremely pleased with it! Many thanks to DannoXYZ, who set me on the right path when he confirmed my doubts here:
You were right, it didn't work, and I gave up on that tack. But you didn't stop there, you also said this:
Yes! That worked! I went to a hardware store and got a tap wrench for $17 and a drill bit and die for another $5, bringing the total cost of my truing stand to about $40 (though having those tap and die tools is a good investment, so perhaps the, ahem "true" cost of the stand is about $18). Here's the final result, save for slicing off the mitred end of the one 2X2:
With wheel:
In action:

I was getting frustrated for a while trying to eye up wheels to true them, as I wasn't getting the accuracy I wanted. Then it dawned on me: why not go by sound?
It works marvellously. What I do now is twist the bolt out a tad, listen for spots where the rim touches it, and true those spots. I then repeat the process until the wheel is virtually perfect. I think I end up turning the bolt a 1/8th turn about 5 or 6 times in total for a wheel that's a bit out of true. It's just a slight wisp of a graze on the rim, so there's no harm done. But the results are absolutely fantastic. I've never had such straight wheels!
With wheel:
In action:
I was getting frustrated for a while trying to eye up wheels to true them, as I wasn't getting the accuracy I wanted. Then it dawned on me: why not go by sound?
It works marvellously. What I do now is twist the bolt out a tad, listen for spots where the rim touches it, and true those spots. I then repeat the process until the wheel is virtually perfect. I think I end up turning the bolt a 1/8th turn about 5 or 6 times in total for a wheel that's a bit out of true. It's just a slight wisp of a graze on the rim, so there's no harm done. But the results are absolutely fantastic. I've never had such straight wheels!
01-05-09, 12:41 AM
#57

drink slinger
Join Date: Feb 2005
Posts: 462
Mentioned: 0 Post(s)
Tagged: 0 Thread(s)
Quoted: 2 Post(s)
Likes: 0
Liked 0 Times
in
0 Posts
Very impressive. Not my preferred style of stand but I would say that the threaded screw you put in makes it as accurate as any stand on the market. And I agree that your true cost is $18...as long as you use those tools again.
I still think you need a roundness indicator though for best results.
I still think you need a roundness indicator though for best results.
__________________
Five is right out!
Five is right out!
Last edited by theopowers; 01-05-09 at 12:44 AM.
01-05-09, 01:23 AM
#58
cycling n00b

Join Date: Jun 2005
Location: West Coast of Finland
Posts: 582
Bikes: EAI Brassknuckle fixed Sannino fixed, Thorn Club Tour, Soma Smoothie
Mentioned: 0 Post(s)
Tagged: 0 Thread(s)
Quoted: 0 Post(s)
Likes: 0
Liked 0 Times
in
0 Posts
Here's mine that a workmate built for me:

It swivels and is adjustable for width, works best when clamped to a table with a C-clamp. Guy said it took him 30 minutes to build.
It swivels and is adjustable for width, works best when clamped to a table with a C-clamp. Guy said it took him 30 minutes to build.
01-05-09, 09:04 AM
#59
Senior Member
Thread Starter
Thanks for the feedback. And Black Shuk, that's a nice stand you got there!
01-05-09, 09:54 AM
#61
Senior Member
Join Date: Jun 2003
Posts: 668
Mentioned: 0 Post(s)
Tagged: 0 Thread(s)
Quoted: 140 Post(s)
Liked 72 Times
in
48 Posts
Well, I finally finished my homemade truing stand. I'm extremely pleased with it! Many thanks to DannoXYZ, who set me on the right path when he confirmed my doubts here:
You were right, it didn't work, and I gave up on that tack. But you didn't stop there, you also said this:
Yes! That worked! I went to a hardware store and got a tap wrench for $17 and a drill bit and die for another $5, bringing the total cost of my truing stand to about $40 (though having those tap and die tools is a good investment, so perhaps the, ahem "true" cost of the stand is about $18). Here's the final result, save for slicing off the mitred end of the one 2X2:
With wheel:
In action:
I was getting frustrated for a while trying to eye up wheels to true them, as I wasn't getting the accuracy I wanted. Then it dawned on me: why not go by sound?
It works marvellously. What I do now is twist the bolt out a tad, listen for spots where the rim touches it, and true those spots. I then repeat the process until the wheel is virtually perfect. I think I end up turning the bolt a 1/8th turn about 5 or 6 times in total for a wheel that's a bit out of true. It's just a slight wisp of a graze on the rim, so there's no harm done. But the results are absolutely fantastic. I've never had such straight wheels!
em
01-05-09, 09:57 AM
#62
cycling n00b
Join Date: Jun 2005
Location: West Coast of Finland
Posts: 582
Bikes: EAI Brassknuckle fixed Sannino fixed, Thorn Club Tour, Soma Smoothie
Mentioned: 0 Post(s)
Tagged: 0 Thread(s)
Quoted: 0 Post(s)
Likes: 0
Liked 0 Times
in
0 Posts
The bolt on the far leg of the stand can be used as a reference for roundness as well.
01-06-09, 04:24 AM
#63
Senior Member
Join Date: Aug 2007
Location: Northampton, MA
Posts: 956
Bikes: Iron Monkey: a junkyard steel 26" slick-tired city bike. Grey Fox: A Trek 7x00 frame, painted, with everything built, from spokes up. Jet Jaguar: A 92 Cannondale R900 frame, powder coated matte black with red and aluminum highlights.
Mentioned: 0 Post(s)
Tagged: 0 Thread(s)
Quoted: 1 Post(s)
Likes: 0
Liked 1 Time
in
1 Post
Both of these are pretty cool.
01-08-09, 08:43 PM
#64
Senior Member
Thread Starter
I've added a straight-edge wooden stir stick to my homemade truing stand as a means of fixing radial trueness, and I'm really very pleased with the results. However, I'm intrigued by the notion of dial gauges/indicators. Where do you get them? At the hardware store? What are some brand names or models that you might suggest?
01-09-09, 06:57 AM
#65
Senior Member
Join Date: Jun 2003
Posts: 668
Mentioned: 0 Post(s)
Tagged: 0 Thread(s)
Quoted: 140 Post(s)
Liked 72 Times
in
48 Posts
Rousseau
I get dials at a used tool store near my home. Otherwise, get them at Harbor Freight or Ebay. The cheapest ones work fine for this kind of thing.
em
I get dials at a used tool store near my home. Otherwise, get them at Harbor Freight or Ebay. The cheapest ones work fine for this kind of thing.
em
01-09-09, 11:59 AM
#66
Senior Member
Join Date: Jan 2007
Posts: 66
Mentioned: 0 Post(s)
Tagged: 0 Thread(s)
Quoted: 0 Post(s)
Likes: 0
Liked 0 Times
in
0 Posts
I personally use the TS-2, but part of it is due to my relative incompetence with wheel truing and bulding. It seems that with the TS-2, I get some very satisfactory results vs the good ol' brake pad trick that never cut the mustard enough for me. My friend, a skilled woodworker, is building a stand with R. Musson's plan. Should be every bit as good as a TS-2. But sometimes, forking out 160 for a pro stand doesn't sound that expensive when you take for account it will last for the rest of your life.
01-09-09, 02:47 PM
#67
Senior Member
Join Date: Mar 2007
Location: Reston, VA
Posts: 2,369
Bikes: 2003 Giant OCR2
Mentioned: 0 Post(s)
Tagged: 0 Thread(s)
Quoted: 3 Post(s)
Likes: 0
Liked 0 Times
in
0 Posts
Personally, I wait until a rainy, crappy day has my brake pads gunky as all hell. Then I clean the rim and spin the wheel gently, then apply each brake pad very lightly. It paints the rim with crap wherever it sticks out. Repeat until true.

I think I might convert a trainer I haven't used for a couple of years into a stand. It already has the radial check with the tension wheel.
01-10-09, 10:39 PM
#68
Senior Member
Thread Starter
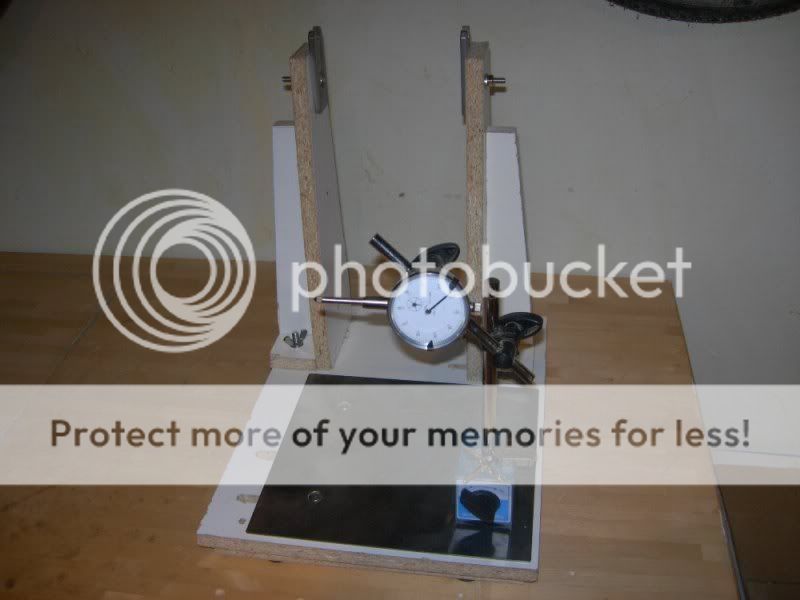
I found a dial indicator in stock at the fourth place I tried in my town. Sheesh, everybody wants to tell you about it and order it for you, nobody has one in stock to let you hold it in your hand. Except for the one place. Here's the set-up now:
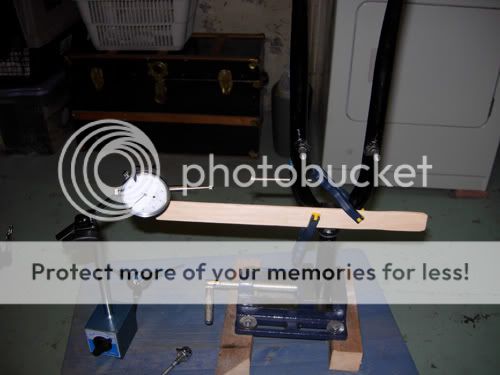
I'm very happy with it! I've just torn apart my first wheel build and relaced them with proper-sized new spokes and with lubrication on the spoke threads and in the spokes holes (I can't believe what a difference lubrication makes). I also bought and downloaded Roger Musson's online wheel-building book and followed his instructions to the letter. This time the wheels came together beautifully.
It was only my second build, but I think I'm starting to get a system. Once the spokes are up to a modicum of tension I put the wheel on my bike and have a look at trueness and dishing, and make minor adjustments to both. I then put it on the stand and do a preliminary radial and lateral true with the bolt and the horizontal stick, after which I go back to the bike to make sure the dishing looks good and make any adjustments if necessary. Then it's back to the stand, where I do a quarter turn on each spoke to raise the tension if it needs it. I do another eighth turn if necessary. Then I use the dial for radial truing first, followed by lateral truing.
It's great fun using the dial! I really, really enjoyed the wheel-build this time. Question: will spoked wheels such as we currently know them still be commonplace twenty years from now? I hope so, because I think I've found an avocation for my retirement!
01-17-09, 05:31 PM
#69
Senior Member
Thread Starter
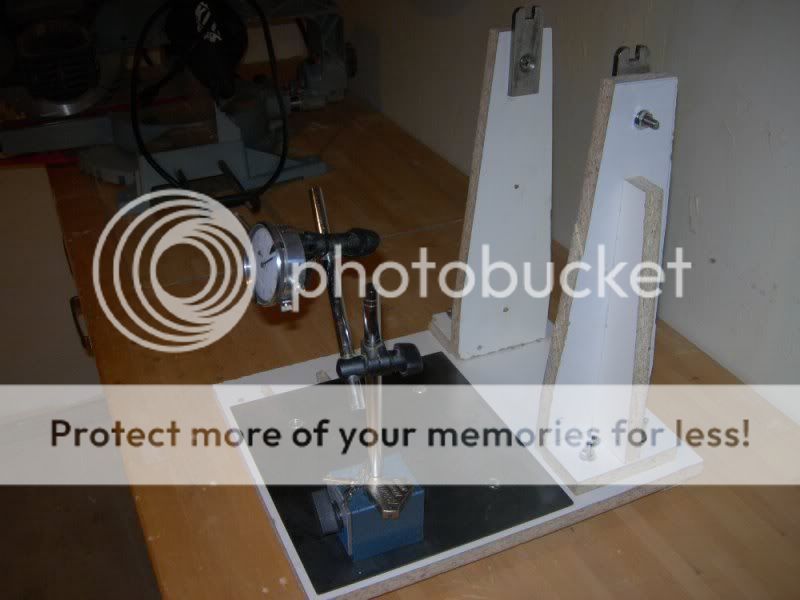
Homemade truing stand, generation 2: the realization that the magnetic dial indicator stand will "stick" to the metal on the vice leads to a new innovation. Duh!
06-28-10, 08:25 PM
#70
Senior Member
Thread Starter
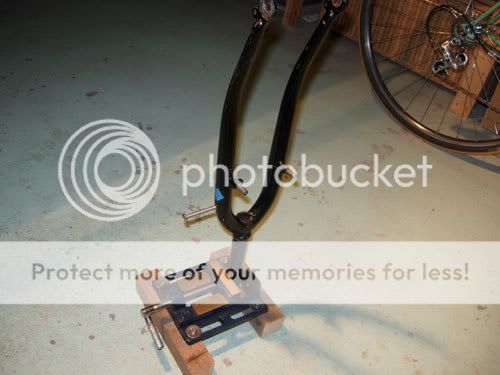
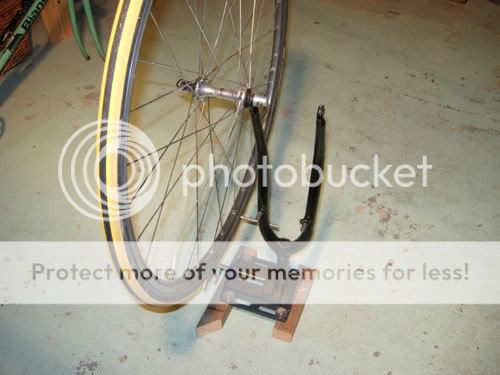
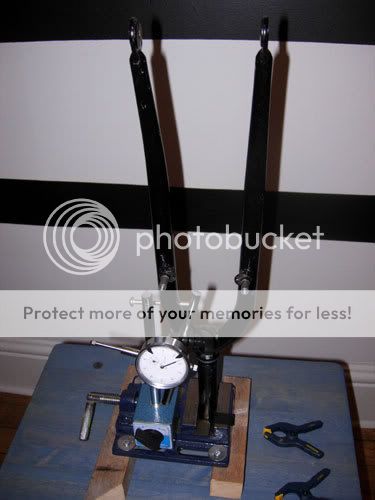
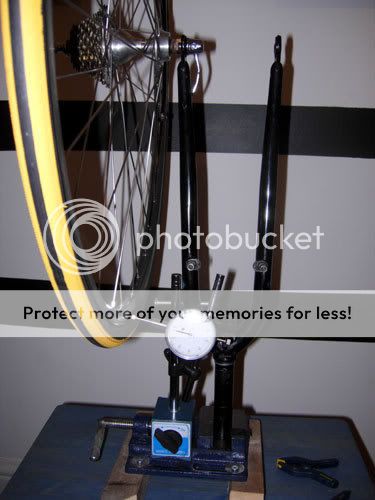
Truth be told, I was never all that happy with the fork-in-the-vice setup. So I went back to Roger Musson's book (see here; I'm no relation, I just think it's a great book, as do numerous other people on BF.net) and built the stand according to his plans. Here's what I ended up with:

I went to my friendly local machine shop and paid a guy $30 to make the two holders that receive the axle and $15 to cut the plate that the magnetic dial gauge sits on. The MDF board was a couple bucks. It split when I tried to put wood screws into it, so at the suggestion of the guy at my friendly local hardware store I picked up a nifty dowel jig for $18 and used dowels and glue everywhere one MDF piece meets another (I've become addicted--making dowel joints is fun!).
The truing stand works. I'm flushed with DIY self-satisfaction. The crude finish to the stand is due to the dull blade on my mitre saw. The two gaps at the front left of the stand represent my first attempt at using a jigsaw to carve out the canals that allow the one support to slide back and forth for different sized wheels. I made the opening for the one canal too wide, with the result that the head of the bolt underneath would slip through unless I put a large washer on it, though then it didn't tighten properly. On my second attempt I got it right.
09-13-10, 04:03 PM
#71
Junior Member

Join Date: Aug 2010
Location: UpState, SC
Posts: 8
Bikes: Schwinn Hybrid
Mentioned: 0 Post(s)
Tagged: 0 Thread(s)
Quoted: 0 Post(s)
Likes: 0
Liked 0 Times
in
0 Posts
Lots of good ideas here on DIY wheel truing stands!
I'm learning to true wheels and having a blast!
I have trued my wheels and the wheels for a couple of friends to +/-002"
First I was attempting to true the wheels while on the bike and did a pretty good job. I built the truing stand below and truing on it is much easier than on the bike!


I'm learning to true wheels and having a blast!
I have trued my wheels and the wheels for a couple of friends to +/-002"
First I was attempting to true the wheels while on the bike and did a pretty good job. I built the truing stand below and truing on it is much easier than on the bike!
Last edited by Scarecrow7; 09-13-10 at 04:06 PM.
09-13-10, 04:25 PM
#72
Mechanic/Tourist
[QUOTE=theopowers;8015385]How do you deal with roundness accurately with just an old fork? Not sarcasm, honest question.
QUOTE]
One can use almost anything that will give some feedback when attached to the fork blade and passed under the wheel. I've seen folks use cable ties, even a large rubber band passed over both fork blades.
QUOTE]
One can use almost anything that will give some feedback when attached to the fork blade and passed under the wheel. I've seen folks use cable ties, even a large rubber band passed over both fork blades.
09-13-10, 05:38 PM
#73
Senior Member

Join Date: Jun 2006
Posts: 1,407
Mentioned: 2 Post(s)
Tagged: 0 Thread(s)
Quoted: 23 Post(s)
Likes: 0
Liked 0 Times
in
0 Posts
Here's my Roger Musson truing stand. It works great and was pretty simple to build. I've been really happy with it and have built 3-4 wheels with it so far. Couldn't be happier, especially since including his book with plans, it came to around $30-35 i think.
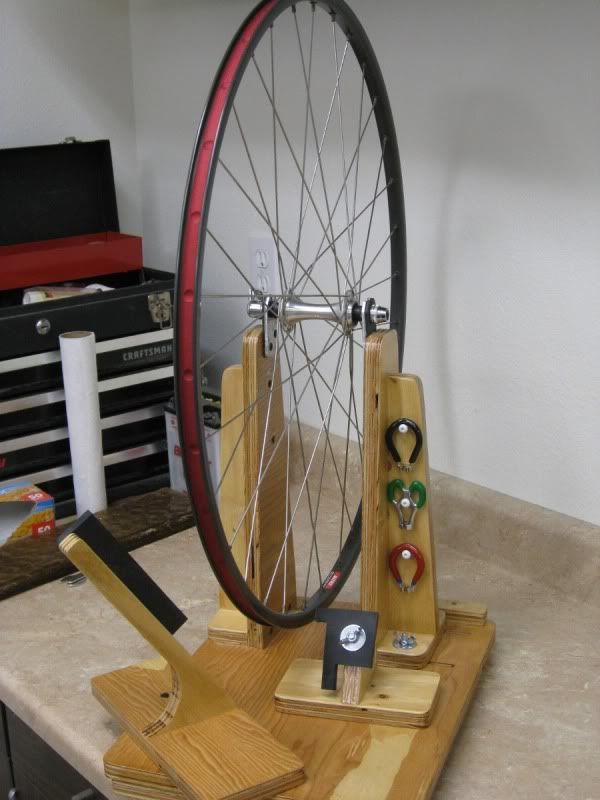
-Jeremy
-Jeremy
09-13-10, 06:10 PM
#74

Bianchi Goddess

Join Date: Apr 2009
Location: Shady Pines Retirement Fort Wayne, In
Posts: 27,858
Bikes: Too many to list here check my signature.
Mentioned: 192 Post(s)
Tagged: 2 Thread(s)
Quoted: 2930 Post(s)
Liked 2,923 Times
in
1,491 Posts
this thing is awsome. I would almost pay a bit more than $30-40 for one of these.
Here's my Roger Musson truing stand. It works great and was pretty simple to build. I've been really happy with it and have built 3-4 wheels with it so far. Couldn't be happier, especially since including his book with plans, it came to around $30-35 i think.
-Jeremy
-Jeremy
__________________
�One morning you wake up, the girl is gone, the bikes are gone, all that's left behind is a pair of old tires and a tube of tubular glue, all squeezed out"
Sugar "Kane" Kowalczyk
�One morning you wake up, the girl is gone, the bikes are gone, all that's left behind is a pair of old tires and a tube of tubular glue, all squeezed out"
Sugar "Kane" Kowalczyk
09-13-10, 07:25 PM
#75
Senior Member
Join Date: Dec 2005
Posts: 7,848
Mentioned: 0 Post(s)
Tagged: 0 Thread(s)
Quoted: 1 Post(s)
Likes: 0
Liked 2 Times
in
2 Posts
Dunno if anybody mentioned it, a truing stand is necessary but it needs to have a dishing gauge to work with it too. Move the wheel back and forth to figure it out the dishing it will work but a dishing gauge will be better.