


How to remove the body from a Nexus front hub?
 06-24-11, 04:00 PM
#1
Senior Member
Thread Starter

Join Date: Jun 2009
Location: Ghent - Belgium
Posts: 178
Bikes: Eddy Merckx MX Leader "Vive le Roy", Flanders Pista, Poggio Shimano 600 10-speed
Mentioned: 2 Post(s)
Tagged: 0 Thread(s)
Quoted: 2 Post(s)
Likes: 0
Liked 2 Times
in
1 Post
How to remove the body from a Nexus front hub?
I need to fix a broken Shimano HB-NX50 front hub.
Service Manual
The bearings are completely shot (the bike has been ridden long after the problem first occurred). I was able to disasseble the entire left part, but I cannot remove the body (part number 5) from the hub shell (the only part without a number). Is this possible? The exploded view makes me believe it is, but I can't find a way. I would like to avoid building a new wheel if possible. Any ideas? The hub has got a roller brake mounting point that seems to be part of (5).
Thanks!
 06-25-11, 03:46 AM
#2
Senior Member
Thread Starter
Join Date: Jun 2009
Location: Ghent - Belgium
Posts: 178
Bikes: Eddy Merckx MX Leader "Vive le Roy", Flanders Pista, Poggio Shimano 600 10-speed
Mentioned: 2 Post(s)
Tagged: 0 Thread(s)
Quoted: 2 Post(s)
Likes: 0
Liked 2 Times
in
1 Post
Well, it seems you can unscrew the body from the housing with a 32mm wrench!
06-25-11, 06:14 AM
#3
Senior Member
Join Date: Feb 2001
Location: England
Posts: 12,948
Mentioned: 0 Post(s)
Tagged: 0 Thread(s)
Quoted: 19 Post(s)
Likes: 0
Liked 7 Times
in
7 Posts
With bikes, as with ships, left/right are confusing. Use drive/non-driveside.
The best instructions for dismantling a Shimano Dynamo Hub were from Trinity Cycles. The text is still available but their pictures are no more.
Take great care with the delicate wire on the non-rotating part of the hub, it is really easy to break then the hub is useless as a generator.
...................................
For reference, I'm copying the Trinity Cycles instruction text here:
Overhauling Shimano Dynamo Hubs
Shimano makes a nice, affordable dynohub used by many commuters. It
isn't as light, efficient, or pretty as the Schmidt, but it is less
than half the price and has been reliable for me as well as many
customers. Unfortunately, Shimano doesn't provide any instructions for
overhauling their dynohub, and the technicians at Shimano North
America who I have spoken with are unfamiliar with the hub, offering
me incorrect advice about its dissassembly. The Shimano dynohub uses
traditional cup and cone bearings, but there is one hitch--there is a
wire running from the internal assembly of the hub to the plug on the
drive side of the hub. Care must be taken to remove the wire from the
plug assembly so that the hub can be taken apart and the bearings
serviced.
Tools
The only special bicycle tool you need for overhauling the hub is a
15mm cone wrench. You'll also need a 17mm wrench, a 32mm wrench (a
headset wrench works well) or large crescent wrench that can open to
32mm, and a sharp tool used to pry up a couple of thin pieces
connected to the plug. If any of your bearings need to be replaced,
the Shimano dynohub uses 3/16" ball bearings on each side of the hub.
Hub Parts
A pdf of Shimano's exploded diagram for the hub can be found here.
This diagram is helpful for visualizing the hub, but it won't help you
to access all the bearings, because unless the cone from the drive
side is removed--which requires the removal of the plug assembly and
detachment of the wire from the plug assembly--the drive side bearings
cannot be accessed.
Do I really need to do this?
The dynohub produces electricity by the rotation of magnets inside the
hub shell, these magnets give the hub a "notchy" feel when spun in
hand. At high speeds, this notchiness can also be felt on the bike.
This is perfectly normal. The DH-3N71's bearings are very well
protected by two seals on each side of the hub. I have used one of
these hubs for several thousand miles before opening up to find the
grease was perfectly clean. Of course, your results may vary. Try
adjusting your hub using the non drive side cone if you feel the
bearings are too tight. If you feel the grease needs to be replaced,
or just like to take things apart, use the instructions below.
These instructions assume you know how to overhaul a traditional cup
and cone hub. If you need instructions on overhauling a cup and cone
hub refer to these instructions from the Park tool website.
Directions
Place your 15mm cone wrench on the drive side cone in between the plug
and the hub body. Place your 17mm wrench on the locknut. Using your
finger to prevent the plug assembly from turning, break the lock nut
from the cone and remove the locknut. The plug assembly will try to
turn with the locknut, but if you allow it to rotate while the axle is
stationary, the wire which runs from the internal assembly to the plug
will break and your hub will be ruined.
Now that the lock nut is removed, you can begin to take apart the plug
assembly and remove the current wire from the plug. Below is a picture
of the parts on the drive side of the hub. Parts 3 though 8 constitute
the plug assembly along with the current wire and the connector that
is soldered to the current wire.
# 1 Rubber Seal
# 2 Cone with Dust Cover and Seal Ring
# 3 Back Plate of Plug Assembly
# 4 Metal Spacer with Wire Slot
# 5 Metal Spacer with Wire Slot (identical to part 4)
# 6 Plug Assembly Body
# 7 Plastic Plug Assembly Cover
# 8 Ground Plate
# 9 Lock Nut
Begin to take apart the plug assembly. First, use a sharp tool to lift
off the ground plate.
Do the same with the plastic cover to the plug assembly.
Now the current connector and current wire are exposed. Sorry for some
of the blurry pictures below.
Use your sharp tool to lift up the current connector and wire. Be
careful not to stress the soldered connection between the two.
You'll notice an opening on the bottom of the plug assembly body. This
opening is large enough for the current connector to pass though.
Carefully work the plug assembly body off the hub.
If this is the first time your hub has been opened, there will be a
mess of white, semi-solid substance (which I assume is Teflon)
slathered around the wire where it passes through an opening in the
silver metal spacer at the triangular end. You'll probably need to
pick away some of the Teflon to remove the spacers. Below the spacers,
the wire runs in the groove on the hub axle. After you've removed the
spacers (parts 4 and 5), the hub will look like this:
Place the wire along the groove in the hub so that the back plate
(part 3) can be removed and the cone screwed off the axle without
damaging the wire.
At this point the ball bearings on the drive side are exposed, but
they're not easily accessible and you'll find it hard to clean the
cups of the hub well unless we remove the axle.
Break the lock nut from the cone on the non drive side of the hub and
remove both. Then using a 32mm wrench grab the large nut on the drive
side of the hub pictured below and turn counterclockwise. This will
take a little force, brace the wheel against your body for a good
grip.
Now the inner assembly of the dynamo can can be removed.
With the axle out of the way, the bearings on each side of the hub can
easily be removed and the cups cleaned and inspected. Remove all the
old grease and repack, replacing bearings as necessary.
When reassembling the hub, remember to prevent the plug assembly from
turning as you cinch down the locknut. Clearly, allowing the plug
assembly to rotate while holding the axle stationary can break the
wire.
Last edited by MichaelW; 06-25-11 at 11:42 AM.
02-26-21, 06:23 AM
#4
Senior Member
Join Date: Aug 2011
Location: Paris, France
Posts: 2,497
Mentioned: 9 Post(s)
Tagged: 0 Thread(s)
Quoted: 573 Post(s)
Liked 118 Times
in
99 Posts
I'll add a question to this thread, since it's close.
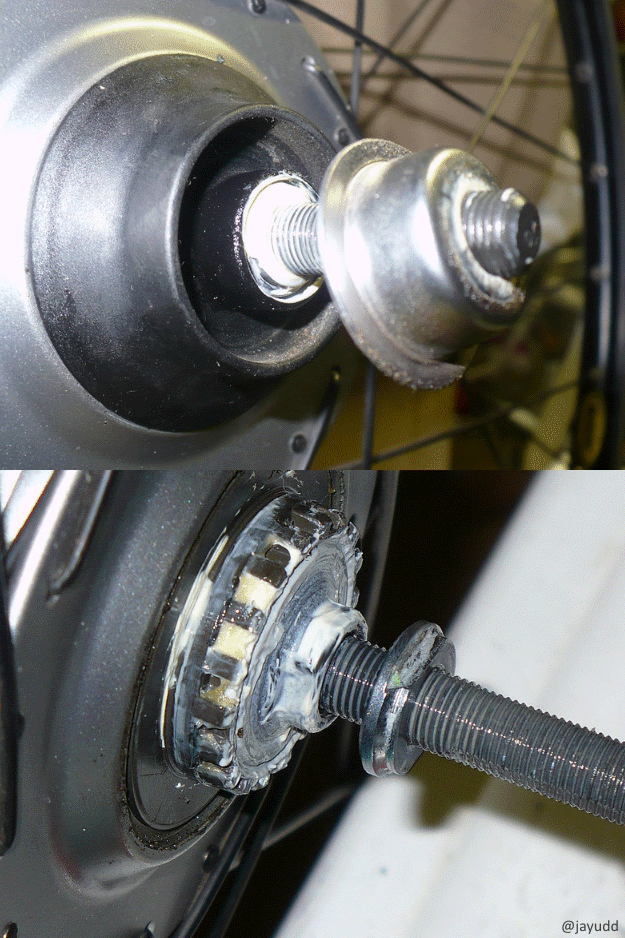
To reduce the width of a Nexus 8 from 132mm to 120mm to fit in a slimmer fork, you can remove the left-side dust cover.
I'm concered about riding without a dust cover, though, especially in inclement weather.
Is there some kind of thin dust cover that would do the job and still enjoy the beneft of a slimmer Nexus?
Thank you.
https://www.flickr.com/photos/juddpa...57613358920756
02-26-21, 06:44 AM
#5

Senior member

Join Date: Oct 2004
Location: Oakville Ontario
Posts: 8,115
Mentioned: 25 Post(s)
Tagged: 0 Thread(s)
Quoted: 942 Post(s)
Liked 656 Times
in
370 Posts
I'm not sure what that exact model you have looks like or if the internal assembly is threaded in like the one in this video, but here is a demo showing how I removed the internals from a hub. I forget the exact model number.
The second video shows a drive side bearing overhaul. Yours should be similar.
Note that removal of the internals should not be necessary to access the bearings.
The second video shows a drive side bearing overhaul. Yours should be similar.
Note that removal of the internals should not be necessary to access the bearings.
Likes For Dan Burkhart:
02-27-21, 05:36 AM
#6
Senior Member
Join Date: Aug 2011
Location: Paris, France
Posts: 2,497
Mentioned: 9 Post(s)
Tagged: 0 Thread(s)
Quoted: 573 Post(s)
Liked 118 Times
in
99 Posts
It's gear hubs, not dynohubs.
I might use either an SG-8R31 or an SG-C6011.
Is there no part that could be used as dust cap, even if it's not originally meant for that purpose?
I might use either an SG-8R31 or an SG-C6011.
Is there no part that could be used as dust cap, even if it's not originally meant for that purpose?
02-27-21, 05:30 PM
#7
Senior Member
Join Date: Sep 2004
Location: Chicago area
Posts: 2,546
Bikes: Airborne "Carpe Diem", Motobecane "Mirage", Trek 6000, Strida 2, Dahon "Helios XL", Dahon "Mu XL", Tern "Verge S11i"
Mentioned: 22 Post(s)
Tagged: 0 Thread(s)
Quoted: 980 Post(s)
Liked 580 Times
in
398 Posts
Here's a "Photo Essay" I sent to "Hubstripping" 10 years ago, documenting a couple of repairs on Dahon "Joule" hubs. These are similar in many ways to the Shimano dynohubs; they may share a "common ancestor"!
Steve
Likes For sweeks:

