


Thudbuster Upgrade Options You Can Do Yourself, This One's Bulletproof As Possible!
 06-17-12, 04:47 PM
#1
Banned.
Thread Starter
Join Date: Jun 2012
Posts: 360
Mentioned: 0 Post(s)
Tagged: 0 Thread(s)
Quoted: 0 Post(s)
Likes: 0
Liked 0 Times
in
0 Posts
Thudbuster Upgrade Options You Can Do Yourself, This One's Bulletproof As Possible!
Well,...my new Cane Creek "Thudbuster LT" came in on saturday,.....pleasant surprise as it wasn't expected until monday according to the tracking.
I've made some neat changes to my Thudbuster LT to vastly improve it's bushing seals against dust and wear, (side strength also), that i think will drastically slow down the unwanted feature of side play creeping in over time. (time will tell)
I know you can get a rebuild kit for these,......but since this was a new install i thought i would do all i could NOW to prolong it's tight fitting quality feel and function.
But all that comes a bit later, so don't freak out and leave thinking there was nothing worthwhile!
I just wanted to start at the beginning and cover a problem i anticipated before i ordered the unit,....and how i handled it once it arrived.
Then we'll get into the good stuff!
Mine was not expected to be a quick install, as i wanted a direct fit without needing a spacer. My 1987 Schwinn Cimarron's original seatpost measured just 1.045" (about 26.43mm), and the nearest Thudbuster LT post was made in 26.8mm, so that's what arrived.
Looking inside the seat post tube, i could see there was a layer of paint, and also i expected to be able to open up the tube clamp area a little also, but didn't want to do anything until the Thudbuster arrived.
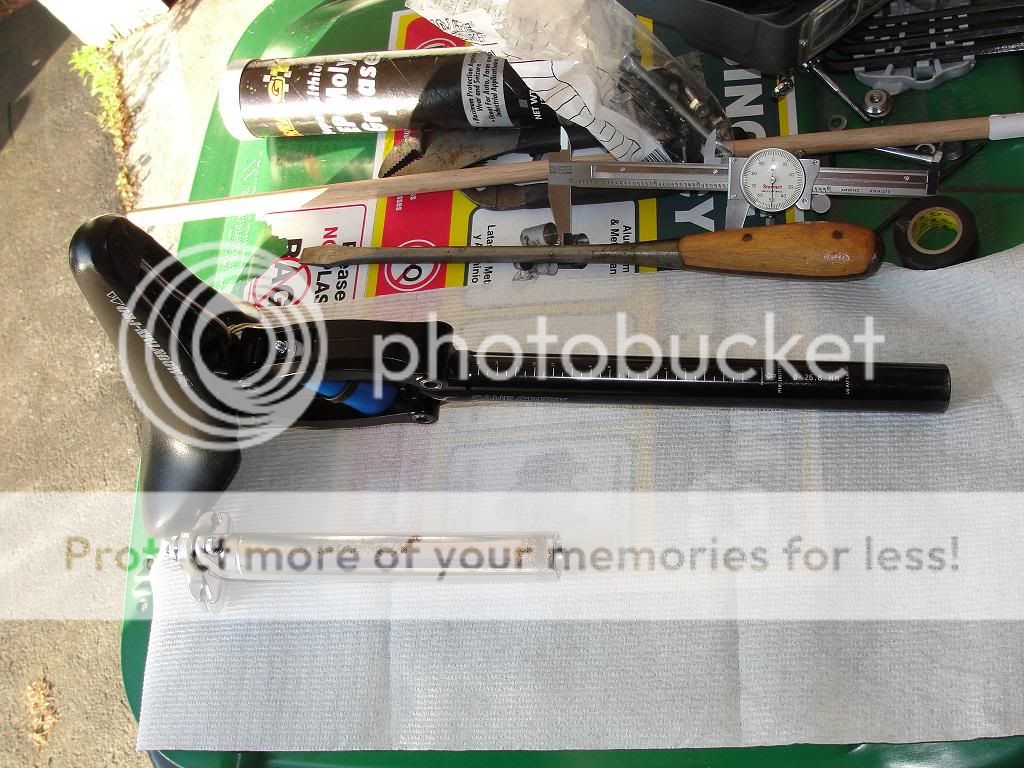
I used that huge antique flat screwdriver (1st pic) to lightly tap the clamp area slot of the tube a bit (a little added grease helps) , but it was obvious the tube itself would need a reaming. I had picked up a brake cylinder hone in anticipation of the job before me, and chucked it up into a 3/8" drill i had.
At a medium speed, and moving the drill up and down at a pretty even pace to keep the paint/metal removal even,......in about 5 minutes i had a snug fitting post (dry) that went down to the 1st bottle screw.
If you have a similiar need, be sure to take a little off and check the fit regularly as you go! I used my air compressor to blow out the tube, and added a little bit of wheel bearing grease to the inside of the tube with a wooden dowel, and also on the new seat post. Friction fit just about perfect with the lube on.
However, it was not obvious the Thudbuster post was too long to allow me to get the seat down to a usuable level, so when it was down as low as i could go (hitting the water cage screw and some sort of support inside the tube i could feel with a wooden dowel), i measured how much tube was remaining up top. That was to be my cut off amount....
Here's my original seatpost compared to the Thudbuster,....big difference:
.....And so out the TB came back out, and i wiped the grease off the tube and proceeded to saw off the required amount.
Here is where i ended up:
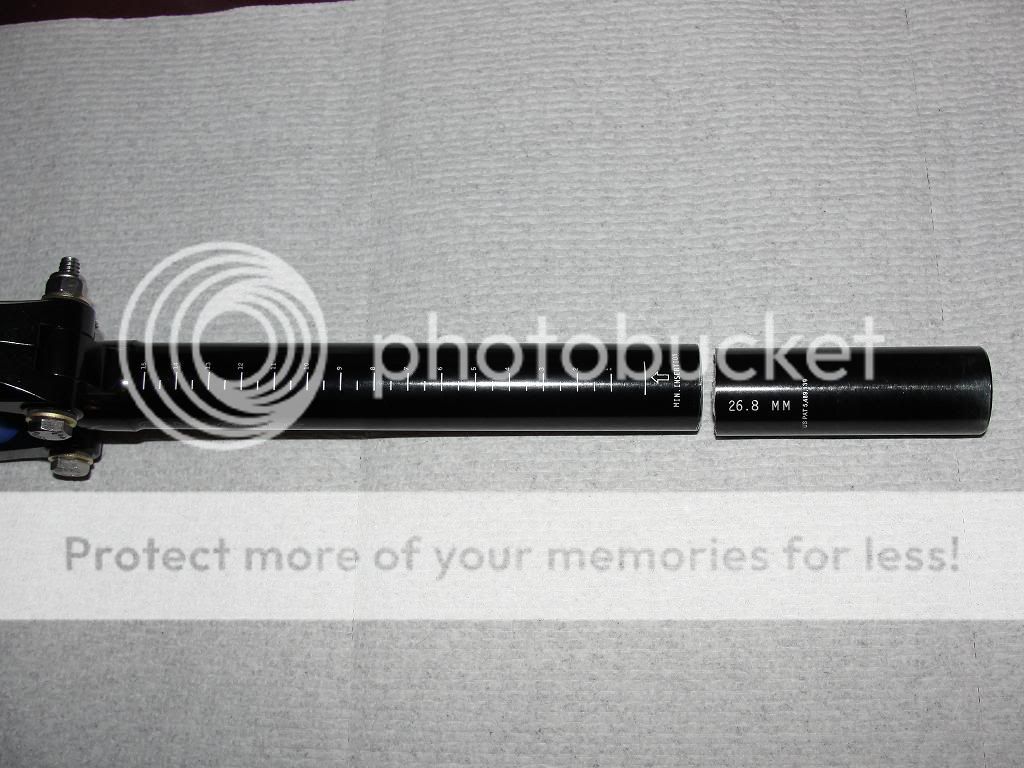
....and the Thudbuster LT at it's new length:
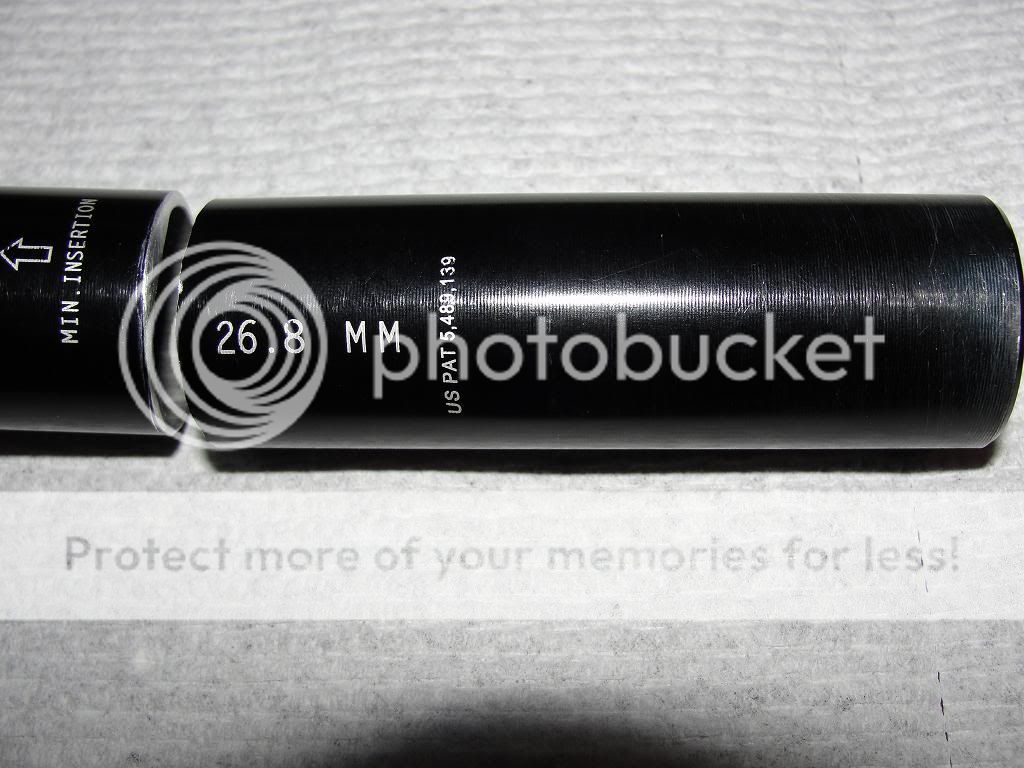
I was a little bummed out the manufacturer didn't put the size marking and patent number further up, in anticipation some folks would have to trim the posts?
....so i lost them:
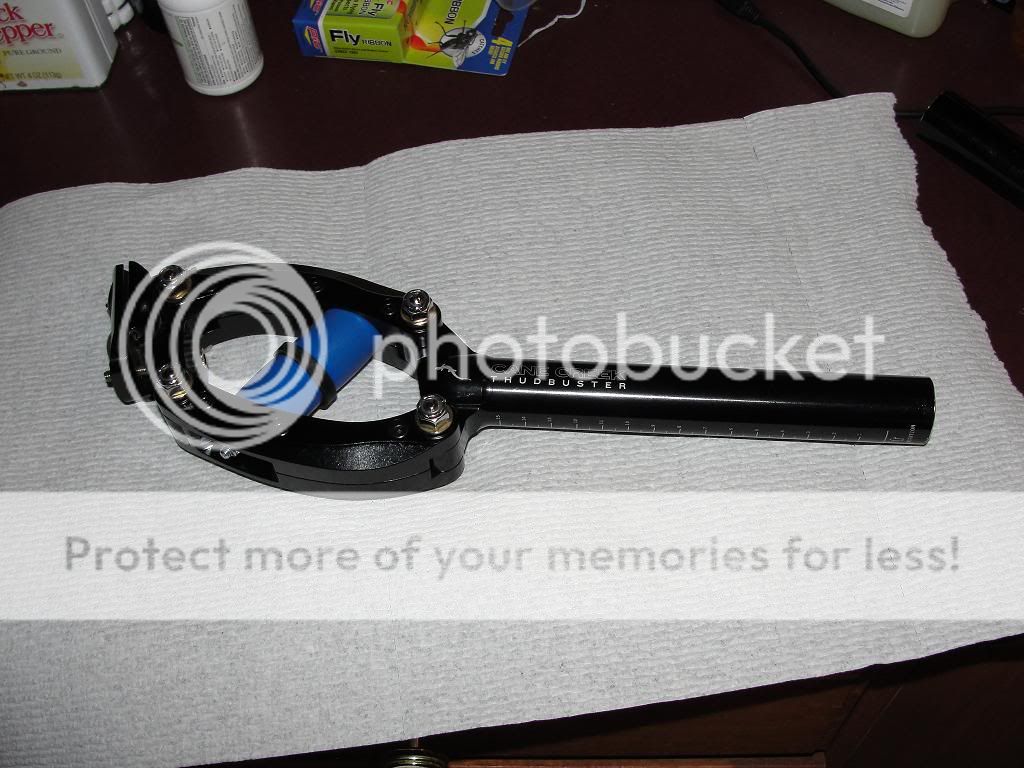
A quick cleanup of the cut followed by added a slight bevel to the outer edge, and with a light coating of wheel bearing grease added, i now could "just" bottom out the new Thudbuster LT post within the confines of my bike's seat post tube.
OK,.....now we'll get into the changes i made.
I wanted this new Thudbuster to be as "bullet proof" as possible, and was willing to take on a few ounces of weight to get there,.....no free lunch as you all know.
I'll present my final version (for now!), but in the 3rd post of this thread i'll outline some simpler options if all you want to do is offer a bit of dustproofing to your bushings.
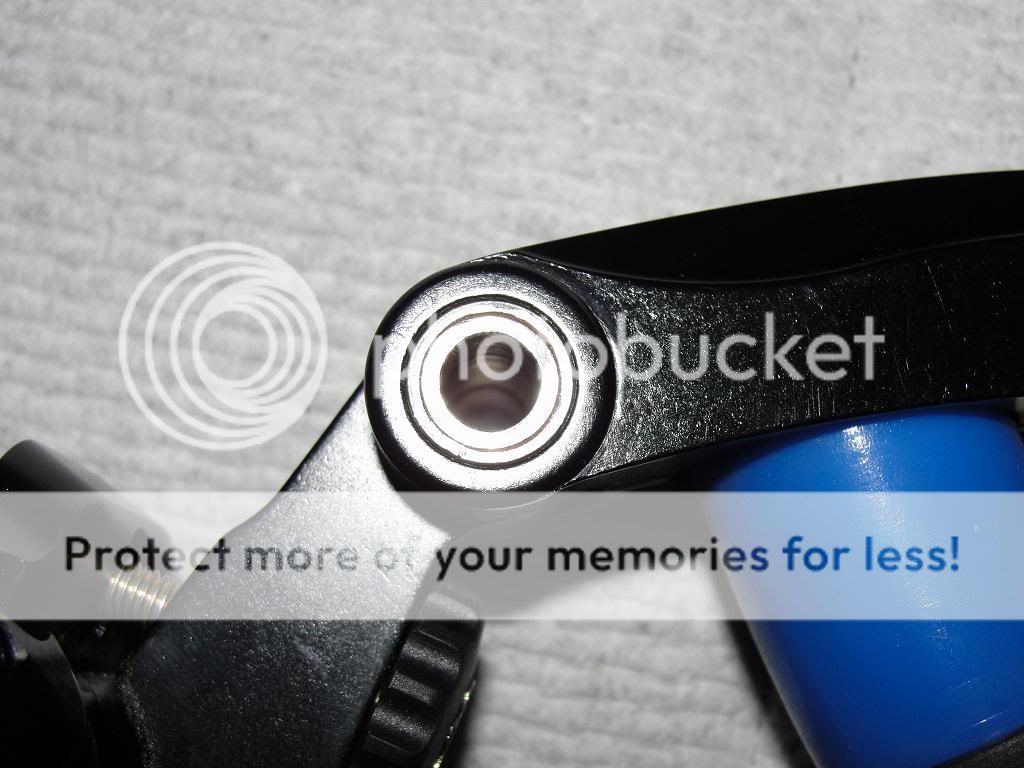
Right off i knew i would have to trim a few of the stainless steel part of the bushing area. Some were sticking out a bit, and others pretty flat and at a similiar level to the bronze bushing.
Here's one of the higher ones:

.....and one i wish all were from the beginning:

I carefully trimmed the high steel tube ends, until they were all pretty flush with the bronze bushing. I was a bench jeweler for 35 years, so i got pretty good at using my Foredom Flex-shaft machine with a 1" cutoff disc. A piloted facing bit would have been easier to trim the steel tubes flush with the bronze ones, but couldn't find one or even know where to look?
IF anyone knows where a tool bit like that is available, please pass it along. The center SS tube is 7mm diameter, (for the piloted plug to guide the cutter), and the outer diameter of the bronze bushing is about 12.065mm (measures .475 inch on my dial caliper when closely eyeballing it)
In this case, it's not critical as long as you're reasonably flat. Be sure to clean up all the grinding dust. I used my air compressor to get most of it, then several wipe downs with paper towels lightly coated with 93% denatured alcohol to make sure no abrasives worked into the bushing over time. (negating what i was attempting to prevent!) A few Q-tips in tighter areas also.
OK, we got down to all of the bushings having a similiar look to this, wherein the stainless center tube is fairly even with the outer bronze bushings:
That made it easier to get an effective dust seal , and on my 3rd incarnation i arrived at using a nylon washer to cover each bushing(coat with wheel bearing grease on the bushing facing side), followed by a stainless steel wash and nut. I used a stainless steel 1/4 X 20 X 2" hex bolt and lock nut (with the nylon locking material on one end) to keep it all together.
A 7mmX 1mm threaded bolt would have made a little tighter fit to the ss tubing of the bushings, but my local hardware store didn't have them in stainless steel and i didn't bother looking online.
I ended up filling most of the slack on the bolts by putting some 3/16" heat shrink tubing over the bolts. It had to be stretched a bit with needle nose plyers, and there was no need to heat it as it was still a snug fit. Added just a little wheel bearing grease on the outside of the tubing, as the bolt does spin slightly in use while the ss tubing does not. Doubt the bolt sides ever touche the inner stainless steel tube of the bushings though, so probably not necessary.
The 2 inch bolt length will need to be trimed after you've aquired your nylon and ss washers, as they vary a lot in width depending on where you get them. (you'll end up in the 1 3/4" range probably)
BTW, i did find it interesting the Thudbuster rebuild kits contain new bronze bushing and washers, among other items,....but no new stainless steel
tubing at the center.
I guess it should survive several of the softer bushing replacments, but wondered when the time comes if it's possible to just use a solid ss bolt of the proper outside dimention? We'll look into that should the need arise.
more to follow...............
I've made some neat changes to my Thudbuster LT to vastly improve it's bushing seals against dust and wear, (side strength also), that i think will drastically slow down the unwanted feature of side play creeping in over time. (time will tell)
I know you can get a rebuild kit for these,......but since this was a new install i thought i would do all i could NOW to prolong it's tight fitting quality feel and function.
But all that comes a bit later, so don't freak out and leave thinking there was nothing worthwhile!
I just wanted to start at the beginning and cover a problem i anticipated before i ordered the unit,....and how i handled it once it arrived.
Then we'll get into the good stuff!
Mine was not expected to be a quick install, as i wanted a direct fit without needing a spacer. My 1987 Schwinn Cimarron's original seatpost measured just 1.045" (about 26.43mm), and the nearest Thudbuster LT post was made in 26.8mm, so that's what arrived.
Looking inside the seat post tube, i could see there was a layer of paint, and also i expected to be able to open up the tube clamp area a little also, but didn't want to do anything until the Thudbuster arrived.
I used that huge antique flat screwdriver (1st pic) to lightly tap the clamp area slot of the tube a bit (a little added grease helps) , but it was obvious the tube itself would need a reaming. I had picked up a brake cylinder hone in anticipation of the job before me, and chucked it up into a 3/8" drill i had.
At a medium speed, and moving the drill up and down at a pretty even pace to keep the paint/metal removal even,......in about 5 minutes i had a snug fitting post (dry) that went down to the 1st bottle screw.
If you have a similiar need, be sure to take a little off and check the fit regularly as you go! I used my air compressor to blow out the tube, and added a little bit of wheel bearing grease to the inside of the tube with a wooden dowel, and also on the new seat post. Friction fit just about perfect with the lube on.
However, it was not obvious the Thudbuster post was too long to allow me to get the seat down to a usuable level, so when it was down as low as i could go (hitting the water cage screw and some sort of support inside the tube i could feel with a wooden dowel), i measured how much tube was remaining up top. That was to be my cut off amount....
Here's my original seatpost compared to the Thudbuster,....big difference:
.....And so out the TB came back out, and i wiped the grease off the tube and proceeded to saw off the required amount.
Here is where i ended up:
....and the Thudbuster LT at it's new length:
I was a little bummed out the manufacturer didn't put the size marking and patent number further up, in anticipation some folks would have to trim the posts?
....so i lost them:
A quick cleanup of the cut followed by added a slight bevel to the outer edge, and with a light coating of wheel bearing grease added, i now could "just" bottom out the new Thudbuster LT post within the confines of my bike's seat post tube.
OK,.....now we'll get into the changes i made.
I wanted this new Thudbuster to be as "bullet proof" as possible, and was willing to take on a few ounces of weight to get there,.....no free lunch as you all know.
I'll present my final version (for now!), but in the 3rd post of this thread i'll outline some simpler options if all you want to do is offer a bit of dustproofing to your bushings.
Right off i knew i would have to trim a few of the stainless steel part of the bushing area. Some were sticking out a bit, and others pretty flat and at a similiar level to the bronze bushing.
Here's one of the higher ones:
.....and one i wish all were from the beginning:
I carefully trimmed the high steel tube ends, until they were all pretty flush with the bronze bushing. I was a bench jeweler for 35 years, so i got pretty good at using my Foredom Flex-shaft machine with a 1" cutoff disc. A piloted facing bit would have been easier to trim the steel tubes flush with the bronze ones, but couldn't find one or even know where to look?
IF anyone knows where a tool bit like that is available, please pass it along. The center SS tube is 7mm diameter, (for the piloted plug to guide the cutter), and the outer diameter of the bronze bushing is about 12.065mm (measures .475 inch on my dial caliper when closely eyeballing it)
In this case, it's not critical as long as you're reasonably flat. Be sure to clean up all the grinding dust. I used my air compressor to get most of it, then several wipe downs with paper towels lightly coated with 93% denatured alcohol to make sure no abrasives worked into the bushing over time. (negating what i was attempting to prevent!) A few Q-tips in tighter areas also.
OK, we got down to all of the bushings having a similiar look to this, wherein the stainless center tube is fairly even with the outer bronze bushings:
That made it easier to get an effective dust seal , and on my 3rd incarnation i arrived at using a nylon washer to cover each bushing(coat with wheel bearing grease on the bushing facing side), followed by a stainless steel wash and nut. I used a stainless steel 1/4 X 20 X 2" hex bolt and lock nut (with the nylon locking material on one end) to keep it all together.
A 7mmX 1mm threaded bolt would have made a little tighter fit to the ss tubing of the bushings, but my local hardware store didn't have them in stainless steel and i didn't bother looking online.
I ended up filling most of the slack on the bolts by putting some 3/16" heat shrink tubing over the bolts. It had to be stretched a bit with needle nose plyers, and there was no need to heat it as it was still a snug fit. Added just a little wheel bearing grease on the outside of the tubing, as the bolt does spin slightly in use while the ss tubing does not. Doubt the bolt sides ever touche the inner stainless steel tube of the bushings though, so probably not necessary.
The 2 inch bolt length will need to be trimed after you've aquired your nylon and ss washers, as they vary a lot in width depending on where you get them. (you'll end up in the 1 3/4" range probably)
BTW, i did find it interesting the Thudbuster rebuild kits contain new bronze bushing and washers, among other items,....but no new stainless steel
tubing at the center.
I guess it should survive several of the softer bushing replacments, but wondered when the time comes if it's possible to just use a solid ss bolt of the proper outside dimention? We'll look into that should the need arise.
more to follow...............
Last edited by joejeweler; 06-18-12 at 04:46 PM.
 06-17-12, 04:48 PM
#2
Banned.
Thread Starter
Join Date: Jun 2012
Posts: 360
Mentioned: 0 Post(s)
Tagged: 0 Thread(s)
Quoted: 0 Post(s)
Likes: 0
Liked 0 Times
in
0 Posts
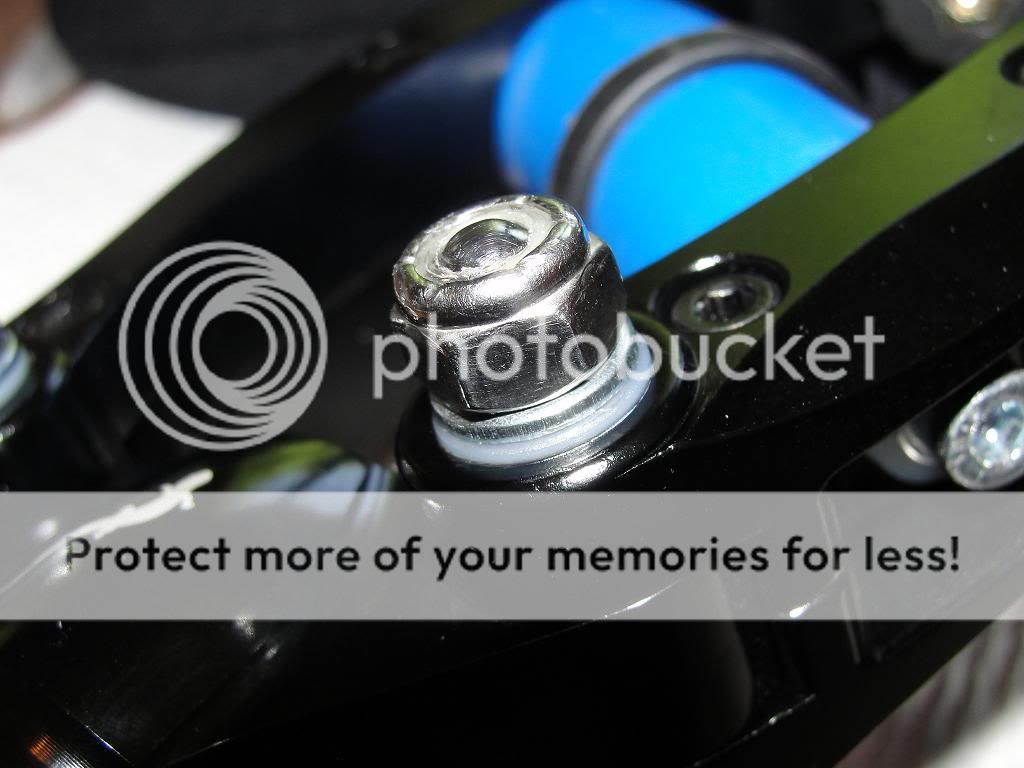
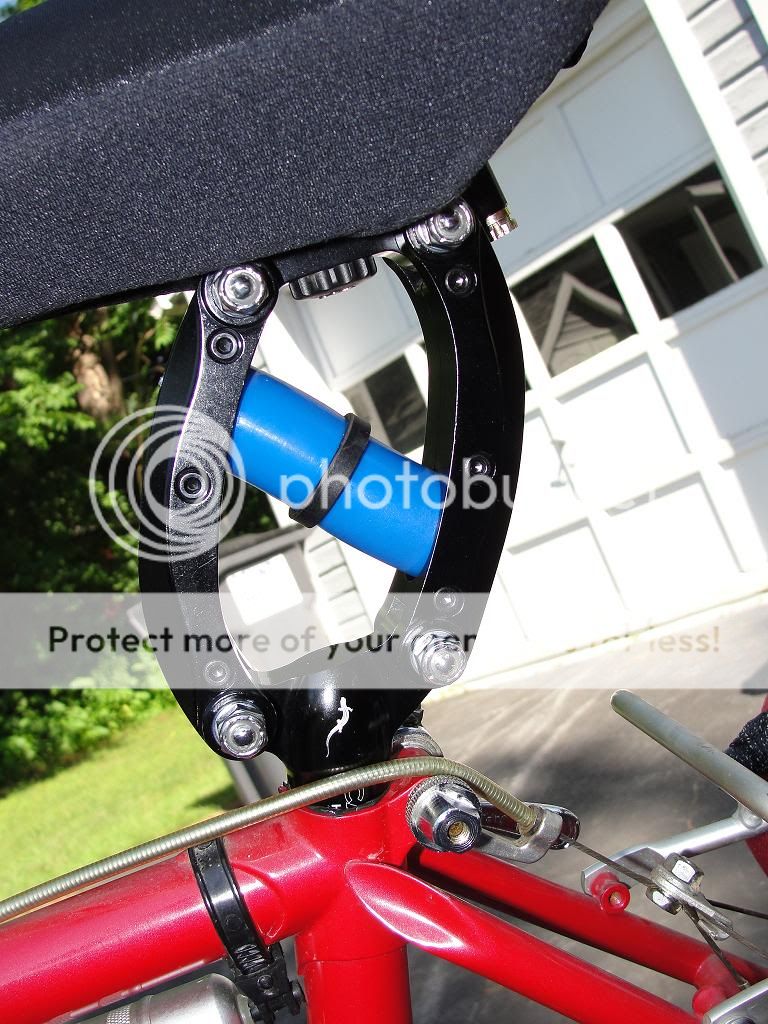
I tightened it all up just enough to get pressure on each bushing joint and add additional support to the hindge joints, but not enough to hinder the function. I also added a small amount of wheel bearing grease to the nylon washer side facing the bushing, to aid in the functioning.
(a ss washer is under the nylon one,.. tough to see in the pic though):
The excess bolt lengths had to be trimmed away, and i rounded and polished up the bolt ends to remove any sharpness there.
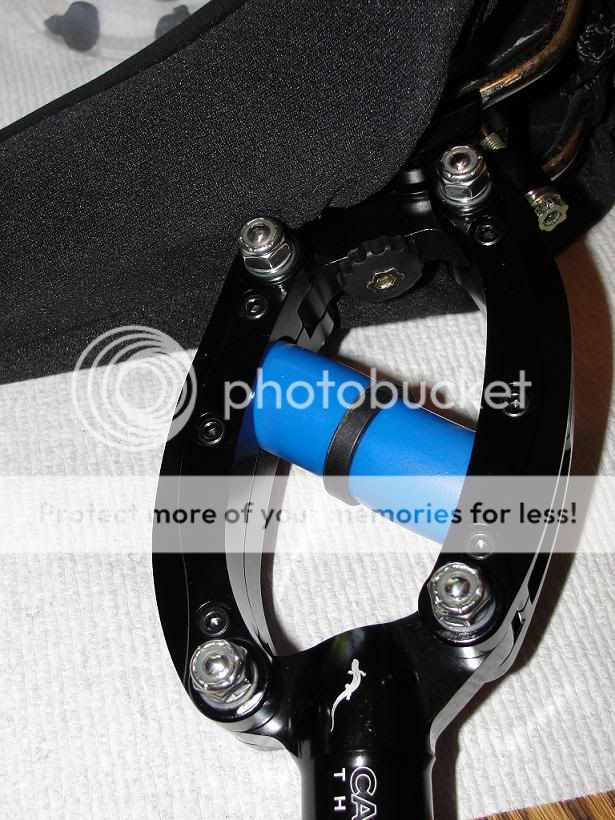
.....the other side:
A close up of the polished ss bolt ends:
So that's the final version of what i ended up with. The side arms have a lot more support now, and the bushings more protected from rode dust.
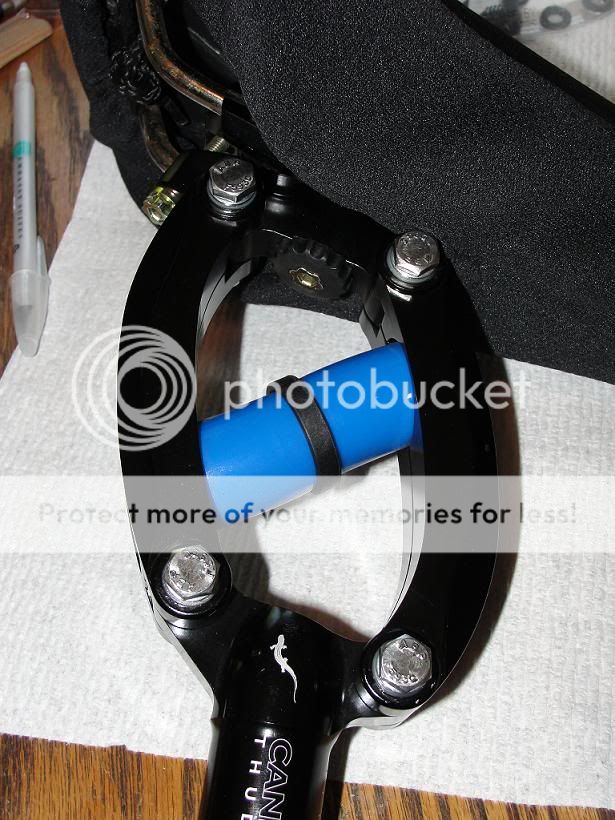
My 1st rendition last night i used soft rubber washers instead of the hard nylon ones, figuring they would seal against dust and moisture better. But you just can't get much pressure on them before they distort. Possibly using a flat faucet washer would work,.....but i'm satisfied with the added protection and support offered now.
This is with the rubber washers mounted (original rendition now changed), and before i cut and polished the bolt ends:
....another view:
The sealing was fine with the rubber washers,....but just didn't feel it was offering any additional support to the hindges, as the material was just too soft.
....and here on the bike (1987 Schwinn Cimarron, 18" Frame):
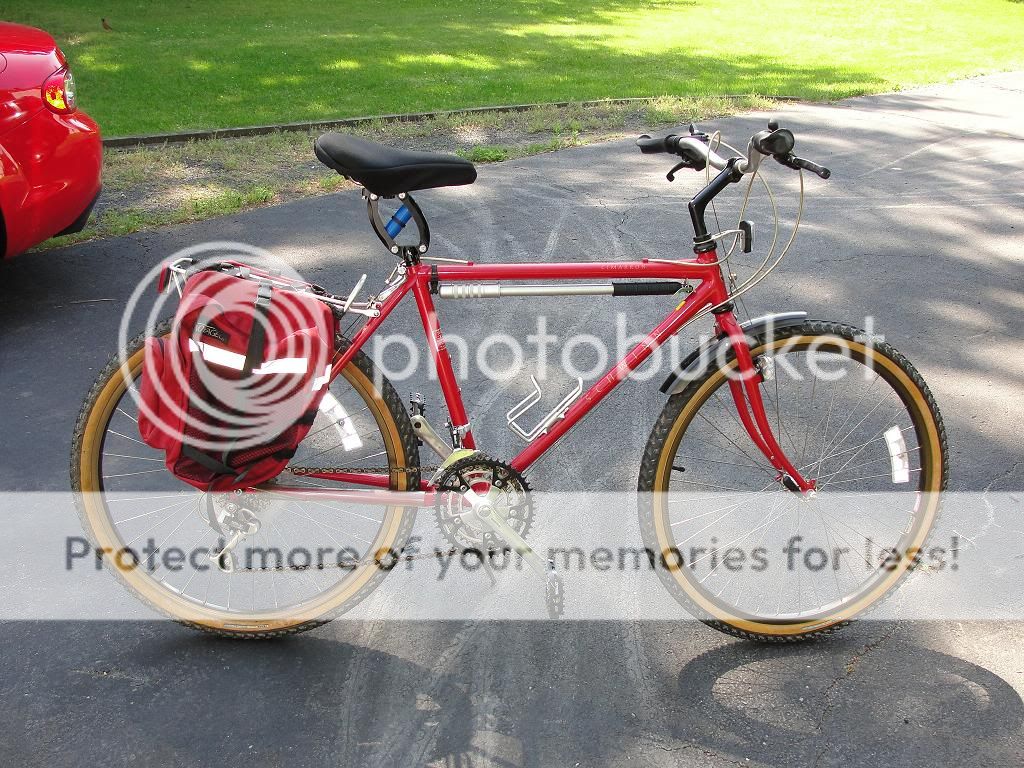
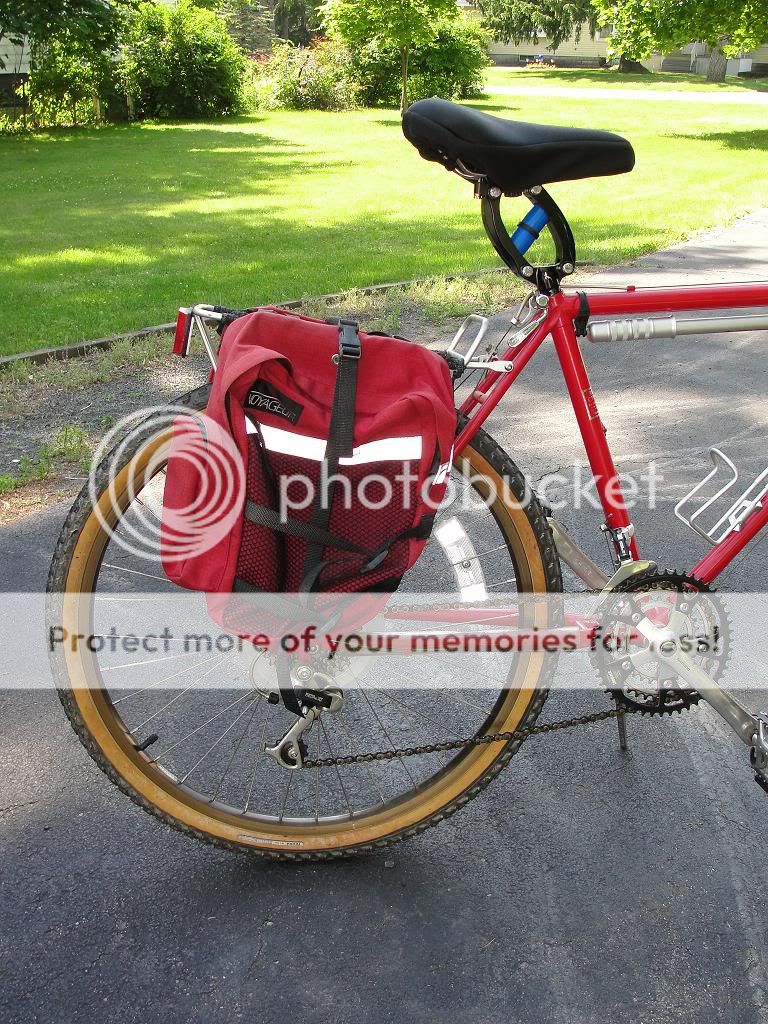
So there she is,..."done" for now. The only thing i want to do is locate a bit wider ss and nylon washers that will more fully cover the frame arms beyong where the bushings are. The hardware store didn't have anything in stock like that, but should be available with a little looking.
That will give the optimum support to the linkage arms, which previously are only supported by the 3 thin screws along the center. Substantial bolts on the ends greatly augment that support, and i'm hopeful any loosening (side play) of the unit much less likely with extended use.
(a ss washer is under the nylon one,.. tough to see in the pic though):
The excess bolt lengths had to be trimmed away, and i rounded and polished up the bolt ends to remove any sharpness there.
.....the other side:
A close up of the polished ss bolt ends:
So that's the final version of what i ended up with. The side arms have a lot more support now, and the bushings more protected from rode dust.
My 1st rendition last night i used soft rubber washers instead of the hard nylon ones, figuring they would seal against dust and moisture better. But you just can't get much pressure on them before they distort. Possibly using a flat faucet washer would work,.....but i'm satisfied with the added protection and support offered now.
This is with the rubber washers mounted (original rendition now changed), and before i cut and polished the bolt ends:
....another view:
The sealing was fine with the rubber washers,....but just didn't feel it was offering any additional support to the hindges, as the material was just too soft.
....and here on the bike (1987 Schwinn Cimarron, 18" Frame):
So there she is,..."done" for now. The only thing i want to do is locate a bit wider ss and nylon washers that will more fully cover the frame arms beyong where the bushings are. The hardware store didn't have anything in stock like that, but should be available with a little looking.
That will give the optimum support to the linkage arms, which previously are only supported by the 3 thin screws along the center. Substantial bolts on the ends greatly augment that support, and i'm hopeful any loosening (side play) of the unit much less likely with extended use.
Last edited by joejeweler; 06-19-12 at 12:59 AM.
06-17-12, 05:02 PM
#3
Banned.
Thread Starter
Join Date: Jun 2012
Posts: 360
Mentioned: 0 Post(s)
Tagged: 0 Thread(s)
Quoted: 0 Post(s)
Likes: 0
Liked 0 Times
in
0 Posts
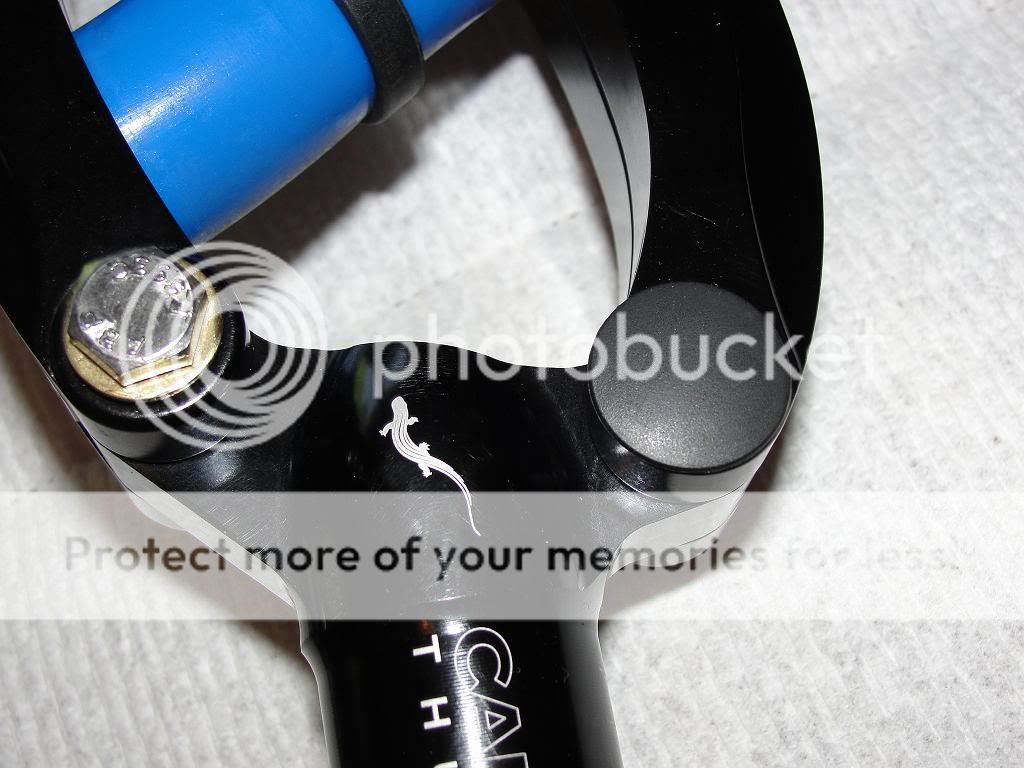
Ok, so what if you want to offer "some" bushing protection, but don't want to go as far as i did. Well, consider from what i've read that road dust contributes to your needing a rebuild kit eventually, here are some simple choices that anyone can do pretty cheap.
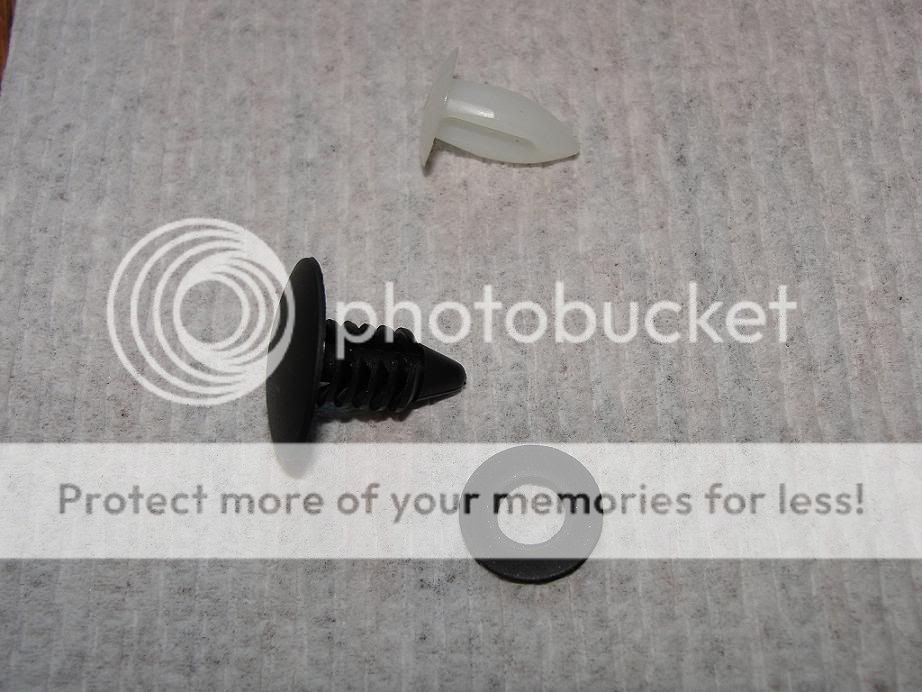
At my local hardware store, i found the following caps that will offer a pretty good seal to the bushings:
The black one is an automobile style fastener that come in various lengths. Even using the shortest ones might require a little to be cut off so they don't meet in the middle and prevent full seating.
The white one was called an arrow cap i believe, and both could probably fit a soft rubber washer in as they have a cupped inner surface:
Here's the auto fastener in place:
....another view:
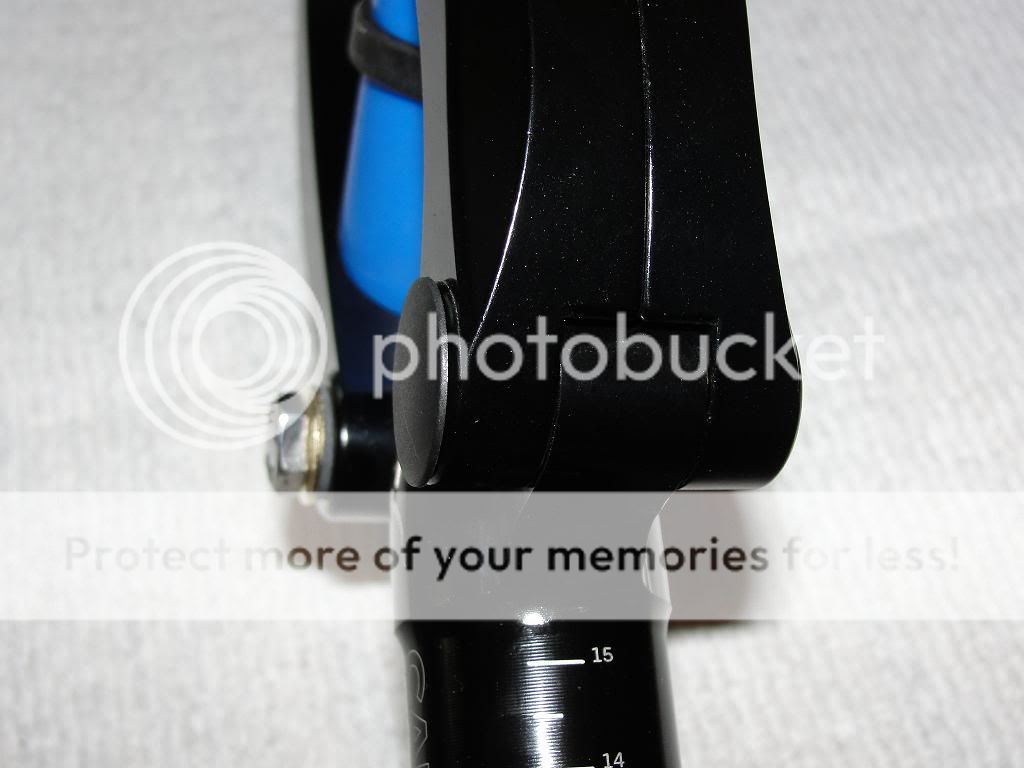
Here's the arrow style cap in place,....and formed a pretty tight seal covering over my bushing:
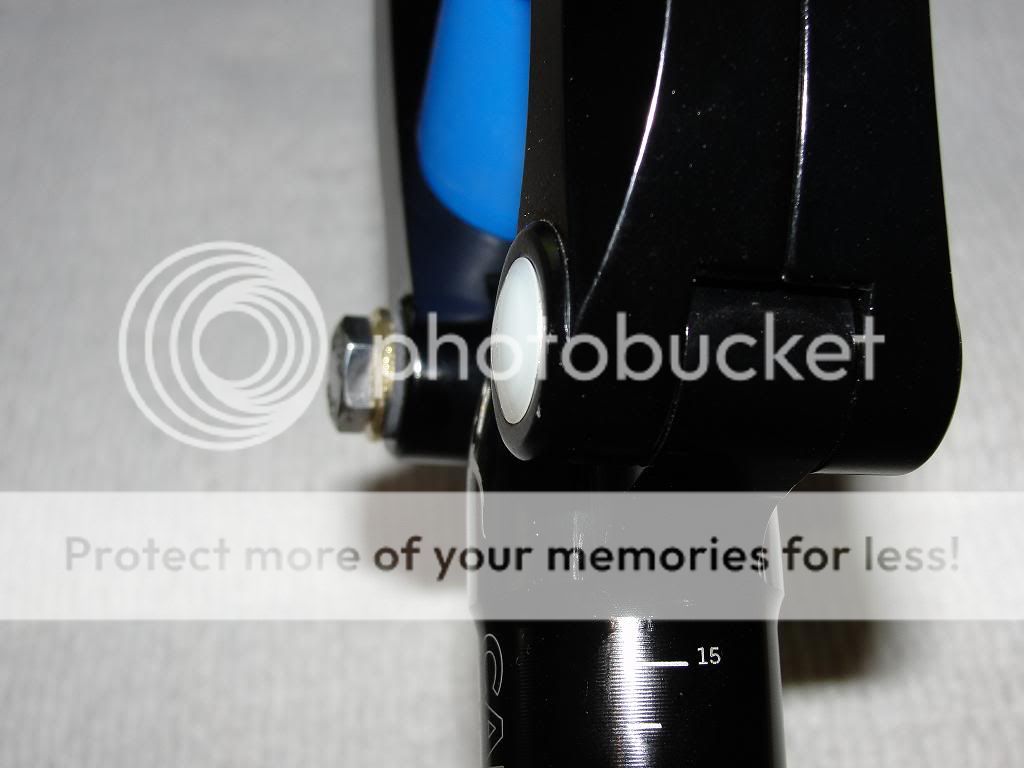
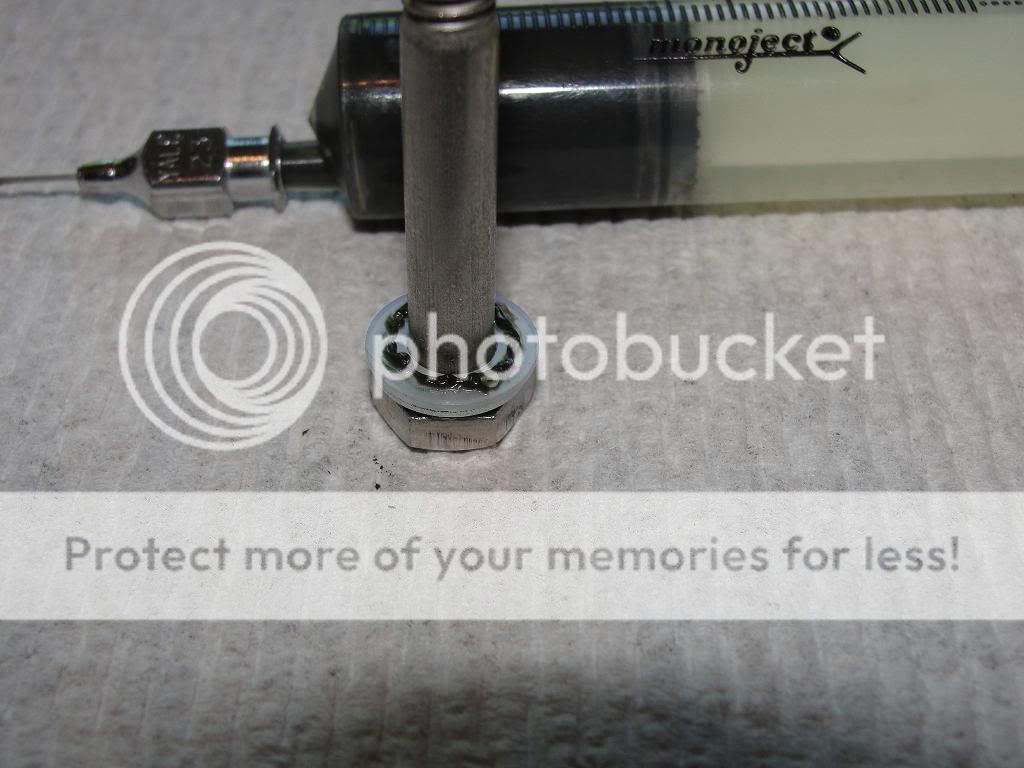
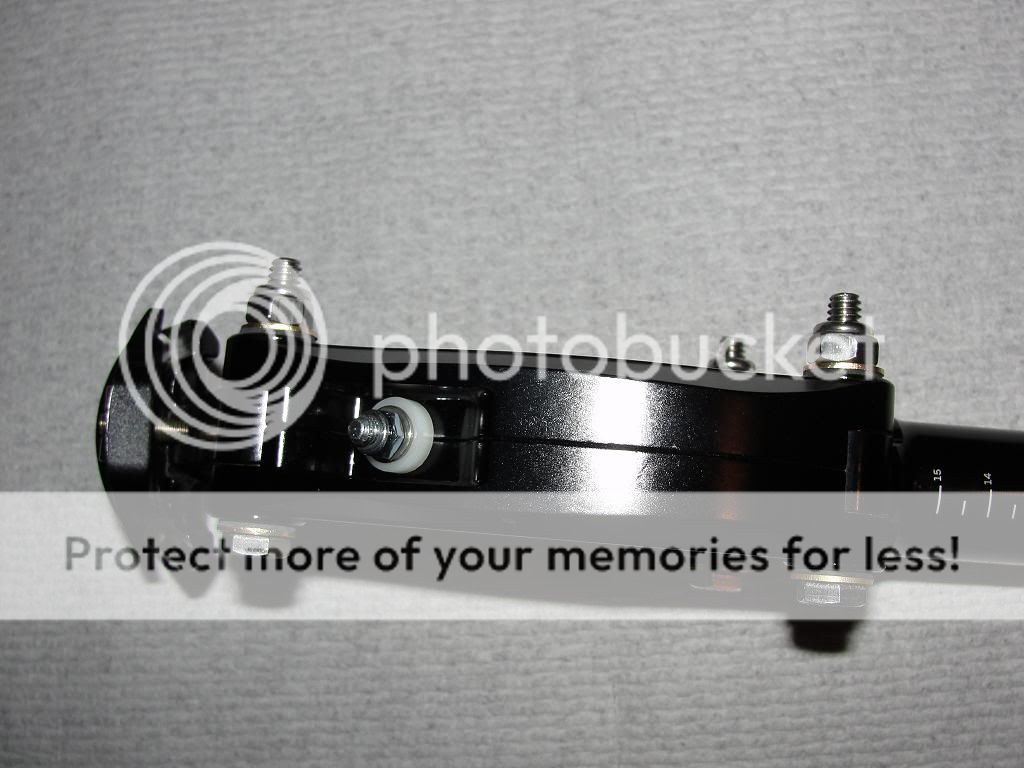
One final option you could do to allow more dust sealing is to pick up some nylon bolts and nuts. They are super light weight and you can get a little preasure down on the rubber sealing washers:
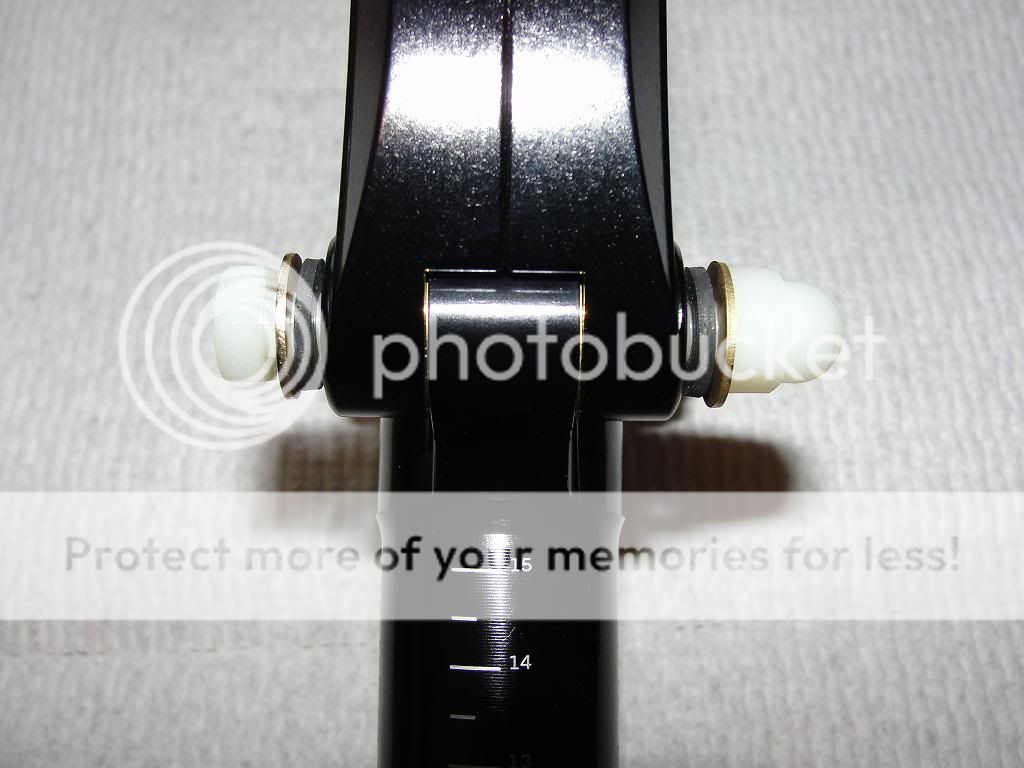
This is a cap nut, but they also make a nylon lock nut that would be a better choice,....the store was just out of them. The brass washer just something i had available to show in the pic, but a nylon washer would do as well:

I'll end by saying it'll be interesting to see how long i can go without side play or bushing wear to be noticed. That's on the stainless steel bolt/nut version. Don't expect nylon screws/nuts to offer anything other than keeping a rubber seal up against your bushings to keep dust out)
I will do regular cleaning and relube of the bushings preseason, as well as a regular drop of oil in the center area of the unit,.....
I'm hopeful i will have nothing to report further! :
At my local hardware store, i found the following caps that will offer a pretty good seal to the bushings:
The black one is an automobile style fastener that come in various lengths. Even using the shortest ones might require a little to be cut off so they don't meet in the middle and prevent full seating.
The white one was called an arrow cap i believe, and both could probably fit a soft rubber washer in as they have a cupped inner surface:
Here's the auto fastener in place:
....another view:
Here's the arrow style cap in place,....and formed a pretty tight seal covering over my bushing:
One final option you could do to allow more dust sealing is to pick up some nylon bolts and nuts. They are super light weight and you can get a little preasure down on the rubber sealing washers:
This is a cap nut, but they also make a nylon lock nut that would be a better choice,....the store was just out of them. The brass washer just something i had available to show in the pic, but a nylon washer would do as well:
I'll end by saying it'll be interesting to see how long i can go without side play or bushing wear to be noticed. That's on the stainless steel bolt/nut version. Don't expect nylon screws/nuts to offer anything other than keeping a rubber seal up against your bushings to keep dust out)
I will do regular cleaning and relube of the bushings preseason, as well as a regular drop of oil in the center area of the unit,.....
I'm hopeful i will have nothing to report further! :
Last edited by joejeweler; 11-01-12 at 06:53 PM.
06-17-12, 06:41 PM
#4

bike whisperer

Join Date: Dec 2009
Location: Melbourne, Oz
Posts: 9,537
Bikes: https://weightweenies.starbike.com/forum/viewtopic.php?f=10&t=152015&p=1404231
Mentioned: 15 Post(s)
Tagged: 0 Thread(s)
Quoted: 1523 Post(s)
Liked 716 Times
in
508 Posts
Looks like it'll do the job. Might even hide the slop when it develops some wear for a bit.
But why not scratch '26.8' on the bottom of the post for future reference?
But why not scratch '26.8' on the bottom of the post for future reference?
__________________
Sheldon Brown's bike info ~~~ Park Tools repair help
Half-step triple, using double gear ~~~ 6400 STI rebuild walkthrough ~~~ Want 8/9/10s @126mm OLD? OCR. ~~~ Shimano cassette body overhaul ~~~ Ergopower Escape wear repair ~~~ PSA: drivetrain wear
List of US/Canada bike co-ops ~~~ Global list
Sheldon Brown's bike info ~~~ Park Tools repair help
Half-step triple, using double gear ~~~ 6400 STI rebuild walkthrough ~~~ Want 8/9/10s @126mm OLD? OCR. ~~~ Shimano cassette body overhaul ~~~ Ergopower Escape wear repair ~~~ PSA: drivetrain wear
List of US/Canada bike co-ops ~~~ Global list
06-17-12, 06:59 PM
#5
Banned.
Thread Starter
Join Date: Jun 2012
Posts: 360
Mentioned: 0 Post(s)
Tagged: 0 Thread(s)
Quoted: 0 Post(s)
Likes: 0
Liked 0 Times
in
0 Posts
With my "collection" of 10 or so Starrett dial and vernier calipers, a quick measurement and the mystery would be over, so to speak if i ever need to know. (after converting to mm's)
While i was a jewelry repairman for 35 years, i often did inside ring engraving "freehand" with my Foredom flex-shaft machine with just a small round bit attached. Sometimes i would pre-measure if i would have the room inside a wedding band by using a sharp magic marker to sketch it in first, and trace over it.
......so i may yet engrave the side of the tube somewhere on it,......most likely on the inside of the open end where there are a couple of re-enforcing sections strengthening the tube.
.......but i have to say i'll miss the original size marking and patent number:
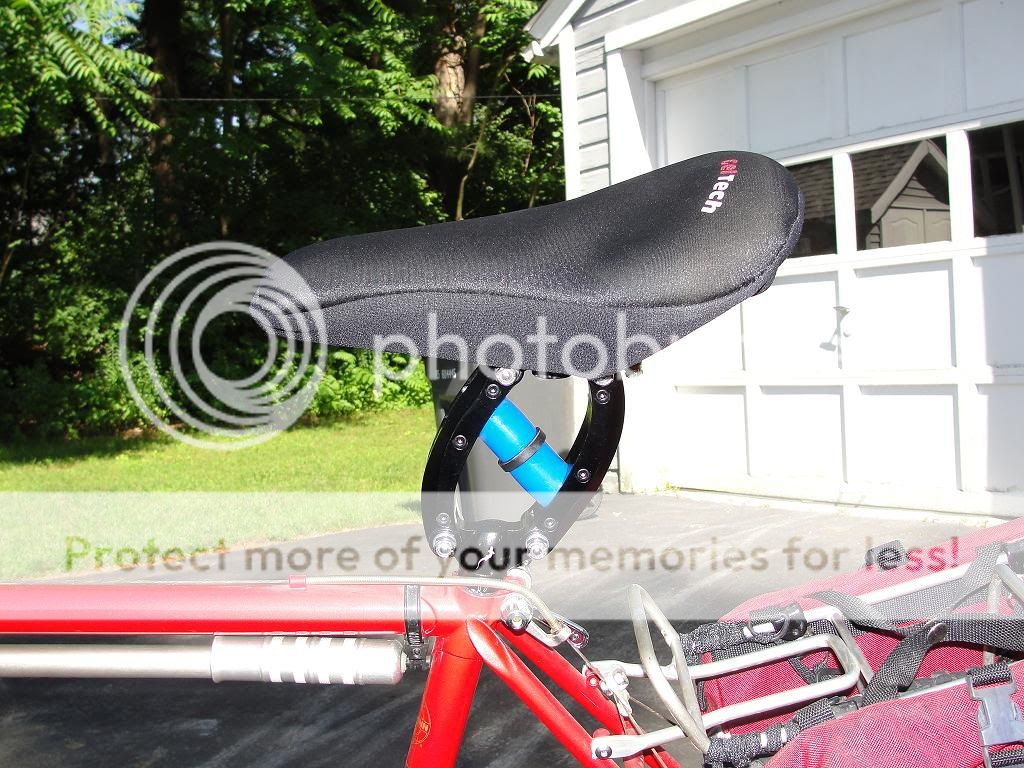
Oh,....i'm not sure if Thudbuster LT seatposts are used on serious competion MTB's,.....but if they are i think i've want the "adjustment" made here.

Last edited by joejeweler; 11-01-12 at 06:54 PM.
06-18-12, 10:17 AM
#6
Banned.
Thread Starter
Join Date: Jun 2012
Posts: 360
Mentioned: 0 Post(s)
Tagged: 0 Thread(s)
Quoted: 0 Post(s)
Likes: 0
Liked 0 Times
in
0 Posts
Ummm, my brand new Thudbuster elastomers and bolt were DRY of the recommended grease?
Well, i thought i would just quickly take apart the elastomer section on my "new" Thudbuster LT today, just to give it a quick wipedown of the old grease and relube. I thought it was possible some of the grinding dust from my 1st post proceedure (in this thread) had gotten in between the elastomers or ends where they press against the arm cutouts. This even though i had blown around the outside with my air compressor hose,.......
......and they were clean and free of any grinding debree.
In fact, they were Clean and Free of ANYTHING,....even the GREASE the Cane Creek video shows should be applied when changing your elastimers!
(as shown here: https://www.youtube.com/watch?v=B06223LSigs )
A bit surprising the video presents a need for lubricating the parts that slide against each other, yet a brand new unit was completly free of any lubricant. Had i not decided to check for grit, i would have just run the TB as is and certainly contributed to unnecessary wear down the line.
.....so just a heads up if you've recently bought one and assumed it was all set,.....you might want to remove the elastomers and check for lube? I used the white silicone type grease, as it's the lube to use for polyurethane material which the TB site mentions the elastomers are made from. Funny no mention of that anywhere on the site.
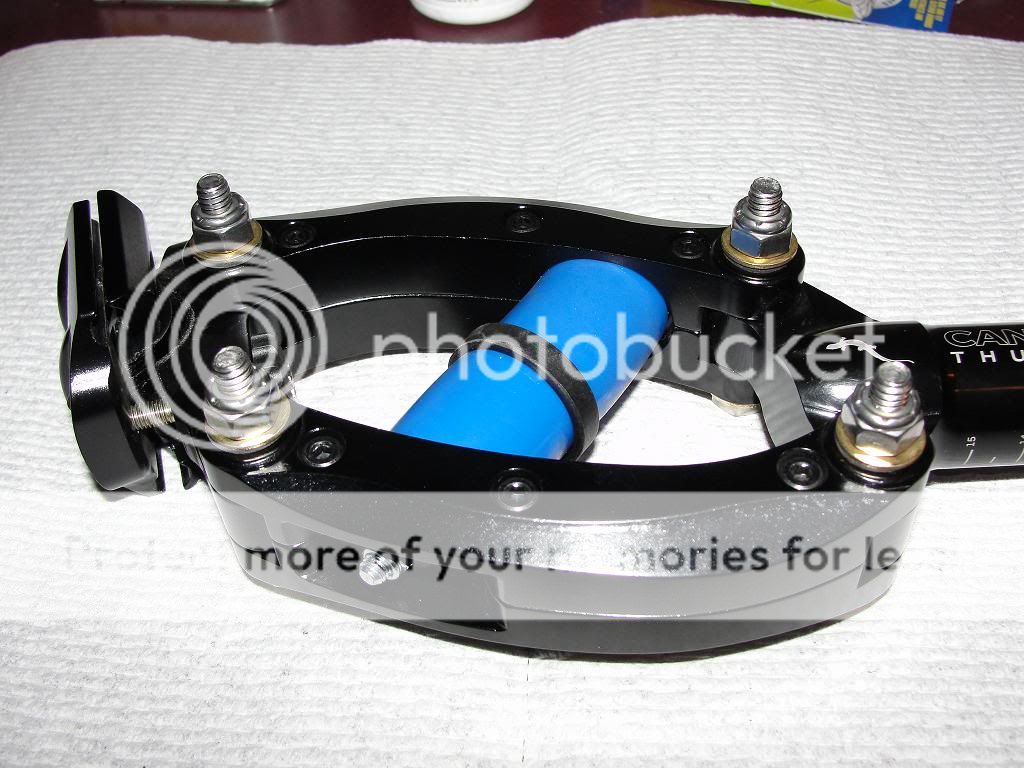
A lot of folks are likely to be in the weight range of the Thudbuster LD as designed for use with the blue/blue elastimer set. This is as supplied and installed in the unit when it shipped.
One side benefit of taking the elastomer section out is i noticed my addition of the ss side bolts/lock nut supports was not hindering the action of the arms, and i could actually tighten up the lock nuts a little more than i thought.
Previously, i stopped tightening when the bolt was unable to be turned between my fingertips, hesitant to add more support tension for fear i would hinder the action of the parallel arms. Having the elastomer section out allowed me to add tension to each bolt individually until action was hindered, and then backing off on the lock nut a fraction of a turn to re-establish free funtion to the unit.
Fine tune tightening each bolt in sucession this way will allow maximum lateral support to each arm without any compromise in basic TB functioning.
There did appear to be some lube applied at the working bushings when i was flattening the stainless steel tube parts to the bronze bushing level, so i don't feel the need to pull the arms and grease there.
Some lube was noticed when i carefull wiped out any residue from my previous grinding, and i used compressed air also. But i'll add the recommended oiling to the bushing joints on a regular basis, followed by a once a season teardown/clean/inspection of the parts and replace anything worn.
......and they were clean and free of any grinding debree.
In fact, they were Clean and Free of ANYTHING,....even the GREASE the Cane Creek video shows should be applied when changing your elastimers!
(as shown here: https://www.youtube.com/watch?v=B06223LSigs )
A bit surprising the video presents a need for lubricating the parts that slide against each other, yet a brand new unit was completly free of any lubricant. Had i not decided to check for grit, i would have just run the TB as is and certainly contributed to unnecessary wear down the line.
.....so just a heads up if you've recently bought one and assumed it was all set,.....you might want to remove the elastomers and check for lube? I used the white silicone type grease, as it's the lube to use for polyurethane material which the TB site mentions the elastomers are made from. Funny no mention of that anywhere on the site.
A lot of folks are likely to be in the weight range of the Thudbuster LD as designed for use with the blue/blue elastimer set. This is as supplied and installed in the unit when it shipped.
One side benefit of taking the elastomer section out is i noticed my addition of the ss side bolts/lock nut supports was not hindering the action of the arms, and i could actually tighten up the lock nuts a little more than i thought.
Previously, i stopped tightening when the bolt was unable to be turned between my fingertips, hesitant to add more support tension for fear i would hinder the action of the parallel arms. Having the elastomer section out allowed me to add tension to each bolt individually until action was hindered, and then backing off on the lock nut a fraction of a turn to re-establish free funtion to the unit.
Fine tune tightening each bolt in sucession this way will allow maximum lateral support to each arm without any compromise in basic TB functioning.
There did appear to be some lube applied at the working bushings when i was flattening the stainless steel tube parts to the bronze bushing level, so i don't feel the need to pull the arms and grease there.
Some lube was noticed when i carefull wiped out any residue from my previous grinding, and i used compressed air also. But i'll add the recommended oiling to the bushing joints on a regular basis, followed by a once a season teardown/clean/inspection of the parts and replace anything worn.
Last edited by joejeweler; 06-18-12 at 04:53 PM.
06-18-12, 11:44 AM
#7
Banned
OTOH, the Crud Buster is a Boot, that pulls over the whole parallelogram.
to do all the things you were trying to do.. much simpler ..
After market, sale are some denser LT elastomers for those around 200#
When I bought my BiFri, they included them,,
color code: after grey then, blue, is black [what I use] and a purple
Elastomers with ST they're all black, for the varying rider weight densities,
no boot made for them, then your push plug thing may be useful ..
06-18-12, 02:06 PM
#8
Banned.
Thread Starter
Join Date: Jun 2012
Posts: 360
Mentioned: 0 Post(s)
Tagged: 0 Thread(s)
Quoted: 0 Post(s)
Likes: 0
Liked 0 Times
in
0 Posts
OTOH, the Crud Buster is a Boot, that pulls over the whole parallelogram.
to do all the things you were trying to do.. much simpler ..
After market, sale are some denser LT elastomers for those around 200#
When I bought my BiFri, they included them,,
color code: after grey then, blue, is black [what I use] and a purple
Elastomers with ST they're all black, for the varying rider weight densities,
no boot made for them, then your push plug thing may be useful ..
to do all the things you were trying to do.. much simpler ..
After market, sale are some denser LT elastomers for those around 200#
When I bought my BiFri, they included them,,
color code: after grey then, blue, is black [what I use] and a purple
Elastomers with ST they're all black, for the varying rider weight densities,
no boot made for them, then your push plug thing may be useful ..
Sorry, but i have to respectfully disagree,...for where does the crudbuster add additional support to the hinging joints of the arms?

The additional cover protection to the outer bushing areas (with the addition of some nylon & steel washers), is much neater looking than a full logo drenched neoprene cover, IMHO. ("neater" as far as a "cleaner" looking install,....and well, just plain "neater" looking!
 )
)If we're talking strickly crud protection,.....the crudbuster works pretty well from what i hear. If they would provide these without all the cheezy logos i might even consider buying one!
(btw, the Thudbuster website now shows a crudbuster option available for the ST version)
Folks have still reported some side play developing over time, crudbuster installed or not. My adding substantial lateral support to the pivot areas does re-enforce these areas way beyond what the original 3 screws on each set of arms could ever do so alone.
When my Thudbuster LT 1st arrived, i was really impressed with the overall quality of construction. But in looking over the main hindging areas couldn't help but wonder if some of the reported sideplay developement issues (as minor as they seem to be), might be as a result of some sideways flexing of the seat while riding in rough areas or just over extented time periods.
Granted, some weight is added by using additional bolts, washers, and locking nuts,.....
......but i actually SAVED 320 grams by removing the gel seat cover i no longer need because of the suspension added by the TB. Believe me, i'm WAY ahead in the weight difference department!
Perhaps the TB'er folks reasoned additional support where i've added it is unnecessary for most riders, or the added cost and maintainance requirements beyond what most folks would want to do. But really, there are far more critical cleaning and adjustment areas on most bikes anyway, than having to service the areas i've added to.
......i suspect it was a combination of weight savings and price point considerations that dictated the manufacturer's decision to not do as i have done, as i would find it hard to believe they hadn't at least considered it.
Now, had they offered a "Lifetime" warrantee to these things instead of a year,......i think you'd see a similiar support structure!
Nope,...looks to be a great product as is,.....but i'm hoping to have eliminated any built in obsolenses factors made in manufacturing and assembly decisions!

One last point, i've read that polyurethane bushing manufacturers advise
to never use a petroleum based grease for poly bushing lubrication. (the Thudbuster elastomers are said to be made of a special blend of polyurethane on their website)
Polyurethane should only be lubricated with one specific type of grease to insure a long bushing life, and squeak-free performance. Silicone based synthetic water-proof grease, the white sticky stuff!
I have some silicone grease used in certain areas of my motorcycle brake caliper backing shim areas. It's a high heat rating,...although not necessary in this application. But that's what i used to lubricate the areas outline in the Thudbuster youtube video on changing/servicing your elastomers.
cheers,
Joe T
Last edited by joejeweler; 06-18-12 at 09:51 PM.

Thread
Thread Starter
Forum
Replies
Last Post
steppinthrax
Bicycle Mechanics
16
11-09-17 12:39 PM


