


New Hard Sided Panniers
 08-24-08, 05:38 PM
#1
Conservative Hippie
Thread Starter
Join Date: Mar 2005
Location: Wakulla Co. FL
Posts: 4,271
Mentioned: 0 Post(s)
Tagged: 0 Thread(s)
Quoted: 1 Post(s)
Likes: 0
Liked 0 Times
in
0 Posts
New Hard Sided Panniers
Being that my old panniers were beginning to fall apart, not weatherproof, generally unsatisfactory, and quality new panniers (like everything else cycling) are overpriced, I made my own.
Now that I have test flown them for a couple of weeks, and they work to my satisfaction, it's time to share.
Now part of this idea I did not plagiarize from one of our fellow forum members. I blatantly, outright, stole it. And I would be more than happy to give credit where credit is due, if I could only find that thread again. So if you see your ideas used here, sound off.
This photo shows the completed product.
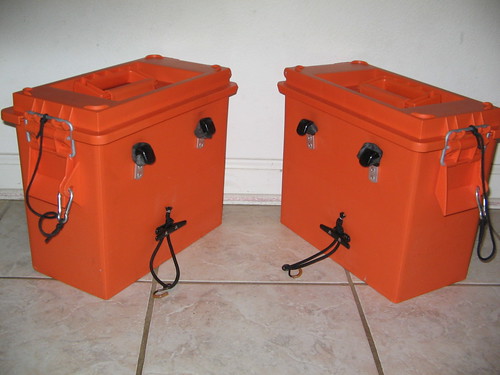
Using this box:
https://www.basspro.com/webapp/wcs/st..._SearchResults
The hooks, bungee and and retaining line for the latch clips came off my old panniers. The hooks are attached with 3/16"x3/16-1/4" grip range aluminum pop rivets, and backed with back-up plates. These are the shortest rivets I would use for this, slightly longer would also work.
The latch clips are to keep the boxes from popping open and scattering their contents all over the road in case I do a surface density test of the pavement.
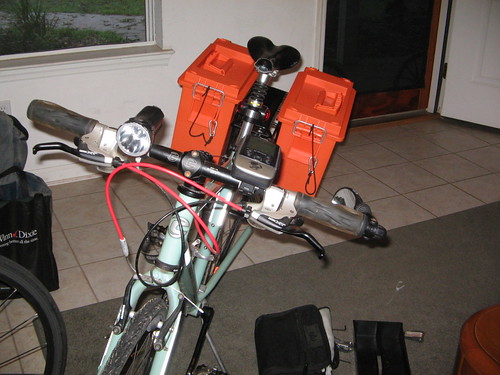
One on the bike.
Here you can see the rubber bands I made from an old inner tube around the hooks and rack to keep the panniers from bouncing off. A carryover from my old panniers. These clips from MEC would probably be better.
https://www.mec.ca/Products/product_d...=1219620918746
You can also see how the 3", nylon, open base, cleat mates with the rack to keep the box held in tight to the rack. I attached the cleats using stainless screws, flat washers and locking nuts. Although stainless probably wasn't necessary for this. Each nut has an oversized flat washer, followed by a smaller flat washer under it.
The bungy attaches through the hollow base of the cleat, held in place by a simple stopper knot.
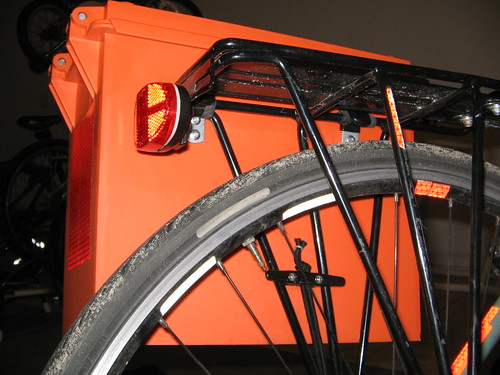
Rear view.

Showing the DOT C-2 reflective tape.
Front view.
The panniers are mounted so high so that the rivets don't interfere with the removable tray that goes in the top of these boxes.
They are mounted so high and far back on this bike to avoid heel strike when this rack and panniers are on my road bike.
Total cost was less than $20 apiece, $40 for the pair.
Now that I have test flown them for a couple of weeks, and they work to my satisfaction, it's time to share.
Now part of this idea I did not plagiarize from one of our fellow forum members. I blatantly, outright, stole it. And I would be more than happy to give credit where credit is due, if I could only find that thread again. So if you see your ideas used here, sound off.
This photo shows the completed product.
Using this box:
https://www.basspro.com/webapp/wcs/st..._SearchResults
The hooks, bungee and and retaining line for the latch clips came off my old panniers. The hooks are attached with 3/16"x3/16-1/4" grip range aluminum pop rivets, and backed with back-up plates. These are the shortest rivets I would use for this, slightly longer would also work.
The latch clips are to keep the boxes from popping open and scattering their contents all over the road in case I do a surface density test of the pavement.
One on the bike.
Here you can see the rubber bands I made from an old inner tube around the hooks and rack to keep the panniers from bouncing off. A carryover from my old panniers. These clips from MEC would probably be better.
https://www.mec.ca/Products/product_d...=1219620918746
You can also see how the 3", nylon, open base, cleat mates with the rack to keep the box held in tight to the rack. I attached the cleats using stainless screws, flat washers and locking nuts. Although stainless probably wasn't necessary for this. Each nut has an oversized flat washer, followed by a smaller flat washer under it.
The bungy attaches through the hollow base of the cleat, held in place by a simple stopper knot.
Rear view.
Showing the DOT C-2 reflective tape.
Front view.
The panniers are mounted so high so that the rivets don't interfere with the removable tray that goes in the top of these boxes.
They are mounted so high and far back on this bike to avoid heel strike when this rack and panniers are on my road bike.
Total cost was less than $20 apiece, $40 for the pair.
Last edited by CommuterRun; 08-24-08 at 05:45 PM.
 08-24-08, 06:39 PM
#2
Senior Member

Join Date: Jun 2008
Location: Atlanta
Posts: 2,978
Bikes: Cannondale T700s and a few others
Mentioned: 0 Post(s)
Tagged: 0 Thread(s)
Quoted: 4 Post(s)
Likes: 0
Liked 2 Times
in
2 Posts
Top notch! 
Is that the 15x8x10's?
I really like those. May have to build a set for rain days.
Is that the 15x8x10's?
I really like those. May have to build a set for rain days.


 08-24-08, 08:01 PM
#6
Bicycle Utopian

Join Date: Aug 2008
Location: Austin, TX
Posts: 787
Bikes: Bianchi Campione d'Italia, Softride Qualifier, Ritchey Breakaway Cyclocross
Mentioned: 0 Post(s)
Tagged: 0 Thread(s)
Quoted: 0 Post(s)
Likes: 0
Liked 0 Times
in
0 Posts
Even cheaper DIY option here with old kitty litter bins: https://www.crazyguyonabike.com/doc/Buckets.
Yours look much nicer and the container you chose has better utility. Good job.
Yours look much nicer and the container you chose has better utility. Good job.
08-24-08, 08:37 PM
#7
Senior Member
Join Date: Jun 2008
Location: Flint, MI
Posts: 100
Bikes: '12 C-dale HT; '89 C-dale sr300; Trek 820
Mentioned: 0 Post(s)
Tagged: 0 Thread(s)
Quoted: 0 Post(s)
Likes: 0
Liked 0 Times
in
0 Posts
Brilliant! It reminded me I have an old tackle box that would probably work as well.
08-24-08, 09:18 PM
#8
Senior Member
Join Date: Nov 2006
Location: Minneapolis
Posts: 174
Mentioned: 0 Post(s)
Tagged: 0 Thread(s)
Quoted: 0 Post(s)
Likes: 0
Liked 0 Times
in
0 Posts
CommuterRun,
Is this the thread you got the idea from? https://www.bikeforums.net/showthread...ghlight=drybox
Is this the thread you got the idea from? https://www.bikeforums.net/showthread...ghlight=drybox
08-24-08, 10:28 PM
#9
Conservative Hippie
Thread Starter
Join Date: Mar 2005
Location: Wakulla Co. FL
Posts: 4,271
Mentioned: 0 Post(s)
Tagged: 0 Thread(s)
Quoted: 1 Post(s)
Likes: 0
Liked 0 Times
in
0 Posts
That's it. It was you and jbabic I stole this idea from. Post #29, jbabic's reply to an earlier post you made sparked this idea. Thanks MNBiker. Thanks jbabic. 
Yes, Grim, it's the 15 x 8 x 11 1/2 size.
Yes, Grim, it's the 15 x 8 x 11 1/2 size.
Last edited by CommuterRun; 08-24-08 at 10:34 PM.
08-24-08, 10:58 PM
#10
totally louche

Join Date: Oct 2004
Location: A land that time forgot
Posts: 18,023
Bikes: the ever shifting stable loaded with comfortable road bikes and city and winter bikes
Mentioned: 0 Post(s)
Tagged: 0 Thread(s)
Quoted: 0 Post(s)
Likes: 0
Liked 10 Times
in
9 Posts
I've been field testing one from bikebins.com
https://www.bikebins.com/sitemap.html
Rixen and Kaul hooks, lockable lids.
yours are pretty schweet though, commuterrun.
https://www.bikebins.com/sitemap.html
Rixen and Kaul hooks, lockable lids.
yours are pretty schweet though, commuterrun.
Last edited by Bekologist; 08-25-08 at 12:27 AM.
08-25-08, 03:43 AM
#11
ol' Icebeard
Join Date: Jul 2008
Location: Cleveland, OH
Posts: 148
Bikes: Mercier Kilo WT-5
Mentioned: 0 Post(s)
Tagged: 0 Thread(s)
Quoted: 0 Post(s)
Likes: 0
Liked 0 Times
in
0 Posts
I use their other boxes as rack trunks for most of my daily commutes and secure them with a simple bungee.
I highly recommend the MEC pannier clips for security and bungee-free simplicity.
Great pics. One of these days I'll get pics of mine posted...
Best wishes.
P.S. By the way, the cheapest place I've found these boxes is at Northern Tool online. They now carry the orange as well as the olive in small and medium.
Last edited by jbabic; 08-25-08 at 03:46 AM.
08-25-08, 07:18 AM
#12
Scott

Join Date: Jun 2006
Posts: 2,393
Bikes: Too Many
Mentioned: 0 Post(s)
Tagged: 0 Thread(s)
Quoted: 1 Post(s)
Likes: 0
Liked 1 Time
in
1 Post
I used laundry detergent buckets.


1" angle aluminum with 4 #10 screws and fender washers used to mount the angle under the handle support lip and two long #10 screws acting as hooks. Note the #8 U nut, a #8 sheet metal screw run through it from inside the bucket prevents the bucket pannier from jumping off the rack when hitting a pot hole or other obstruction.
1" angle aluminum with 4 #10 screws and fender washers used to mount the angle under the handle support lip and two long #10 screws acting as hooks. Note the #8 U nut, a #8 sheet metal screw run through it from inside the bucket prevents the bucket pannier from jumping off the rack when hitting a pot hole or other obstruction.
08-25-08, 08:52 AM
#13
Life Is The Trip

Join Date: Aug 2008
Location: North Carolina
Posts: 23
Bikes: Surly - LHT
Mentioned: 0 Post(s)
Tagged: 0 Thread(s)
Quoted: 0 Post(s)
Likes: 0
Liked 0 Times
in
0 Posts
CommuterRun with you being in FL it may not get cold enough to make the plastic brittle , but here in the mountains of NC. and els were in the Mid-West, Northern parts of the USA, do you think that the plastic would hold up if cold to crash ? Is the plastic like ABS plastic ?
08-25-08, 09:07 AM
#14
Senior Member
Join Date: Jun 2008
Location: Western Chicagoland
Posts: 1,824
Mentioned: 0 Post(s)
Tagged: 0 Thread(s)
Quoted: 1 Post(s)
Liked 0 Times
in
0 Posts
I almost shelled out good cash for a panier that doubled as a cooler. I intended to haul iced down beverages, or haul ice to power my martini shaker. What I have seen has convinced me that I would just be better off to DIY with an old cooler. Thanks!
08-25-08, 12:11 PM
#15
ol' Icebeard
Join Date: Jul 2008
Location: Cleveland, OH
Posts: 148
Bikes: Mercier Kilo WT-5
Mentioned: 0 Post(s)
Tagged: 0 Thread(s)
Quoted: 0 Post(s)
Likes: 0
Liked 0 Times
in
0 Posts
CommuterRun with you being in FL it may not get cold enough to make the plastic brittle , but here in the mountains of NC. and els were in the Mid-West, Northern parts of the USA, do you think that the plastic would hold up if cold to crash ? Is the plastic like ABS plastic ?
I had some metal straps fail from corrosion and stress from carrying a heavy 12 volt 10 amp hour battery, but the box itself performed flawlessly. Hopefully my experience testifies to their toughness. No worries whatsoever about wet clothes or lunch. Salt stains wiped clean. No worries about salt-stained cloth panniers that *might* be waterproof.
These boxes are waterproof. I read one boater's review that they withstood submersion. May we never have that concern!
08-25-08, 07:27 PM
#16
Senior Member
Join Date: Aug 2008
Location: MN
Posts: 252
Bikes: Trek 800
Mentioned: 0 Post(s)
Tagged: 0 Thread(s)
Quoted: 0 Post(s)
Likes: 0
Liked 0 Times
in
0 Posts
Are there any issues with the reflective tape sticking to the plastic? I would think it would have a tendency to peel off after a while (weather / cold / heat / rain / snow)
08-25-08, 07:33 PM
#17

Humvee of bikes =Worksman

Join Date: May 2004
Posts: 5,362
Mentioned: 0 Post(s)
Tagged: 0 Thread(s)
Quoted: 10 Post(s)
Likes: 0
Liked 6 Times
in
6 Posts
Great solution found, and built, with a little "outside the box" thinking.
Well done!!
Well done!!
__________________
My preferred bicycle brand is.......WORKSMAN CYCLES
I dislike clipless pedals on any city bike since I feel they are unsafe.
Originally Posted by krazygluon
Steel: nearly a thousand years of metallurgical development
Aluminum: barely a hundred, which one would you rather have under your butt at 30mph?
08-25-08, 07:59 PM
#18
Junior Member
Join Date: Mar 2008
Posts: 105
Mentioned: 0 Post(s)
Tagged: 0 Thread(s)
Quoted: 0 Post(s)
Likes: 0
Liked 6 Times
in
1 Post
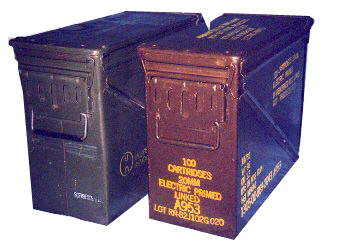
Now it looks like you can mount a 50 caliber machine gun on that rack and have plenty of ammunition for cycling away from zombies.
Actually that gives me an idea for some great panniers.
Actually that gives me an idea for some great panniers.
08-26-08, 09:12 AM
#19
Clydesdale On Wheels
Join Date: Jun 2008
Location: Richardson, Texas
Posts: 24
Mentioned: 0 Post(s)
Tagged: 0 Thread(s)
Quoted: 0 Post(s)
Likes: 0
Liked 0 Times
in
0 Posts
Terrific idea & execution. My hat is off to you.
Why do I have a visual of you rolling down the street, martini glass in one hand, appreciating life?
Also, some washboard pavement could pre-shake your martinis.
Also, some washboard pavement could pre-shake your martinis.
08-26-08, 02:16 PM
#20
Senior Member
Join Date: Oct 2007
Location: PaGrove
Posts: 88
Bikes: '07 Giant Talon, '08 Bike Friday Pocket Rocket 16
Mentioned: 0 Post(s)
Tagged: 0 Thread(s)
Quoted: 0 Post(s)
Likes: 0
Liked 0 Times
in
0 Posts
they look really nice & tough. the color would have to increase your visibility to drivers too. just curious, why did you decide to use rivets instead of nuts & bolts?
08-26-08, 03:31 PM
#21
Senior Member
Join Date: Aug 2008
Location: MN
Posts: 252
Bikes: Trek 800
Mentioned: 0 Post(s)
Tagged: 0 Thread(s)
Quoted: 0 Post(s)
Likes: 0
Liked 0 Times
in
0 Posts
The three reasons I can think of to use rivets would be
1. You don't have to worry about the nut coming loose.
2. The rivets don't stick out into the case like a nut and bolt would reducing the risk of damage to the contents.
3 It gives it a cleaner look. (looks like you know what you were doing)
1. You don't have to worry about the nut coming loose.
2. The rivets don't stick out into the case like a nut and bolt would reducing the risk of damage to the contents.
3 It gives it a cleaner look. (looks like you know what you were doing)
08-26-08, 05:17 PM
#22
Conservative Hippie
Thread Starter
Join Date: Mar 2005
Location: Wakulla Co. FL
Posts: 4,271
Mentioned: 0 Post(s)
Tagged: 0 Thread(s)
Quoted: 1 Post(s)
Likes: 0
Liked 0 Times
in
0 Posts
And
4. I've been looking for an excuse to buy a better pop rivet tool.
Thanks for the positive replies, folks.
I doubt that I will likely have a chance to find out how these boxes hold up to real cold. The coldest I have ridden here is in the mid-teens, which as cold as it got the last two winters.
That's a good looking box, Bek. Much more aero than mine, which is quite literally a box. One thing I forgot to mention, though. One of the criteria for the boxes I chose was that my Bell Metro helmet would fit inside. And it does, although a little tightly, with room to spare. The BikeBins look great, but too narrow for that. I could be wrong just looking at a picture.
Could you post a picture of the Rixen and Kaul hooks? I'm not familiar with that term. Thanks.
When I was putting these together I was sitting in the living room one Saturday morning. Measuring, marking, measuring, erasing, measuring, marking, math, erase, measure, mark, erase, math.....
Wife: "What are you doing?"
CR: "Trying to get this right the first time so I don't have a box with 15 holes in it."
Wife: "You need help."
CR: "No thanks, I can manage."
Last edited by CommuterRun; 08-26-08 at 05:29 PM.
08-26-08, 05:37 PM
#23
Conservative Hippie
Thread Starter
Join Date: Mar 2005
Location: Wakulla Co. FL
Posts: 4,271
Mentioned: 0 Post(s)
Tagged: 0 Thread(s)
Quoted: 1 Post(s)
Likes: 0
Liked 0 Times
in
0 Posts
Oh yes, Brokenknee, sorry, almost forgot your question.
No, no problems with the reflective tape peeling off yet. Before application of the tape I did wipe that area down with mineral spirits, followed by rubbing alcohol and allowed to dry.
No, no problems with the reflective tape peeling off yet. Before application of the tape I did wipe that area down with mineral spirits, followed by rubbing alcohol and allowed to dry.
09-05-08, 07:38 PM
#24
Caffeinated.
Join Date: Aug 2004
Location: Waltham, MA
Posts: 1,541
Bikes: Waterford 1900, Quintana Roo Borrego, Trek 8700zx, Bianchi Pista Concept
Mentioned: 0 Post(s)
Tagged: 0 Thread(s)
Quoted: 0 Post(s)
Likes: 0
Liked 1 Time
in
1 Post
Nice.
I'd imagine using strong boxes/bins as panniers would also give you an option for a camp stool/minitable/ etc etc.
I'd imagine using strong boxes/bins as panniers would also give you an option for a camp stool/minitable/ etc etc.
05-06-09, 07:44 PM
#25
Senior Member
Join Date: May 2008
Location: New England
Posts: 324
Bikes: 2020 Fuji Bighorn 1.3, 2005 LeMond Buenos Aires, 2013 Jamis Coda Elite
Mentioned: 0 Post(s)
Tagged: 0 Thread(s)
Quoted: 3 Post(s)
Liked 0 Times
in
0 Posts
I know this is an old thread, but I just came across a link from another thread and wanted to say that your panniers look beautiful. It helps that orange is one of my favorite colors 
Being that my old panniers were beginning to fall apart, not weatherproof, generally unsatisfactory, and quality new panniers (like everything else cycling) are overpriced, I made my own.
Now that I have test flown them for a couple of weeks, and they work to my satisfaction, it's time to share.
Now part of this idea I did not plagiarize from one of our fellow forum members. I blatantly, outright, stole it. And I would be more than happy to give credit where credit is due, if I could only find that thread again. So if you see your ideas used here, sound off.
This photo shows the completed product.
Using this box:
https://www.basspro.com/webapp/wcs/st..._SearchResults
The hooks, bungee and and retaining line for the latch clips came off my old panniers. The hooks are attached with 3/16"x3/16-1/4" grip range aluminum pop rivets, and backed with back-up plates. These are the shortest rivets I would use for this, slightly longer would also work.
The latch clips are to keep the boxes from popping open and scattering their contents all over the road in case I do a surface density test of the pavement.
One on the bike.
Here you can see the rubber bands I made from an old inner tube around the hooks and rack to keep the panniers from bouncing off. A carryover from my old panniers. These clips from MEC would probably be better.
https://www.mec.ca/Products/product_d...=1219620918746
You can also see how the 3", nylon, open base, cleat mates with the rack to keep the box held in tight to the rack. I attached the cleats using stainless screws, flat washers and locking nuts. Although stainless probably wasn't necessary for this. Each nut has an oversized flat washer, followed by a smaller flat washer under it.
The bungy attaches through the hollow base of the cleat, held in place by a simple stopper knot.
Rear view.
Showing the DOT C-2 reflective tape.
Front view.
The panniers are mounted so high so that the rivets don't interfere with the removable tray that goes in the top of these boxes.
They are mounted so high and far back on this bike to avoid heel strike when this rack and panniers are on my road bike.
Total cost was less than $20 apiece, $40 for the pair.