


There must be something in the Breeze
 09-18-06, 10:46 PM
#1

Dropped
Thread Starter

There must be something in the Breeze
I'm finally living up to my name. The junkers keep finding me.
Picked up a '66 Schwinn Breeze today for $4. It's in great shape, actually. Since my search for a decent vintage road bike has yielded no tangible results (well, except for the Varsity Little Darwin kidnapped from me), I've decided I need a project to keep me busy and something on which to spend my meager allowance. So, I've decided to do a poor man's restoration (refurbishment?) on it.
I figure $50 can get me tires, tubes, cables, etc. Some elbow grease can get the bike a little cleaner. I'd also like to prep the inside of the frame to inhibit any internal rust (you can get into the tubes of an EF Schwinn with some stabilizer, right?) I'll also repack all bearings - which I'm sure will yield pitted cones and races, driving my cost up. Finally - and the real reason I picked this up - I'll disassemble/clean/inspect the Sturmey AW hub.
If anyone has any advice, warnings or insults - please, feel free.
I do have one specific question. I'd like, if at all possible, to use the existing Weinmann brakes. But how in God's name do you adjust them? My guess is, the springs no longer have even tension, but I thought maybe there were some tricks to use to get them at least moderately centered on the wheel? Are these things pure crap? Should I just suck it up and replace them with something better? If so, what?
Also, if I stick with the Weinmann's, does anyone have suggestions for compatible brake shoes that would work well on the S-5 crome rims?
I'll be sure to post some pics soon. And when I encounter problems, I'll be sure to share them with you!
 09-19-06, 06:59 AM
#2
Dropped
Thread Starter
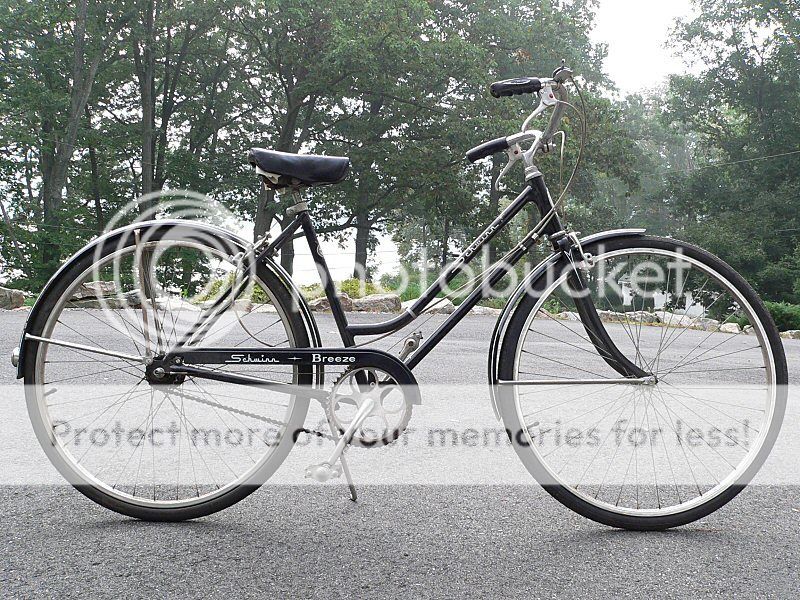
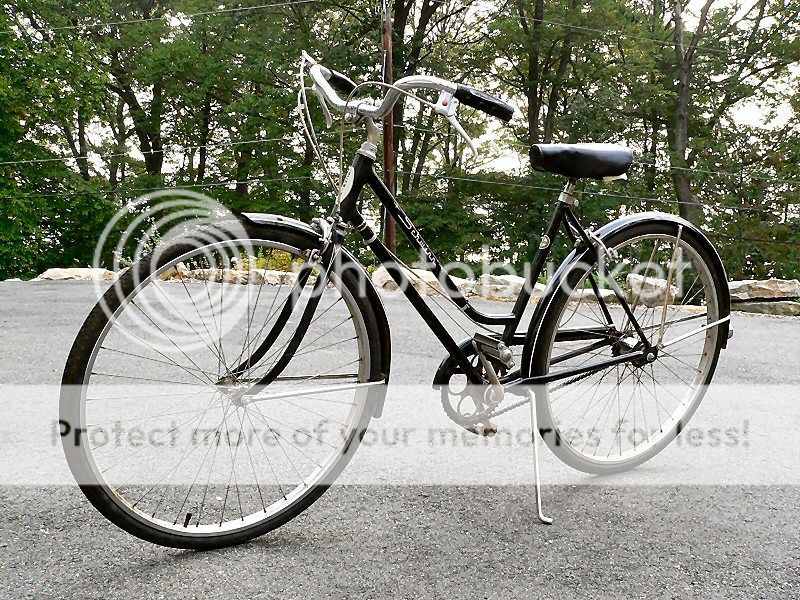
Here she is, my electro-forged bride in the morning light:
09-19-06, 07:21 AM
#3
Senior Member

Join Date: Jun 2006
Location: Denver, CO
Posts: 1,358
Bikes: March [B]'71 Schwinn Sports Tourer [/B] [B]
Mentioned: 0 Post(s)
Tagged: 0 Thread(s)
Quoted: 5 Post(s)
Likes: 0
Liked 5 Times
in
5 Posts
What a beautiful Schwinn! I think that's the finest $4 purchase I've ever seen
09-19-06, 07:51 AM
#4
Chrome Freak

Join Date: Dec 2005
Location: Kuna, ID
Posts: 3,208
Bikes: 71 Chrome Paramount P13-9, 73 Opaque Blue Paramount P15, 74 Blue Mink Raleigh Pro, 91 Waterford Paramount, Holland Titanium x2
Mentioned: 1 Post(s)
Tagged: 0 Thread(s)
Quoted: 4 Post(s)
Likes: 0
Liked 26 Times
in
14 Posts
Most of the chrome is in really nice shape. That should be an easy restoration!
__________________
1971 Paramount P-13 Chrome
1973 Paramount P-15 Opaque Blue
1974 Raleigh Professional Blue Mink
1991 Waterford Paramount
Holland Titanium Dura Ace Group
Holland Titanium Ultegra Triple Group
1971 Paramount P-13 Chrome
1973 Paramount P-15 Opaque Blue
1974 Raleigh Professional Blue Mink
1991 Waterford Paramount
Holland Titanium Dura Ace Group
Holland Titanium Ultegra Triple Group
09-19-06, 09:16 AM
#5
Senior Member

The springs should have "some" tension left. Are you certain it's not the cables hanging up in the housings?
I would recommend new housings and cables. and then make absolutely certain the center of the spring is sitting at a right angle to the rim. Most centering problems I've run into have been the cause of a crooked spring. The best way I have found is to disassemble the calipers, and tighten the mounting shaft with the spring completely straight in the slot. grease the pivot points with a light grease, and reassemble them.
If all else fails, you can run with the mounting shaft a tiny bit loose. Or, with the caliper assembled, hold the spring block centered with a pair of needle nose vise grips, and tighten the rear nut. I have found even the oldest Weinmanns can be put back into service with a little TLC. Make sure the caliper arms aren't squeezed too hard onto the shaft. Tighten the nut just enough to keep them from moving forward, and then tighten the locknut like you would a hub cone. While you have them apart, grab a little aluminum polish and shine the arms up. With very little work they'll look brand new.
BTW:That is a BEAUTIFUL bike. I would blow it completely apart, rebuild the hubs and headset, shine the paint up with some cleaner wax, clean the chrome, and reassemble. It will look very close to new with some elbow grease and polish. Leave the decals alone though!! They will wear off if you even look at them with a polish rag in your hand, lol.,,,,BD
$4? Amazing!
__________________
So many bikes, so little dime.
So many bikes, so little dime.
09-19-06, 09:22 AM
#6
Senior Member
For brake shoes, sheldon brown sells some salmon color brake shoes. Or, visit your local shop and pick up some Jagwire shoes. from my experience they stop a bike like yesterday. In other words, keep a firm hold on the grips, hehe. You can also tweak the caliper arms
to toe the shoes in. Just slip a small crescent wrench and ever so gently bend them in. Don't overdo it though. I wouldn't recommend bending them more than once. One direction only. If you go too far and try to bend them back, it could fatigue them to point of breakage. Of course it would happen at the worst possible time.,,,,BD
to toe the shoes in. Just slip a small crescent wrench and ever so gently bend them in. Don't overdo it though. I wouldn't recommend bending them more than once. One direction only. If you go too far and try to bend them back, it could fatigue them to point of breakage. Of course it would happen at the worst possible time.,,,,BD
__________________
So many bikes, so little dime.
So many bikes, so little dime.
Last edited by Bikedued; 09-19-06 at 09:32 AM.
09-19-06, 10:27 AM
#7
Dropped
Thread Starter
Bikedued,
Thanks for the mini tutorial. Very helpful. I'm planning on doing exactly what you said - stripping the bike down to it's frame, overhauling bearings, and cleaning it up. So, I'll use your advice when I get to the rebuild part. The brake calipers work wonderfully (and they're only 40 years old!), they are simply not centered. The brake shoes on the other hand ...
I was thinking of Kool stops, though the prices on some are a bit high. But, I was also slightly confused about the fit. It looks like the Continentals or Eagle 2's would be compatible?
Also, I was thinking of clearcoating the frame myself. I've read a bit about DIY paint jobs, and I know I could end up making it look worse than it originally was, unless I'm very patient and apply many, many light coats. Or maybe a paint shop would do a clearcoat on a frame for cheap.
Anyway, my first endeavor will be inspecting/cleaning the hub. I just need to find a vice.
Thanks for the mini tutorial. Very helpful. I'm planning on doing exactly what you said - stripping the bike down to it's frame, overhauling bearings, and cleaning it up. So, I'll use your advice when I get to the rebuild part. The brake calipers work wonderfully (and they're only 40 years old!), they are simply not centered. The brake shoes on the other hand ...
Originally Posted by Bikedued
For brake shoes, sheldon brown sells some salmon color brake shoes.
Also, I was thinking of clearcoating the frame myself. I've read a bit about DIY paint jobs, and I know I could end up making it look worse than it originally was, unless I'm very patient and apply many, many light coats. Or maybe a paint shop would do a clearcoat on a frame for cheap.
Anyway, my first endeavor will be inspecting/cleaning the hub. I just need to find a vice.
09-20-06, 10:05 AM
#9
Senior Member

I found an old Raleigh with those same brake issues and I just squeezed a bit of grease down into the cable housings and voila they were like new. Nice find, black and chrome works so well together.
09-20-06, 04:34 PM
#10
\,,/(^_^)\,,/

Join Date: Sep 2003
Location: Minneapolis, MN
Posts: 869
Bikes: Surly 1x1 Xtracycle, '01 Haro Flair Dave Mirra
Mentioned: 0 Post(s)
Tagged: 0 Thread(s)
Quoted: 0 Post(s)
Likes: 0
Liked 0 Times
in
0 Posts
Originally Posted by JunkYardBike
Finally - and the real reason I picked this up - I'll disassemble/clean/inspect the Sturmey AW hub.
If anyone has any advice, warnings or insults - please, feel free.
If anyone has any advice, warnings or insults - please, feel free.
(or have your digital camera ready and take photos as you go!)
Good luck
__________________
You know you're getting old when you look at a beautiful 19-year-old girl and you find yourself thinking, "Gee, I wonder what her mother looks like?"
You know you're getting old when you look at a beautiful 19-year-old girl and you find yourself thinking, "Gee, I wonder what her mother looks like?"
09-20-06, 05:01 PM
#11

www.theheadbadge.com

Join Date: Sep 2005
Location: Southern Florida
Posts: 28,510
Bikes: https://www.theheadbadge.com
Mentioned: 124 Post(s)
Tagged: 0 Thread(s)
Quoted: 2420 Post(s)
Liked 4,381 Times
in
2,090 Posts
Originally Posted by JunkYardBike
I was thinking of Kool stops, though the prices on some are a bit high. But, I was also slightly confused about the fit. It looks like the Continentals or Eagle 2's would be compatible?
Also, I was thinking of clearcoating the frame myself. I've read a bit about DIY paint jobs, and I know I could end up making it look worse than it originally was, unless I'm very patient and apply many, many light coats. Or maybe a paint shop would do a clearcoat on a frame for cheap.
Also, I was thinking of clearcoating the frame myself. I've read a bit about DIY paint jobs, and I know I could end up making it look worse than it originally was, unless I'm very patient and apply many, many light coats. Or maybe a paint shop would do a clearcoat on a frame for cheap.
Do NOT clearcoat that frame - the clear will run, and ruin the finish. No need to do so anyway - after all, that paint has lasted since 1966 in pretty much mint condition (wax it and you'll see), why bother to improve on something perfect? Wax AROUND the decals as mentioned here before.
Take care,
-Kurt
__________________


09-20-06, 05:17 PM
#12

The Improbable Bulk

Join Date: Jul 2005
Location: Wilkes-Barre, PA
Posts: 8,379
Bikes: Many
Mentioned: 0 Post(s)
Tagged: 0 Thread(s)
Quoted: 5 Post(s)
Likes: 0
Liked 7 Times
in
7 Posts
Don't hesitate to take the brakes apart and clean them. I have done that on some center pulls, and sidepulls, they are pretty easy as long as you pay attention to what goes where.
When I do it, I also lube all the pivots with a teflon based lube. I guess grease would work too. It is amazing what a good cleaning and lube will do for the smooth operation of the brakes.
If you are even thinking of taking apart the 3 speed hub, you should be very confident in knowing how much simpler the brakes are. The sping can be pulled off of the studs that ension the brakes with pliers, and removing the tension should be your first step... re-applying the tension should be one of the last things...
If you have problems, let us know here, and we can help you out.
__________________
Slow Ride Cyclists of NEPA
People do not seem to realize that their opinion of the world is also a confession of character.
- Ralph Waldo Emerson
Slow Ride Cyclists of NEPA
People do not seem to realize that their opinion of the world is also a confession of character.
- Ralph Waldo Emerson
09-20-06, 05:31 PM
#13
Ferrous wheel
Join Date: Apr 2005
Location: New Orleans
Posts: 1,388
Bikes: 2004 Gunnar Rock Hound MTB; 1988 Gitane Team Pro road bike; 1986-ish Raleigh USA Grand Prix; mid-'80s Univega Gran Tourismo with Xtracycle Free Radical
Mentioned: 0 Post(s)
Tagged: 0 Thread(s)
Quoted: 0 Post(s)
Likes: 0
Liked 0 Times
in
0 Posts
There's no harm in taking it apart, of course, and they are pretty cool to look at, but I'd be surprised if the AW needed anything other than a squirt of oil -- if that. I'd open it up only if it was not functioning correctly.
09-20-06, 07:32 PM
#14
Senior Member
Join Date: Mar 2005
Location: The 'Burbs
Posts: 387
Bikes: ' 96 Trek 830 Mountain Track,'74 Schwinn Suburban, '74-ish Fuji Dynamic 10, '73 Schwinn Varsity,'73 Schwinn Breeze, '94 Schwinn Sidewinder. First Schwinn was a '74 Schwinn 24 inch Varsity in Lime Green, and previously owned a '74 Schwinn Breeze
Mentioned: 0 Post(s)
Tagged: 0 Thread(s)
Quoted: 0 Post(s)
Likes: 0
Liked 3 Times
in
3 Posts
That is a FABULOUS bike! Of course, I love the Schwinn Breeze, but regardless, what a great bike, especially when you see that you got it for $4!!!! My baby is a"73 in Campus Green Breeze, single speed with Bendix coaster brake, and she's fabulous, too! Good luck with the restoration! You will love the smooth, relaxed ride that you get with her!
Last edited by DynamicD74; 09-20-06 at 07:42 PM.
09-21-06, 09:37 AM
#15
Dropped
Thread Starter
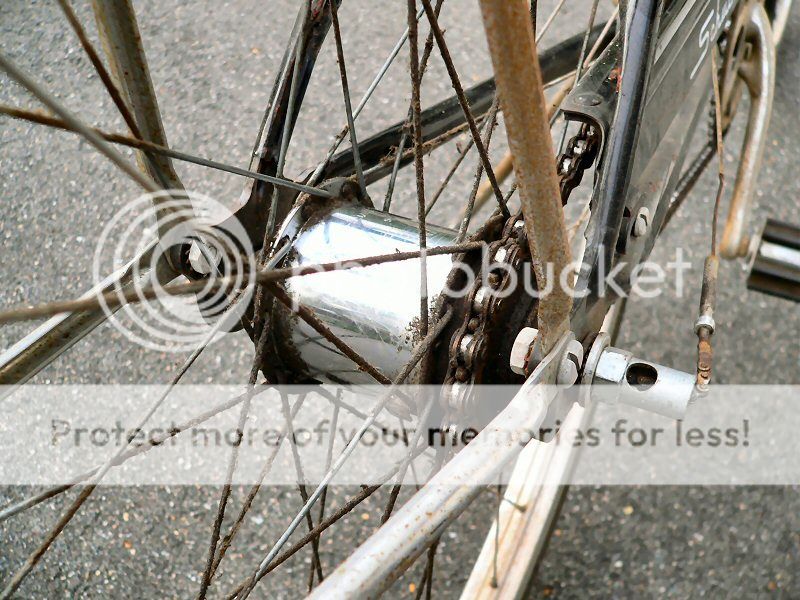
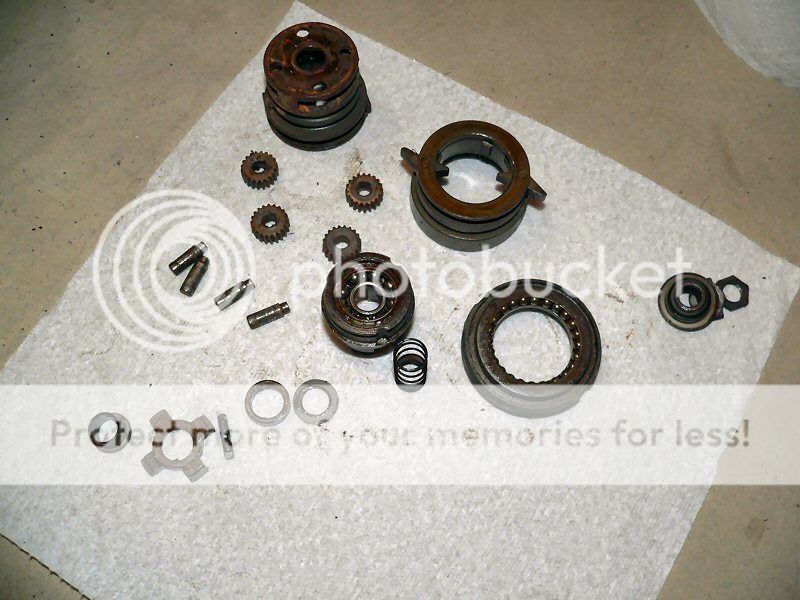
Well, here's the mess I've made of the hub (some parts missing from photo). The gears, pawls, etc. are all in great shape with no visible wear at all. All parts were covered in aged oil turned to syrup. The pawls were sticking, so I'm glad I opened it. The only parts that need replacement are the bearing balls.
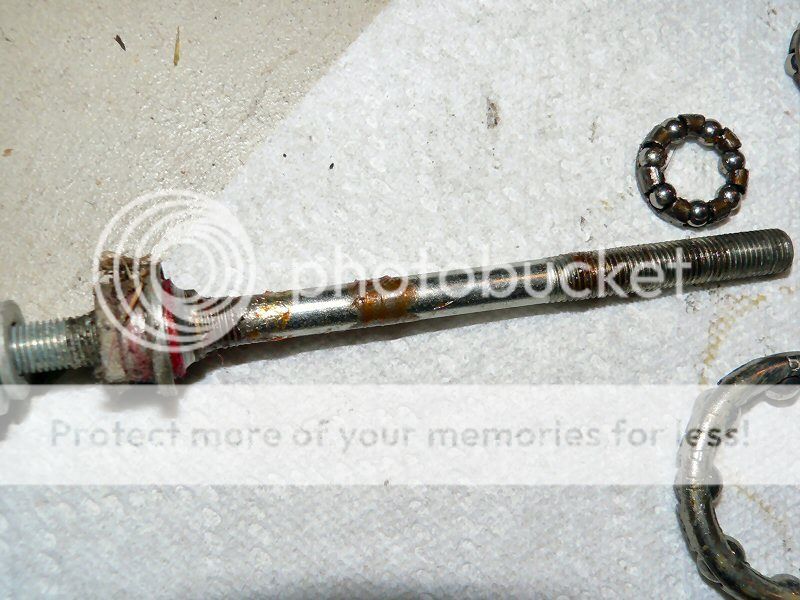
Here's a photo of the front axle. The grease is still clear! This bike looks like it was hardly used. The rear cones probably need replacement, but the fronts have no pitting, and only minor wear. Since it's open though, I probably should replace all cones. Most of the cups look to be in good shape.
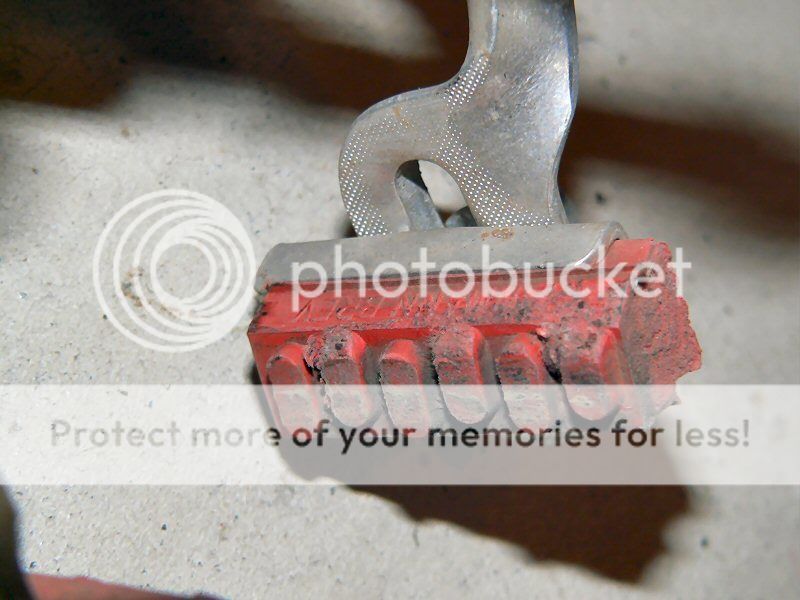
Here's a brake shoe. It's probably original, but doesn't have the "X" pattern cudak888 mentioned. If these were rubber at one time, they've fossilized. They feel like plastic.
Here's a bearing retainer from the bottom bracket (which incidentally has absolutely no internal rust!). Grease is still clean. I've read about how the Schwinns were completely, or almost completely built in the Schwinn factories. But even the bearing retainers?!?!
This leads me to a question. Should I be searching for bearing retainers with the bearing balls, or should I simply replace the balls and use the existing retainers? I think it would be neat to resuse the Schwinn retainers, and I'm not sure what grade balls a new retainer would come equipped with. I'd like to get 25 grade. I've reused retainers before, but does this procedure scratch the bearing balls?

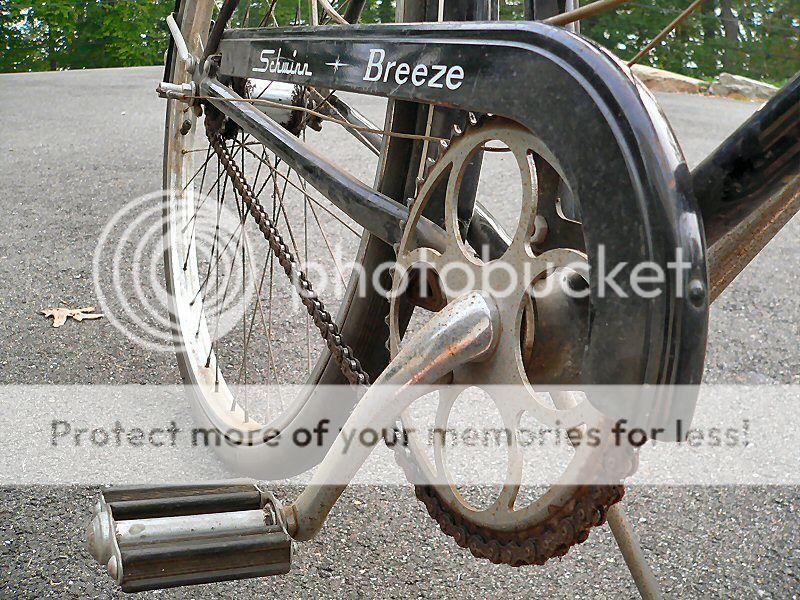
Finally, about the comments on the paint. While it is in very good condition, I think the photos make it look much nicer than it is. There are many scratches, especially on the top tube, a few chips and gouges and some rusting, especially on the chainstays. The fenders, which are not chrome though they may appear to be in the photo, have small dents and quite a bit of surface scratching and rust. My idea to clearcoat was first to preserve the existing paint, but also to seal the areas that are rusting (after cleaning them of course). It just seems there is too much to do with touch up paint, and I don't want to make a mess of it.
Here's a photo of the front axle. The grease is still clear! This bike looks like it was hardly used. The rear cones probably need replacement, but the fronts have no pitting, and only minor wear. Since it's open though, I probably should replace all cones. Most of the cups look to be in good shape.
Here's a brake shoe. It's probably original, but doesn't have the "X" pattern cudak888 mentioned. If these were rubber at one time, they've fossilized. They feel like plastic.
Here's a bearing retainer from the bottom bracket (which incidentally has absolutely no internal rust!). Grease is still clean. I've read about how the Schwinns were completely, or almost completely built in the Schwinn factories. But even the bearing retainers?!?!
This leads me to a question. Should I be searching for bearing retainers with the bearing balls, or should I simply replace the balls and use the existing retainers? I think it would be neat to resuse the Schwinn retainers, and I'm not sure what grade balls a new retainer would come equipped with. I'd like to get 25 grade. I've reused retainers before, but does this procedure scratch the bearing balls?
Finally, about the comments on the paint. While it is in very good condition, I think the photos make it look much nicer than it is. There are many scratches, especially on the top tube, a few chips and gouges and some rusting, especially on the chainstays. The fenders, which are not chrome though they may appear to be in the photo, have small dents and quite a bit of surface scratching and rust. My idea to clearcoat was first to preserve the existing paint, but also to seal the areas that are rusting (after cleaning them of course). It just seems there is too much to do with touch up paint, and I don't want to make a mess of it.
09-21-06, 09:40 AM
#16
Dropped
Thread Starter
Oh, one more thing. How is the handlebar stem attached to the fork? I've removed the bolt running through the stem, but the fork and stem remain mated. I sprayed some WD-40 inside the head tube, but I can't budge the stem or fork.
09-21-06, 09:53 AM
#17
The Improbable Bulk
Join Date: Jul 2005
Location: Wilkes-Barre, PA
Posts: 8,379
Bikes: Many
Mentioned: 0 Post(s)
Tagged: 0 Thread(s)
Quoted: 5 Post(s)
Likes: 0
Liked 7 Times
in
7 Posts
First, hit the top of the stem with a rubber mallet and see if you can shake it loose. You are on the right track, after loosening the bolt it should just come out.
Second, in replacing the BB bearings, the retainer is simply to help retain the bearings for easy installation, so replacing the balls shouldn't be an issue. You can also dump the retainer and increase the number of balls for an even smoother BB... just harder to install.
If you do use the existing retainers, based on my guesses only, you won't scratch the bearings, especially if you do get a good grade of bearing which is much harder than the retainer.
__________________
Slow Ride Cyclists of NEPA
People do not seem to realize that their opinion of the world is also a confession of character.
- Ralph Waldo Emerson
Slow Ride Cyclists of NEPA
People do not seem to realize that their opinion of the world is also a confession of character.
- Ralph Waldo Emerson
09-21-06, 10:42 AM
#18
www.theheadbadge.com
Join Date: Sep 2005
Location: Southern Florida
Posts: 28,510
Bikes: https://www.theheadbadge.com
Mentioned: 124 Post(s)
Tagged: 0 Thread(s)
Quoted: 2420 Post(s)
Liked 4,381 Times
in
2,090 Posts
Originally Posted by JunkYardBike
Here's a brake shoe. It's probably original, but doesn't have the "X" pattern cudak888 mentioned. If these were rubber at one time, they've fossilized. They feel like plastic.
The "X" pattern Weinmann brake pads I was referring to was a different design that Weinmann produced - I mentioned it only as it so happens that one of the better aftermarket pads available out there features the same pattern. (Not to be confused with the current "X" pattern variant under the Pyramid name).
Originally Posted by JunkYardBike
This leads me to a question. Should I be searching for bearing retainers with the bearing balls, or should I simply replace the balls and use the existing retainers?
Originally Posted by JunkYardBike
Finally, about the comments on the paint. While it is in very good condition, I think the photos make it look much nicer than it is. There are many scratches, especially on the top tube, a few chips and gouges and some rusting, especially on the chainstays. The fenders, which are not chrome though they may appear to be in the photo, have small dents and quite a bit of surface scratching and rust. My idea to clearcoat was first to preserve the existing paint, but also to seal the areas that are rusting (after cleaning them of course). It just seems there is too much to do with touch up paint, and I don't want to make a mess of it.
For the record, I have not used phosphoric acid or touchup paint on my Continental, and not one of the rust spots have caused any issues.
Take care,
-Kurt
__________________
09-21-06, 11:49 AM
#19
Non Tribuo Anus Rodentum and off to the next adventure (RIP)

Join Date: Dec 2002
Posts: 9,161
Mentioned: 0 Post(s)
Tagged: 0 Thread(s)
Quoted: 1 Post(s)
Likes: 0
Liked 2 Times
in
2 Posts
JYB, got to a BMW motorcycle dealer, get a tube of their Schwartz(sp)/Black touch-up paint for the early Boxers. This is premium Glasurit paint and should match exactly. You can fill in the chips and buff it smothe. Do your trials in an inconspicous place, Jumping on the band wagon... Don't clearcoat!
__________________

09-21-06, 01:02 PM
#20
Senior Member
Join Date: Mar 2005
Location: The 'Burbs
Posts: 387
Bikes: ' 96 Trek 830 Mountain Track,'74 Schwinn Suburban, '74-ish Fuji Dynamic 10, '73 Schwinn Varsity,'73 Schwinn Breeze, '94 Schwinn Sidewinder. First Schwinn was a '74 Schwinn 24 inch Varsity in Lime Green, and previously owned a '74 Schwinn Breeze
Mentioned: 0 Post(s)
Tagged: 0 Thread(s)
Quoted: 0 Post(s)
Likes: 0
Liked 3 Times
in
3 Posts
See, your Schwinn Breeze is even beautiful on the inside! What more could you ask for? (LOL!) Enjoy!
Enjoy!
09-21-06, 01:17 PM
#21
Senior Member
Join Date: Mar 2005
Location: The 'Burbs
Posts: 387
Bikes: ' 96 Trek 830 Mountain Track,'74 Schwinn Suburban, '74-ish Fuji Dynamic 10, '73 Schwinn Varsity,'73 Schwinn Breeze, '94 Schwinn Sidewinder. First Schwinn was a '74 Schwinn 24 inch Varsity in Lime Green, and previously owned a '74 Schwinn Breeze
Mentioned: 0 Post(s)
Tagged: 0 Thread(s)
Quoted: 0 Post(s)
Likes: 0
Liked 3 Times
in
3 Posts
This is my 1973 Schwinn Breeze in Campus Green. She is a single speed, coaster brake bicycle. She is in great shape, except for the usual scratches a bike only 9 years younger than me would have. ( I have many more dings than she does!  ) Anyway, here are some pics, including one of the Bendix Coaster Brake Arm. I have added the NOS Schwinn reflectors. The package said 1974, so I figure it's an upgrade. Personally, I think they look great! I've also added a bell and the basket, which I only plan to put on it when I need it. And, the last pic is of her 1973 license plate that shows where I wish I was riding my Breeze!
) Anyway, here are some pics, including one of the Bendix Coaster Brake Arm. I have added the NOS Schwinn reflectors. The package said 1974, so I figure it's an upgrade. Personally, I think they look great! I've also added a bell and the basket, which I only plan to put on it when I need it. And, the last pic is of her 1973 license plate that shows where I wish I was riding my Breeze!
09-21-06, 07:18 PM
#22
Dropped
Thread Starter
Originally Posted by Little Darwin
First, hit the top of the stem with a rubber mallet and see if you can shake it loose. You are on the right track, after loosening the bolt it should just come out.
Originally Posted by cudak888
I re-used the original retainer AND bearing balls when I refurbished my 1971 Schwinn Continental
Oh, and I promise, I won't clearcoat it.
Originally Posted by Stacey
JYB, got to a BMW motorcycle dealer, get a tube of their Schwartz(sp)/Black touch-up paint for the early Boxers.
Originally Posted by DynamicD74
This is my 1973 Schwinn Breeze in Campus Green.
09-21-06, 07:23 PM
#23
Dropped
Thread Starter
Harris Cyclery has cones for the Sturmey hub, but does anyone know where I can find cones for the front Schwinn 200 hub? I've searched the internet and come up empty. There is no pitting on these cones, but there is a noticeable groove along the bearing ball path. I'm thinking of reusing them, but it seems foolish to install new bearing balls one a worn cone.
09-21-06, 10:36 PM
#25
Senior Member

Join Date: Oct 2004
Location: NYC
Posts: 2,124
Bikes: All 70s and 80s, only steel.
Mentioned: 0 Post(s)
Tagged: 0 Thread(s)
Quoted: 2 Post(s)
Likes: 0
Liked 2 Times
in
2 Posts
I think a groove's fine, as long as there's no pitting. I'd just go ahead and throw those bearings in.