


My first wheel build
 09-01-07, 08:34 PM
#1
just keep riding
Thread Starter
Join Date: Feb 2005
Location: Milledgeville, Georgia
Posts: 13,560
Bikes: 2018 Black Mountain Cycles MCD,2017 Advocate Cycles Seldom Seen Drop Bar, 2017 Niner Jet 9 Alloy, 2015 Zukas custom road, 2003 KHS Milano Tandem, 1986 Nishiki Cadence rigid MTB, 1980ish Fuji S-12S
Mentioned: 15 Post(s)
Tagged: 0 Thread(s)
Quoted: 173 Post(s)
Liked 33 Times
in
22 Posts
My first wheel build
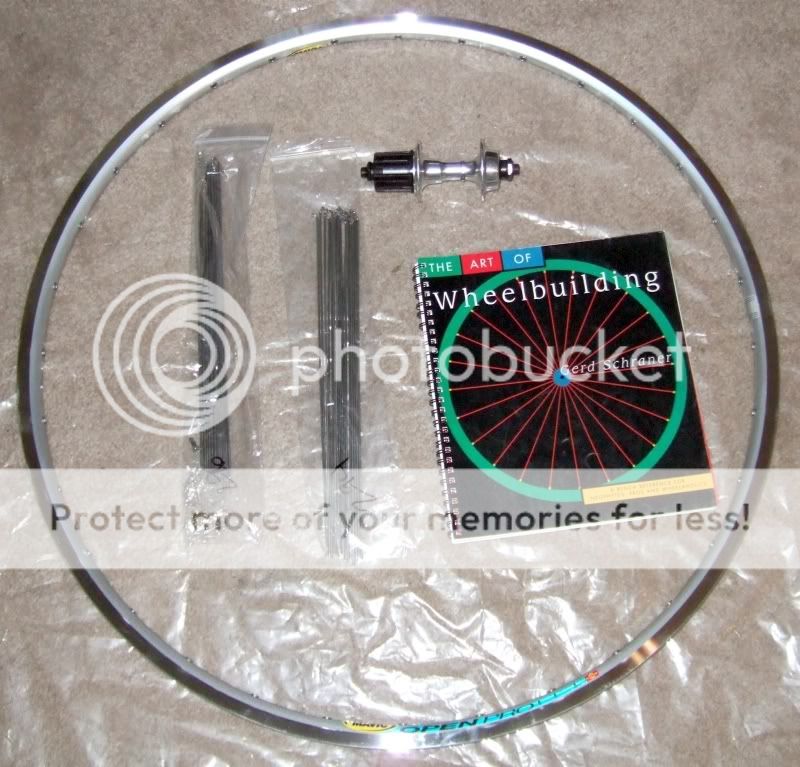
After years of procrastinating, I have finally stepped up to try my hand at building a wheel. I do almost all the maintenance and assembly on all my bikes but have never tried building a wheel. I had been wanting to put lighter wheels on my Bridgestone. I have a very good set of custom built wheels with Phil Wood hubs and Torelli Master rims, but they are kind of heavy with 36 spokes. I'm moving them over to my old Fuji to replace its 27" wheels. A big upgrade.
I came across a screaming deal on a front wheel with Dura Ace hub, Mavic Open Pro rim and 32 DT DB spokes. I have a 32 hole 7 speed Shimano 600 hub that was originally on the Bridgestone. I got a matching rima nd the appropriate DB spokes to build a rear wheel. I borrowed a copy of "The Art of Wheelbuilding" by Gerd Schraner and got to work. Once I got started it was not as difficult as I expected to lace the wheel. I don't have a truing stand or dishing tool, so I put the laced wheel on the bike and used the brake pads as a rough guide to get things close to right at fairly low tension. I can see I have a little radial correction (roundness) to do as well as lateral truing. I'll take the wheel into the LBS and borrow their stand to do the finishing touches. I can't wait to get it all done and try it out on the road.
The parts
Drive side laced
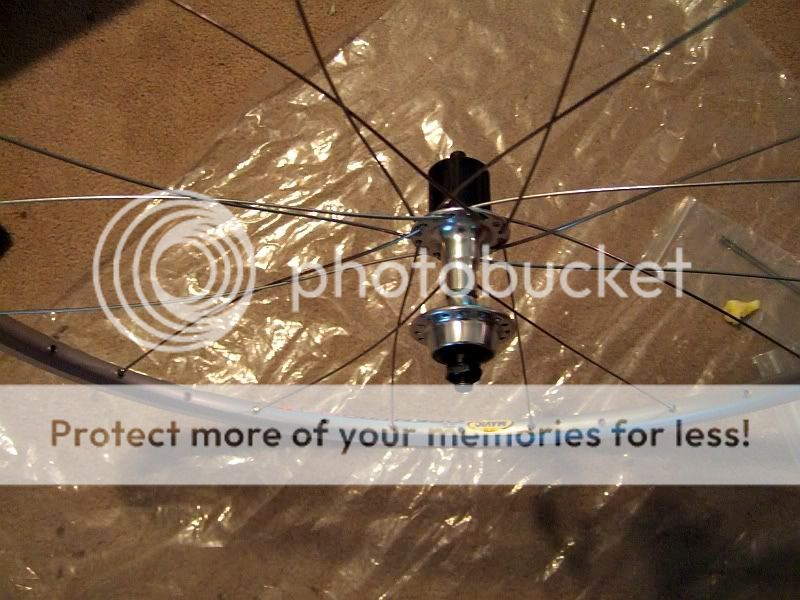
Laced wheel
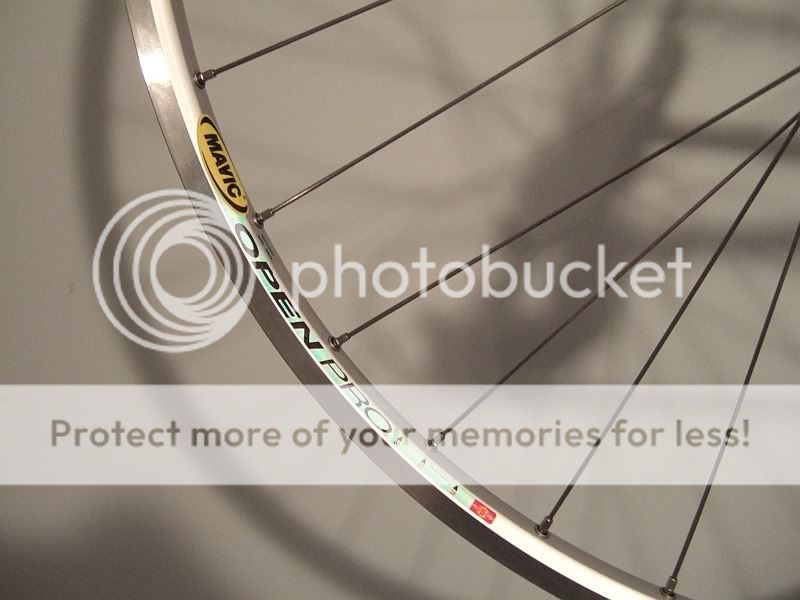
Another view
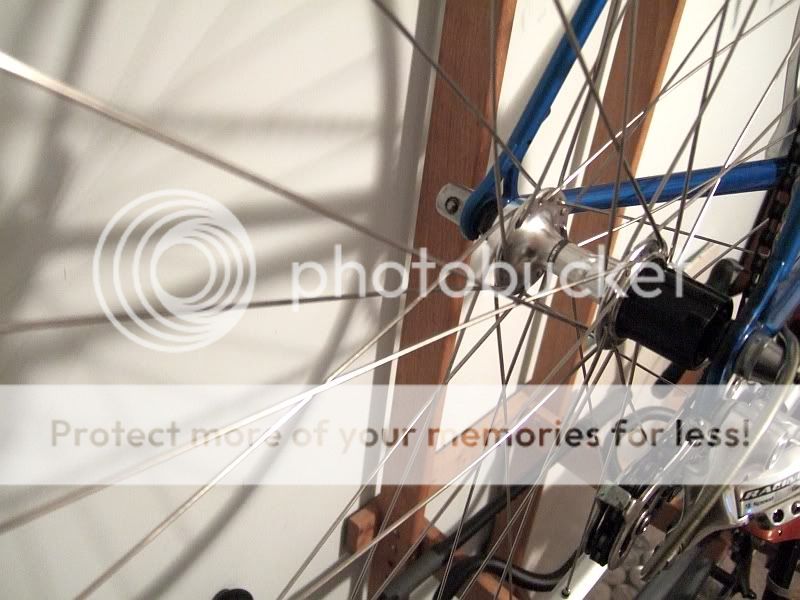
I came across a screaming deal on a front wheel with Dura Ace hub, Mavic Open Pro rim and 32 DT DB spokes. I have a 32 hole 7 speed Shimano 600 hub that was originally on the Bridgestone. I got a matching rima nd the appropriate DB spokes to build a rear wheel. I borrowed a copy of "The Art of Wheelbuilding" by Gerd Schraner and got to work. Once I got started it was not as difficult as I expected to lace the wheel. I don't have a truing stand or dishing tool, so I put the laced wheel on the bike and used the brake pads as a rough guide to get things close to right at fairly low tension. I can see I have a little radial correction (roundness) to do as well as lateral truing. I'll take the wheel into the LBS and borrow their stand to do the finishing touches. I can't wait to get it all done and try it out on the road.
The parts
Drive side laced
Laced wheel
Another view
 09-01-07, 09:11 PM
#2

Senior Member

I was talking to my wife about the wheels on my bike and that when they start popping I would like to try building my own. But I thought about the tools I'd need and how old I am and I probably never use them again. So out the window with that idea. I was kind of concerned about my wheels and my weight and bike weight, with bags, about 250#. I think that was one of the main reasons I wanted to buy a touring bike, for the stronger wheels. Anyhow, I bet you felt good about yourself, for building your own. I know I would be.
__________________
George
George
09-01-07, 09:13 PM
#3
Senior Member
I was thinking of using a Shimano hub 6600. I think that was the number, they have so many.
__________________
George
George
 09-01-07, 11:21 PM
#5


Squirrel

How did you determine the tension of the spokes? I'm worried about my first build because I know someone who did their whole first wheel and then found out the whole thing was undertensioned and had to redo it!
__________________

09-01-07, 11:40 PM
#6
Curmudgeon

Join Date: Aug 2005
Location: Nausea, New Hamster
Posts: 1,572
Bikes: (see https://wildavis.smugmug.com/Bikes) Bianchi Veloce (2005), Nishiki Cascade (1992), Schwinn Super Sport (1983)
Mentioned: 0 Post(s)
Tagged: 0 Thread(s)
Quoted: 0 Post(s)
Likes: 0
Liked 4 Times
in
4 Posts
Hey, congratulations on taking the plunge! The Schraner book is (IMNSHO) the very best, and I've found his lacing method to be totally fool-proof (well, for this fool at least!). I'm impressed that you started with a rear rather than a front, as the tension and dishing is always a bit easier to get right when you're building a symmetrical (i.e. front) wheel.
It's really worth taking extra time on getting the tension just right; the wheel will have more strength, will "stand" better, and will stay true much longer. If you plan on building/fixing lots of wheels, a tensionmeter is an excellent investment (I have a Park Tool TM-1; terrific value, and very easy to use!)
BTW any particular reason why you chose to have your pulling (trailing spokes) on the outside of the flange?
- Wil
09-01-07, 11:49 PM
#7
Squirrel
Wil, here's what I'm confused about... I have several vintage wheels that I'm going to relace. I've heard that different rims have different tensions required. How do you know?
__________________
09-02-07, 12:12 AM
#8
Curmudgeon
Join Date: Aug 2005
Location: Nausea, New Hamster
Posts: 1,572
Bikes: (see https://wildavis.smugmug.com/Bikes) Bianchi Veloce (2005), Nishiki Cascade (1992), Schwinn Super Sport (1983)
Mentioned: 0 Post(s)
Tagged: 0 Thread(s)
Quoted: 0 Post(s)
Likes: 0
Liked 4 Times
in
4 Posts
You can try to find out what tension the manufacturer recommends for the rim; it's usually fairy high, and you will find that you will start to round off the nipples before you get anywhere near the breaking point of the spoke or the rim. In my opinion it's better to have the tension slightly high than too low. If too low, more damage will occur to the spokes, which could lead to early spoke failure (and wheel failure).
Gerd Schraner has some good advice and recommendations about assessing spoke tension on pp. 46-48 of "The Art of Wheelbuilding".
- Wil
Gerd Schraner has some good advice and recommendations about assessing spoke tension on pp. 46-48 of "The Art of Wheelbuilding".
- Wil
09-02-07, 12:38 AM
#9
lunatic fringe
Join Date: Aug 2005
Location: Miles from Nowhere, Columbia County, OR
Posts: 1,111
Bikes: 1980 Schwinn World Sport, 1982 Schwinn Super Le Tour, 1984 (?) Univega Single Speed/Fixed conversion, Kogswell G58 fixed gear, 1987 Schwinn Super Sport
Mentioned: 0 Post(s)
Tagged: 0 Thread(s)
Quoted: 0 Post(s)
Likes: 0
Liked 1 Time
in
1 Post
The best way to find out is to ask the tech staff at the rim manufacturer. I have emailed Sun and Velocity and got a reply from both the next day. Tell them which rim, hub and spokes you are using.
09-02-07, 01:13 AM
#10
Senior Member

Join Date: Nov 2006
Posts: 2,990
Mentioned: 0 Post(s)
Tagged: 0 Thread(s)
Quoted: 0 Post(s)
Likes: 0
Liked 0 Times
in
0 Posts
I built a couple pf years 20 years ago, I never had the urge to try again. I still have my truing stand
My hat's off to you, 'Dawg, go out and put some miles on those babies.
My hat's off to you, 'Dawg, go out and put some miles on those babies.
09-02-07, 02:52 AM
#11
Boomer

Join Date: Nov 2003
Posts: 7,214
Bikes: Diamondback Clarity II frame homebuilt.
Mentioned: 106 Post(s)
Tagged: 0 Thread(s)
Quoted: 16098 Post(s)
Liked 1,457 Times
in
1,064 Posts
This is one of the most satisfying jobs that you can perform on a bicycle.
The tools do not have to be expensive. I use one of the less expensive Minoura wheelstands that self centers (do not put all of your faith in that reverse the wheel often to judge how far off center it is), has a pointer on each side of the wheel and a "scraper plate" with ink markings in mm for centering and radial adjust. It can be bought for about $60. In addition I use 4 sided spoke wrenches (the spoke slot is in a corner), either Pedro's or the newest versions of the Park Tools. Make sure you have the exact size for the job. Black for most new builds as we tend to use DB or Wheelsmith spokes in this country. (Red for many OEM wheels from Tiawan) First wheels are best done with brass nipples as it is easy to round off an aluminium one if you are not careful.
After years of building wheels without a tension guage I finally bought one. From this I learned that I was tensioning high enough by sound while plucking but it did wonders for improving my accuracy from spoke to spoke.
For the last 2 years I have also started using spoke washers on all wheels. The wheels are tighter and more uniform and seem to hold their "trueness" far longer. These come in relatively expensive bags of 1000 or 2000 but can be purchased on Ebay in qty 200 for less than $10.
Dawg, one tip, on the rear, before you reach final tension try to perform all spoke tightening operations toward the drive side saving the very last tightening for the non drive side. Its easier to make the final adjustments for dishing or lateral true on the lower tension side of the wheel. Use a little lube on spoke threads and under the head of the spoke against the rim.
Have fun. Your going to like the way it looks on you.
09-02-07, 07:08 AM
#12
Senior Member
Join Date: Feb 2007
Location: S.E. Pennsylvania, USA
Posts: 1,737
Mentioned: 0 Post(s)
Tagged: 0 Thread(s)
Quoted: 2 Post(s)
Likes: 0
Liked 0 Times
in
0 Posts
BluesDawg, cudos for going after your first build. There is a remarkable level of satisfaction to be had riding your own wheels.
My first set were over 20 years ago, and those wheels are still in service (my niece is running them on an old Schwinn LeTour as she rides back and forth to classes for her graduate program). I think many folks would benefit from attempting to build a wheel. Once you have done so, wheels become much more understandable and less of a mystery.
Today, I tend to buy my wheels instead of building them. I've just been lucky to find wheel sets on sale at prices too good to pass up. However, an inexpensive wheel truing stand (either the Minoura or the one Performance sells) is well worth the investment. Every winter I'll sit in front of the TV with my truing stand and tune-up my wheels while waiting for the winter storm to abate enough to get back out riding.
09-02-07, 09:59 AM
#13
Senior Member
I guess I should look at this book, I have on my shelf a little more, " The Bicycle Wheel" by Jobst Brandt. It sounds like it could be fun.
__________________
George
George
09-02-07, 10:05 AM
#14
Surly Girly

Join Date: Mar 2007
Location: SoCal
Posts: 4,116
Mentioned: 0 Post(s)
Tagged: 0 Thread(s)
Quoted: 2 Post(s)
Likes: 0
Liked 0 Times
in
0 Posts
Congratulations! I admire your effort and the job well done. I imagine that a bike built by the rider must feel like an extension of the rider, like an old car restored to the owner's own tastes and specs. There isn't another one like it.
__________________
Specialized Roubaix Expert
Surly Long Haul Trucker
Specialized Roubaix Expert
Surly Long Haul Trucker
09-02-07, 05:27 PM
#15
feros ferio

Join Date: Jul 2000
Location: www.ci.encinitas.ca.us
Posts: 21,793
Bikes: 1959 Capo Modell Campagnolo; 1960 Capo Sieger (2); 1962 Carlton Franco Suisse; 1970 Peugeot UO-8; 1982 Bianchi Campione d'Italia; 1988 Schwinn Project KOM-10;
Mentioned: 44 Post(s)
Tagged: 0 Thread(s)
Quoted: 1391 Post(s)
Liked 1,322 Times
in
835 Posts
Since my undergrad days at UCLA I have done all of my own wheel builds. My only bad outcome resulted from changing the lacing pattern on a Campag. Record low-flange rear hub with a well-worn flange. Changing the drive side to "tails in" resulted in occasional spoke breakage. With a used hub, copy the original pattern!
__________________
"Far and away the best prize that life offers is the chance to work hard at work worth doing." --Theodore Roosevelt
Capo: 1959 Modell Campagnolo, S/N 40324; 1960 Sieger (2), S/N 42624, 42597
Carlton: 1962 Franco Suisse, S/N K7911
Peugeot: 1970 UO-8, S/N 0010468
Bianchi: 1982 Campione d'Italia, S/N 1.M9914
Schwinn: 1988 Project KOM-10, S/N F804069
09-02-07, 06:05 PM
#16
Squirrel
I haven't built a wheel yet... I'm going to take a class in it. But I've trued wheels, and I love doing it. It puts me in the same mental place as kerning type, or doing really picky photoshop work, where you suddenly realize you haven't blinked for hours.
__________________
09-24-07, 11:43 AM
#17
Senior Member

Join Date: Feb 2007
Location: Auburn, WA
Posts: 622
Bikes: 2006 LeMond Croix de Fer, 2005 Kona Dew Deluxe
Mentioned: 0 Post(s)
Tagged: 0 Thread(s)
Quoted: 0 Post(s)
Likes: 0
Liked 0 Times
in
0 Posts
Just a few weeks ago I completed my first wheel set. I'm a slightly bigger rider near 200lbs. I had to hunt a good deal, but managed to find some older 8 speed hyperglide dura-ace era hubs (which modern 10 speed cassettes will fit) on eBay for cheap. For rims I used generic 32h black Velocity Deep Vs, all laced with DT comp 2.0/1.8 spokes.
I built the rear first using Shraener's 32h 3x pattern to the letter. The first time tensioning I had some trouble and ended up rounding some nipples - even when using a tensionmeter. I ended up unthreading all the spokes so only 1 thread was showing and then carefully counted my turns this time and used my ear to gauge the relative tension.
The back wheel is stiff, spins smooth and has held true for a few hundred miles so far.
For the front I wanted something flashy, so I opted to radially lace. The lacing was obviously easier and faster, but I spent much more time messing with tension. I think when the shop cut these spokes there was some variance in length, since a few spokes barely have the last thread inside the nipple.
With both wheels mounted, I've gotten up to 40mph on some long winding descents a few times and am still here typing. Part of me is a tad skeptical of the front, but it's radially and laterally true and the tension is very balanced on all spokes.
Many lessons learned - and used Dura-ace hubs were worth the treasure hunting, they are so smooth!
There's no way I could've purchased new wheels as nice for the price I spent (just over $200 not including tools).
BTW: I don't normally browse this forum (merely 31 years of age), but found this thread in a search
09-24-07, 01:20 PM
#18
just keep riding
Thread Starter
Join Date: Feb 2005
Location: Milledgeville, Georgia
Posts: 13,560
Bikes: 2018 Black Mountain Cycles MCD,2017 Advocate Cycles Seldom Seen Drop Bar, 2017 Niner Jet 9 Alloy, 2015 Zukas custom road, 2003 KHS Milano Tandem, 1986 Nishiki Cadence rigid MTB, 1980ish Fuji S-12S
Mentioned: 15 Post(s)
Tagged: 0 Thread(s)
Quoted: 173 Post(s)
Liked 33 Times
in
22 Posts
Glad this resurfaced. After a couple weeks of long work hours and procrastination, I finally got around to completing the wheel. Wil's comment about the lacing pattern got me wondering. I'm pretty sure I had followed the directions in the Schraener book, but they were vague enough that I couldn't be certain. So I followed my first instinct and went to Sheldon's site and read his instructions. They were much clearer to my simple mind, so I unlaced the spokes and started over. Sheldon's tensioning directions were also much clearer.
I never had time to get to the shop to use their truing stand, so I did the whole job with the wheel in the rear triangle of my bike, which I placed upside down in front of my chair. Using the brake pads, finger pressure, a screwdriver shaft and alignment to the seat tube as guides, I finally got the wheel laterally and radially true and dished correctly. I compared the drive side spoke tension to the front wheel which was already built by a pro. I was a little anxious about going too tight, so I probably went a little too slack.
I took the bike out for a 30 mile test ride and it felt great, rolling fast and smooth, but after about 20 miles I noticed the wheel was beginning to wobble just a little. By the end of the ride there was a noticeable wobble and I could feel that some of the spokes had loosened.
So I set up the makeshift stand again and proceeded to true and tighten the wheel. This time I made the drive side as tight as the front wheel. The next day I went on a 35 mile ride and it came home as true as when I started the ride.
There is a big downhill section on this ride where I normally hit 38mph. This ride I went 42 with no extra effort. Not bad to outperform my previous wheels with their smooth Phil Wood hubs!
09-24-07, 01:41 PM
#19
Time for a change.

Join Date: Jan 2004
Location: 6 miles inland from the coast of Sussex, in the South East of England
Posts: 19,913
Bikes: Dale MT2000. Bianchi FS920 Kona Explosif. Giant TCR C. Boreas Ignis. Pinarello Fp Uno.
Mentioned: 2 Post(s)
Tagged: 0 Thread(s)
Quoted: 3 Post(s)
Likes: 0
Liked 5 Times
in
4 Posts
I have always taken the wobbles out of my wheels by using the Frame as my trueing tool and setting the brake pads up as the guide- like BD. Always manage to get the wheel true but I have always been worried about spoke tension. Plus the fact that something must have knocked the wheel out of true in the first place so is there any other damage. So two retrues and it is back to the Wheel builder to sort them.
But- I have good quality wheels and I prefer to let the experts tweak my wheels. On my Tandem I have two very expensive sets of wheels. Both identical with Hope BigUn hubs- 36 straight gauge spokes and Mavic downhill grade rims. I have one set of wheels set up with slicks and the other with Knobblies. The pair that had the knobblies on were put on the bike for this weekend and I checked trueness in the frame. Not much out but I decided to "Ping" the spokes for Tension. They were all over the place so Checked the other pair and they were still perfect on true and the "Ping" was far better. So it was swop the tyres over on the wheels and go and ride. Dropped the "Tired" wheels into the LBS this morning and got a phone call back at 2pm. Wheels are perfect now but "Who has been Messing about with my Wheels?" The rim had gone oval and it took a bit of time to get them round again. This is something I cannot check by just using the frame- so I will be getting a Trueing stand in the future. Then I might be able to save a fortune on having my wheel builder give me a big bill for what a lot of people call a basic job.
But- I have good quality wheels and I prefer to let the experts tweak my wheels. On my Tandem I have two very expensive sets of wheels. Both identical with Hope BigUn hubs- 36 straight gauge spokes and Mavic downhill grade rims. I have one set of wheels set up with slicks and the other with Knobblies. The pair that had the knobblies on were put on the bike for this weekend and I checked trueness in the frame. Not much out but I decided to "Ping" the spokes for Tension. They were all over the place so Checked the other pair and they were still perfect on true and the "Ping" was far better. So it was swop the tyres over on the wheels and go and ride. Dropped the "Tired" wheels into the LBS this morning and got a phone call back at 2pm. Wheels are perfect now but "Who has been Messing about with my Wheels?" The rim had gone oval and it took a bit of time to get them round again. This is something I cannot check by just using the frame- so I will be getting a Trueing stand in the future. Then I might be able to save a fortune on having my wheel builder give me a big bill for what a lot of people call a basic job.
__________________
How long was I in the army? Five foot seven.
Spike Milligan
How long was I in the army? Five foot seven.
Spike Milligan
09-24-07, 02:11 PM
#20
Boomer
Join Date: Nov 2003
Posts: 7,214
Bikes: Diamondback Clarity II frame homebuilt.
Mentioned: 106 Post(s)
Tagged: 0 Thread(s)
Quoted: 16098 Post(s)
Liked 1,457 Times
in
1,064 Posts
Once you can assemble a bicycle completely from basic parts, there are only 2 remaining hurdles to clear. Wheel building and Frame welding. I have no desire to weld frames as I do not believe that a home shop has the technology or quality check equipment (x-ray, ultrasound, carbon layup instead of welding) so the frame will be considered one more basic part.
Congratulations on all who have completed at least one wheelset, you have arrived at the pinnacal of being a bycicle mechanic. It feels really good to look at that wheel and realize that its yours................
Congratulations on all who have completed at least one wheelset, you have arrived at the pinnacal of being a bycicle mechanic. It feels really good to look at that wheel and realize that its yours................
