


First repair attempt...sigh
 01-10-08, 05:11 PM
#1

I need more cowbell.
Thread Starter
Join Date: Jun 2005
Location: Reno, Nevada
Posts: 8,182
Bikes: 2015 Specialized Sirrus Elite
Mentioned: 0 Post(s)
Tagged: 0 Thread(s)
Quoted: 23 Post(s)
Likes: 0
Liked 0 Times
in
0 Posts
First repair attempt...sigh
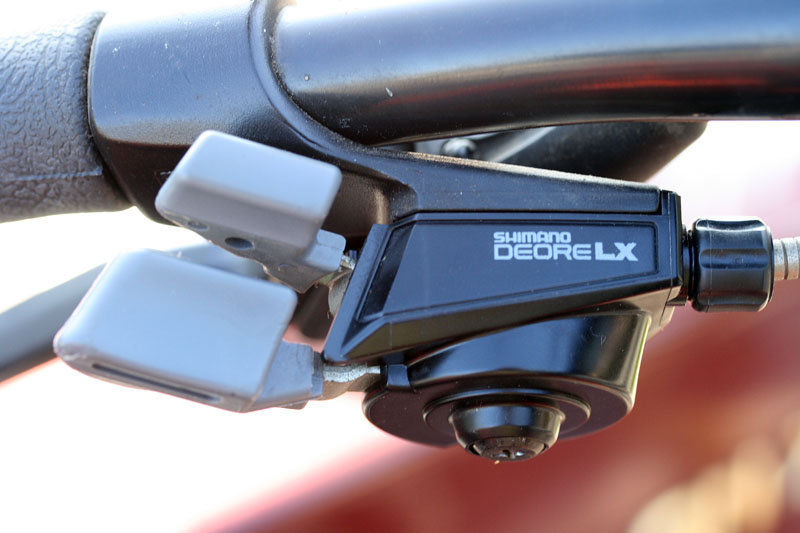
I decided to try fixing the FD, which would not allow me to shift out of the small ring. After fiddling with the adjustment knob by the shifters, which produced no result, I looked closer at the cage itself.
It turns out it's out of alignment. It will push the chain to the middle ring, but once I let go, it's hitting the chain and that causes the chain to return to the small ring.
So, I tried adjusting it. I found the way to loosen it from the seat tube, and tried moving it up or down, plus side to side. I learned I had to release the cable to do this, so I made several attempts at finding the sweet spot for the cage and then reattaching the cable, but I couldn't make a go of it.
I also learned that the shifter knob that would bring the chain back down from the larger to the smaller ring doesn't do anything. It doesn't seem to produce any tension on the cable whatsoever.
After twenty or so attempts, I packed it in for the day. It's frustrating because I can sense that the LBS could probably fix this in about two minutes.
FWIW, here's a few pictures. I'm not sure how much you can tell from them.
I managed to get the FD back to the same position I started with (which I consider a minor victory -- it's not worse than before). What am I either doing wrong or not understanding?
__________________
2015 Sirrus Elite
Proud member of the original Club Tombay
2015 Sirrus Elite
Proud member of the original Club Tombay
 01-10-08, 05:12 PM
#2
I need more cowbell.
Thread Starter
Join Date: Jun 2005
Location: Reno, Nevada
Posts: 8,182
Bikes: 2015 Specialized Sirrus Elite
Mentioned: 0 Post(s)
Tagged: 0 Thread(s)
Quoted: 23 Post(s)
Likes: 0
Liked 0 Times
in
0 Posts
__________________
2015 Sirrus Elite
Proud member of the original Club Tombay
2015 Sirrus Elite
Proud member of the original Club Tombay
01-10-08, 05:38 PM
#3
Senior Member

Join Date: Nov 2003
Location: Grass Valley, CA
Posts: 2,544
Bikes: Time RXRS, Specialized Stumpjumper FSR
Mentioned: 0 Post(s)
Tagged: 0 Thread(s)
Quoted: 1 Post(s)
Likes: 0
Liked 0 Times
in
0 Posts
Go to the Shimano website, they have manuals for all their equipment in pdf format. All the FD work the same way so use a different one if you cannot find your specific model.
As a rule of thumb you want the FD cable to be fully relaxed before touching the FD, it means that the chain should be on the small chainring. Position the FD parallel to the chainring, its height should allow about a 1 to 2 mm clearance when the FD moves over the large chainring. Adjust the inner limit screw on the FD so that the chain doesn't fall between the small ring and the BB. Rotate the knob at the shifter clockwise until stuck against the shifter, release the cable bolt on the FD and pull the cable tight before retightening the bolt. Then play with the adjustment knob and the FD limit screws to fine tune.
The FD cable seems rusty. I would change it.
01-10-08, 06:31 PM
#4

Ride Daddy Ride

Join Date: Feb 2007
Location: Villa Incognito
Posts: 2,648
Bikes: 1983 Trek 720; 1983 Trek 620; 1989 Gi Cannondale Bad Boy Ultra; LeMond Victoire; Bike Friday Pocket Rocket Pro
Mentioned: 0 Post(s)
Tagged: 0 Thread(s)
Quoted: 0 Post(s)
Likes: 0
Liked 1 Time
in
1 Post
Here's my take DG: You're really good at what you do. The LBS had people who are really good at what they do, so make more money and enjoy life more by focusing on your strengths. Let the LBS do the job in two minutes and fuggetabout doing any but the most basic repairs yourself. It will save you enormous amounts of time and frustration and you'll support a local business that could use some support.
I know this goes against the grain of the way many people think.
I know this goes against the grain of the way many people think.
__________________
"Light it up, Popo." --Levi Leipheimer
"Light it up, Popo." --Levi Leipheimer
01-10-08, 06:52 PM
#5
Senior Member

Join Date: Apr 2006
Posts: 135
Mentioned: 0 Post(s)
Tagged: 0 Thread(s)
Quoted: 0 Post(s)
Likes: 0
Liked 0 Times
in
0 Posts
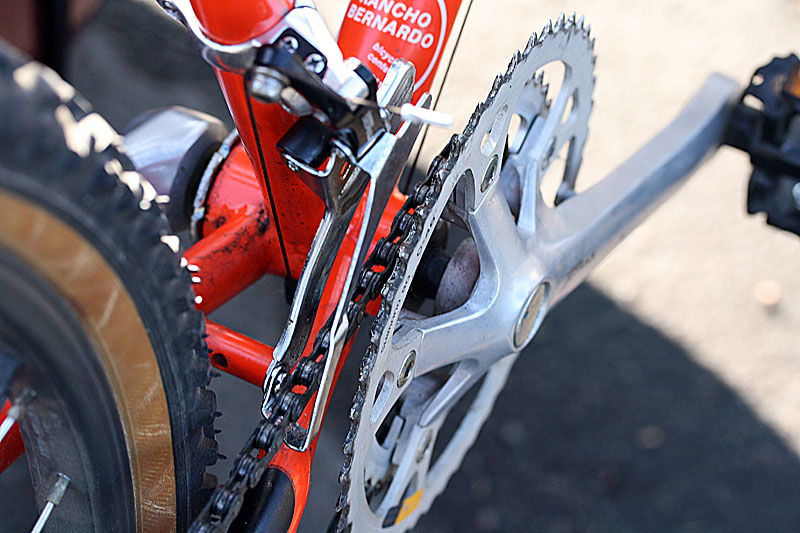
Lube and clean the cable track under the bottom bracket. Clean and lube the d�railleur. Simple Green or similar and most any light oil will be fine
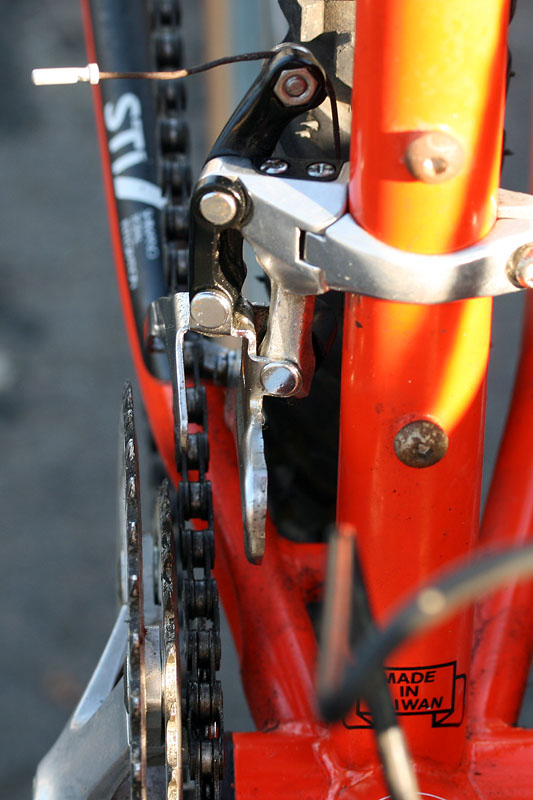
It MAY be the angle of the photo, but the outer cage should only clear the big ring by 1/8-1/4 inch. Higher will make it harder to push it up on the big and middle rings.
It also looks like the inner cage is too far inboard. Shouldn't need more than 1/8 inch.
So, First loosen the cable clamp on the d�railleur - click the downshift lever several times while pulling on cable under the down tube - this is to make sure cable has released tension AND makes sure you really are in low. THEN while pulling on the cable shift up- to make sure the lever really works and pulls cable. If it isn't, then you could try some gentle cleaning of the levers with Simple Green or similar non-petro cleaner. Make sure cable slide smoothly through the housing at this point.
Assuming the levers work - make sure the d�railleur is correctly positioned on seat tube - you can swing it up to check clearance onto big ring. Cage should be either parallel with rings or the rear about 1/16 or 1/8" out.
Back in the cable adjustment on the lever. at most leave a turn out from fully in. Make sure lever is in low.
Adjust inner limit screw. Pull on cable with pliers while tightening cable clamp. Have someone hold the rear wheel up while working the lever checking for operation.
While your hands are dirty and the tools are out, it might be a good time to clean the rear d�railleur also.
01-10-08, 07:04 PM
#6
His Brain is Gone!

Join Date: Sep 2006
Location: Paoli, Wisconsin
Posts: 9,979
Bikes: RANS Stratus, Bridgestone CB-1, Trek 7600, Sun EZ-Rider AX, Fuji Absolute 1.0, Cayne Rambler 3
Mentioned: 1 Post(s)
Tagged: 0 Thread(s)
Quoted: 2 Post(s)
Likes: 0
Liked 1 Time
in
1 Post
My Park Repair Book warns me that FD adjustments can be tricky and frequently require trying one setting, adjusting again, and testing again. It took me a few attempts to get it right on my Trek 820. And it sounds like yours was much worse than mine to being with.
So I would not be terribly discouraged by this attempt. While I'm sure this adjustment becomes much easier over practice, and is relatively simple for many, it is not a Level 1 degree of difficulty first repair.
So I would not be terribly discouraged by this attempt. While I'm sure this adjustment becomes much easier over practice, and is relatively simple for many, it is not a Level 1 degree of difficulty first repair.
__________________
"Too often I would hear men boast of the miles covered that day, rarely of what they had seen." Louis L'Amour
There are two types of road bikers: bikers who are faster than me, and me. Bruce Cameron - Denver Post
"Too often I would hear men boast of the miles covered that day, rarely of what they had seen." Louis L'Amour
There are two types of road bikers: bikers who are faster than me, and me. Bruce Cameron - Denver Post
01-10-08, 07:07 PM
#7
Senior Member
Join Date: May 2005
Posts: 2,259
Mentioned: 0 Post(s)
Tagged: 0 Thread(s)
Quoted: 0 Post(s)
Likes: 0
Liked 0 Times
in
0 Posts
Here's my take DG: You're really good at what you do. The LBS had people who are really good at what they do, so make more money and enjoy life more by focusing on your strengths. Let the LBS do the job in two minutes and fuggetabout doing any but the most basic repairs yourself. It will save you enormous amounts of time and frustration and you'll support a local business that could use some support.
I know this goes against the grain of the way many people think.
I know this goes against the grain of the way many people think.
But, as JT says, most people think differently.
Last edited by Big Paulie; 01-10-08 at 07:22 PM.
01-10-08, 07:08 PM
#8
Senior Member
Join Date: Jun 2005
Location: Kentucky
Posts: 2,599
Bikes: 06 Lemond Reno, 98 GT Timberline mtn.bike
Mentioned: 8 Post(s)
Tagged: 0 Thread(s)
Quoted: 427 Post(s)
Liked 699 Times
in
436 Posts
Don't feel too bad about it, DG. I'm not to shabby at mechanical fixes, and I'd rather try to get a rear der. adjusted correctly than a front der. any day!! It's easier for me to do it than explain how to do it, but these guys are a good place to start:
https://www.parktool.com/repair/readhowto.asp?id=75
https://www.parktool.com/repair/readhowto.asp?id=75
01-10-08, 07:14 PM
#9
Senior Member

Join Date: Oct 2006
Location: SWMO
Posts: 3,185
Mentioned: 11 Post(s)
Tagged: 0 Thread(s)
Quoted: 1400 Post(s)
Likes: 0
Liked 0 Times
in
0 Posts
Here's my take DG: You're really good at what you do. The LBS had people who are really good at what they do, so make more money and enjoy life more by focusing on your strengths. Let the LBS do the job in two minutes and fuggetabout doing any but the most basic repairs yourself. It will save you enormous amounts of time and frustration and you'll support a local business that could use some support.
I know this goes against the grain of the way many people think.
I know this goes against the grain of the way many people think.
__________________
It's all downhill from here. Except the parts that are uphill.
It's all downhill from here. Except the parts that are uphill.
01-10-08, 07:18 PM
#10
Senior Member
DeeGee, it's just an adjustment or two. First, downshift all the way in front and undo the cable at the derailleur. That adjuster up by the handlebars? Center it in its range. Then adjust the lower limit screw on the derailleur so that the cage is centered on the small ring. You'll know you have the right screw when you can move the cage by turning the screw. While you're at it, you can check the upper limit screw by moving the cage by hand and adjusting the screw so that the cage moves far enough but not too far, to shift onto the big ring.
At that point, make sure the cable moves freely in the housing by sliding the housing up and down a bit. If it binds, spend a few bucks and get a new cable. Replacing the cable is more involved, but not hard. C'mon back if you have to do that. Assuming the cable works OK, pull all the slack out of it with pliers while you clamp it back to the derailleur. Make sure the cable is in the groove or it may not shift right.
At that point, make sure the cable moves freely in the housing by sliding the housing up and down a bit. If it binds, spend a few bucks and get a new cable. Replacing the cable is more involved, but not hard. C'mon back if you have to do that. Assuming the cable works OK, pull all the slack out of it with pliers while you clamp it back to the derailleur. Make sure the cable is in the groove or it may not shift right.
01-10-08, 07:20 PM
#11
Senior Member

Lube and clean the cable track under the bottom bracket. Clean and lube the d�railleur. Simple Green or similar and most any light oil will be fine
It MAY be the angle of the photo, but the outer cage should only clear the big ring by 1/8-1/4 inch. Higher will make it harder to push it up on the big and middle rings.
It also looks like the inner cage is too far inboard. Shouldn't need more than 1/8 inch.
So, First loosen the cable clamp on the d�railleur - click the downshift lever several times while pulling on cable under the down tube - this is to make sure cable has released tension AND makes sure you really are in low. THEN while pulling on the cable shift up- to make sure the lever really works and pulls cable. If it isn't, then you could try some gentle cleaning of the levers with Simple Green or similar non-petro cleaner. Make sure cable slide smoothly through the housing at this point.
Assuming the levers work - make sure the d�railleur is correctly positioned on seat tube - you can swing it up to check clearance onto big ring. Cage should be either parallel with rings or the rear about 1/16 or 1/8" out.
Back in the cable adjustment on the lever. at most leave a turn out from fully in. Make sure lever is in low.
Adjust inner limit screw. Pull on cable with pliers while tightening cable clamp. Have someone hold the rear wheel up while working the lever checking for operation.
While your hands are dirty and the tools are out, it might be a good time to clean the rear d�railleur also.
__________________
George
George
01-10-08, 07:22 PM
#12
Senior Member
Join Date: May 2005
Posts: 2,259
Mentioned: 0 Post(s)
Tagged: 0 Thread(s)
Quoted: 0 Post(s)
Likes: 0
Liked 0 Times
in
0 Posts
Lube and clean the cable track under the bottom bracket. Clean and lube the d�railleur. Simple Green or similar and most any light oil will be fine
It MAY be the angle of the photo, but the outer cage should only clear the big ring by 1/8-1/4 inch. Higher will make it harder to push it up on the big and middle rings.
It also looks like the inner cage is too far inboard. Shouldn't need more than 1/8 inch.
So, First loosen the cable clamp on the d�railleur - click the downshift lever several times while pulling on cable under the down tube - this is to make sure cable has released tension AND makes sure you really are in low. THEN while pulling on the cable shift up- to make sure the lever really works and pulls cable. If it isn't, then you could try some gentle cleaning of the levers with Simple Green or similar non-petro cleaner. Make sure cable slide smoothly through the housing at this point.
Assuming the levers work - make sure the d�railleur is correctly positioned on seat tube - you can swing it up to check clearance onto big ring. Cage should be either parallel with rings or the rear about 1/16 or 1/8" out.
Back in the cable adjustment on the lever. at most leave a turn out from fully in. Make sure lever is in low.
Adjust inner limit screw. Pull on cable with pliers while tightening cable clamp. Have someone hold the rear wheel up while working the lever checking for operation.
While your hands are dirty and the tools are out, it might be a good time to clean the rear d�railleur also.
It MAY be the angle of the photo, but the outer cage should only clear the big ring by 1/8-1/4 inch. Higher will make it harder to push it up on the big and middle rings.
It also looks like the inner cage is too far inboard. Shouldn't need more than 1/8 inch.
So, First loosen the cable clamp on the d�railleur - click the downshift lever several times while pulling on cable under the down tube - this is to make sure cable has released tension AND makes sure you really are in low. THEN while pulling on the cable shift up- to make sure the lever really works and pulls cable. If it isn't, then you could try some gentle cleaning of the levers with Simple Green or similar non-petro cleaner. Make sure cable slide smoothly through the housing at this point.
Assuming the levers work - make sure the d�railleur is correctly positioned on seat tube - you can swing it up to check clearance onto big ring. Cage should be either parallel with rings or the rear about 1/16 or 1/8" out.
Back in the cable adjustment on the lever. at most leave a turn out from fully in. Make sure lever is in low.
Adjust inner limit screw. Pull on cable with pliers while tightening cable clamp. Have someone hold the rear wheel up while working the lever checking for operation.
While your hands are dirty and the tools are out, it might be a good time to clean the rear d�railleur also.
 01-10-08, 07:35 PM
#13
Muscle bike design spec

Join Date: Oct 2004
Location: Sterling VA
Posts: 3,688
Bikes: 70 Atala Record Proffesional, 00 Lemond, 08 Kestrel Evoke, 96 Colnago Master Olympic, 01 Colnago Ovalmaster, 76 Raleigh Gran Sport, 03 Fuji World, 86 Paramount, 90 Miyata CF, 09 Ritchey Breakaway CX, Bianchi Trofeo, 12 OutRiderUSA HyperLite
Mentioned: 1 Post(s)
Tagged: 1 Thread(s)
Quoted: 3 Post(s)
Likes: 0
Liked 3 Times
in
3 Posts
I can see two issues. The FD is too high - it should clear the big ring by the height of the chainring teeth - at most. Second, the two rails should be roughly parallel with the chainrings.
When the shifter is set for the small chainring you should adjust the cable to center the FD on that chainring.
In addition, there are two limit screws on the FD. They limit the movement to keep the chain from falling off the small and large chainrings. If the one labeled H isn't set right it can prevent shifting to the large ring.
I feel for you, DG, I've had some miserable times adjusting d�railleurs. Setting up a two/three ring compatible STI shifter for a two ring was a real trial.
__________________
Korval is Ships
See my Hyperlite 411 it's the photo model on OutRiderUSA web page
See my Hyperlite 411 it's the photo model on OutRiderUSA web page
01-10-08, 07:56 PM
#14
I need more cowbell.
Thread Starter
Join Date: Jun 2005
Location: Reno, Nevada
Posts: 8,182
Bikes: 2015 Specialized Sirrus Elite
Mentioned: 0 Post(s)
Tagged: 0 Thread(s)
Quoted: 23 Post(s)
Likes: 0
Liked 0 Times
in
0 Posts
I want to thank everyone who's taken the time to give me step by step suggestions. But I'm going to take the other advice -- go with my strengths and turn over to others that which I find confusing and vexing. I want to ride, dammit!
So I'll take the Peugeot over to the LBS and have them fix the FD, replace the cable, and while they're at it, check the brakes (which I think are actually fine). I'll purchase two new tires and some tubes, and install them myself because that's something I know how to do.
Then, I'll hang on to the Fuji for a while, and when a repair stand comes up on Craigslist I'll work on it. Nothing to lose, and maybe a bike to flip or give to someone in need.
This is still all about having a trail bike for 15-20 trail rides a year, after all. In my first three years of riding (almost) the only mechanical issues I've had on the road are flats, and a time or two when a chain came off, and I can handle those.
__________________
2015 Sirrus Elite
Proud member of the original Club Tombay
2015 Sirrus Elite
Proud member of the original Club Tombay
01-10-08, 08:03 PM
#15
Fred E Fenders

Join Date: Feb 2006
Location: Again! Philippines & S. California
Posts: 1,453
Bikes: Jamis Aurora Elite
Mentioned: 0 Post(s)
Tagged: 0 Thread(s)
Quoted: 3 Post(s)
Likes: 0
Liked 1 Time
in
1 Post
From experience when I added some 90 degree angles to the cables at the brifters I put in new cables and had to change the cable housing from the stops to the brifters to clear a handle bar bag. Worked great.
Like robtown said. The FD looks way to high. You can also tweak the shifting by not lining up the FD with the chain rings. I would start with it parallel before going that route. An expensive set of repair manuals a friend of mine bought for over $ 100.00 I believe said that the FD should clear the large chain ring by the thickness of a dollar or a tad more. Really close tolerances on that high end stuff, I guess.
Like robtown said. The FD looks way to high. You can also tweak the shifting by not lining up the FD with the chain rings. I would start with it parallel before going that route. An expensive set of repair manuals a friend of mine bought for over $ 100.00 I believe said that the FD should clear the large chain ring by the thickness of a dollar or a tad more. Really close tolerances on that high end stuff, I guess.
__________________
F Thomas
"Life is like riding a bicycle. To keep your balance, you must keep moving."
Albert Einstein (1879-1955)
F Thomas
"Life is like riding a bicycle. To keep your balance, you must keep moving."
Albert Einstein (1879-1955)
01-10-08, 08:04 PM
#16
Ride Daddy Ride
Join Date: Feb 2007
Location: Villa Incognito
Posts: 2,648
Bikes: 1983 Trek 720; 1983 Trek 620; 1989 Gi Cannondale Bad Boy Ultra; LeMond Victoire; Bike Friday Pocket Rocket Pro
Mentioned: 0 Post(s)
Tagged: 0 Thread(s)
Quoted: 0 Post(s)
Likes: 0
Liked 1 Time
in
1 Post
My brother has given me much good advice through the years including this, which, to my mind is absolutely brilliant in its simplicity: "If you're doing what you don't want to do, you'll be doing what you don't want to do."
__________________
"Light it up, Popo." --Levi Leipheimer
"Light it up, Popo." --Levi Leipheimer
01-10-08, 08:22 PM
#17
Senior Member

Join Date: Jan 2006
Location: Camino, CA
Posts: 1,181
Bikes: Trek 5500 OCLV, Trek Fuel EX 9
Mentioned: 0 Post(s)
Tagged: 0 Thread(s)
Quoted: 1 Post(s)
Likes: 0
Liked 0 Times
in
0 Posts
...So I'll take the Peugeot over to the LBS and have them fix the FD, replace the cable, and while they're at it, check the brakes (which I think are actually fine). I'll purchase two new tires and some tubes, and install them myself because that's something I know how to do.
") 01-10-08, 08:49 PM
01-10-08, 08:49 PM
#18
The Grampster

Join Date: Sep 2005
Location: Washington, DC
Posts: 657
Bikes: Eddy Merckx SXM, LeMond Buenos Aires, Cannondale Road Warrior 1000 plus a couple of comforts (Specialized Crossroads and Giant Cyprus) and a beater mtb for around town.
Mentioned: 0 Post(s)
Tagged: 0 Thread(s)
Quoted: 0 Post(s)
Likes: 0
Liked 0 Times
in
0 Posts
BTW, Gary, fabulous photos, you old f-stop you. I like the do-what-you-do advice.
__________________
The definition of insanity is doing the same thing over and over and expecting different results.
--Ben Franklin
The definition of insanity is doing the same thing over and over and expecting different results.
--Ben Franklin
01-10-08, 08:50 PM
#19

Boomer

Join Date: Nov 2003
Posts: 7,214
Bikes: Diamondback Clarity II frame homebuilt.
Mentioned: 106 Post(s)
Tagged: 0 Thread(s)
Quoted: 16098 Post(s)
Liked 1,457 Times
in
1,064 Posts
Lots of good advice here.............now mine.
Zinn............now..............there are pictures...with arrows...see jane run.
Zinn............now..............there are pictures...with arrows...see jane run.
01-10-08, 09:07 PM
#20
Muscle bike design spec
Join Date: Oct 2004
Location: Sterling VA
Posts: 3,688
Bikes: 70 Atala Record Proffesional, 00 Lemond, 08 Kestrel Evoke, 96 Colnago Master Olympic, 01 Colnago Ovalmaster, 76 Raleigh Gran Sport, 03 Fuji World, 86 Paramount, 90 Miyata CF, 09 Ritchey Breakaway CX, Bianchi Trofeo, 12 OutRiderUSA HyperLite
Mentioned: 1 Post(s)
Tagged: 1 Thread(s)
Quoted: 3 Post(s)
Likes: 0
Liked 3 Times
in
3 Posts
DG,
Personally, given my wifely auditor I couldn't afford to frequent my LBS. You may not require more skill besides knowing the location of a good LBS and being able to fix a flat tire. That means a patch kit and/or replacement tube in most cases + an air pump. A cell phone or a body like one of your beach ladies may suffice - if you're not off the main roads on a MUP.
Personally, given my wifely auditor I couldn't afford to frequent my LBS. You may not require more skill besides knowing the location of a good LBS and being able to fix a flat tire. That means a patch kit and/or replacement tube in most cases + an air pump. A cell phone or a body like one of your beach ladies may suffice - if you're not off the main roads on a MUP.
__________________
Korval is Ships
See my Hyperlite 411 it's the photo model on OutRiderUSA web page
See my Hyperlite 411 it's the photo model on OutRiderUSA web page
01-10-08, 09:34 PM
#21
Squirrel

Yeah, Thank goodness you have a nice camera, DG.
__________________

01-10-08, 10:12 PM
#22
Senior Member
Join Date: May 2005
Posts: 2,259
Mentioned: 0 Post(s)
Tagged: 0 Thread(s)
Quoted: 0 Post(s)
Likes: 0
Liked 0 Times
in
0 Posts
01-11-08, 06:53 AM
#23
Senior Member

Join Date: Aug 2007
Location: washington dc
Posts: 311
Bikes: derosa, bianchi, fuji, panasonic, jamis
Mentioned: 0 Post(s)
Tagged: 0 Thread(s)
Quoted: 0 Post(s)
Likes: 0
Liked 0 Times
in
0 Posts
Trying to adjust a FD probably wasn't a good place to start your bike repair career. Its about the fiddliest job on a bike (and most bike adjustments are fiddly). You have to get the height and angle (yaw) EXACTLY right before setting the limit screws. Like someone else mentioned the instructions from Shimano are quite good.
You can take it to a bike shop but chances are good that they will do a half way (mono-buttocked as Sheldon would say) job of it. It can be adjusted it so it works perfectly on the stand but not well 100% of the time on the road. It has to be ridden and tweaked until its right and it appears to me that most shops are not willing to put the time in that is required. Dropping chains is commonplace on the group rides I go on and invariably when I ask the rider they've taken the bike to one or more high end shops who all swear the adjustment is perfect. I say, if the adjustment was perfect why did it just throw the chain at the bottom of the gnarliest hill in the area?
You can take it to a bike shop but chances are good that they will do a half way (mono-buttocked as Sheldon would say) job of it. It can be adjusted it so it works perfectly on the stand but not well 100% of the time on the road. It has to be ridden and tweaked until its right and it appears to me that most shops are not willing to put the time in that is required. Dropping chains is commonplace on the group rides I go on and invariably when I ask the rider they've taken the bike to one or more high end shops who all swear the adjustment is perfect. I say, if the adjustment was perfect why did it just throw the chain at the bottom of the gnarliest hill in the area?
01-11-08, 07:23 AM
#24
Bikin' and Hikin'
Join Date: Aug 2006
Location: Greeneville Tennessee
Posts: 248
Bikes: Lemond Reno, Diamondback Topanga Mountain Bike
Mentioned: 0 Post(s)
Tagged: 0 Thread(s)
Quoted: 0 Post(s)
Likes: 0
Liked 0 Times
in
0 Posts
Dee Gee.I just put together a road bike to give my son for Christmas. Like you, this was my first attempt at being a bike "wrench!" Everything went fine except for two things: the brakes and front derailleur. The brakes were simple. I had ordered normal brakes when the frame required "long pull." I just replaced them and they worked fine. The front deraileur was a bear though and I spent about a half a day trying to get it adjusted. I studied Shimano's website, Park's website, Sheldon Brown's website along with Zinn's book and two DVD's to no avail. I finally gave up and took it to the LBS. To my surprise, the first mechanic that checked it couldn't get it to shift properly either. He took the bike to the head mechanic who had problems with it too. He said the chain line was off a little but that was normal for a triple. He finally removed the "required" spacer and replaced it with one about 1mm thinner and everything worked OK. The build took a long time as I was in no hurry and did it at work when I wasn't busy but the learning experience was immense and very rewarding. I signed up for advanced maintenance classes with the LBS and am really looking forward to it....Ned