


Painting a frame?
 01-27-08, 09:19 AM
#1
Senior Member
Thread Starter

Join Date: Oct 2007
Location: Waterloo, ONT
Posts: 1,417
Bikes: Road: Trek 1.5 (2007). Mountain: Santa Cruz Chameleon (2008). Beater: Peugeot Recorde du Monde (1850)
Mentioned: 0 Post(s)
Tagged: 0 Thread(s)
Quoted: 2 Post(s)
Likes: 0
Liked 0 Times
in
0 Posts
Painting a frame?
Hello!
I'm working on my beater bike. It needs a coat of paint. It is an old steel frame. Yes, there is rust on it, but it's all cosmetic. I don't want the paint job to look like total crap, so I decided to ask the people who may know a thing or two about it.
I understand you're supposed to rub away the rust with steel wool before you paint?
I would prefer to use spray paint, if that's possible.
Where do I start?
 01-27-08, 09:36 AM
#2

Senior Member

Join Date: Feb 2004
Location: St Peters, Missouri
Posts: 30,225
Bikes: Catrike 559 I own some others but they don't get ridden very much.
Mentioned: 16 Post(s)
Tagged: 0 Thread(s)
Quoted: 1572 Post(s)
Liked 643 Times
in
364 Posts
This is a frequently brought up topic. I rattle can a bike frame every year or so. Mine won't rival a factory paint job but they don't look like total crap either. My paint jobs also don't chip easily and chipping is the frequent "knock" that I hear on rattle can paint jobs.
I think that surface preperation is the #1 key. I use a chemical stripper to remove all of the old paint. Then I prime the frame and start the sanding process. When I get the entire frame as smooth as I want the final paint to look, I reprime the entire frame and let it cure for at least a week.
I recommend practicing with spray painting something that's made of tubeing. Start with a very light spray in the hard-to-reach places like the seat tube and bottom bracket clusters or you'll get runs when you try to fill them in later. I've fallen in love with satin black. It's easy to get even coverage and it doesn't scream "home paint job!". Let the paint cure for at least a week before attempting to assemble the bike.
Doing it my way probably costs about 1/3 to 1/2 the price of having the frame powder coated but I also get the satisfaction of having done it myself.
Last edited by Retro Grouch; 01-27-08 at 09:42 AM.
01-27-08, 09:46 AM
#3
King of the molehills

Join Date: May 2006
Location: Detroit 'burbs, east side.
Posts: 1,192
Bikes: '04 Giant OCR2, DIY light tourer built on on Scattante cross frame, '87 Schwinn World Sport F/G conversion, '85 Schwinn Super Le Tour
Mentioned: 0 Post(s)
Tagged: 0 Thread(s)
Quoted: 1 Post(s)
Liked 0 Times
in
0 Posts
Since it's a beater, a rattle can job should do. Remove as much surface rust as you can. If you can remove it all, great. Prime with RustOleum Rusty Metal Primer or equivalent. Finish with color of your choice.
In all kinds of spray painting, remember that several light coats are better (smoother and more durable) than few heavy coats.
Be sure to follow the "user manual", i.e. the directions on the can! 99% of all paint problems can be avoided thus.
Look into the "hammered metal" finishes by RustOleum and other brands. I like the look (YMMV) and it is quite durable. The finish covers a multitude of sins. I've used it successfully on outdoor steel furniture & it lasts years out in all kinds of weather. I am planning on using this for my beater once it's warm enough to strip & paint in the garage.
Of course if this were a "nice" bike we'd be talking catalyzed automotive finishes or powdercoating, both of which are usually best left to pros IMO.
Markham sounds familiar. Are you near KW or TO? Lots of nice roads & paths around KW/Guelph/Wellington I'd like to try on a visit.
(EDIT) +1 on Retro Grouch's words of wisdom too. There's a difference between "dry" and "cured" paint; curing is what hardens it and that takes time.
Last edited by bcoppola; 01-27-08 at 09:53 AM.
01-27-08, 10:53 AM
#4
Senior Member
If its rusted, manually cleaning up the rust will probably not work. My frame had minor rust and I rattle canned it 3 times and the rust always came back until I had the frame bead blasted. But blasting wiil set you back around $20-40 and if you are going to spend that money, you may as well have it blasted/powdercoated, which will run about $75-100 and you will get a very hard, longlasting paint job.
If you want to cheap out, just degrease the entire frame, sand the rust to bare metal, prime the rust areas and wet sand the entire frame with 400 grit paper and paint. Don't even worry about stripping the frame. Its not worth it with rattle can paint which is very soft and will start to chip immediately.
If you want to cheap out, just degrease the entire frame, sand the rust to bare metal, prime the rust areas and wet sand the entire frame with 400 grit paper and paint. Don't even worry about stripping the frame. Its not worth it with rattle can paint which is very soft and will start to chip immediately.
__________________
Il faut de l'audace, encore de l'audace, toujours de l'audace
1980 3Rensho-- 1975 Raleigh Sprite 3spd
1990s Raleigh M20 MTB--2007 Windsor Hour (track)
1988 Ducati 750 F1
Il faut de l'audace, encore de l'audace, toujours de l'audace
1980 3Rensho-- 1975 Raleigh Sprite 3spd
1990s Raleigh M20 MTB--2007 Windsor Hour (track)
1988 Ducati 750 F1
01-27-08, 10:57 AM
#5
Senior Member
Thread Starter
Join Date: Oct 2007
Location: Waterloo, ONT
Posts: 1,417
Bikes: Road: Trek 1.5 (2007). Mountain: Santa Cruz Chameleon (2008). Beater: Peugeot Recorde du Monde (1850)
Mentioned: 0 Post(s)
Tagged: 0 Thread(s)
Quoted: 2 Post(s)
Likes: 0
Liked 0 Times
in
0 Posts
Thanks for the advice so far!
Markham is part of the GTA (Greater Toronto Area), it's North of Toronto.
Markham is part of the GTA (Greater Toronto Area), it's North of Toronto.
01-27-08, 11:15 AM
#6
Senior Member
Join Date: Feb 2004
Location: St Peters, Missouri
Posts: 30,225
Bikes: Catrike 559 I own some others but they don't get ridden very much.
Mentioned: 16 Post(s)
Tagged: 0 Thread(s)
Quoted: 1572 Post(s)
Liked 643 Times
in
364 Posts
That's funny! Read all of the posts. I strip my frames completely and say that my rattle can paint jobs don't chip. San Rensho says stripping isn't worth it because the rattle can paint is going to chip immediately.
01-27-08, 11:41 AM
#7
Senior Member

Join Date: Jul 2005
Posts: 7,487
Mentioned: 1 Post(s)
Tagged: 0 Thread(s)
Quoted: 140 Post(s)
Liked 162 Times
in
89 Posts
One way around stripping the paint completely is to sand everything until all chips and dings are completely feathered at the edges, and all rust is removed. And do sand the entire surface, just not necessarily to remove all the paint. Sanding will help with adhesion, the old paint should not appear shiny anywhere after you sand.
Clean all the dust off, then use a liquid sander (aka liquid deglosser) to wipe the entire frame down. Following the directions on the liquid sander can, you'll be instructed to prime within about an hour of wiping on the liquid deglosser in order to get maximum adhesion. Prime the entire frame with a couple of coats of primer. Additives in the liquid sander will make the primer stick to the point that you would need a chisel to scrape it off once the primer has cured.
Sand the whole frame lightly with very fine sandpaper to knock down the primer, clean all dust off, and you're ready for two or three coats of color, and then clearcoat if applicable. Wear gloves and work outside with the liquid sander, it's nasty, toxic stuff. But it works great, we used it extensively when I was a painter for about ten years, when adhesion was an issue.
Like Retro Grouch says, rattlecan jobs can produce decent results, not factory quality, but decent. I've got rattlecan paint jobs that have held up extremely well, and folks are always very surprised to find out the paint came out of a rattlecan-
01-27-08, 12:00 PM
#8
Senior Member
I'm sold on powdercoating. The paint hasn't even come off the dropouts where the quick-releases clamp.
__________________
Il faut de l'audace, encore de l'audace, toujours de l'audace
1980 3Rensho-- 1975 Raleigh Sprite 3spd
1990s Raleigh M20 MTB--2007 Windsor Hour (track)
1988 Ducati 750 F1
Il faut de l'audace, encore de l'audace, toujours de l'audace
1980 3Rensho-- 1975 Raleigh Sprite 3spd
1990s Raleigh M20 MTB--2007 Windsor Hour (track)
1988 Ducati 750 F1
01-27-08, 12:04 PM
#9
King of the molehills
Join Date: May 2006
Location: Detroit 'burbs, east side.
Posts: 1,192
Bikes: '04 Giant OCR2, DIY light tourer built on on Scattante cross frame, '87 Schwinn World Sport F/G conversion, '85 Schwinn Super Le Tour
Mentioned: 0 Post(s)
Tagged: 0 Thread(s)
Quoted: 1 Post(s)
Liked 0 Times
in
0 Posts
Stripping is the way to go if you really want the job to last. Frankly, the time & effort to properly abrade the existing paint w/sandpaper to ensure adhesion of your new paint makes stripping the better choice, IMO. Chemical deglossing as mentioned above is an easy alternative, though.
As an alternative to blasting the rust look into commonly available chemical rust removers like Naval Jelly. Again, follow label directions. A steel wire wheel on a power drill can do the job too.
It's true that "rust never sleeps" but with a little extra care in even a DIY job you can keep it at bay for a surprisingly long time.
Again, bear in mind the OP called the bike a "beater" and is presumably seeking a cheap DIY solution. So powdercoating or other professional finishes, for all their undeniable virtues, are off the table.
01-27-08, 12:19 PM
#10
Senior Member
Join Date: Jul 2005
Posts: 7,487
Mentioned: 1 Post(s)
Tagged: 0 Thread(s)
Quoted: 140 Post(s)
Liked 162 Times
in
89 Posts
Stripping is the way to go if you really want the job to last. Frankly, the time & effort to properly abrade the existing paint w/sandpaper to ensure adhesion of your new paint makes stripping the better choice, IMO. Chemical deglossing as mentioned above is an easy alternative, though.
01-27-08, 12:19 PM
#11
cab horn
Join Date: Jun 2004
Location: Toronto
Posts: 28,353
Bikes: 1987 Bianchi Campione
Mentioned: 1 Post(s)
Tagged: 0 Thread(s)
Quoted: 42 Post(s)
Likes: 0
Liked 25 Times
in
18 Posts
Hello!
I'm working on my beater bike. It needs a coat of paint. It is an old steel frame. Yes, there is rust on it, but it's all cosmetic. I don't want the paint job to look like total crap, so I decided to ask the people who may know a thing or two about it.
I understand you're supposed to rub away the rust with steel wool before you paint?
I would prefer to use spray paint, if that's possible.
Where do I start?
I'm working on my beater bike. It needs a coat of paint. It is an old steel frame. Yes, there is rust on it, but it's all cosmetic. I don't want the paint job to look like total crap, so I decided to ask the people who may know a thing or two about it.
I understand you're supposed to rub away the rust with steel wool before you paint?
I would prefer to use spray paint, if that's possible.
Where do I start?
01-27-08, 01:46 PM
#12
Senior Member
Join Date: May 2007
Posts: 321
Mentioned: 0 Post(s)
Tagged: 0 Thread(s)
Quoted: 0 Post(s)
Likes: 0
Liked 0 Times
in
0 Posts
I rattle-canned a frame once. All the advice here holds true. One thing I would add is to be careful about clearcoat. The one I sprayed stripped an amazing looking gloss gold and black paint job. And yes, I used the same paint - both enamel. I don't know if the Clear coat was labeled wrong or what, but definitely be careful. The paint was great but now it is cracked and chips easily. Good Luck!
01-27-08, 02:50 PM
#13
Senior Member
Join Date: Feb 2004
Location: St Peters, Missouri
Posts: 30,225
Bikes: Catrike 559 I own some others but they don't get ridden very much.
Mentioned: 16 Post(s)
Tagged: 0 Thread(s)
Quoted: 1572 Post(s)
Liked 643 Times
in
364 Posts
I've never had a bike frame powder coated. One of the other posters indicated $75.00 for the job which sounds too good to be true. I'm thinking that by the time I add up stripper, primer, sand paper and paint I'll be at least half way to that $75.00 mark maybe closer. While I consider doing it myself to be a plus, I'll also have to admit that powder coating is definitely going to look more professional. I think that maybe next time around I'll have to try powder coating.
01-27-08, 05:09 PM
#14
Senior Member
I've never had a bike frame powder coated. One of the other posters indicated $75.00 for the job which sounds too good to be true. I'm thinking that by the time I add up stripper, primer, sand paper and paint I'll be at least half way to that $75.00 mark maybe closer. While I consider doing it myself to be a plus, I'll also have to admit that powder coating is definitely going to look more professional. I think that maybe next time around I'll have to try powder coating.
Powdercoating has a bit more industrial look to it, not quite as smooth and shiny as a good paint job, but a good powdwercoater can get a result that the majority of people couldn't tell apart from paint.
And yes, depending on the market, you can get a frame bead blasted and powedercoated for $75-125. Just be sure the painter has experience with blasting a thin-tube bicycle frames. Some sandblasting can be very aggressive and actually damage the tubes.
__________________
Il faut de l'audace, encore de l'audace, toujours de l'audace
1980 3Rensho-- 1975 Raleigh Sprite 3spd
1990s Raleigh M20 MTB--2007 Windsor Hour (track)
1988 Ducati 750 F1
Il faut de l'audace, encore de l'audace, toujours de l'audace
1980 3Rensho-- 1975 Raleigh Sprite 3spd
1990s Raleigh M20 MTB--2007 Windsor Hour (track)
1988 Ducati 750 F1
01-27-08, 05:16 PM
#15
Banned.
Join Date: Nov 2007
Location: santa clara, CA
Posts: 123
Bikes: 1979 motobecane fixed, 2002 GT LTS-3 street stomper
Mentioned: 0 Post(s)
Tagged: 0 Thread(s)
Quoted: 0 Post(s)
Likes: 0
Liked 1 Time
in
1 Post
I have been painting motorcycles, cars, and bikes for something like 35+ years now.
I started off like most, with rattlecans in the garage or driveway, but I got bitten bad by the kustom kraze in the early seventies, and wanted to airbrush, and pinstripe, just like ed 'big daddy' roth, so I went out and got brushes, a paasche VL (good ol airbrush) and just completely screwed up perfectly good looking motorcycles, cars and bikes for a year or so (all my own, thank god), but eventually I learned the rattlecan way, the hard way, the easy way, the fast way, the super uber quality way, and just about everyway in between.
since most of you can probably (or already have) figured out the hard way, the rattlecan way (which looks good=not for long though), the easy way, and the fast way, I'll detail the "reasonably fast, but still high quality way" which is, by the way, a PERFECT way to paint a something metal if you hate sanding; I have never met anyone who loved to sand things down, so I'll assume most of you will be with me on this.
this assumes you have access to a compressor, a HVLP or LVLP paint gun (a detail gun also helps) and a space to paint free of any ignition sources, and with good ventilation (usually outside with the ground wetted down, and then the piece moved into a sealed up garage after painting works VERY well) be VERY careful about overspray settling onto neighbors property (nothing will piss off a neighbor more than finding a brand new car dusted with paint overspray)
here's what I do with just about every bicycle frame I paint now:
A) tear it down COMPLETELY: headset cups, BB and all, nothing looks more amateur than tell tale overspray on chrome or shiny bits, because they should have been removed, not masked off. IF your removing any braze ons, eyelets (or brazing new ones on!) or cable stays, do it now before the next step.
B) take it to a blaster, and have them blast it: note! tell the blaster if the frame will be powdercoated or painted, because they will want to use different blasting media, for each type of coating.
this is usually something like $20-$40
I HATE chemical strippers for ONE REASON: you cannot get all the stripper off: it's impossible there will be tiny specks left in crevices, and once painted these specks will start to remove YOUR PAINT JOB! so take my advice after 50 or so bike frames, and too many motorcycle frames to count, GO TO THE BLASTER, it's easy, it's fast, you get bare metal, and no residue (just remember to blow all the leftover media out of all the tubes!)
C) CLEAN THE DANG THING! paint will not stick to oil or grease, hamburger drippings, or taco juice and that includes the oils from your hands. (taco or not)
steel can be cleaned with alcohol or mineral spirits.
for aluminum I reccommend PPG's aluminum cleaner (quart=$10@ body shop supply houses or "color shops") once cleaned DO NOT TOUCH IT WITH BARE HANDS, USE GLOVES. (NOTE: if powdercoating, now you would put it in a plastic bag, and deliver it to the powdercoater)
D) SEAL IT/FILL IT/SEAL IT AGAIN: using a decent 2 part EPOXY BASED NON SANDING SEALER. (PPG, House of Kolor, DuPont etc,...)
this is special stuff, and is just a god send if you remember acid etch primers.
this sealer is designed to go over just about any type of bare metal, sealing it off from oxygen (no oxygen=no oxidation: rust) and provides a topcoatable surface that can be directly painted over with NO SANDING NEEDED, for something like 5 days. follow the "p" sheets (instructions) available online or where you buy the paint and shoot two good coats, waiting about 15 minutes between each coat (USE A TIMER! DON'T GUESS)
in the old days, you had to scuff the etch primer after it cured or your stuff would peel off in sheets,...not anymore.
now if you removed braze ons, or cable stays, or have a ding or other surface imperfection you'll need to grind the braze on or damage sites so they are a tiny bit LOWER than the surrounding tube, use a file, or a angle grinder, but obviously be careful, and don't go very deep at all, you just can't have anything sticking up from the repair area. to fill the dings or tiny grinder marks or little indentations where you removed the braze ons, you use a GOOD QUALITY filler (NEVER, EVER, EVER, EVER USE "BONDO" brand from kragen/shucks whatever, EVER!) I use "METAL2METAL" from evercoat, it has powdered aluminum in it, so it's like filling with lead, except no stunted growth or brain and nerve damage from lead fumes! (no I never used lead, nice try ) sand the filled areas down with 180 grit sand paper on a HARD block of some sort: if the block is longer than the area you are sanding, and you sand along the length of it, the area will be nice and flat when done. you should sand in a "X" pattern for round tubes, so the filler profile after shaping/sanding matches the tube profile, and you get an undetectable repair. NOTE!! only sand down the areas you are repairing. now blow on another two coats of the sealer, and after 30 minutes look at the frame, it should be all smooth, and even, with no tell tale sanding or grinder marks visible anywhere,...if you see some sanding scratches, wait another hour, and then another coat of sealer, and check it again. REMEMBER: paint will NOT hide anything (except white paint), in fact it will highlight ANY surface imperfection ESPECIALLY if you are going to use a metallic or pearlescent color coat.
E) BASECOAT: I prefer modern urethane basecoats which will chemically bond with both the substrate (the epoxy sealer) and the clear topcoat, creating a nearly solid paint layer from bare metal to surface: VERY tough and durable, and polishable YEARS after painting. the only real tips I can give you for this are: 1) use the proper temp range reducer for the painting area (thinner for urethanes) this is CRITICAL if you are applying a metallic or pearl basecoat or the tiny flakes wont settle properly and the surface looks grainy and bumpy, this is called "MOTTLING", less critical for solid colors.
2) less is more: only shoot enough LIGHT coats of the base to get "HIDING" (you can no longer see whats underneath) once you get hiding STOP SHOOTING. the basecoat dries in minutes so a common mistake is to just start hosing the thing down with multiple coats, DO NOT DO THIS! shoot for hiding, and even color and then stop.
F) CLEARCOATING: (USE A FREAKIN RESPIRATOR, DUH!) this is the most technical step; everything usually goes GREAT until you get to the clearcoat and it falls apart fast, so tips learned the hard way: USE A PRACTICE PANEL FIRST!!
the BIGGEST (and most common) rookie mistake is to try and "learn" how to shoot clearcoat ON the thing you are trying to paint, again DO NOT DO THIS unless you have experience shooting urethane/polyurethane clearcoats ON TUBULAR SURFACES, and thats the rub, just because you know how to lay glass on a car hood, or motorcycle tank, don't think you can just start shooting tubes and not have a learning curve.
so "ALL PAINTERS MAKE MISTAKES, BUT THE PROS MAKE THEM ON TEST/PRACTICE PANELS NOT THE PROJECT PIECE"
I would get a section of steel pipe and set it next to the frame and when you use the epoxy sealer/primer shoot the pipe at the same time, and shoot the base on the pipe as well when you basecoat, NOW you have a perfect practice panel, and if you screw it up (orange peel, or runs, it'll happen) you can just wipe it all off with thinner and start again: the epoxy can be topcoated 20 minutes after shooting, same with the basecoat. once you feel proficient THEN you shoot your beloved PX-10, grand jubilee, colnago whatever.
shoot a coat of clear: thats ONE even pass over each surface: for tubes I shoot lengthwise once on top, once for each side, and the bottom, so four passes (with about a 50% overlap) then move to the adjacent tube. for bicycles I like FOUR COATS, BUT!!! you MUST WAIT AT LEAST 15 minutes before shooting the next coat: here's a great trick for determining when the previous coat is ready for the next: on the masking (headset or bottom bracket) touch your gloved finger to the clear after shooting and pull it away: directly after shooting it will pull away clean, after 2 minutes you see "strings" when you pull away, and after about 15-20 minutes it will just be tacky, and will no longer "string", now it's ready for the next coat. (this is assuming a 70 degree painting area, colder will take longer, hotter will be faster, don't paint under 60 degrees or over 85 degrees for best results)
now keep in mind that the clearcoat has a hardener, and that hardener starts doing it's thing the moment you mix them both together, how long you can work with it is called the "pot life", so only mix enough for for two coats, and then mix another batch for coats 3 and 4, or your 3rd and 4th coats will go on gloppy and you'll get orange peel of biblical proportions.
you don't paint your bicycle frame to save money, if your trying to save money, have it powdercoated, you paint your frame because it's a very satisfying feeling to ride something you painted, when you stop, and people ask "who painted that"?, you get to say "I did" and then bask in the compliments, or simply ride feeling like you took part in more than just the selection of components and assembly of your steed.
my current bicycle wont be painted till spring, so here's a 62' dominator (almost as cool as a fixie)
peace, love and isocyanates
I started off like most, with rattlecans in the garage or driveway, but I got bitten bad by the kustom kraze in the early seventies, and wanted to airbrush, and pinstripe, just like ed 'big daddy' roth, so I went out and got brushes, a paasche VL (good ol airbrush) and just completely screwed up perfectly good looking motorcycles, cars and bikes for a year or so (all my own, thank god), but eventually I learned the rattlecan way, the hard way, the easy way, the fast way, the super uber quality way, and just about everyway in between.
since most of you can probably (or already have) figured out the hard way, the rattlecan way (which looks good=not for long though), the easy way, and the fast way, I'll detail the "reasonably fast, but still high quality way" which is, by the way, a PERFECT way to paint a something metal if you hate sanding; I have never met anyone who loved to sand things down, so I'll assume most of you will be with me on this.
this assumes you have access to a compressor, a HVLP or LVLP paint gun (a detail gun also helps) and a space to paint free of any ignition sources, and with good ventilation (usually outside with the ground wetted down, and then the piece moved into a sealed up garage after painting works VERY well) be VERY careful about overspray settling onto neighbors property (nothing will piss off a neighbor more than finding a brand new car dusted with paint overspray)
here's what I do with just about every bicycle frame I paint now:
A) tear it down COMPLETELY: headset cups, BB and all, nothing looks more amateur than tell tale overspray on chrome or shiny bits, because they should have been removed, not masked off. IF your removing any braze ons, eyelets (or brazing new ones on!) or cable stays, do it now before the next step.
B) take it to a blaster, and have them blast it: note! tell the blaster if the frame will be powdercoated or painted, because they will want to use different blasting media, for each type of coating.
this is usually something like $20-$40
I HATE chemical strippers for ONE REASON: you cannot get all the stripper off: it's impossible there will be tiny specks left in crevices, and once painted these specks will start to remove YOUR PAINT JOB! so take my advice after 50 or so bike frames, and too many motorcycle frames to count, GO TO THE BLASTER, it's easy, it's fast, you get bare metal, and no residue (just remember to blow all the leftover media out of all the tubes!)
C) CLEAN THE DANG THING! paint will not stick to oil or grease, hamburger drippings, or taco juice and that includes the oils from your hands. (taco or not)
steel can be cleaned with alcohol or mineral spirits.
for aluminum I reccommend PPG's aluminum cleaner (quart=$10@ body shop supply houses or "color shops") once cleaned DO NOT TOUCH IT WITH BARE HANDS, USE GLOVES. (NOTE: if powdercoating, now you would put it in a plastic bag, and deliver it to the powdercoater)
D) SEAL IT/FILL IT/SEAL IT AGAIN: using a decent 2 part EPOXY BASED NON SANDING SEALER. (PPG, House of Kolor, DuPont etc,...)
this is special stuff, and is just a god send if you remember acid etch primers.
this sealer is designed to go over just about any type of bare metal, sealing it off from oxygen (no oxygen=no oxidation: rust) and provides a topcoatable surface that can be directly painted over with NO SANDING NEEDED, for something like 5 days. follow the "p" sheets (instructions) available online or where you buy the paint and shoot two good coats, waiting about 15 minutes between each coat (USE A TIMER! DON'T GUESS)
in the old days, you had to scuff the etch primer after it cured or your stuff would peel off in sheets,...not anymore.
now if you removed braze ons, or cable stays, or have a ding or other surface imperfection you'll need to grind the braze on or damage sites so they are a tiny bit LOWER than the surrounding tube, use a file, or a angle grinder, but obviously be careful, and don't go very deep at all, you just can't have anything sticking up from the repair area. to fill the dings or tiny grinder marks or little indentations where you removed the braze ons, you use a GOOD QUALITY filler (NEVER, EVER, EVER, EVER USE "BONDO" brand from kragen/shucks whatever, EVER!) I use "METAL2METAL" from evercoat, it has powdered aluminum in it, so it's like filling with lead, except no stunted growth or brain and nerve damage from lead fumes! (no I never used lead, nice try
) sand the filled areas down with 180 grit sand paper on a HARD block of some sort: if the block is longer than the area you are sanding, and you sand along the length of it, the area will be nice and flat when done. you should sand in a "X" pattern for round tubes, so the filler profile after shaping/sanding matches the tube profile, and you get an undetectable repair. NOTE!! only sand down the areas you are repairing. now blow on another two coats of the sealer, and after 30 minutes look at the frame, it should be all smooth, and even, with no tell tale sanding or grinder marks visible anywhere,...if you see some sanding scratches, wait another hour, and then another coat of sealer, and check it again. REMEMBER: paint will NOT hide anything (except white paint), in fact it will highlight ANY surface imperfection ESPECIALLY if you are going to use a metallic or pearlescent color coat.E) BASECOAT: I prefer modern urethane basecoats which will chemically bond with both the substrate (the epoxy sealer) and the clear topcoat, creating a nearly solid paint layer from bare metal to surface: VERY tough and durable, and polishable YEARS after painting. the only real tips I can give you for this are: 1) use the proper temp range reducer for the painting area (thinner for urethanes) this is CRITICAL if you are applying a metallic or pearl basecoat or the tiny flakes wont settle properly and the surface looks grainy and bumpy, this is called "MOTTLING", less critical for solid colors.
2) less is more: only shoot enough LIGHT coats of the base to get "HIDING" (you can no longer see whats underneath) once you get hiding STOP SHOOTING. the basecoat dries in minutes so a common mistake is to just start hosing the thing down with multiple coats, DO NOT DO THIS! shoot for hiding, and even color and then stop.
F) CLEARCOATING: (USE A FREAKIN RESPIRATOR, DUH!) this is the most technical step; everything usually goes GREAT until you get to the clearcoat and it falls apart fast, so tips learned the hard way: USE A PRACTICE PANEL FIRST!!
the BIGGEST (and most common) rookie mistake is to try and "learn" how to shoot clearcoat ON the thing you are trying to paint, again DO NOT DO THIS unless you have experience shooting urethane/polyurethane clearcoats ON TUBULAR SURFACES, and thats the rub, just because you know how to lay glass on a car hood, or motorcycle tank, don't think you can just start shooting tubes and not have a learning curve.
so "ALL PAINTERS MAKE MISTAKES, BUT THE PROS MAKE THEM ON TEST/PRACTICE PANELS NOT THE PROJECT PIECE"
I would get a section of steel pipe and set it next to the frame and when you use the epoxy sealer/primer shoot the pipe at the same time, and shoot the base on the pipe as well when you basecoat, NOW you have a perfect practice panel, and if you screw it up (orange peel, or runs, it'll happen) you can just wipe it all off with thinner and start again: the epoxy can be topcoated 20 minutes after shooting, same with the basecoat. once you feel proficient THEN you shoot your beloved PX-10, grand jubilee, colnago whatever.
shoot a coat of clear: thats ONE even pass over each surface: for tubes I shoot lengthwise once on top, once for each side, and the bottom, so four passes (with about a 50% overlap) then move to the adjacent tube. for bicycles I like FOUR COATS, BUT!!! you MUST WAIT AT LEAST 15 minutes before shooting the next coat: here's a great trick for determining when the previous coat is ready for the next: on the masking (headset or bottom bracket) touch your gloved finger to the clear after shooting and pull it away: directly after shooting it will pull away clean, after 2 minutes you see "strings" when you pull away, and after about 15-20 minutes it will just be tacky, and will no longer "string", now it's ready for the next coat. (this is assuming a 70 degree painting area, colder will take longer, hotter will be faster, don't paint under 60 degrees or over 85 degrees for best results)
now keep in mind that the clearcoat has a hardener, and that hardener starts doing it's thing the moment you mix them both together, how long you can work with it is called the "pot life", so only mix enough for for two coats, and then mix another batch for coats 3 and 4, or your 3rd and 4th coats will go on gloppy and you'll get orange peel of biblical proportions.
you don't paint your bicycle frame to save money, if your trying to save money, have it powdercoated, you paint your frame because it's a very satisfying feeling to ride something you painted, when you stop, and people ask "who painted that"?, you get to say "I did" and then bask in the compliments, or simply ride feeling like you took part in more than just the selection of components and assembly of your steed.
my current bicycle wont be painted till spring, so here's a 62' dominator (almost as cool as a fixie)
peace, love and isocyanates
Last edited by reckon; 01-27-08 at 09:32 PM.
01-27-08, 06:14 PM
#16
Senior Member
Join Date: Aug 2006
Posts: 149
Mentioned: 0 Post(s)
Tagged: 0 Thread(s)
Quoted: 0 Post(s)
Likes: 0
Liked 0 Times
in
0 Posts
That was one of the, if no the most helpful thing I have read on the forums. Thank you! Any tips on how to do lettering? Cervelo in particular.
Thanks, Jeff
Thanks, Jeff
01-27-08, 06:56 PM
#17
cab horn
Join Date: Jun 2004
Location: Toronto
Posts: 28,353
Bikes: 1987 Bianchi Campione
Mentioned: 1 Post(s)
Tagged: 0 Thread(s)
Quoted: 42 Post(s)
Likes: 0
Liked 25 Times
in
18 Posts
I've never had a bike frame powder coated. One of the other posters indicated $75.00 for the job which sounds too good to be true. I'm thinking that by the time I add up stripper, primer, sand paper and paint I'll be at least half way to that $75.00 mark maybe closer. While I consider doing it myself to be a plus, I'll also have to admit that powder coating is definitely going to look more professional. I think that maybe next time around I'll have to try powder coating.
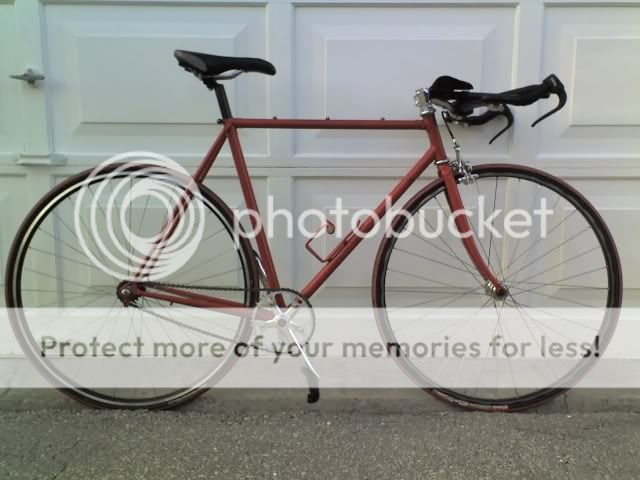
Unfortuante that I don't have a better pic of my bike (the colour looks really off in this pic).
Post #15 is probably one of the most informative i've read in a while.
01-27-08, 07:13 PM
#18
Banned.
Join Date: Nov 2007
Location: santa clara, CA
Posts: 123
Bikes: 1979 motobecane fixed, 2002 GT LTS-3 street stomper
Mentioned: 0 Post(s)
Tagged: 0 Thread(s)
Quoted: 0 Post(s)
Likes: 0
Liked 1 Time
in
1 Post
the easiest way is to sketch the letters on masking, cut out the masking with an exacto (this is called "weeding") if you use the outline from the masking and paint inside it, thats a negative mask, if you use just the cut out letters, place them on a painted surface, then paint over it, when peeled off, you'll have the exact shape of the mask left on the surface, thats called a positive or "blind shot" mask, because the first color coat of the letters can be shot without masking anything, since it all gets covered up except the letters under the masking later on.
now here's where technology is just awesome, you can go to a sticker/sign/graphics shop, have them scan or download the letters you want, and they can make the letters on a special sticker masking material, all layed out perfect. either way, negative or positive. (or you can get both if they don't throw away anything from the computer cut sheet)
so lets say you have an epoxy sealed frame and you want white COLNAGO letters on a red frame, so first you shoot white basecoat where the letters are going to go (or on the entire frame (a white substrate makes colors pop), wait a couple of hours place the masking stickers on the frame after locating where they should go (MEASURE,DUH!) now shoot the red base coat till you get hiding (it'll take extra coats because of the white), now WAIT TILL THE NEXT FREAKIN DAY, DO NOT TRY AND PEEL THE MASKING UNTIL AT LEAST 8 HOURS HAVE ELAPSED (or it'll tear and rip the edge looking raggedy at best, ruined totally at worst) now CAREFULLY peel the masking folding the material back over itself when you remove it, trying to cut through the painted edges. don't get like a kid at christmas ripping open a present (it's fun when you peel and it's easy to get excited and start going too fast) once it's all peeled and looking awesome, shoot the clear, and if you didn't shoot anymore base coats than needed for hiding you wont have much of a depression where the letters are (if any after 4 coats of clear)
hand painted letters with a brush is beyond what I could teach in a written forum, but you get the idea, it's so hard, just use the above method.
01-27-08, 07:23 PM
#19
cab horn
Join Date: Jun 2004
Location: Toronto
Posts: 28,353
Bikes: 1987 Bianchi Campione
Mentioned: 1 Post(s)
Tagged: 0 Thread(s)
Quoted: 42 Post(s)
Likes: 0
Liked 25 Times
in
18 Posts
You say to remove all the braze-on's. Why? Shifter bosses, cable stops - everything has to come off? Those will have to be stripped indepdently?
01-27-08, 08:33 PM
#20
Banned.
Join Date: Nov 2007
Location: santa clara, CA
Posts: 123
Bikes: 1979 motobecane fixed, 2002 GT LTS-3 street stomper
Mentioned: 0 Post(s)
Tagged: 0 Thread(s)
Quoted: 0 Post(s)
Likes: 0
Liked 1 Time
in
1 Post
sorry for the confusion
")
 02-21-08, 02:37 AM
#23
n0oBie

Join Date: Jun 2007
Location: torrance
Posts: 340
Bikes: LOOK!!!
Mentioned: 0 Post(s)
Tagged: 0 Thread(s)
Quoted: 0 Post(s)
Likes: 0
Liked 0 Times
in
0 Posts
I've never had a bike frame powder coated. One of the other posters indicated $75.00 for the job which sounds too good to be true. I'm thinking that by the time I add up stripper, primer, sand paper and paint I'll be at least half way to that $75.00 mark maybe closer. While I consider doing it myself to be a plus, I'll also have to admit that powder coating is definitely going to look more professional. I think that maybe next time around I'll have to try powder coating.
i wouldd agree on powdercoating being "better" than a diy rattle can job.. howver the only thing about powdercoating is that you lose alot of details on on lugs and it looks "thick" when applied... and its hard to get really fine details, custom masking jobs, and special colors and special effects... other than the standard RAL colors... sometihng about a fresh painted bike will always look better to me than powdercoating.. however powdercoat is very very durable and cost effective
02-21-08, 02:54 AM
#24
n0oBie
Join Date: Jun 2007
Location: torrance
Posts: 340
Bikes: LOOK!!!
Mentioned: 0 Post(s)
Tagged: 0 Thread(s)
Quoted: 0 Post(s)
Likes: 0
Liked 0 Times
in
0 Posts
I have been painting motorcycles, cars, and bikes for something like 35+ years now.
I started off like most, with rattlecans in the garage or driveway, but I got bitten bad by the kustom kraze in the early seventies, and wanted to airbrush, and pinstripe, just like ed 'big daddy' roth, so I went out and got brushes, a paasche VL (good ol airbrush) and just completely screwed up perfectly good looking motorcycles, cars and bikes for a year or so (all my own, thank god), but eventually I learned the rattlecan way, the hard way, the easy way, the fast way, the super uber quality way, and just about everyway in between.
since most of you can probably (or already have) figured out the hard way, the rattlecan way (which looks good=not for long though), the easy way, and the fast way, I'll detail the "reasonably fast, but still high quality way" which is, by the way, a PERFECT way to paint a something metal if you hate sanding; I have never met anyone who loved to sand things down, so I'll assume most of you will be with me on this..................
RECKON .. thank you for your years of advice... i myself have taken many steps to reading and reading before i even attempted an somewhat decent job on my first frame.. i have now done a 2nd frame.. and feel like on my 3rd frame i will even do better....
one thing i have been stuck on is clear coat.. i feel like i do an amazing prep and sanding job... and can lay down nice even coats of paint without spotting or over spray etc... but when it gets to clear and then colorsanding i get stuck... do you have any suggestions to making a finish super shiny, and perfect... is there such a thing as too much clear???? is it better to go many and light? or do the hiding technique then just keep going over with even coats... when should i start to color sand... also if im shooting the bike in 2 colors... meaning rear triangle one color front triangle one color.. do i shoot both colors at the same time? do i shoot one.. let it cure then mask it and shoot the other then let that cure before clear coat? or do i shoot one color hit it with clear, then shoot the other color hit it with clear?
sorry for all the questions.. thank you..
02-22-08, 11:16 PM
#25
Guest
Posts: n/a
Mentioned: Post(s)
Tagged: Thread(s)
Quoted: Post(s)
The best way to get a shiny finish is to spray it that way!

Sanding/polishing is just extra work & effort.