


Schwinn Typhoon and Dana 3-Speed
 07-03-08, 04:16 PM
#1
Junior Member
Thread Starter
Join Date: Jul 2008
Posts: 11
Bikes: 1969 Campus Green Schwinn Typhoon
Mentioned: 0 Post(s)
Tagged: 0 Thread(s)
Quoted: 0 Post(s)
Likes: 0
Liked 0 Times
in
0 Posts
Schwinn Typhoon and Dana 3-Speed
Hi-
I posted about this same topic in the mechanic section, but I thought maybe a post here would be beneficial as well.
Last summer I purchased a single-speed, June 1969 Schwinn Typhoon from eBay.
It's a great bike, and I plan on fixing it up to look and ride even better.
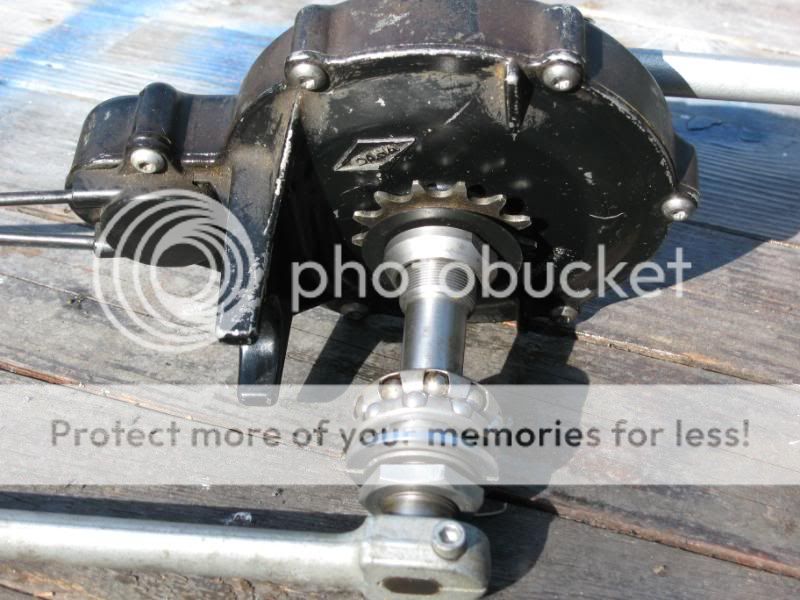
The one strange thing about this bike is that instead of a regular sprocket at the pedals, there is a large, black Dana 3-speed transmission. While it does shift and work well, it has lately started to catch on itself and stop pedaling, most recently while in a busy intersection. Because I am concerned for my safety as well as my bike's safety, I am planning on removing the transmission and replacing it with the single-speed sprocket much like the one that originally came with the bike. Here's where I have a problem.
I don't know anything about the original sprocket. I've been looking in bookstores for Schwinn repair manuals to see how the pedals are attached and what makes the bike move, but to no avail. I'm not even sure how to remove the transmission.
I'm attaching several photos, which should help describe what I'm saying.

this is the transmission as mounted on my bike.

Another view of whole bike.

Is this how it works?
So.
How would I remove this transmission?
How does a Schwinn crankset go together?
I'm seeing terms such as "bottom bracket" and I don't really know what is what.
Thank you very much for your time and I'm hoping to be able to fix this up and ride.
I posted about this same topic in the mechanic section, but I thought maybe a post here would be beneficial as well.
Last summer I purchased a single-speed, June 1969 Schwinn Typhoon from eBay.
It's a great bike, and I plan on fixing it up to look and ride even better.
The one strange thing about this bike is that instead of a regular sprocket at the pedals, there is a large, black Dana 3-speed transmission. While it does shift and work well, it has lately started to catch on itself and stop pedaling, most recently while in a busy intersection. Because I am concerned for my safety as well as my bike's safety, I am planning on removing the transmission and replacing it with the single-speed sprocket much like the one that originally came with the bike. Here's where I have a problem.
I don't know anything about the original sprocket. I've been looking in bookstores for Schwinn repair manuals to see how the pedals are attached and what makes the bike move, but to no avail. I'm not even sure how to remove the transmission.
I'm attaching several photos, which should help describe what I'm saying.
this is the transmission as mounted on my bike.
Another view of whole bike.
Is this how it works?
So.
How would I remove this transmission?
How does a Schwinn crankset go together?
I'm seeing terms such as "bottom bracket" and I don't really know what is what.
Thank you very much for your time and I'm hoping to be able to fix this up and ride.
 07-03-08, 06:36 PM
#2

Senior Member
Join Date: Jul 2006
Location: Milwaukee
Posts: 597
Bikes: Fred cycles
Mentioned: 1 Post(s)
Tagged: 0 Thread(s)
Quoted: 34 Post(s)
Liked 18 Times
in
16 Posts
Wow is that strange. 'Dana 3 speed'.
Firstly, for help with bicycle terms, try Sheldon Brown's site: https://www.sheldonbrown.com/glossary-a.html
Regarding the Dana unit, make sure it's not something easy to fix, like a binding or misadjusted shift linkage. Check lubrication & adjustment of the linkage. Check lubrication of the internals. Much easier to do simple fixes of what you have than to swap it out. Here's a thread, last entry 9/3/07. In the last post, the fellow says he has the instructions, and there's an email link. https://www.schwinnbike.com/heritage/...4&page=2&pp=15 .. General consensus there is it's a good functional unit.
The drawing you show is for the usual Schwinn bottom bracket (i.e., crank and bearing set). That's what's usually there but not what you have. If you want to install one of these, you first must take out the Dana unit. Looks like it might be installed & removed with standard techniques:
https://www.sheldonbrown.com/cotters.html
https://www.sheldonbrown.com/tooltips/bbcups.html
If this really has an English bottom bracket adapter of some sort, you might at this point leave the cups installed & find a nice, properly fitting square-taper spindle, and then use modern & lightweight aluminum cranks with a steel or aluminum chainring. This might require some tinkering and sleuthing and is beyond the scope of my own experience as well as what I can convey here.
After removing all the non-standard stuff, you can install a conventional Schwinn bottom bracket as pictured in the drawing. Make sure you get a 28 t.p.i. (thread per inch) OPC (one piece crank) set. Probably fine to buy a used OPC taken from a Schwinn. There are still plenty out there. Again, here's Sheldon's page: https://www.sheldonbrown.com/opc.html . You'll need some kind of press to get the 'Hanger Cups' pressed into the frame. Maybe a rubber mallet or wood block & steel hammer would do it if you're careful. The rest is easy to put in with standard home mechanic tools -- screwdriver, large adjustable wrench. May also need a pedal wrench (has narrow jaws) for the pedals.
Given the questions you are asking, you may want to find a mechanic partner. If you live in a largish city, then find a bike shop, shadetree mechanic, or bike co-op that deals with old bikes.
Good luck...
Last edited by duffer1960; 07-03-08 at 07:15 PM. Reason: Was not done, wanted to go back & read orig. post
07-03-08, 06:49 PM
#3
Junior Member
Thread Starter
Join Date: Jul 2008
Posts: 11
Bikes: 1969 Campus Green Schwinn Typhoon
Mentioned: 0 Post(s)
Tagged: 0 Thread(s)
Quoted: 0 Post(s)
Likes: 0
Liked 0 Times
in
0 Posts
Wow. 
Thank you very much.
The transmission is a great piece of machinery (sometimes) but it's just not for me.
For safety and aesthetic purposes, I'd much prefer the original setup.
I'll definitely try to remove the Dana unit using those methods... I just need to find a new setup, including chain (apparently skip-toothed), sprocket, crank, etc. I'm checking eBay again and I found a complete assembly... but it's from a 1956 Jaguar, and while I'm fairly certain it will fit, I have my doubts.
If I were not to find a used setup, would the 28 TPI kit featured here be a good idea, used with the one-piece crank featured directly below?
Also, living in New York City, I'm sure I could find a mechanic who could install the pieces if need be... and it appears more and more like that need be... The only thing is cost. Would doing something like this be generally expensive?
I'm sorry for all the questions, but I've just been brimming with them.
Thank you again.
Last edited by josa92; 07-03-08 at 07:41 PM.
07-03-08, 07:13 PM
#4
Senior Member

Join Date: Apr 2004
Location: sf
Posts: 539
Mentioned: 0 Post(s)
Tagged: 0 Thread(s)
Quoted: 3 Post(s)
Likes: 0
Liked 0 Times
in
0 Posts
You want everything in that exploded view you posted. Here's an ebay for exactly what you need.
https://cgi.ebay.com/1979-SCHWINN-SPI...QQcmdZViewItem
The secret to removing the dana 3 speed is on the left side. Take a nice photo or two if you still need help taking it off.
https://cgi.ebay.com/1979-SCHWINN-SPI...QQcmdZViewItem
The secret to removing the dana 3 speed is on the left side. Take a nice photo or two if you still need help taking it off.
07-03-08, 07:20 PM
#6
Senior Member

I have one of these 3 speeds, and it goes on pretty much like one piece crank, except one side is removable. No adapters or anything of that sort. It uses regular bearing cups like a one piece. You undo the
crank and adjust nut on the non drive side, and slips out. Install the one piece crank and you're done. Of course you want to remove that excellent condition chain guard before starting anything You're also going to need a new chain, as a 46 or 48 tooth sprocket is going to need a lot more.,,,,BD
The last step would be shipping the unwanted unit to me, hehe.
crank and adjust nut on the non drive side, and slips out. Install the one piece crank and you're done. Of course you want to remove that excellent condition chain guard before starting anything
You're also going to need a new chain, as a 46 or 48 tooth sprocket is going to need a lot more.,,,,BDThe last step would be shipping the unwanted unit to me, hehe.
__________________
So many bikes, so little dime.
So many bikes, so little dime.
07-03-08, 07:43 PM
#7
Junior Member
Thread Starter
Join Date: Jul 2008
Posts: 11
Bikes: 1969 Campus Green Schwinn Typhoon
Mentioned: 0 Post(s)
Tagged: 0 Thread(s)
Quoted: 0 Post(s)
Likes: 0
Liked 0 Times
in
0 Posts
You want everything in that exploded view you posted. Here's an ebay for exactly what you need.
https://cgi.ebay.com/1979-SCHWINN-SPI...QQcmdZViewItem
The secret to removing the dana 3 speed is on the left side. Take a nice photo or two if you still need help taking it off.
https://cgi.ebay.com/1979-SCHWINN-SPI...QQcmdZViewItem
The secret to removing the dana 3 speed is on the left side. Take a nice photo or two if you still need help taking it off.
 07-03-08, 07:46 PM
#8
Junior Member
Thread Starter
Join Date: Jul 2008
Posts: 11
Bikes: 1969 Campus Green Schwinn Typhoon
Mentioned: 0 Post(s)
Tagged: 0 Thread(s)
Quoted: 0 Post(s)
Likes: 0
Liked 0 Times
in
0 Posts
I have one of these 3 speeds, and it goes on pretty much like one piece crank, except one side is removable. No adapters or anything of that sort. It uses regular bearing cups like a one piece. You undo the
crank and adjust nut on the non drive side, and slips out. Install the one piece crank and you're done. Of course you want to remove that excellent condition chain guard before starting anything You're also going to need a new chain, as a 46 or 48 tooth sprocket is going to need a lot more.,,,,BD
The last step would be shipping the unwanted unit to me, hehe.
crank and adjust nut on the non drive side, and slips out. Install the one piece crank and you're done. Of course you want to remove that excellent condition chain guard before starting anything
You're also going to need a new chain, as a 46 or 48 tooth sprocket is going to need a lot more.,,,,BDThe last step would be shipping the unwanted unit to me, hehe.
So, if I take the unit off, then I have all the internals I need, and just need to buy and install an OPC?
That would be muy excellent if true.
Thank you for your response.
Last edited by josa92; 07-03-08 at 09:03 PM.
07-03-08, 10:07 PM
#9
Junior Member
Thread Starter
Join Date: Jul 2008
Posts: 11
Bikes: 1969 Campus Green Schwinn Typhoon
Mentioned: 0 Post(s)
Tagged: 0 Thread(s)
Quoted: 0 Post(s)
Likes: 0
Liked 0 Times
in
0 Posts
Because of this image, I thought the bottom bracket and other assorted internal elements were part of the transmission... not so?
07-04-08, 04:19 AM
#10
Senior Member
Join Date: Jul 2006
Location: Milwaukee
Posts: 597
Bikes: Fred cycles
Mentioned: 1 Post(s)
Tagged: 0 Thread(s)
Quoted: 34 Post(s)
Liked 18 Times
in
16 Posts
Remove the non-drive side crank arm. Unscrew the locknut and adjusting cone. (Note: These have left-hand threads, unscrew by turning to the right.) Then you can pull the transmission away with the axle attached.
The pedals might be the correct ones, with 1/2" studs. However, most 3 piece cranks use 9/16" pedals, so you might have to get new pedals too. The left-side pedal is left threaded. Try 'em and if they won't go in, then you need new ones.
The pedals might be the correct ones, with 1/2" studs. However, most 3 piece cranks use 9/16" pedals, so you might have to get new pedals too. The left-side pedal is left threaded. Try 'em and if they won't go in, then you need new ones.
Last edited by duffer1960; 07-04-08 at 04:42 AM.
07-04-08, 04:50 AM
#11
Senior Member

Join Date: Jul 2000
Location: Snowy midwest
Posts: 5,391
Mentioned: 0 Post(s)
Tagged: 0 Thread(s)
Quoted: 4 Post(s)
Likes: 0
Liked 1 Time
in
1 Post
Well, I do not believe that the Dana three speed was original on the Typhoon. I have had a number of Typhoon and all of them had the traditional Schwinn single-piece Ashtabula crank.
I have tons of the traditional ashtabula cranks. Contact me by private message and I will fix you up.
I have tons of the traditional ashtabula cranks. Contact me by private message and I will fix you up.
07-04-08, 05:53 AM
#12
Senior Member
Nope not original, but I have seen them on a few Schwinns. They may have sold them at the Schwinn dealer for all I know, and added them at the time of purchase. The pedals look to be 1/2". Back then there really was no such thing as a 9/16" cruiser pedals. They're a more modern development.,,,BD
More good news, the last time I looked those Schwinn glitter grip reproductions are still available.
More good news, the last time I looked those Schwinn glitter grip reproductions are still available.
__________________
So many bikes, so little dime.
So many bikes, so little dime.
07-04-08, 08:45 AM
#13
Junior Member
Thread Starter
Join Date: Jul 2008
Posts: 11
Bikes: 1969 Campus Green Schwinn Typhoon
Mentioned: 0 Post(s)
Tagged: 0 Thread(s)
Quoted: 0 Post(s)
Likes: 0
Liked 0 Times
in
0 Posts
Okay guys, thank you very very much.
My understanding so far is that I take out the transmission (as described above), and then I have all the pieces I need, I just install the crank.
So now I know how to remove the transmission (thanks a million).
This leads me to my next question: How do I install the OPC? and How does the sprocket fit into all this?
I'm looking at a Mag sprocket on eBay, and I wonder if it will fit my Typhoon.
Thank you all very much again.
07-04-08, 10:13 AM
#14
Junior Member
Thread Starter
Join Date: Jul 2008
Posts: 11
Bikes: 1969 Campus Green Schwinn Typhoon
Mentioned: 0 Post(s)
Tagged: 0 Thread(s)
Quoted: 0 Post(s)
Likes: 0
Liked 0 Times
in
0 Posts
Hi-
also, this site was sent to me as how to disassemble... it uses a Park Tool Spanner: is there something I could use instead, seeing as I don't have this tool?
https://www.parktool.com/repair/readhowto.asp?id=150
also, this site was sent to me as how to disassemble... it uses a Park Tool Spanner: is there something I could use instead, seeing as I don't have this tool?
https://www.parktool.com/repair/readhowto.asp?id=150
07-05-08, 07:22 AM
#15
Senior Member
Join Date: Jul 2006
Location: Milwaukee
Posts: 597
Bikes: Fred cycles
Mentioned: 1 Post(s)
Tagged: 0 Thread(s)
Quoted: 34 Post(s)
Liked 18 Times
in
16 Posts
The OPC may come with sprocket already attached. IProbably a large adjustable wrench and a screwdriver will do for tools. Possibly will also need a pedal wrench if can't find a standard wrench with thin enough jaws for the pedals.
'd say, for that bike, the 'cloverleaf' chainring is the 'correct' one; I think the 'mag' chainring was used starting on the Stingray & then on other bikes beginning sometime in the '70's.
'd say, for that bike, the 'cloverleaf' chainring is the 'correct' one; I think the 'mag' chainring was used starting on the Stingray & then on other bikes beginning sometime in the '70's.
07-05-08, 07:44 AM
#16

www.theheadbadge.com

Join Date: Sep 2005
Location: Southern Florida
Posts: 28,513
Bikes: https://www.theheadbadge.com
Mentioned: 124 Post(s)
Tagged: 0 Thread(s)
Quoted: 2422 Post(s)
Liked 4,395 Times
in
2,092 Posts
Hi-
also, this site was sent to me as how to disassemble... it uses a Park Tool Spanner: is there something I could use instead, seeing as I don't have this tool?
https://www.parktool.com/repair/readhowto.asp?id=150
also, this site was sent to me as how to disassemble... it uses a Park Tool Spanner: is there something I could use instead, seeing as I don't have this tool?
https://www.parktool.com/repair/readhowto.asp?id=150
-Kurt
__________________


07-05-08, 09:46 AM
#17
Junior Member
Thread Starter
Join Date: Jul 2008
Posts: 11
Bikes: 1969 Campus Green Schwinn Typhoon
Mentioned: 0 Post(s)
Tagged: 0 Thread(s)
Quoted: 0 Post(s)
Likes: 0
Liked 0 Times
in
0 Posts

So I can just take this out by hand? That would be ideal.
07-05-08, 10:03 AM
#18
Senior Member
Join Date: Apr 2004
Location: sf
Posts: 539
Mentioned: 0 Post(s)
Tagged: 0 Thread(s)
Quoted: 3 Post(s)
Likes: 0
Liked 0 Times
in
0 Posts
Most of the time I tap them out, they're usually not in that tight.
I disassembled a 1965 super sport for cleaning yesterday and the non-drive side fell out, while the drive side was the tightest I've ever encountered. It took quite a few blows with a hammer and punch.
I disassembled a 1965 super sport for cleaning yesterday and the non-drive side fell out, while the drive side was the tightest I've ever encountered. It took quite a few blows with a hammer and punch.
